Backbone of AWS
Learn how to launch, configure, and manage virtual servers in EC2 to build scalable, secure, and reliable application, This workshop covers everything you need to know about setting up instances, managing security, optimizing storage, and deploying application on AWS’s powerful cloud infrastructure.
Amazon Cloud Compute Workshop: Backbone of AWS
Table of Contents
Workshop Overview
In this workshop, you’ll gain a deep understanding of AWS Elastic Compute Cloud (EC2), with a focus on launching and managing EC2 instances. Through hands-on activities, you’ll learn to configure and secure your EC2 environments, manage instance types, and optimize performance for your applications.
By the end of the session, you will have the skills to effectively deploy, manage, and scale EC2 instances, ensuring high availability, security, and cost-efficiency in your AWS infrastructure.
Prerequisites
Ensure you have the following tools installed before starting:
- Windows Subsystem for Linux (WSL): Install WSL
- AWS CLI v2: Install AWS CLI v2
- AWS IAM User with Admin Access: Create an IAM User
Workshop Elements
History of AWS
This section covers the Emergence of Cloud-Based Services.
AWS Architecture
Explore and know how the AWS provides a vast and scalable cloud platform that enables companies to deliver services globally. Key points include:
- AWS Global Infrastruture: This tackles regions and availability Zones along with its purpose, usage and exaples.
- Core AWS Services: Compute services as the backbone for processing power on AWS, Storage, Networking, Databses, Content Delivery, Security, Elasticity & sclaing, and Serverless architecture and their importance to AWS Architecture.
- Key Benefits of AWS Global Architecture
EC2 and its Pricing
Understand the Amazon Elastic Compute Cloud (Amazon EC2) along with it features. This will cover also the different pricing for related services.
Creating an Instance
Learn the steps in launching your first EC2 instance. The following will serve as the primer to your journey:
- Guide to Launching Your First EC2 Instance: Detailed instructions on setting up new AWS accounts.
Creating an Instance using AWS CLI
- Making an EC2 Instance using AWS CLI, the way to interact with AWS services programmatically, this guide also gives you the guide to Create Access Keys in the Management Console .
Instance Connect
This will give you an understanding regarding the access to a server in the cloud, allowing administrators and developers to manage, configure, and maintain the infrastructure remotely. This module includes:
- What is key pair?: Vital to secure access to your Amazon EC2 instance.
- How the Key Pairs Work in SSH: Demonstration of user and host key pairs.
- SSH Handshake and its benefits
- Connecting to your instance: steps to connect after launching EC2 instance.
Security Groups
Know the role of security groups in EC2 instances and the best practices for using one along with Understanding IP addresses.
- Apache Web Server Setup on EC2 instace
S3 and IAM with EC2
Understanding what is Amazon S3 and IAM role and its relation EC2 isntance.
- Guide to Adding files to EC2 instance
EC2 Amazon Machine Image
Discover Amazon Machine Image as a requirement to set up and boot an Amazon EC2 instance.
- Creating a Pre-built AMI from an Instance: Steps to create a pre-built AMI with the image captured from our instance.
Elastic IP
Introduction to Elastic IP with its Key Features and Benefits, security access, cost and tagging, and regional availability.
- Setting Up an Elastic IP
Elastic Block Storage
Explore the range of EC2 storage available particularly understanding what is EBS and EFS. The following includes in this section:
- Storage in EC2: Storage options can be used independently or in combination.
- EBS volumes: It’s the storage volumes that you attach to Amazon EC2 instances.
- EBS snapshots: The backups of Amazon EBS volumes.
- EBS volume types:
- Features and benefits of Amazon EBS volumes
- Elastic File System (EFS): ‘for limux instance’
- EBS Lifecycle Manager: This is for the automation of the creation, retention, and deletion of EBS snapshots and EBS-backed AMIs.
- Expanding an EBS Volume: Steps to expand the EBS volume and the file system on the EC2 instance.
- Configuring an Elastic Load Balancer with Multiple Instances: This is the guide in setting up an (ELB) with three EC2 instances that provide slightly different outputs.
Creating a load balancer
- This part will walk you through the process of setting up an Elastic Load Balancer (ELB) with three EC2 instances that provide slightly different outputs. This setup will help demonstrate how load balancing works by distributing traffic across the instances.
Auto Scaling Group
This will help in ensuring the correct number of Amazon EC2 instances available to handle the load for an application. Key points include:
- Creating a launch template: Best practices for attaching and managing policies.
- Create ASG using launch configurations: Best practices for attaching and managing policies.
- Scaling Methods: Several ways to scale Auto Scaling group.
- Challenges of using EC2 Auto Scaling’
Why AWS?: History of AWS’s Emergence

History: The Beginning of AWS
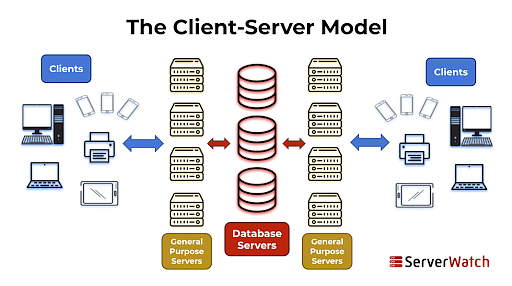
AWS emerged in the early 2000s from Amazon’s internal need to optimize and scale its infrastructure. At the time, Amazon realized that its e-commerce business required a significant amount of computing power, but these resources were often underutilized during non-peak periods. This led Amazon to explore ways to capitalize on excess computing capacity. The realization of their internal challenges and inefficiencies—managing infrastructure that could scale up for peak seasons and then remain idle during downtime—prompted the company to think of a broader solution. By the mid-2000s, the company recognized a gap in the market where other organizations were facing similar issues, and AWS was born to help businesses avoid the capital expense and complexity of managing their own IT infrastructure.
The Emergence of Cloud-Based Services
AWS represents a paradigm shift in how companies manage IT services. Rather than investing in physical servers or data centers, businesses could now rent computing resources on demand. AWS introduced this idea of a cloud-based service model that allowed companies to quickly scale up or down based on demand. This flexibility dramatically lowered the costs associated with IT infrastructure while allowing businesses to focus more on innovation rather than maintenance. The initial offerings, such as Simple Storage Service (S3) and Elastic Compute Cloud (EC2), gave businesses scalable storage and computing power with the added benefits of reliability, speed, and security.
From Renting Servers to Offering a Comprehensive Ecosystem
AWS started primarily as a service to rent out excess server capacity through EC2. However, this was only the beginning of a more extensive ecosystem. Over time, AWS expanded from basic server renting to offering a wide array of services, including managed databases, machine learning, content delivery, networking, security, and developer tools. These services are now used by businesses globally to handle everything from basic web hosting to complex data analytics and artificial intelligence applications. AWS’s success lies in its ability to offer more than 200 fully-featured services that cater to industries such as healthcare, finance, manufacturing, and entertainment.

Key Milestones in AWS History
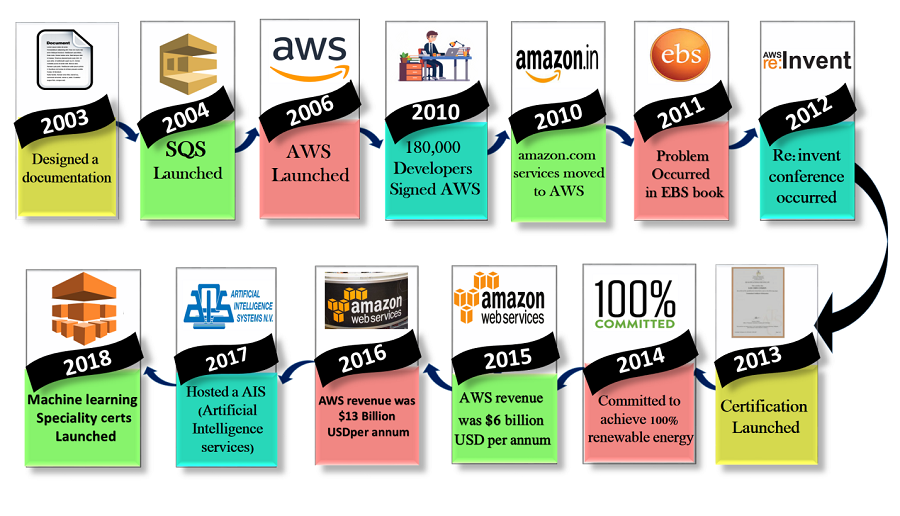
2000-2003: The Idea
- In the early 2000s, Amazon faced internal challenges managing their own infrastructure. This led to the concept of offering excess computing capacity to other companies.
2002: Early Web Services
- Amazon launched its first web services, such as the Amazon e-commerce service, but the full cloud concept wasn’t implemented yet.
2004: AWS Development
- A small team led by Andy Jassy began working on the foundations of AWS. They aimed to create a platform that could help developers build applications more efficiently.
2006: Official Launch of AWS
- AWS officially launched in 2006 with its first services, Simple Storage Service (S3) and Elastic Compute Cloud (EC2). These services allowed businesses to rent storage and computing power on demand.
2007-2011: Growth and New Services
- AWS rapidly grew and expanded its services, including the introduction of Relational Database Service (RDS) in 2009, CloudFront for content delivery in 2008, and Elastic Block Store (EBS) in 2008.
2012-2015: Global Expansion
- AWS expanded its global infrastructure with new data centers worldwide, establishing a robust presence in regions like Europe, Asia, and South America. During this period, it launched over 100 new services, including DynamoDB (2012) and Redshift (2013).
2016: $10 Billion Milestone
- AWS hit $10 billion in annual revenue in 2016. This highlights its dominance in the cloud industry. New services like Lambda (serverless computing) also emerged during this time.
2020-Present: Continuing Innovation
- AWS continues to dominate the cloud industry with innovations in AI, machine learning, and edge computing. It now offers more than 200 services across various sectors.
Understanding AWS’s Architecture
Amazon Web Services (AWS) provides a vast and scalable cloud platform that enables companies to deliver services globally. To ensure high availability, fault tolerance, and low-latency access, AWS has built a robust global infrastructure. Below is the breakdown of its architecture.
Regions
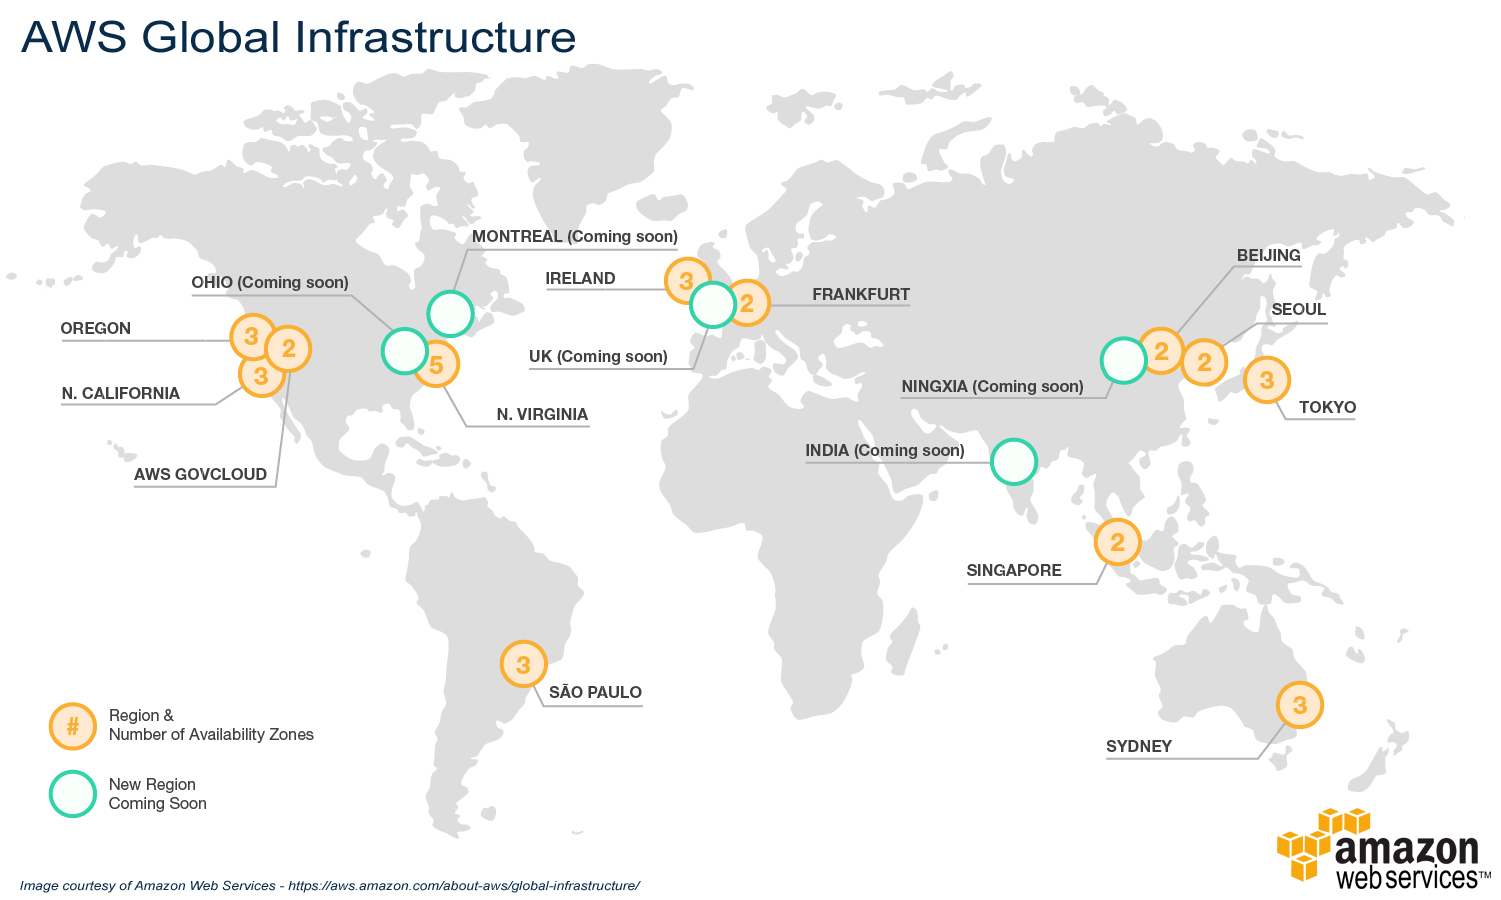
A Region is a geographically distinct area where AWS operates data centers. AWS offers multiple Regions around the world, and each Region is isolated from others to ensure data sovereignty and compliance. For example, AWS has Regions in North America, Europe, Asia-Pacific, and other continents.
Purpose
Regions provide proximity to customers, help with legal and compliance requirements (such as GDPR in the EU), and offer disaster recovery by distributing resources across geographic locations.
Common Regions
- US East (N. Virginia)
- Asia Pacific (Singapore)
- Europe (Frankfurt)
When deploying services on AWS, users choose which Region to deploy their resources in based on factors like latency, cost, and compliance.
Availability Zones (AZs)
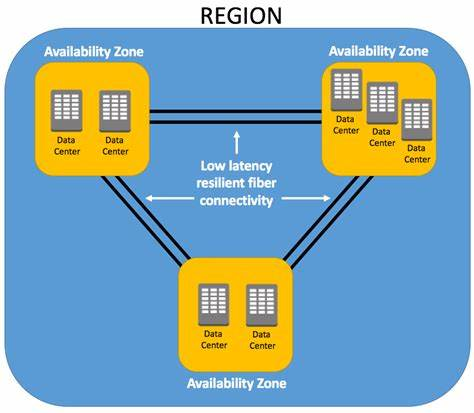
Each Region consists of multiple Availability Zones (AZs). An Availability Zone is essentially a cluster of one or more data centers equipped with independent power, cooling, and networking.
Purpose
Availability Zones are designed to be physically separated from each other to ensure fault tolerance. If one AZ experiences an outage, others in the same Region can take over, ensuring minimal disruption to services. For instance, deploying a web application across three AZs in the same Region allows it to remain operational even if one AZ fails.
Usage
When building highly available applications, it’s recommended to distribute workloads across multiple AZs to avoid a single point of failure.
Examples
- ap-southeast-1b (Singapore): This is one of the AZs within the AWS Region ap-southeast-1 (Asia Pacific, Singapore). The “b” indicates it is one of multiple zones within this region.
- us-east-1a (Northern Virginia): us-east-1 is the AWS Region for Northern Virginia, a major hub for AWS services.
- eu-west-1c (Ireland): The AWS Region eu-west-1 is based in Ireland, and eu-west-1c is one of its Availability Zones.
Core AWS Services
Compute
Compute services provide the backbone for processing power on AWS. These services allow you to run applications, perform calculations, and host servers in a scalable environment.
Importance to AWS Architecture
Compute services are essential for handling the dynamic workloads of modern applications.
Services
- Amazon EC2 (Elastic Compute Cloud): Provides resizable virtual machines (instances) for running applications.
- AWS Lambda: A serverless compute service that runs code in response to events.
- Amazon ECS (Elastic Container Service): A highly scalable container management service that supports Docker containers.
Storage
AWS offers several storage solutions to securely store and manage data, from object storage to block storage and archival solutions.
Importance to AWS Architecture
Reliable and scalable storage is key for data persistence, disaster recovery, and regulatory compliance.
Services
- Amazon S3 (Simple Storage Service): Object storage service for storing large amounts of unstructured data.
- Amazon EBS (Elastic Block Store): Block storage for use with Amazon EC2 instances.
- Amazon Glacier: Low-cost archival storage for infrequently accessed data.
Networking
AWS networking services provide the infrastructure to manage connectivity between AWS resources, the internet, and private on-premises environments.
Importance to AWS Architecture
Networking services are critical for creating highly available, secure, and fast network architectures.
Services
- Amazon VPC (Virtual Private Cloud): Allows you to define a logically isolated section of the AWS Cloud to run AWS resources.
- AWS Direct Connect: Provides a dedicated network connection from your premises to AWS.
- Elastic Load Balancing (ELB): Automatically distributes incoming traffic across multiple EC2 instances.
Databases
AWS offers various types of databases, from relational to NoSQL, that are fully managed to simplify deployment and scaling.
Importance to AWS Architecture
Databases are foundational for handling transactional data, big data analytics, and operational workloads.
Services
- Amazon RDS (Relational Database Service): Managed relational database service for databases like MySQL, PostgreSQL, and Oracle.
- Amazon DynamoDB: A NoSQL database for applications needing low-latency performance at scale.
- Amazon Redshift: Data warehousing service designed for fast, scalable analytics on structured data.
Content Delivery
AWS provides services to deliver content efficiently and securely to users around the world.
Importance to AWS Architecture
Content delivery ensures fast and secure delivery of data, applications, and videos to a global audience with low latency.
Services
- Amazon CloudFront: Content delivery network (CDN) service that speeds up the distribution of static and dynamic web content.
- AWS Global Accelerator: Improves the availability and performance of your global applications by routing traffic to the best-performing AWS regions.
Security
AWS provides security services that help protect data, applications, and the infrastructure.
Importance to AWS Architecture
Security is crucial for protecting sensitive data, ensuring compliance, and mitigating cyberattacks.
Services
- AWS IAM (Identity and Access Management): Manages user access and permissions securely.
- AWS Shield: A managed Distributed Denial of Service (DDoS) protection service.
- AWS Key Management Service (KMS): Helps manage the encryption keys used to encrypt data.
Monitoring and Management
AWS offers tools to monitor and manage your resources, applications, and infrastructure.
Importance to AWS Architecture
Monitoring and management services help ensure the health and performance of your applications, reduce downtime, and troubleshoot issues in real-time.
Services
- Amazon CloudWatch: Monitors AWS resources and applications in real-time.
- AWS CloudTrail: Provides a history of AWS API calls for governance, compliance, and debugging.
- AWS Config: Tracks changes to AWS resources to ensure they comply with organizational policies.
Elasticity and Scaling
AWS services offer the ability to automatically scale resources based on demand.
Importance to AWS Architecture
Elasticity ensures that applications can automatically adjust to fluctuating demands, reducing cost and ensuring efficient use of resources.
Services
- Auto Scaling: Automatically adjusts the number of EC2 instances based on traffic and load.
- Amazon RDS Read Replicas: Automatically scale out read-heavy workloads.
- AWS Elastic Beanstalk: Automatically scales your web application based on traffic demands.
Serverless Architecture
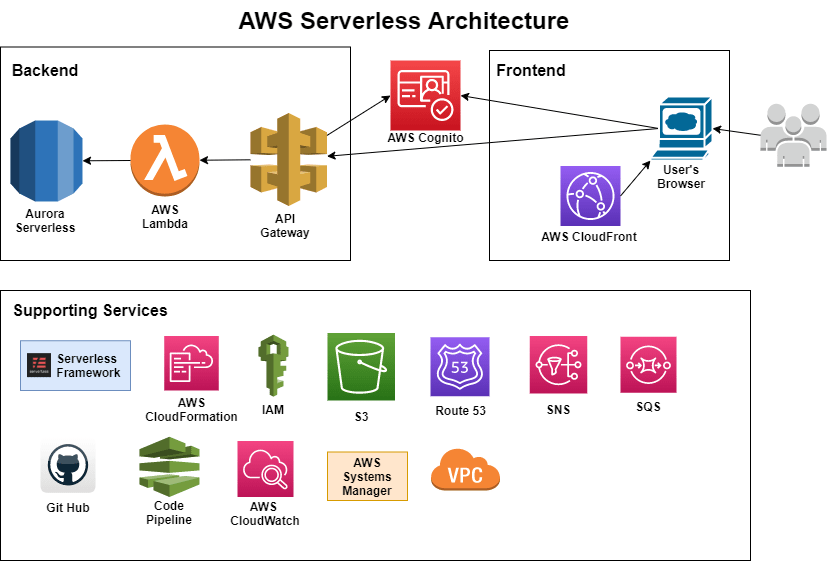
Serverless architecture allows developers to build and run applications without managing the underlying infrastructure.
Importance to AWS Architecture
Serverless services remove the need for server management, enabling rapid application development and scaling, as well as cost-efficiency.
Services
- AWS Lambda: Executes code in response to triggers without provisioning or managing servers.
- Amazon API Gateway: Fully managed service for creating, publishing, and maintaining APIs.
- AWS Step Functions: Coordinates the components of distributed applications using workflows.
Key Benefits of AWS Global Architecture
- Scalability: Easily scale resources up or down in any Region or AZ.
- Low Latency: Thanks to the global distribution of Edge Locations, AWS services can be accessed with low latency from almost anywhere.
- High Availability: The use of multiple AZs and Regions ensures that AWS services remain available even in the case of localized outages.
- Compliance and Governance: With Regions worldwide, AWS helps companies meet data residency and compliance regulations.
- Disaster Recovery: AWS supports robust disaster recovery plans using cross-Region replication and backup services.
AWS’s global infrastructure is built for flexibility, scalability, and reliability, making it one of the most sophisticated cloud platforms available today. This structure allows businesses to deploy resilient, globally distributed applications while minimizing latency and ensuring compliance with local regulations.
EC2 and its Pricing
What is EC2?
Amazon Elastic Compute Cloud (Amazon EC2) provides on-demand, scalable computing capacity in the Amazon Web Services (AWS) Cloud. Using Amazon EC2 reduces hardware costs so you can develop and deploy applications faster. You can use Amazon EC2 to launch as many or as few virtual servers as you need, configure security and networking, and manage storage. You can add capacity (scale up) to handle compute-heavy tasks, such as monthly or yearly processes, or spikes in website traffic. When usage decreases, you can reduce capacity (scale down) again. In practice, EC2 makes life easier for developers by providing secure, and resizable compute capacity in the cloud. It greatly eases the process of scaling up or down, can be integrated into several other services, and comes with a plan where you only pay for how much you use it.
Features
- Instances - Virtual Servers
- Amazon Machine Images (AMIs) - Preconfigured templates for your instances that package the components you need for your server (including the operating system and additional software).
-
Instance Types - Various configurations of CPU, memory, storage, networking capacity, and graphics hardware for your instances. Here are some examples:
- t2.micro: General purpose instance with 1 vCPU and 1 GiB of memory. Suitable for low-traffic web servers, small databases, and development environments.
- m5.large: General purpose instance with 2 vCPUs and 8 GiB of memory. Suitable for small to medium-sized databases, data processing tasks, and backend servers.
- c5.xlarge: Compute optimized instance with 4 vCPUs and 8 GiB of memory. Suitable for compute-intensive applications like high-performance web servers, scientific modeling, and batch processing.
- r5.2xlarge: Memory optimized instance with 8 vCPUs and 64 GiB of memory. Suitable for high-performance databases, in-memory caches, and real-time big data analytics.
- p3.2xlarge: GPU optimized instance with 8 vCPUs, 61 GiB of memory, and 1 NVIDIA V100 GPU. Suitable for machine learning, deep learning, and high-performance computing applications.
- i3.large: Storage optimized instance with 2 vCPUs, 15.25 GiB of memory, and 1 x 475 GB NVMe SSD. Suitable for NoSQL databases, data warehousing, and high-transactional databases.
- Amazon EBS volumes - Persistent storage volumes for your data using Amazon Elastic Block Store (Amazon EBS).
- Instance store volumes - Storage volumes for temporary data that is deleted when you stop, hibernate, or terminate your instance.
- Key pairs - secure login information for your instances. AWS stores the public key and you store the private key in a secure place.
- Security Groups - A virtual firewall that allows you to specify the protocols, ports, and source IP ranges that can reach your instances, and the destination IP ranges to which your instances can connect.
Related Services
- Amazon EC2 Auto Scaling
- AWS Backup
- Amazon CloudWatch
- Elastic Load Balancing
- Amazon GuardDuty
- EC2 Image Builder
- AWS Launch Wizard
- AWS Systems Manager
Pricing for Amazon EC2
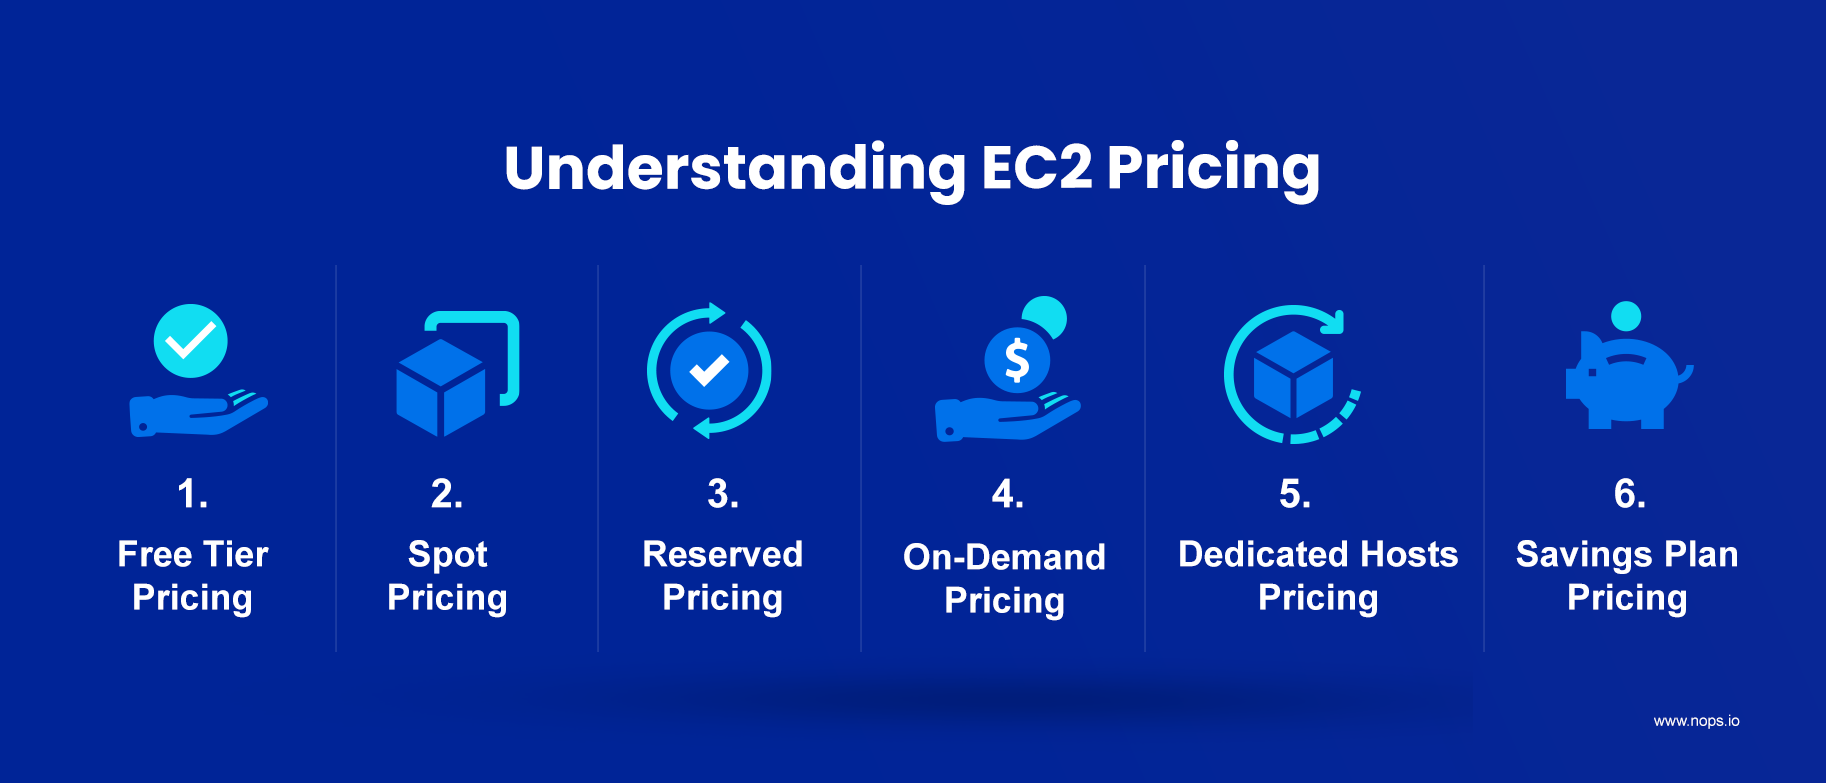
- Free Tier - You can get started with Amazon EC2 for free.
-
Spot Instances EC2 Spot pricing is by far the cheapest, saving you up to 90% off standard pricing. This pricing method lets you use surplus EC2 computing capacity for yourself until AWS needs it back for other customers. Spot prices are not fixed. There is a bidding process for them, and AWS constantly adapts them to market demand across different Availability Zones. The only time you use them is when your bid (request rate) is higher than the offered Spot Price. Here’s the tradeoff. If others outbid you on your maximum price, or if demand increases and supply decreases, AWS discontinues your Spot Instances. For fault-intolerant applications, this interruption can lead to service disruption. In addition, Amazon EC2 automatically switches to the more expensive On-Demand pricing after reclaiming Spot instances, which can blow a hole in your budget. Now, you could manually configure Hibernate or Pause-Stop features to mitigate the risks. With multiple instances or use cases running, this can be overwhelming and time-consuming. Fortunately, tools like Xosphere automate switching between Spot instances so you can take advantage of Spot pricing.
- Reserved Instances - If you commit to consistent usage over one or three years, using EC2 Reserved Instances pricing can save you up to 72% compared to On-Demand prices. The other advantage here is that you get to reserve capacity in a specific Availability Zone, enabling you to launch new instances whenever you need them.
- Standard Reserved Instances pricing enables you to save up to 72% vs On-Demand pricing, and you can change the Availability Zone, instance size, and networking of your Standard RIs within the contract term.
- Convertible Reserved Instances pricing lets you apply up to 66% discounts across instance types, tenancy types, and operating systems of your RIs during the contract period.
Like Savings Plans, you can pay for RIs all upfront, partially upfront, or monthly without a down payment. Of course, the more you pay upfront, the higher your savings.
-
On-Demand Instances - EC2 On-Demand pricing lets you choose any instance type and size, scale resources up and down as needed, and pay only for what you use. No upfront payments. No long-term commitment required. You can also decide when specific EC2 instances should be deployed, terminated, rebooted, or hibernated. Billing is also hourly or per second. In addition, EC2 On-Demand pricing is available for all Availability Zones (AZs), Regions, and operating systems (Linux, Windows, and RedHat Enterprise Limited Edition (RHEL)). This is also the default pricing for EC2 instances and offers the most flexibility. The tradeoff is that On-Demand pricing is more expensive than other EC2 pricing methods, as you’ll notice below. Also, On-Demand pricing is highly variable and depends on your choice of region/availability zone, OS, instance type, and instance size.
-
Dedicated Hosts - A dedicated host is essentially a physical server that provides instance capacity specifically to you. This EC2 pricing method blends the resilience and flexibility of the AWS public cloud with the cost savings of using your own licenses (such as your Windows SQL server license). The plan bills users based on the On-Demand rate per hour, not per second. However, if you purchase them on a reservation basis for one or three years, you get up to 70% off On-Demand hourly pricing. You can also save up to 72% on Dedicated Hosts versus On-Demand pricing when you use Savings Plans for Dedicated Hosts. This pricing approach makes sense for companies seeking to maintain compliance or minimize hardware sharing for security reasons.
-
Savings Plan - A one- or three-year EC2 Savings Plan can save you up to 72% off regular On-Demand pricing. AWS Savings Plans require you to commit to consistent usage in dollars per hour, such as $8/hour for one or three years. Amazon EC2 Instance Savings Plans let you switch between EC2 instance types and operating systems during your contract period. But it locks you into one instance type (family) and AWS Region over the course of that contract. Say, you configured an M5.xl instance in US East (North Virginia) running Windows, to begin with. An EC2 Instance Savings Plan lets you:
- Increase or decrease the instance size to suit changes in your usage
- Switch from Windows to a Linux instance, and vice versa
- Change tenancy (dedicated or shared)
- Change Availability Zone (AZ)
For example, you can switch from the M5.xl running Windows in US East (North Virginia) to an M5.2xl running Linux in US East (North Virginia) to increase capacity. But you won’t be able to switch from the M5.xl running Windows to a T3.xl running Windows or Linux. Also, you cannot migrate to US West (Ohio) to host the same Windows M5.xl instance. Compute Savings Plans offer discounts of up to 66% compared to On-Demand EC2 pricing. Despite their lower discounts, these plans apply to multiple AWS services (Amazon EC2, AWS Fargate, and AWS Lambda), regions, instance families, instance sizes, and operating systems. One more thing. Your Savings Plans discount amount will also depend on the payment plan you choose:
- All upfront – Get the most savings when you pay for the entire plan at the beginning
- Partial upfront – Save when you pay at least 50% down
- No upfront – You’ll pay your commitment monthly over the term of your contract with some savings
Guide to Launching Your First EC2 Instance
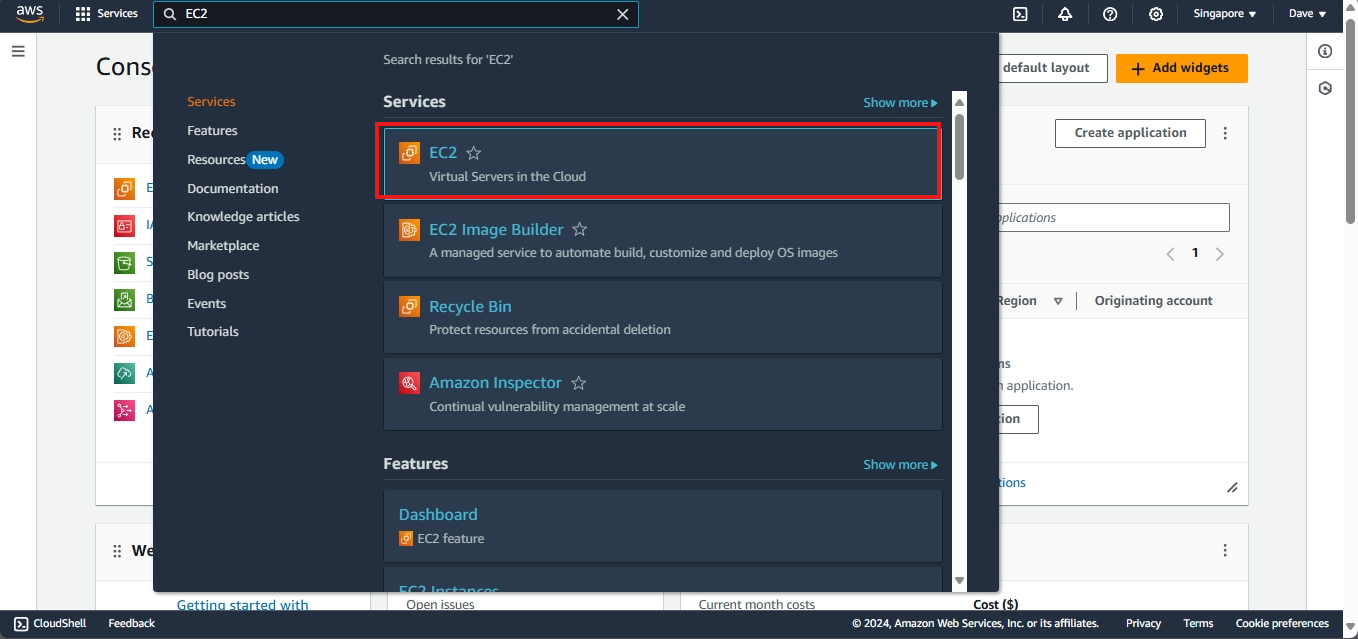
In the AWS Management Console, type EC2 in the search bar or locate it under the Services menu. Click on EC2 to open the EC2 Dashboard.
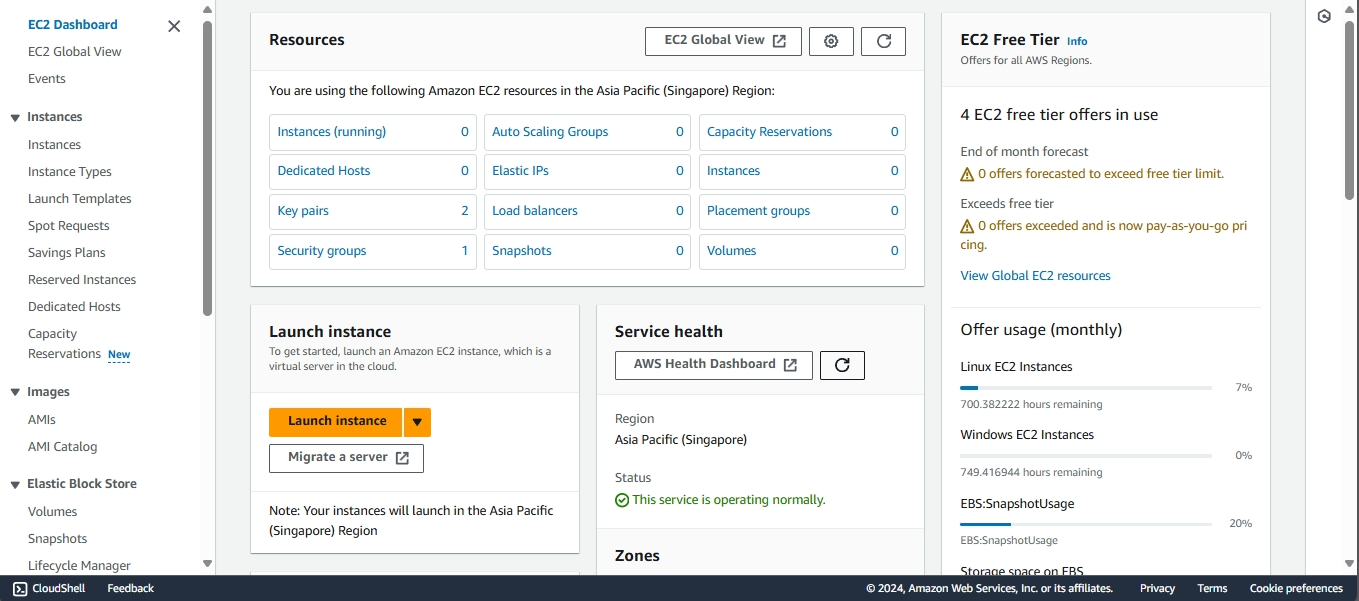
1. Launching the Instance
On the EC2 Dashboard, click the Launch Instance button to start the instance creation process.
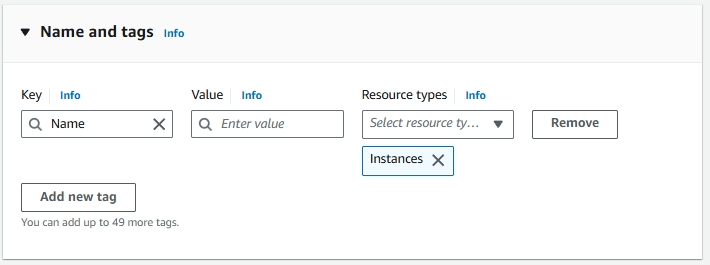
2. Naming and Tagging Your Instance
Create a name for your instance. If you want to add a tag, click on Add additional tags.
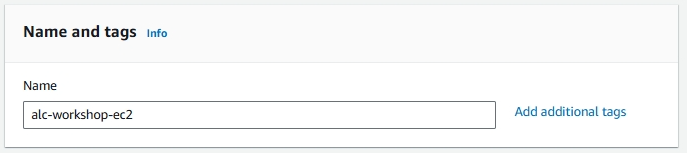
Tags help in identifying, organizing, and managing your instances, especially when dealing with multiple resources.
Example:
- Key: Backup
- Value: ServerBackup
- Resource Type: EBS Volume
3. Selecting an AMI (Amazon Machine Image)
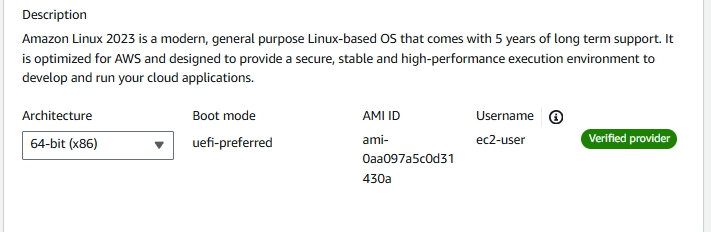
AMIs are preconfigured templates for your instances, containing the operating system and software you want. Choose ‘Amazon Linux’ for this workshop.
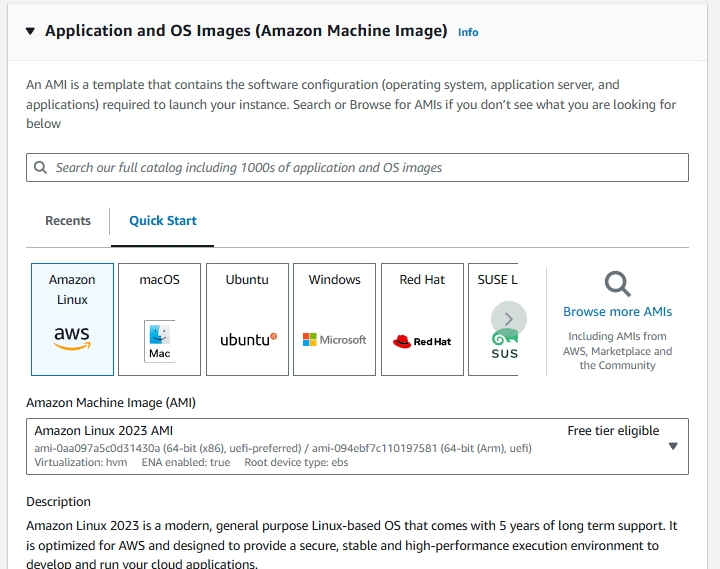
3.1. Choose ‘64-bit (x86)’ for the computer architecture
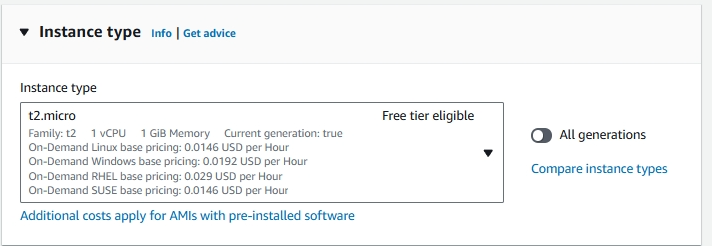
4. Choosing an Instance Type
An instance type in Amazon EC2 defines the virtual hardware for your server, such as CPU, memory, storage, and network capacity. Different types are suited for different workloads.
- Choose t2.micro for this one as it’s affordable, Free Tier eligible, and offers on-demand usage where you only pay for what resources you use.
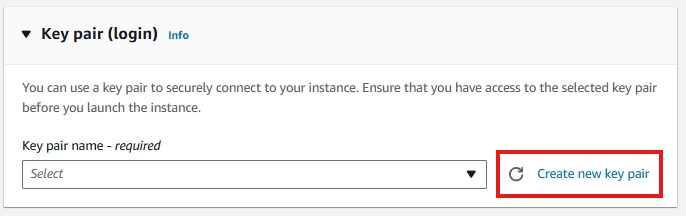
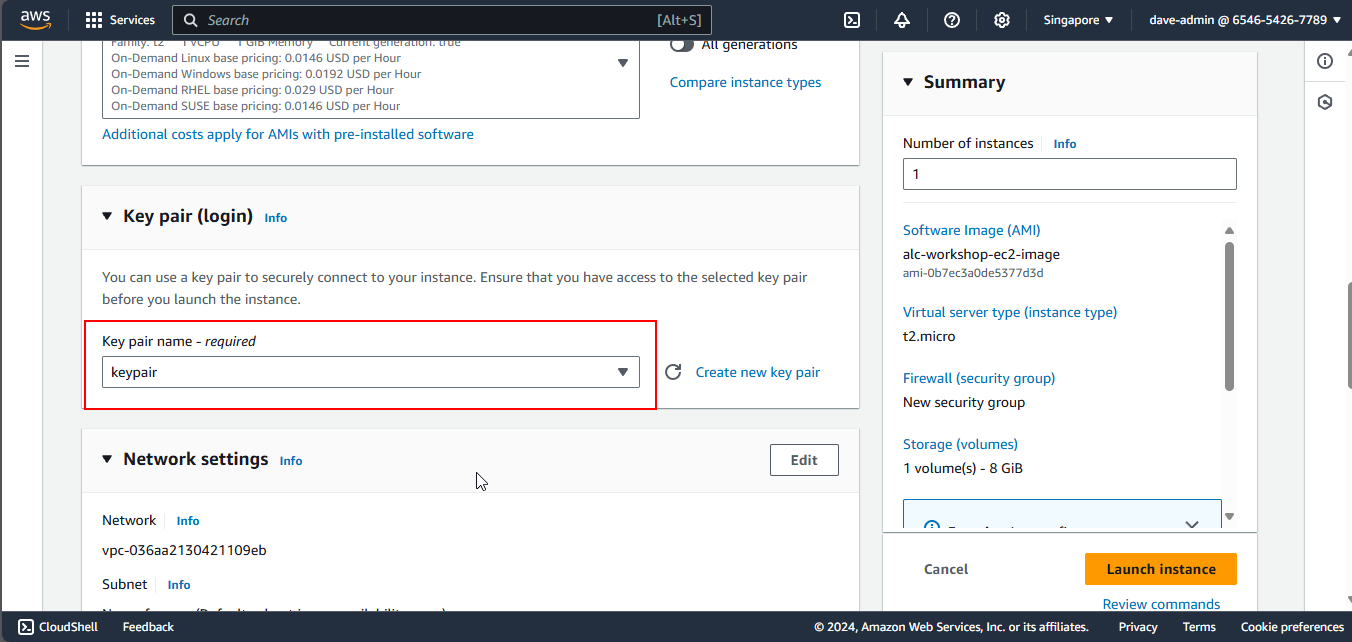
5. Configuring a Key Pair
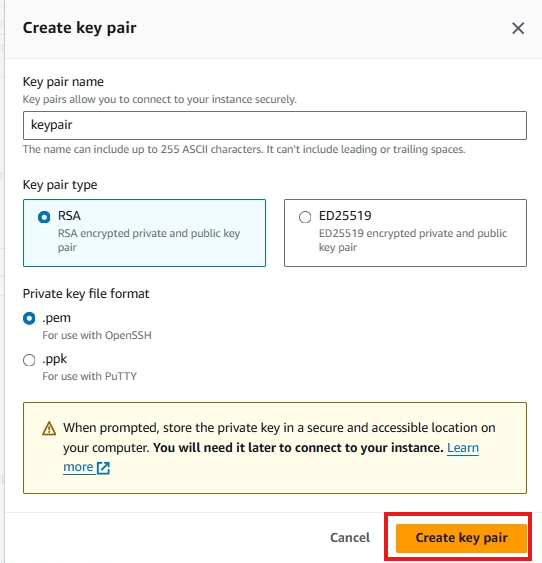
A key pair in Amazon EC2 consists of a public and private key used for securely connecting to your instance. AWS provides the public key for the server, while you download the private key as a .pem file.
Let’s create a new key pair.
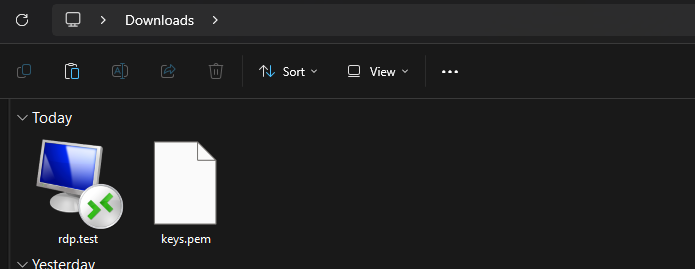
Let’s name it keypair and click Create Key Pair. It will automatically download. Move it in a folder where you can easily access it, as you will need it to connect to your instance later.
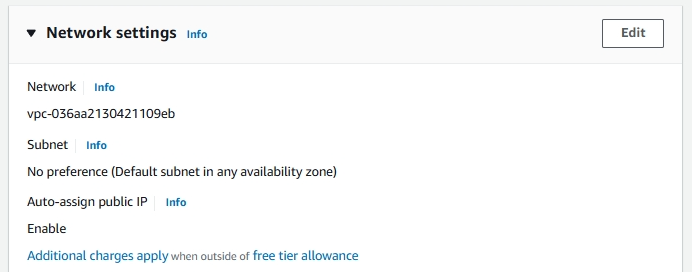
6. Configuring Networking
These are some minute networking details for your instance.
- Network: The network defines the Virtual Private Cloud (VPC) where your instance will reside, isolating your server and enabling you to control it.
- Subnet: A subnet is a segment of a VPC’s IP address range, allowing you to group resources logically by having an efficient network structure.
- Auto-assign Public IP: This setting automatically assigns a public IP address to your instance, enabling direct internet access.
7. Configuring Security Groups
Security groups act as virtual firewalls for your Amazon EC2 instances. They control inbound and outbound traffic based on defined rules. Choose create security group and check allow SSH traffic. This allows us to connect to our instance later.

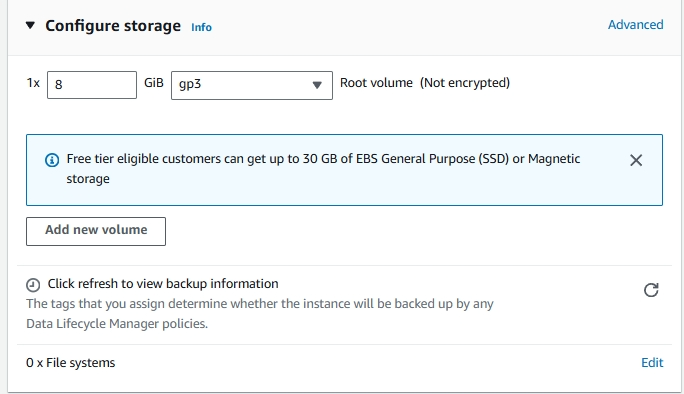
8. Configuring Storage
This will specify the storage options of your instance. Leave the option as it is. Here are the details you need to know:
- 1x: This indicates that there is one volume attached as the root volume to the EC2 instance.
- 8 GiB: This specifies the size of the root volume, which is 8 GiB (Gibibytes). This is the amount of storage allocated for the instance’s operating system and any applications installed on it.
- gp3: This indicates the type of storage volume. gp3 is a type of General Purpose SSD (Solid State Drive) that offers a balance of price and performance. It provides faster and more consistent performance compared to standard magnetic disks.
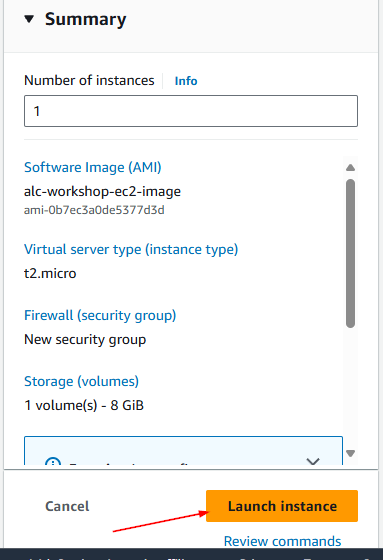
9. Reviewing and Launching
Review your configured instance. If everything looks correct, click launch instance.

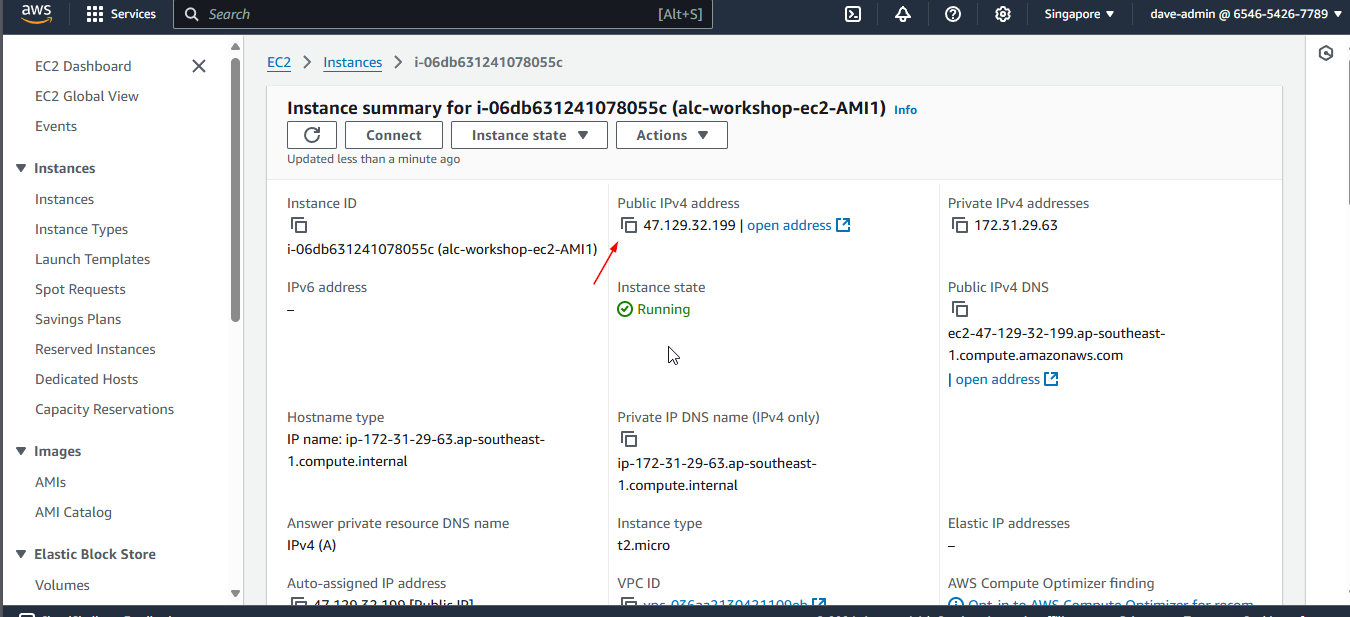
10. Accessing the Instance
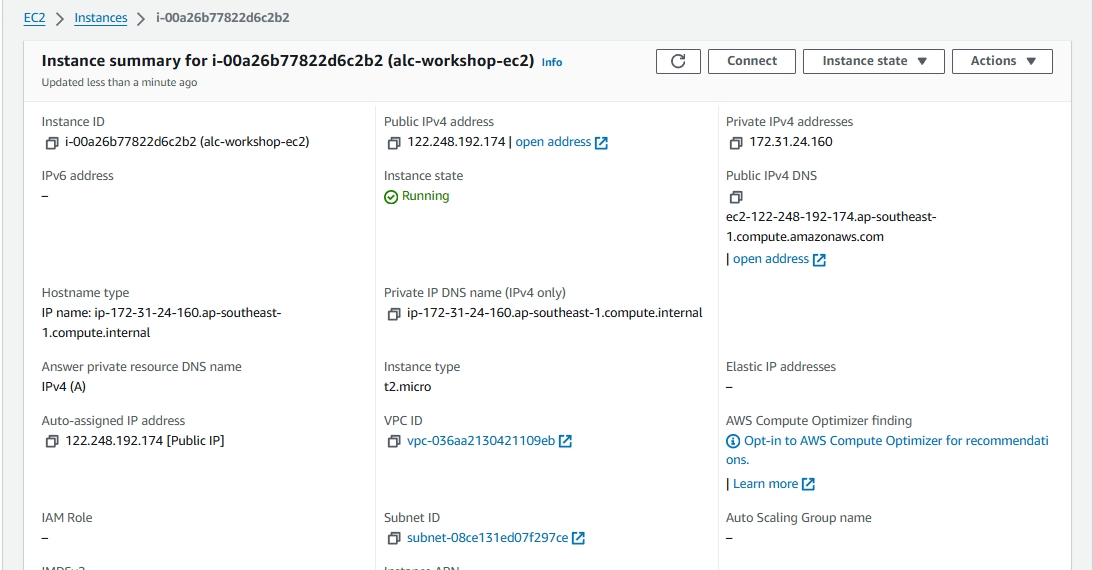
You will proceed to this page, just click the instance ID.
An Instance ID is a unique identifier assigned to each instance upon launch. This ID is used to track, manage, and connect to specific instances. Think of it like a unique ID number for each person. Each EC2 instance has its own Instance ID for identification.

The instance will take time to initialize. It will usually take 2-3 minutes.

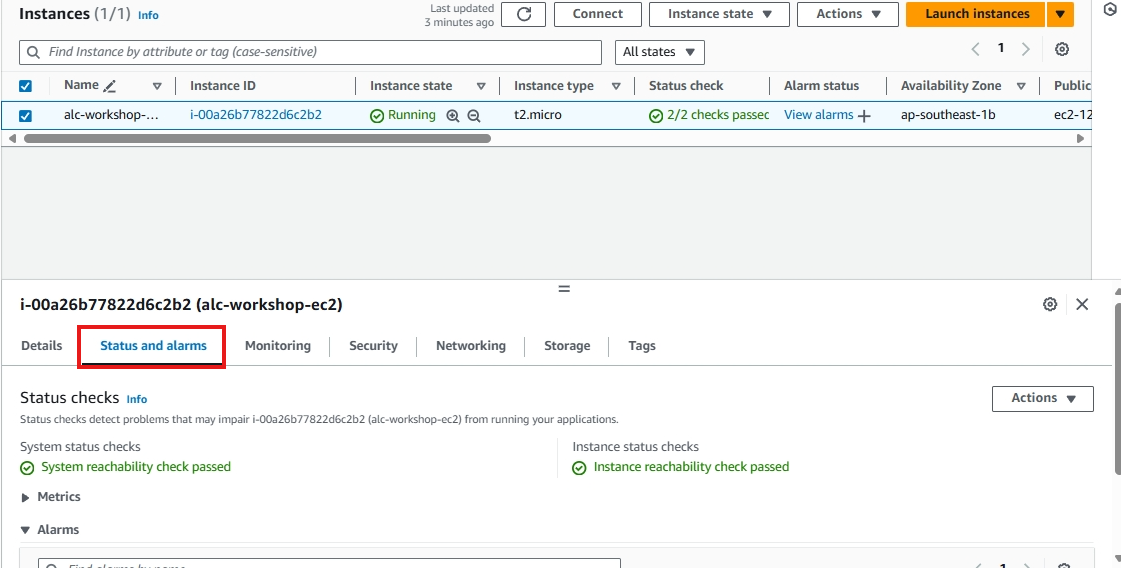
You can see the instance is ready if the status is on 2/2 checks passed. To know what this mean we need to know these concepts. Click on status and alarms.
- System reachability check: Verifies the underlying AWS infrastructure is healthy.
- Instance reachability check: Ensures the specific EC2 instance is operational and reachable.
Click on the instance ID to view the details.

Congratulations
You have successfully launched your first instance. Welcome to the world of cloud computing and painful billings!
Cleaning Up
- Terminating the instance: To avoid unnecessary charges, remember to terminate the instance when you’re done using it. You can do this by selecting the instance and clicking Actions > Instance State > Terminate.
Optional: Setting up RDP AMI Instance
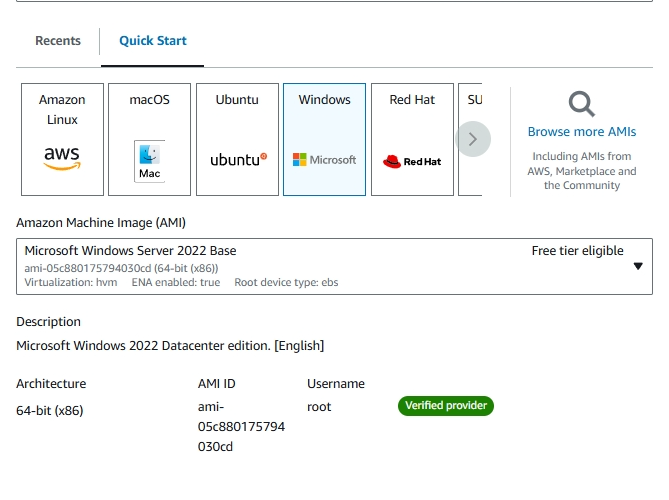
- RDP: Remote Desktop Protocol - This will provide us a graphical interface that lets you interact with the remote desktop, just like you would on your local machine. This will be useful if you want to use Windows-based server. Lets test this later.
Choose Microsoft Windows Server as the AMI base.
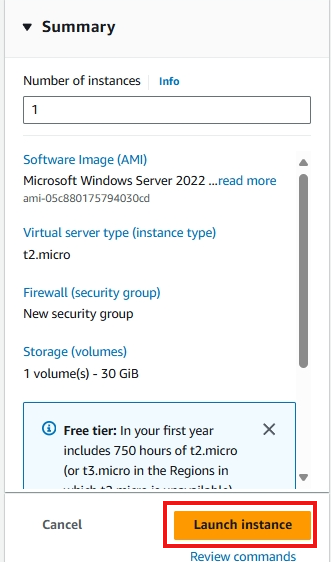
Check the instance summary, then you’re done!
Making an EC2 Instance using AWS CLI
AWS Command Line Interface (CLI) allows you to interact with AWS services programmatically.
What are IAM Access Keys?
IAM Access Keys consist of two components: an Access Key ID and a Secret Access Key. These keys are analogous to a username and password and are used to sign programmatic requests to AWS services.
The Access Key ID is a unique identifier, while the Secret Access Key is a secret that should only be known by the user who owns the key.
IAM Access Keys are required when you interact with AWS services via the AWS CLI, SDKs, or APIs. They are essential for tasks like launching EC2 instances programmatically.
Why do we need Access Keys?
1. Security and Access Control
- Non-Root Access: It’s a best practice to avoid using root account credentials. Instead, you can create IAM users with Access Keys and specific roles/permissions to reduce risk.
- Granular Permissions: You can assign precise permissions to IAM users, following the principle of least privilege, and ensure the Access Keys only allow specific actions or access to certain AWS resources.
2. Programmatic Access
- APIs and SDKs: AWS SDKs and APIs rely on Access Keys for programmatic access to AWS services.
- Command Line Interface (CLI): The AWS CLI uses these keys for authentication when managing AWS resources from the command line.
3. Automating
- CI/CD Pipelines: Automation tools like Jenkins or GitLab use Access Keys to authenticate and automate tasks in your AWS account, including launching EC2 instances.
How to Create Access Keys in the Management Console
1. Navigate to the IAM Service
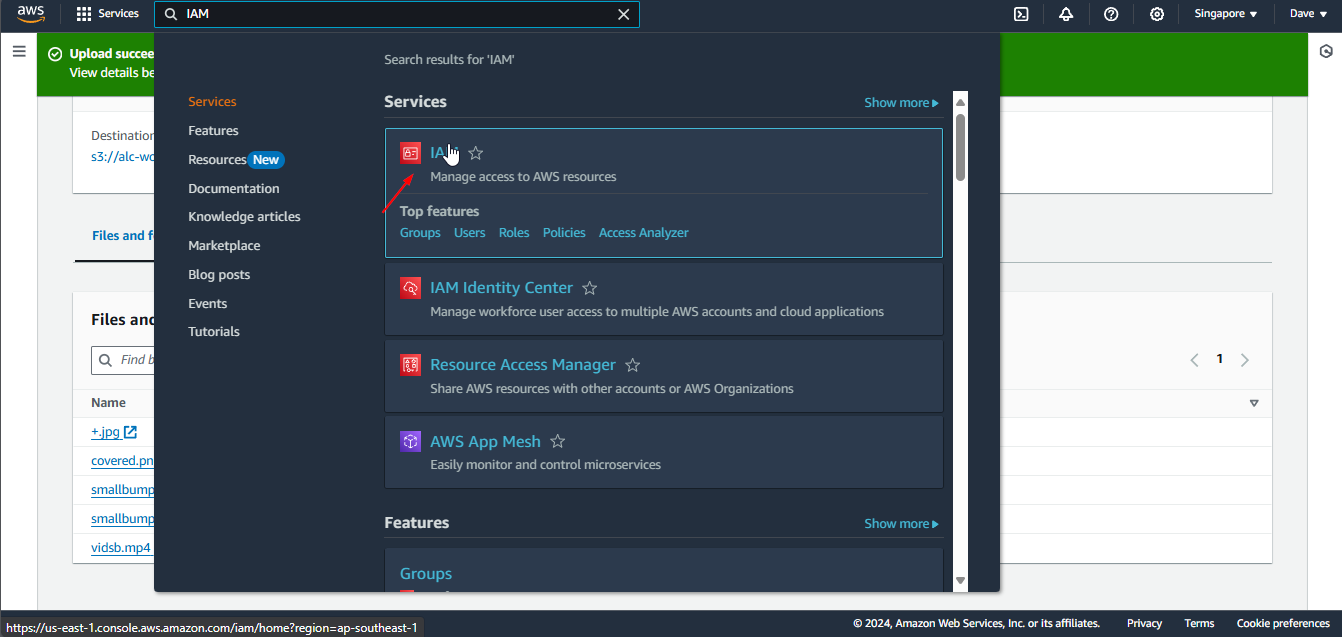
In the AWS Management Console, search for “IAM” and click on the IAM service.

2. Select a User
In the “Users” section, click on the username you created.
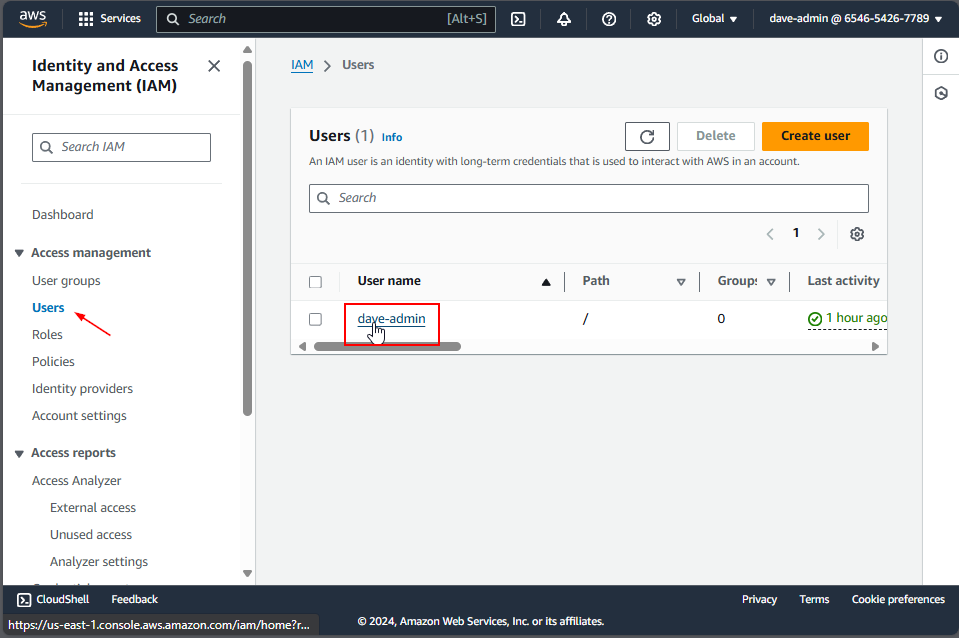
If you don’t have one, refer to this guide First Line of Defense - IAM Users and ARNs
2.1 Create Access Keys Using the Root Account (Optional)
If you do not have an IAM user, you can use your root account to create access keys. However, it’s important to note that using root account credentials is not a best practice due to security risks. If you choose to proceed, follow these steps:
- Log in to the AWS Management Console using your root account credentials.
- Click on your account name in the top right corner and select My Security Credentials.
- In the Access Keys section, you can create access keys for the root account by clicking on Create New Access Key.
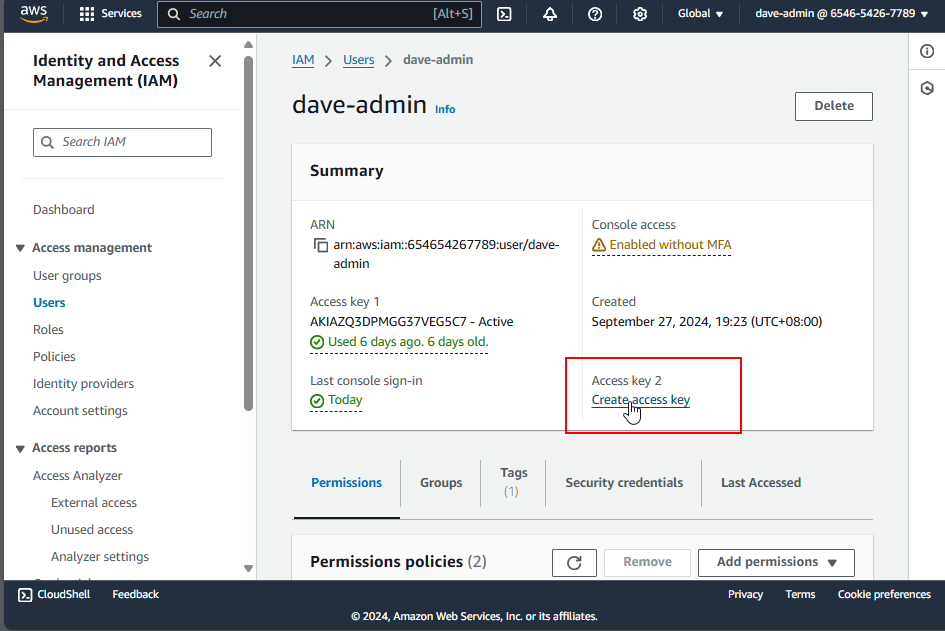
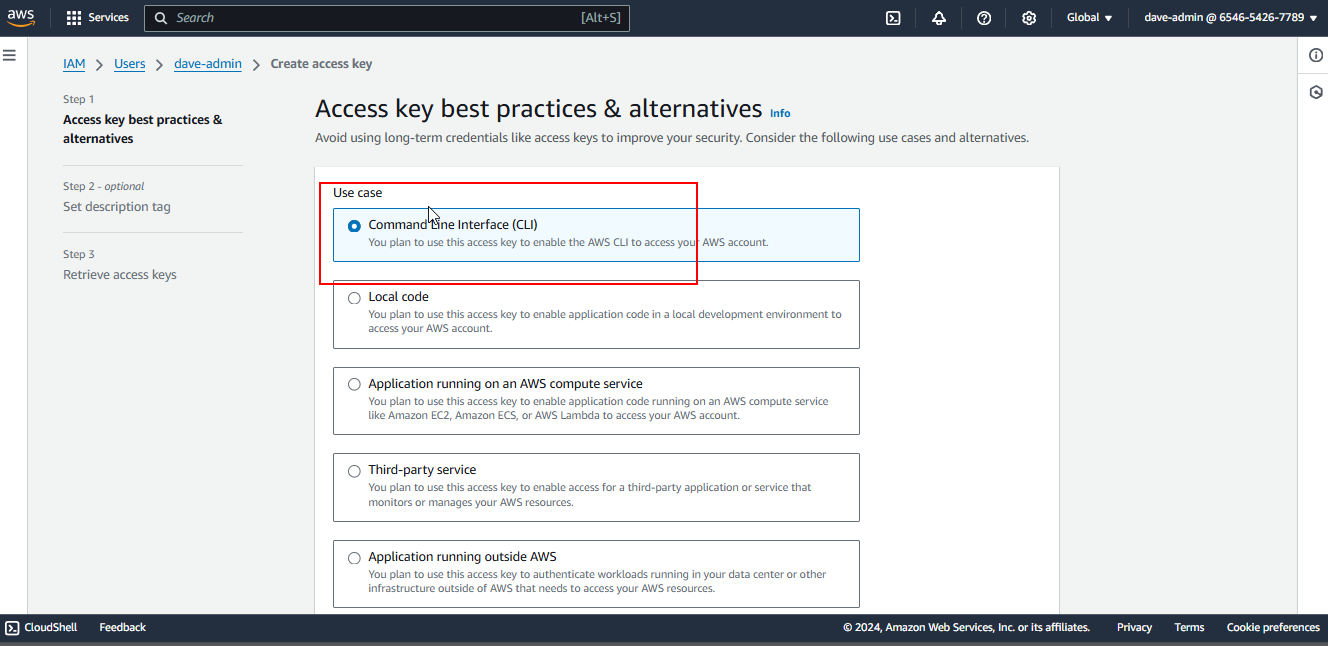
3. Create Access Keys
Once a user is selected, create an access key by clicking the Create Access Key button.
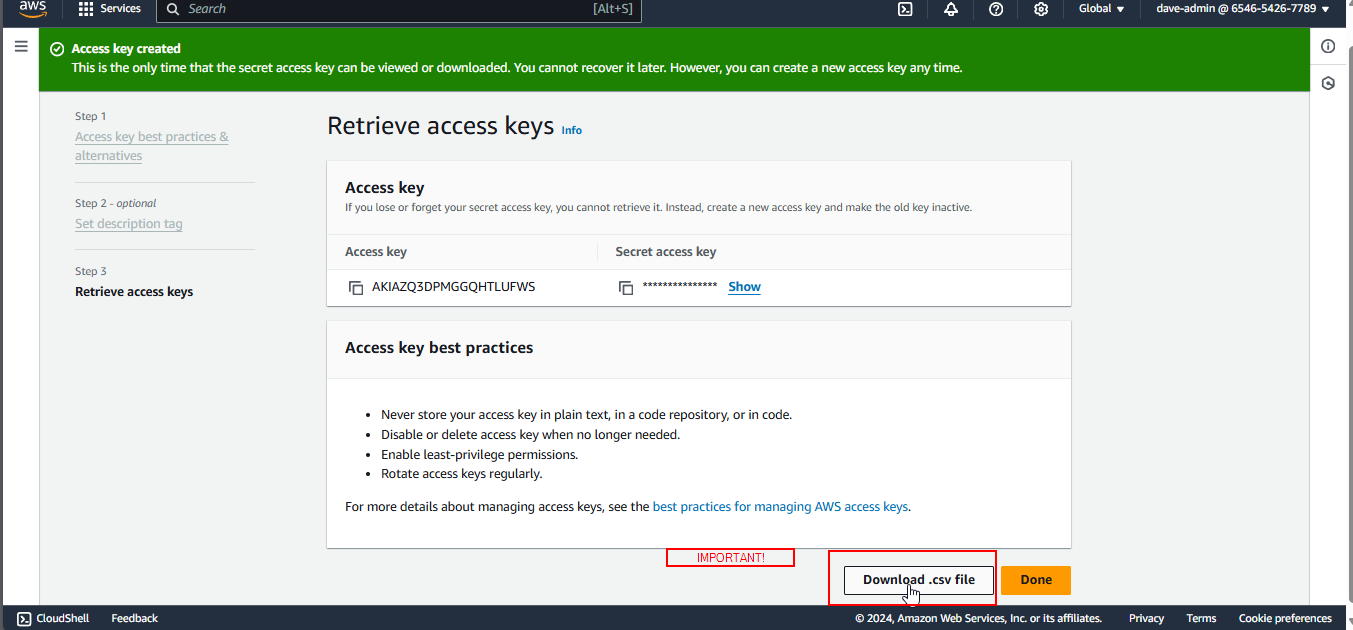
4. Download the Access Key
- Download the
.csvfile or copy the Access Key ID and Secret Access Key immediately. - Remember: AWS does not store the Secret Access Key, so if you lose it, you will need to create a new one.

How to Install and Configure AWS CLI
To interact with AWS services programmatically, you’ll need to install the AWS CLI and configure it with your IAM Access Keys.
Step 1: Install unzip (Linux or WSL)
1
sudo apt install unzip
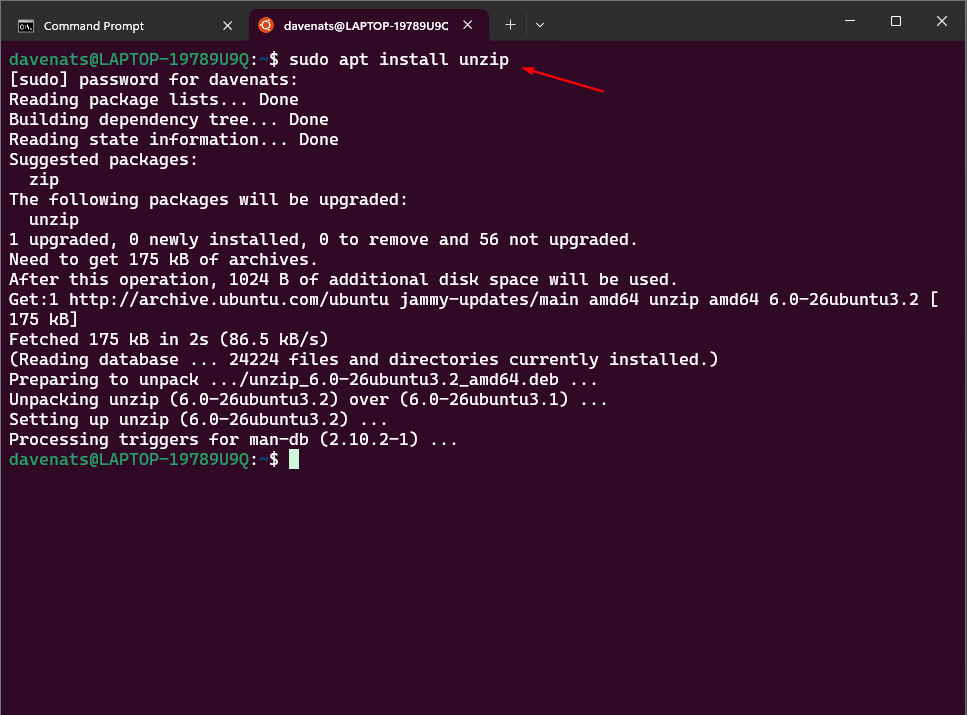
This command installs the unzip utility, which is required to extract the AWS CLI installation files.
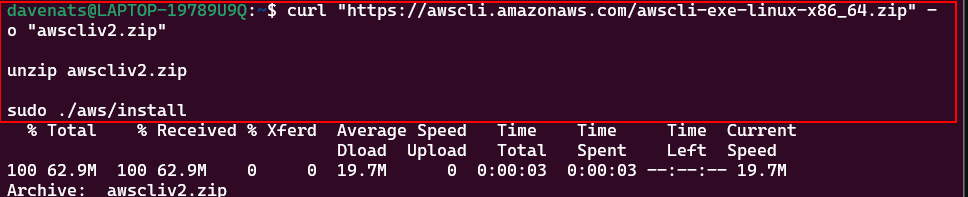
Step 2: Download and Install AWS CLI
1
2
3
4
5
curl "https://awscli.amazonaws.com/awscli-exe-linux-x86_64.zip" -o "awscliv2.zip"

unzip awscliv2.zip

sudo ./aws/install
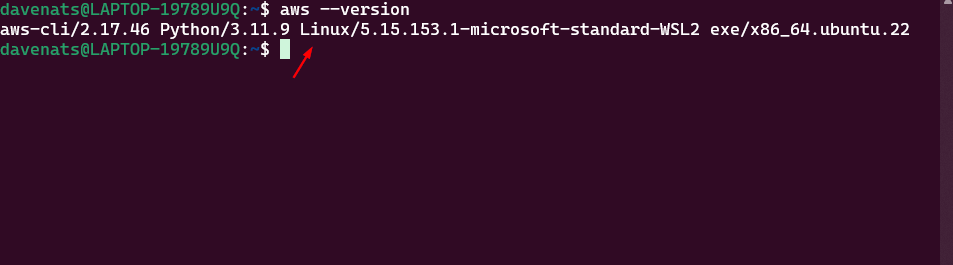
Step 3: Verify AWS CLI Installation
1
aws --version
Step 4: Configure AWS CLI with IAM Access Keys
1
aws configure
Upon running the command, you’ll be prompted to enter your credentials:
1
2
3
4
5
6
7
AWS Access Key ID [None]: YOUR_ACCESS_KEY_ID

AWS Secret Access Key [None]: YOUR_SECRET_ACCESS_KEY

Default region name [None]: [click enter]

Default output format [None]: [click enter]
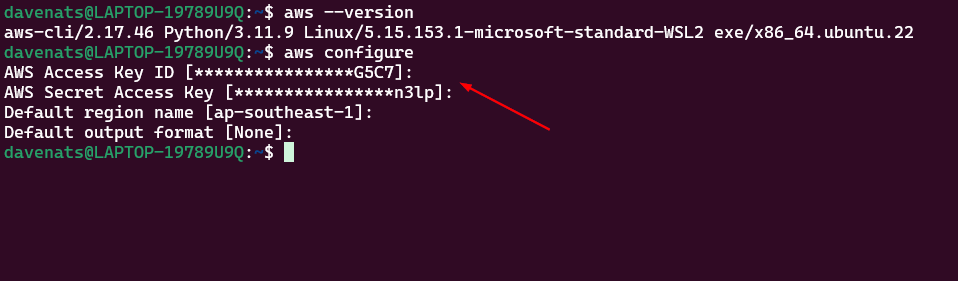
This sets up your default profile to authenticate your requests to AWS.
Creating an EC2 Instance Using AWS CLI
Once AWS CLI is configured, you’re ready to create an EC2 instance. Here’s how:
Step 1: Launch the EC2 Instance
1
2
3
4
5
6
aws ec2 run-instances \
    --image-id <ami-id> \
    --instance-type t2.micro \
    --key-name <your-key-pair> \
    --security-group-ids <your-security-group-id> \
    --tag-specifications 'ResourceType=instance,Tags=[{Key=Name,Value=<Instance Name>}]'
Use the following command to launch a t2.micro instance with the name ‘awscli-instance’, using the default security group and a key pair pemfile named ‘keypair’ that we made earlier (just replace the keypair name with your own). You can also omit the –key-name command if you dont want to put one:
image-id as: ami-0aa097a5c0d31430a This is the Amazon Linux 2023 AMI, the one we used earlier.
1
2
3
4
5
6
aws ec2 run-instances \
    --image-id ami-0aa097a5c0d31430a \
    --instance-type t2.micro \
    --key-name keypair \
    --security-group-ids default \
    --tag-specifications 'ResourceType=instance,Tags=[{Key=Name,Value=awscli-instance}]'
if you dont want to have a keypair, you can remove the –key-name command.
1
2
3
4
5
aws ec2 run-instances \
    --image-id ami-0aa097a5c0d31430a \
    --instance-type t2.micro \
    --security-group-ids default \
    --tag-specifications 'ResourceType=instance,Tags=[{Key=Name,Value=awscli-instance}]'
You will see the instance details after it is succesfully created.
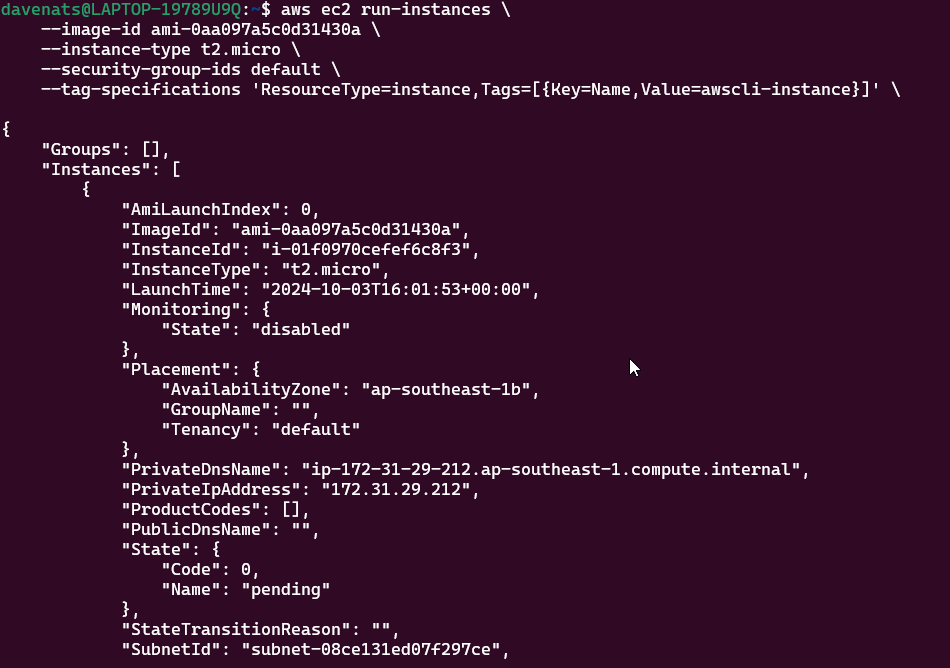
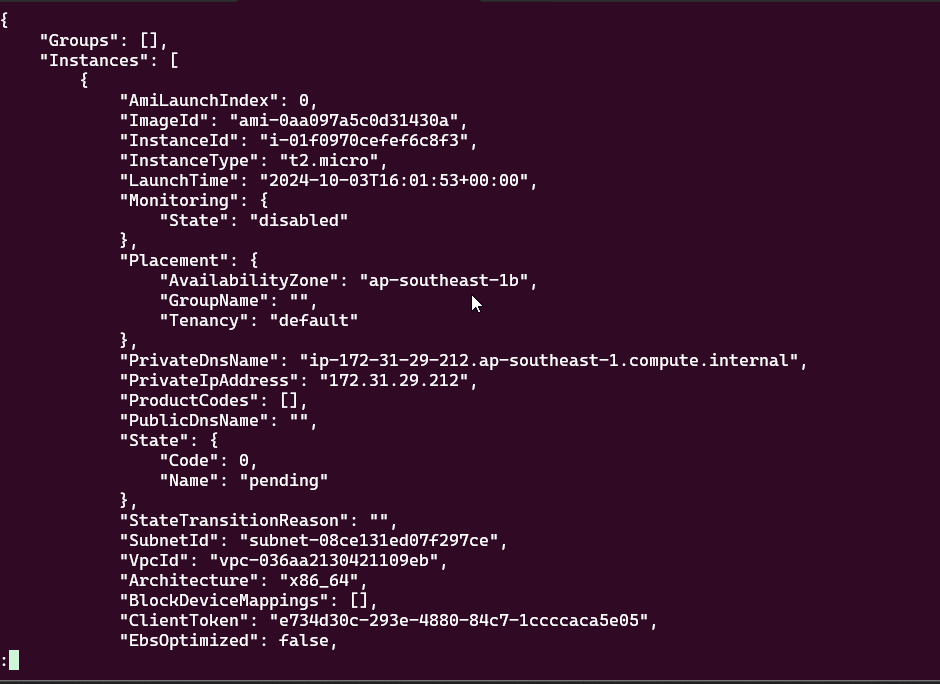
use q if you want to stop viewing the instance detail.
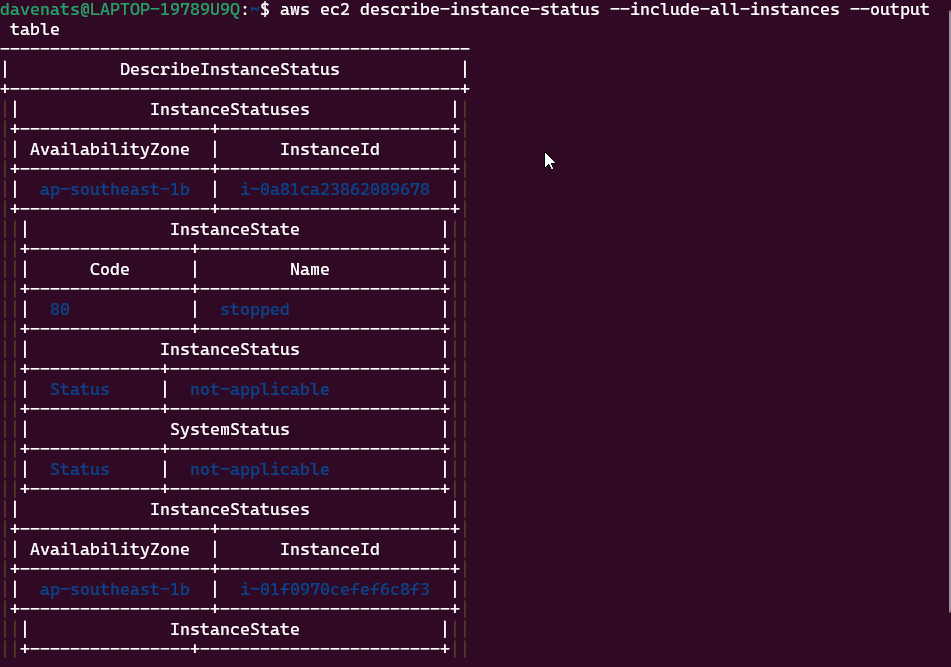
Step 2: Verify the status of the instance
This command will show all the instances in the region, including the status of the instance you just created in a table format.
1
aws ec2 describe-instance-status --include-all-instances --output table
or to view with the instance name
1
2
3
aws ec2 describe-instances \
    --query 'Reservations[*].Instances[*].[InstanceId, Tags[?Key==`Name`].Value]' \
    --output table
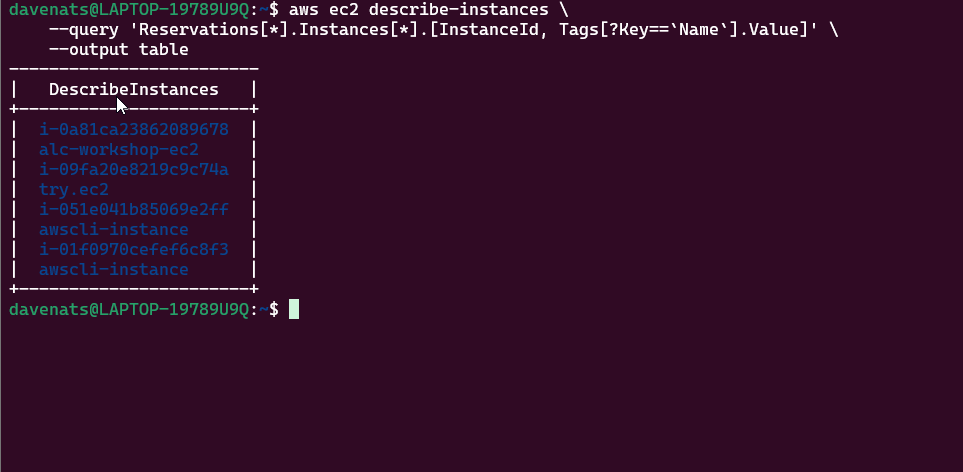
use q if you want to stop viewing the instances.
You can check the synopsis of all the query available here, or if you want to fully navigate EC2 commands using AWS CLI, you can check the official documentation here
All About Connecting to an Instance
An EC2 instance is a virtual server in Amazon’s Elastic Compute Cloud (EC2) that provides scalable compute capacity. It allows users to run applications, host websites, or perform any kind of computation in the cloud without the need for physical hardware. The instance operates much like a physical computer, but it’s managed and provisioned from the AWS platform. EC2 instances come with different configurations of CPU, memory, storage, and networking capacity, making them customizable for various workloads.
Why do we connect to an instance?
Connecting to an instance allows an access to a server in the cloud, allowing administrators and developers to manage, configure, and maintain the infrastructure remotely. By connecting, we can install and update software, troubleshoot issues, and monitor performance. It ensures that cloud-hosted services are secure and functions efficiently.
Secure Shell (SSH)
EC2 supports different methods for connecting to instances using SSH, including direct connections using an SSH client or browser-based SSH connections using EC2 Instance Connect. SSH is widely used for securely connecting to remote servers, particularly Linux-based systems. Additionally, every connection attempt via SSH is logged, making it easier to audit and track who accessed the instance. This is especially important in environments with multiple users and instances.
What is Key-pair?
A key pair is a set of two cryptographic keys—a public key and a private key—that work together to secure access to your Amazon EC2 instance.
It consists of:
Public Key - stored on the EC2 instance and can be shared publicly
Private Key - stored securely on your computer, ensuring that only authorize users can connect to the EC2 environment
These two keys work together to encrypt and decrypt data, enabling secure, password-free access to servers.
SSH and Key-Pair
SSH (Secure Shell) uses public-key cryptography, a method of encryption that relies on two mathematically linked keys, known as a key pair: a public key (shareable) and a private key (secret). In SSH, two separate key pairs are involved—user key pair (client) and host key pair (server)—each with its own public and private key. This dual setup enhances mutual authentication and ensures a secure SSH connection between the client and server.
How the Key Pairs Work in SSH
- User (Client-Side Authentication) Key Pair:
- Private Key: Stored securely on the user’s local machine. It is never transmitted or shared and is used to authenticate the user by digitally signing requests during the SSH handshake.
- Public Key: Shared with the server to allow authentication. It is used by the server to validate the user’s private key during authentication.
- Host (Server-Side Authentication) Key Pair:
- Private Key: Stored securely on the server. It is used to decrypt encrypted communications and is never exposed to the client.
- Public Key: Provided to users when they first connect to the server. SSH clients store this public key and use it to verify the server’s identity in future sessions.
SSH Handshake
The SSH Handshake is a foundational process in the SSH protocol that establishes a secure and authenticated connection between a client (your local machine) and a server (such as an EC2 instance). This handshake ensures that only trusted users and servers can access or communicate over the connection. It involves the use of key pairs, which play a crucial role in both authentication and encryption during the process. The client uses its private key to authenticate itself to the server, while the server presents its public key to verify its identity.
Benefits
- Security - The SSH handshake establishes key parameters, such as encryption algorithms, to ensure effective data exchange between the client and the server.
- Synchronization - Ensures that both the client and server are ready to communicate securely, preventing issues such as data being sent too quickly or at an inappropriate time, which can disrupt the connection.
- Error Identification - The handshake detects potential errors before establishing a secure connection, preventing data corruption.
- Setting Communication Parameters - The SSH handshake establishes key parameters, such as encryption algorithms, to ensure effective data exchange.
4 Method of Connecting to an Instance
There are 4 ways of connecting to an instance. Amazon EC2 offers various methods for connecting to instances depending on the operating system of the instance and the user’s needs. Each of these ways has distinct use cases, security mechanisms, and platform compatibility.
- EC2 Instance Connect
- SSH Client
- Remote Desktop Protocol (RDP)
- Session Manager
In this workshop, let us discuss the first three ways to connect to an instance.
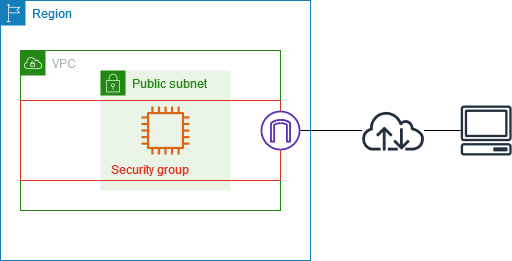
Method 1: EC2 Instance Connect
Connecting via EC2 Instance Connect is a feature that enables a secure connection to your Linux instances over SSH. EC2 Instance Connect allows you to connect to your instance directly through your browser. It refers to the feature in Amazon Web Services (AWS) that enables users to connect to their EC2 instances using SSH through the AWS Management Console, without the need for a standalone SSH client. It allows you to use AWS Identity and Access Management (IAM) policies and users to control SSH access without needing to share or manage SSH keys.
Prerequisites for installing and using EC2 Instance Connect:
- EC2 Instance Connect Package: Ensure the EC2 Instance Connect package is installed on your EC2 instance.
- Network Accessibility: Confirm that your instance is accessible over the network.
- SSH Traffic Configuration: Adjust security group settings to allow incoming SSH traffic (TCP on port 22).
- User Permissions: Make sure your IAM user has the necessary permissions to utilize EC2 Instance Connect.
- Correct Username: Use the appropriate username based on the Linux distribution of your EC2 instance.
Here are some of the usernames:
- Ubuntu: ubuntu
- Amazon Linux: ec2-user
- CentOS: root, centos or ec2-user
- Debian: admin
- Fedora: fedora or ec2-user
- RHEL (Red Hat Enterprise Linux): ec2-user or root
- SUSE: ec2-user or root
- Oracle: ec2-user
- Bitnami: bitnami
- Rocky Linux: rocky
- Others
Method 2: SSH Client
Connecting to an instance through SSH Client involves using encryption and key-pair authentication when connecting to EC2 Linux instances. This method enables us to associate with key pair.
Prerequisites for Connecting EC2 Instance Using SSH
- SSH Key (.pem file): A private key used for authenticating your identity when connecting to the EC2 instance.
- IP Address: The public address assigned to the EC2 instance, required to direct the SSH client to the correct server.
- Username: The default login name for the specific Linux distribution on the instance, necessary for authentication.
Some SSH Usernames:
- Ubuntu: ubuntu
- Amazon Linux: ec2-user
- CentOS: centos
- BitNami: bitnami
- NanoStack: ubuntu
- Others
Method 3: Remote Desktop Protocol (RDP)
Remote Desktop Protocol (RDP) enables multiple users to connect to a window instances. Users can have separate sessions on the same server, allowing them to run different applications, access different files, and have their own desktop environments without interfering with each other’s work.
Prerequisite for Connecting Instance using RDP
- RDP Client: Install an RDP client (e.g., mstsc for Windows, Microsoft Remote Desktop for macOS, Remmina for Linux).
- Instance Details: Have the IP address or hostname of the instance.
- Network Configuration: Allow inbound RDP traffic on TCP port 3389 in your firewall/security group.
- Instance Status: Ensure the instance is running and has passed status checks.
- Credentials: Obtain the administrator password or domain credentials.
- Public IP Address: Ensure the instance has a public IP if connecting over the internet.
- Authentication: Set up any required authentication methods (e.g., IAM permissions).
Connecting to your instance
After launching your EC2 instance, follow these steps to connect:
1. Start by Clicking the Instance ID

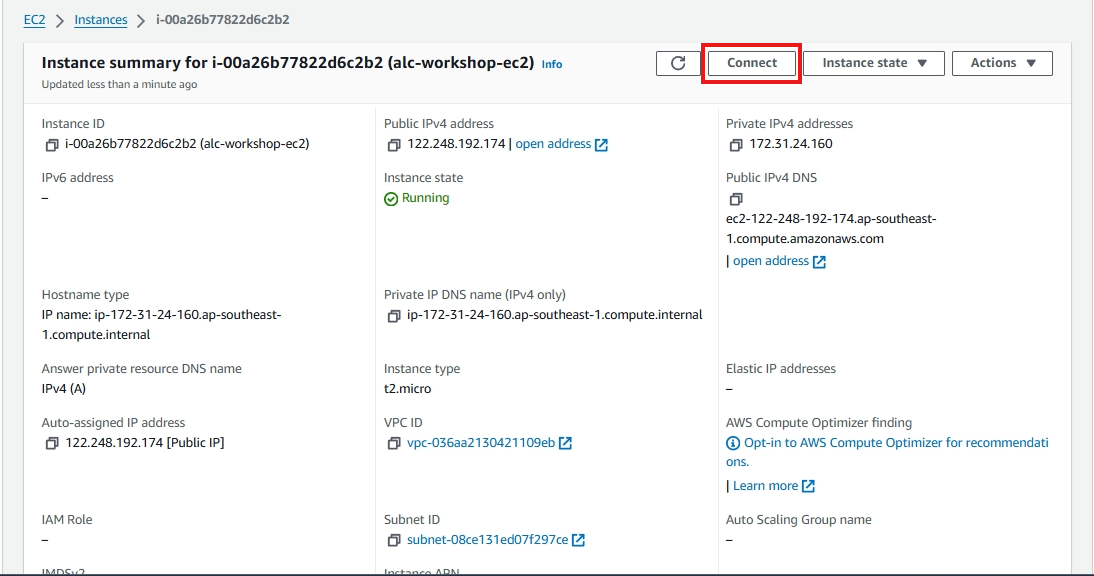
2. Access Instance Details
After selecting your instance, you’ll see all the details pertaining to it. To connect to your instance, click the Connect button on the upper right-hand corner of the page.
3. Choose a Connection Method
There are four primary ways to connect to your instance:
- EC2 Instance Connect
- SSH Client
- Remote Desktop Protocol (RDP) - for Windows instances only.
- Session Manager
Let’s do the first 3 methods for this workshop.
Method 1: EC2 Instance Connect
EC2 Instance Connect allows you to connect to your instance directly through your browser.
- Select EC2 Instance Connect as the connection method.
- Use the Public IPv4 address of your instance.
- Make sure your username is set to the default (
ec2-userfor Amazon Linux,ubuntufor Ubuntu). - Click Connect.
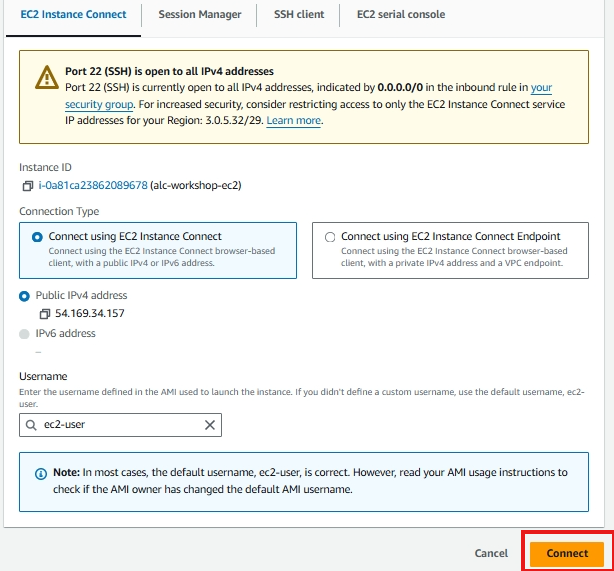
This will open a browser-based CLI that allows you to interact with your instance without needing an SSH key pair.

Method 2: SSH Client
Using an SSH Client is one of the most common ways to connect to an EC2 instance, especially for Linux-based instances.
- Make sure you have an SSH key pair created during the instance launch.
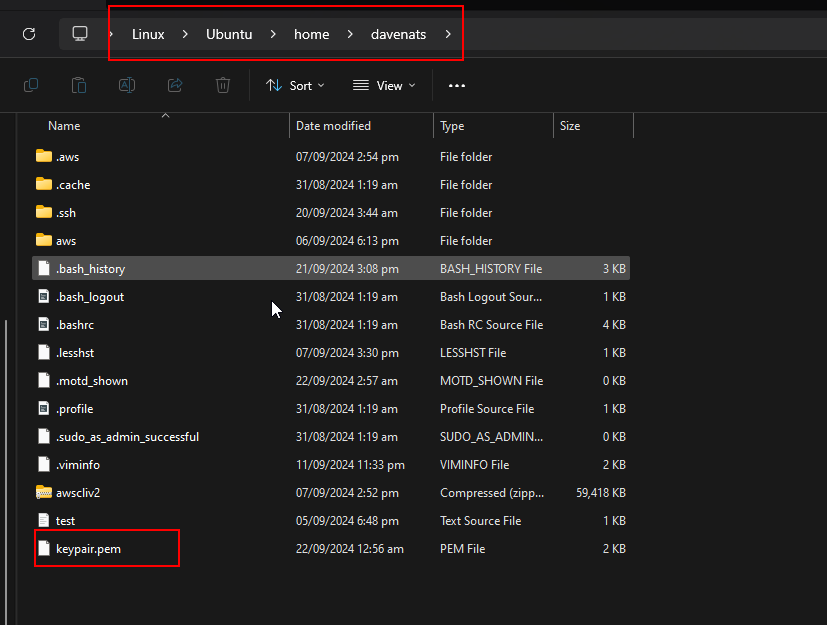
- Download the
.pemprivate key file if you haven’t already. - Get the location of your
.pem. If you let it download by itself. It is probably in yourDownloadsfolder.
Copy the pem file to your home > user folder.
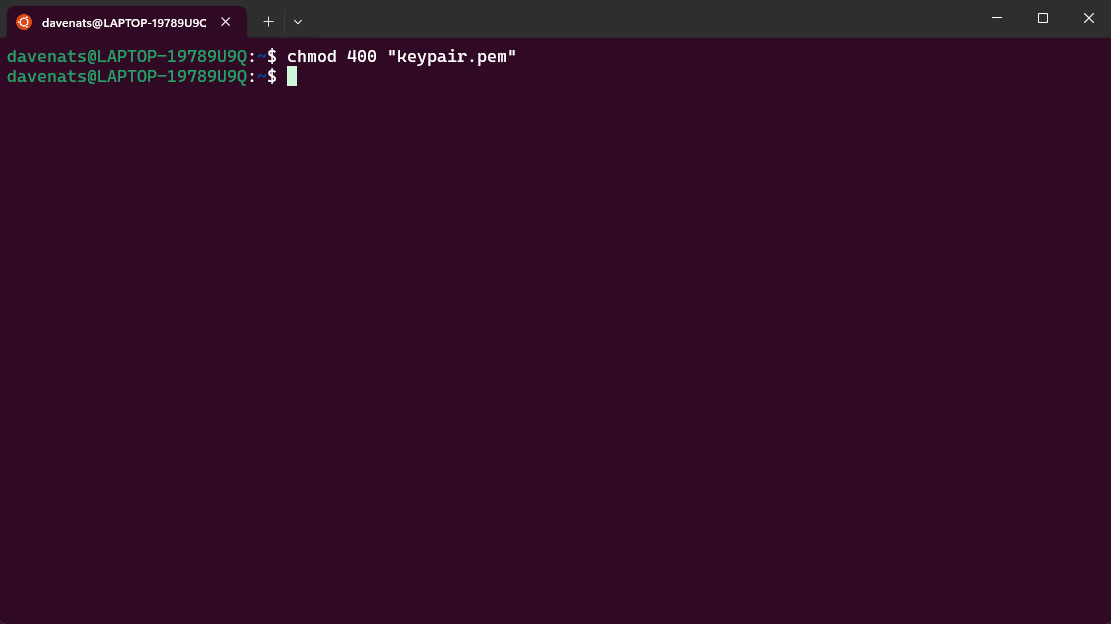
Do this command to make the pem file secure. This will prevent unauthorized access to the file by making it read only.
chmod 400 "keypair.pem"
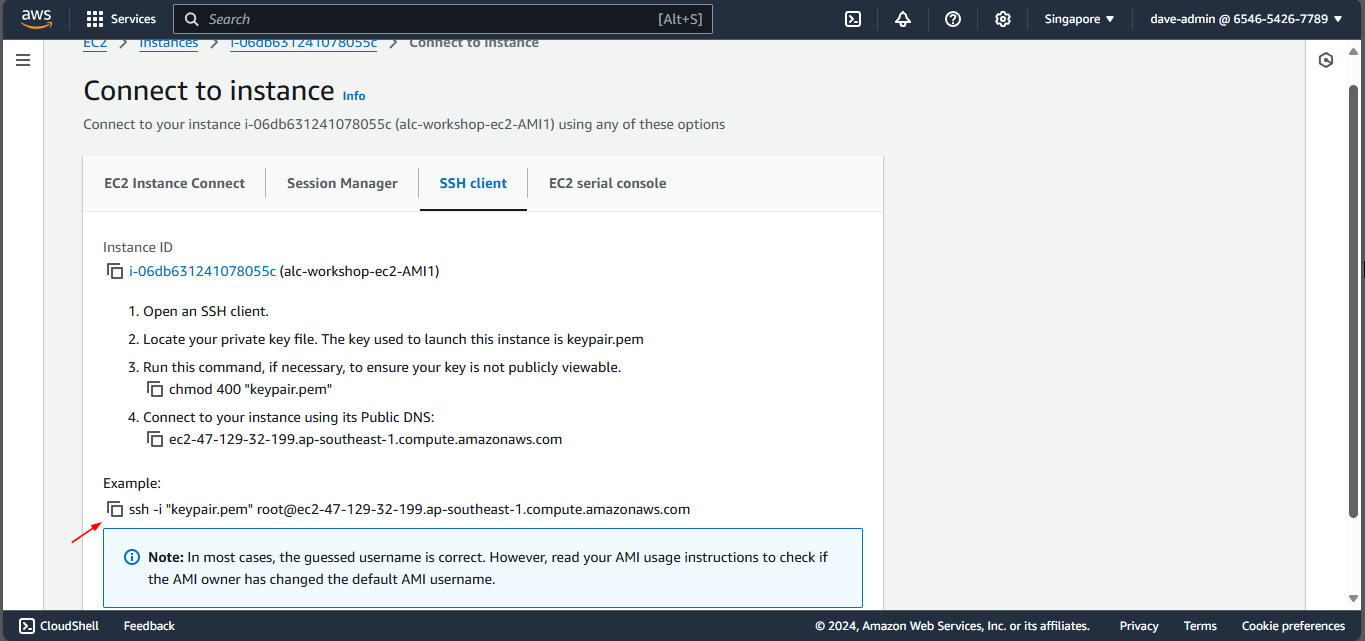
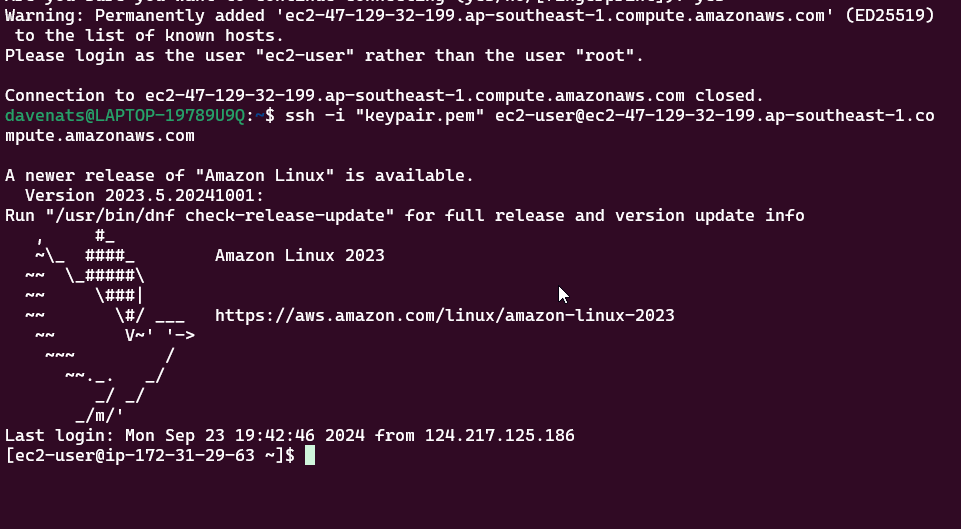
Lets connect to our instance, do ssh -i keypair.pem ec2-user@<your-instance-public-ip>. Replace your-instance-public-ip with the Public IPv4 address of your instance.
Or we can just simply copy the command from the AWS console.
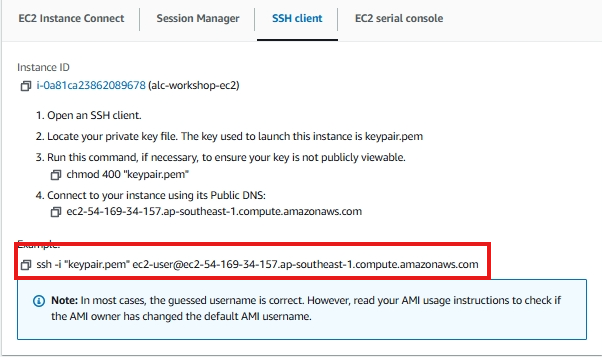
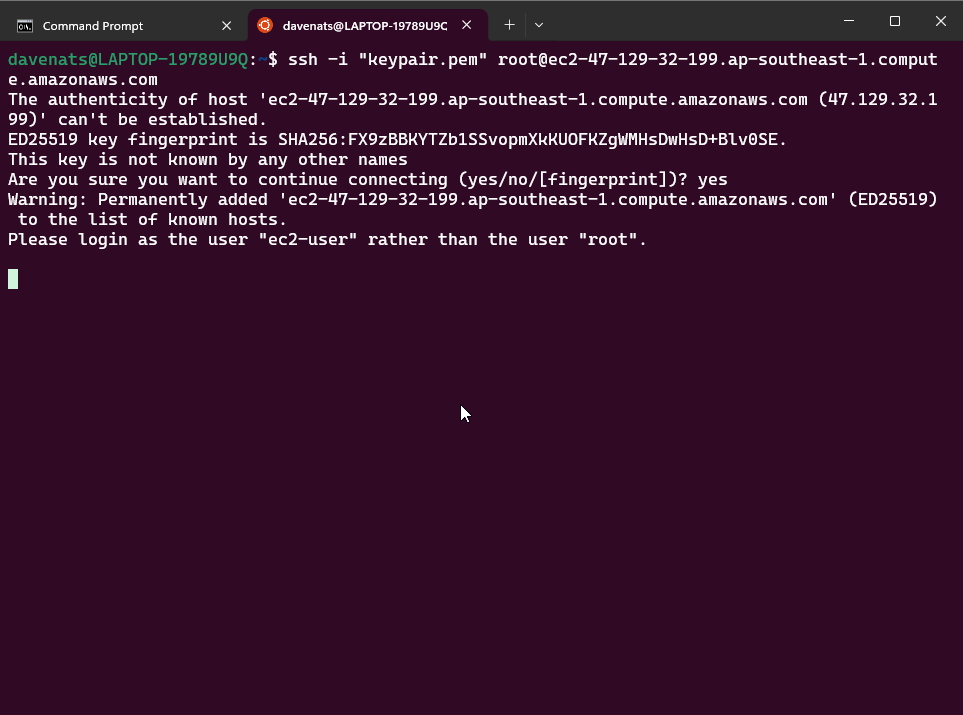
Paste it on your terminal and press enter. Just choose yes as the answer to the prompt.
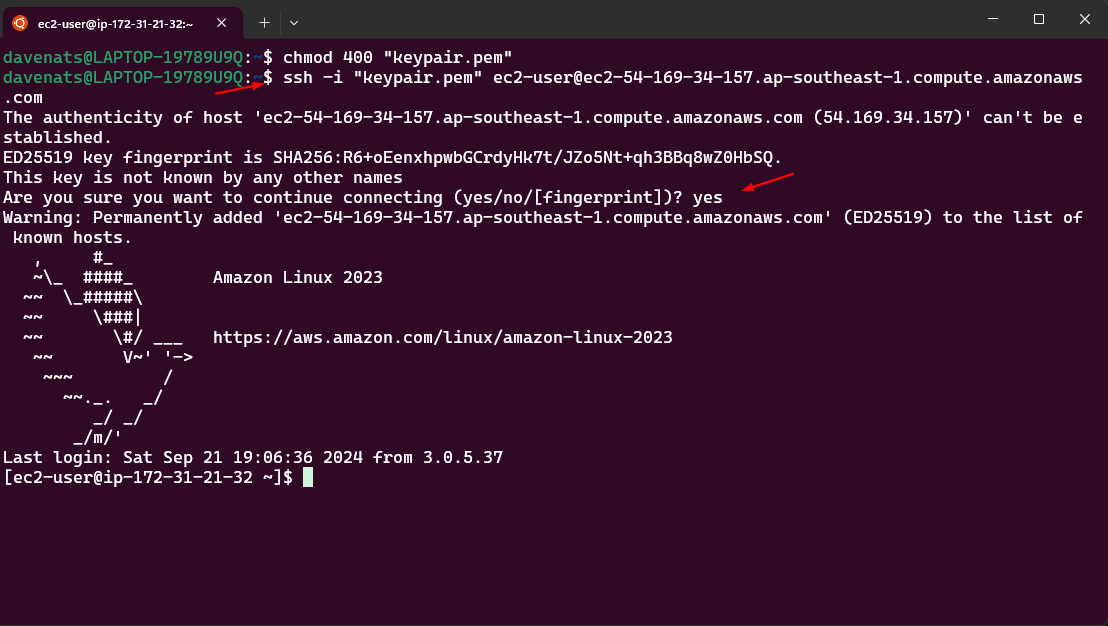
You are now connected to your instance using SSH Client.
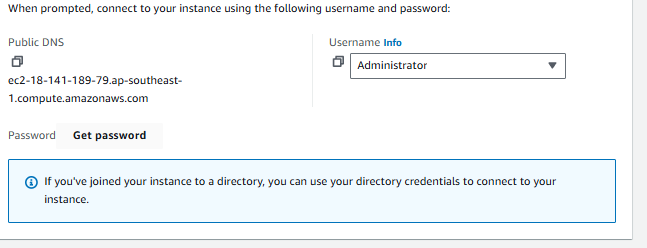
Method 3: Remote Desktop Protocol (RDP) (For Windows Instances Only)
RDP is used to connect to Windows instances. Follow these steps to use RDP:
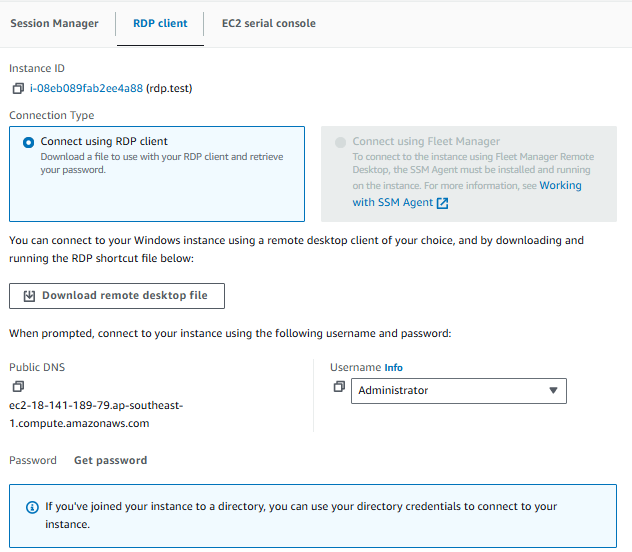
- Click on the Connect button at the top of the instance details page.
- Select the RDP Client tab.
- Click on Get Password.
- Click Browse and select your
.pemfile (the key pair you created). Then click Decrypt Password.
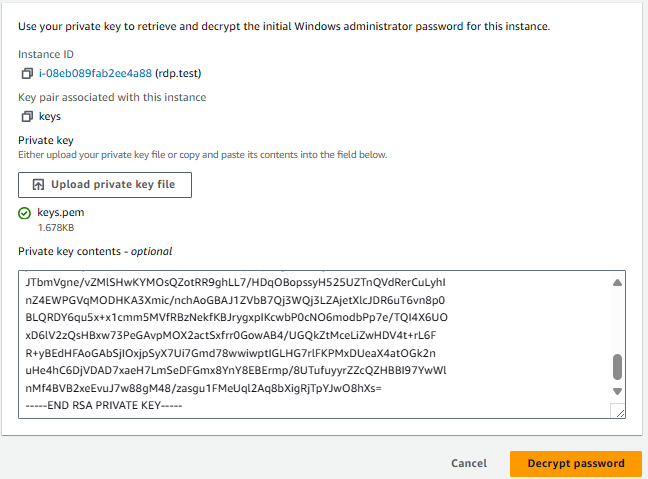
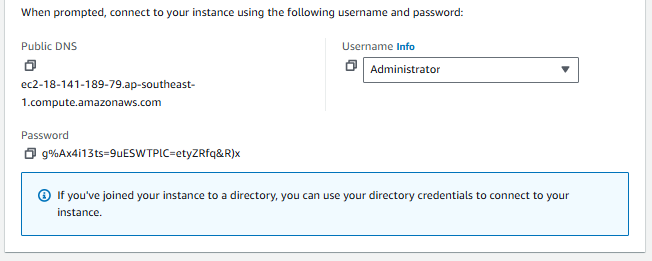
- Note the Administrator password that is displayed. Lets copy that.
- Still in the RDP Client tab, click on Download Remote Desktop File. This will download an
.rdpfile to your local machine.
- Locate the downloaded
.rdpfile on your computer and double-click it. This will open the Remote Desktop Connection application.
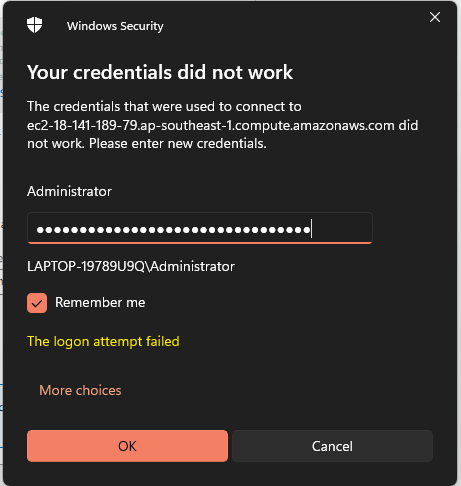
There will be a prompt after that, just click connect.

- Enter the administrator password you copied earlier. The username is
Administrator. Click OK to connect.
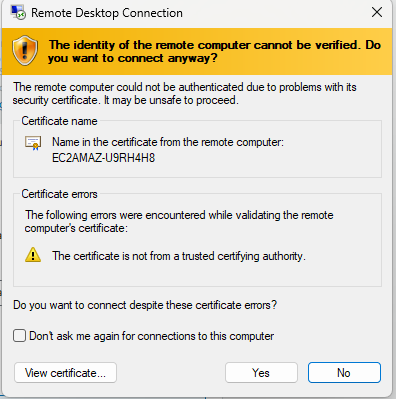
- You may receive a warning about the identity of the remote computer. Check the box to not be prompted again (if you wish) and click Yes to continue.
Congratulations! You are now connected to your Windows EC2 instance via RDP. You can now use it as you would a local Windows machine.

You can now connect to your EC2 instance using one of the above methods. Whether through a browser, SSH client, or RDP, AWS provides flexibility based on your needs and the instance’s operating system.
Security Groups: Managing traffic with firewalls.
What is a Security Group?
A Security Group in AWS functions as a virtual firewall for your EC2 instances. It controls the inbound and outbound traffic to and from your instances. Essentially, it is a set of rules that define the allowed traffic based on IP addresses, port numbers, and protocols. Security groups are pivotal in ensuring that only legitimate traffic reaches your instances, thereby protecting them from unauthorized access and potential threats.
Role of Security Groups in EC2 Instances
When you launch an EC2 instance, you can associate it with one or more security groups. These groups play an important role in managing the traffic flow:
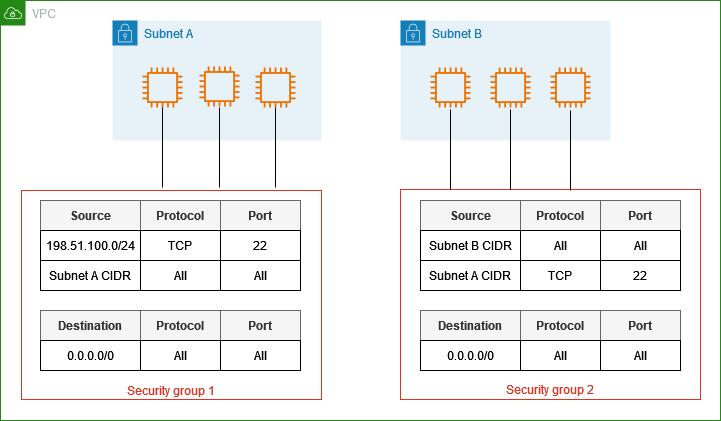
1. Inbound Rules: These rules control the incoming traffic to your instance. For example, you can allow SSH traffic (port 22) from a specific IP address or range, enabling secure remote access to your instance. This ensures that only trusted sources can connect to your instance, reducing the risk of unauthorized access.
2. Outbound Rules: These rules manage the outgoing traffic from your instance. By default, all outbound traffic is allowed, but you can restrict it based on your security requirements. For instance, you might want to allow outbound traffic only to specific IP ranges or ports to prevent data exfiltration.
3. Stateful Nature: Security groups are stateful, meaning if you send a request from your instance, the response traffic for that request is automatically allowed to flow in, regardless of inbound rules. Similarly, responses to allowed inbound traffic are allowed to flow out. This stateful behavior simplifies the management of traffic rules, as you don’t need to create separate rules for response traffic.
4. Dynamic Updates: You can modify the rules of a security group at any time, and the changes are automatically applied to all associated instances. This flexibility allows you to adapt to changing security needs without downtime. For example, if you need to open a new port for a temporary service, you can update the security group and the change will take effect immediately.
Best Practices for Using Security Groups
To maximize the effectiveness of security groups, consider the following best practices: Least Privilege Principle: Only allow the minimum necessary traffic. For instance, if only HTTP and HTTPS traffic is needed, restrict the security group to allow traffic only on ports 80 and 443. This minimizes the attack surface and reduces the risk of unauthorized access.
Regular Audits: Periodically review and update your security group rules to ensure they meet your current security requirements. Over time, your security needs may change, and regular audits help ensure that your security groups remain effective.
Use Descriptive Names: Name your security groups and rules descriptively to easily understand their purpose and scope. For example, instead of naming a security group “sg-12345”, name it “web-server-sg” to indicate that it is used for web servers.
Segmentation: Use different security groups for different types of instances or applications. This segmentation helps isolate different parts of your infrastructure and limits the impact of a potential security breach.
Logging and Monitoring: Enable logging and monitoring to track the traffic allowed or denied by your security groups. AWS provides tools like VPC Flow Logs and CloudWatch to help you monitor and analyze traffic patterns.
Understanding IP Addresses in Security Groups
IP addresses play a crucial role in security groups by defining the sources and destinations of allowed traffic:
Source IP Address: In inbound rules, the source IP address specifies where the incoming traffic is coming from. For example, allowing traffic from 0.0.0.0/0 means accepting traffic from any IP address.
Destination IP Address: In outbound rules, the destination IP address specifies where the outgoing traffic is going. You can restrict outbound traffic to specific IP ranges to enhance security.
By carefully configuring these IP addresses in your security group rules, you can control access to your EC2 instances and protect your applications from unauthorized access.
Apache Web Server Setup on EC2 instace
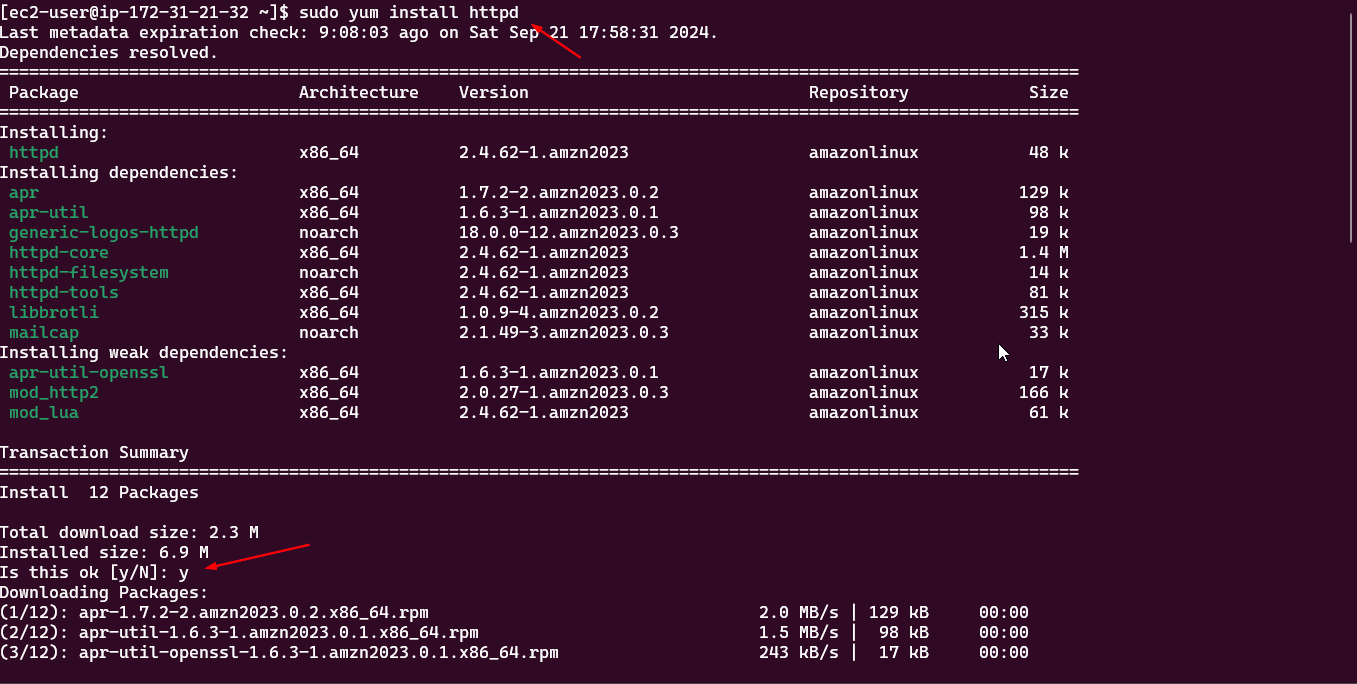
1. Install the Apache Web Server
Apache is an open-source web server that processes HTTP requests and serves web content. Run the following command to install Apache:
1
sudo yum install httpd
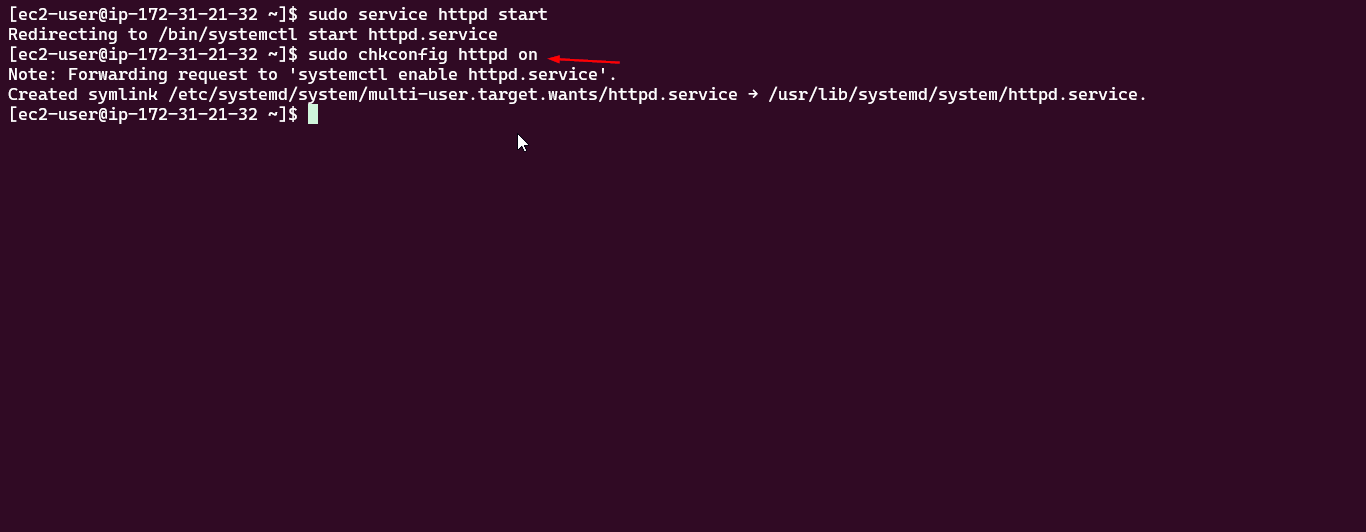
2. Start the HTTPD Service
The following command starts the Apache (httpd) service, allowing the web server to handle incoming requests:
1
sudo service httpd start

3. Enable Apache to Start on Boot
To ensure Apache starts automatically during system boot, run the following command:
1
sudo chkconfig httpd on
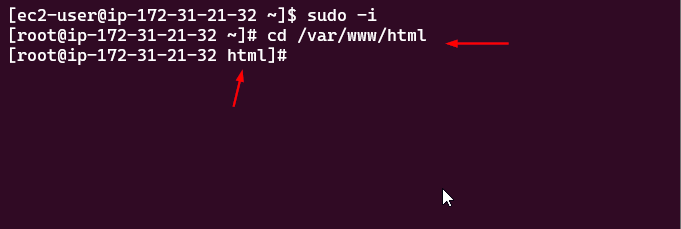
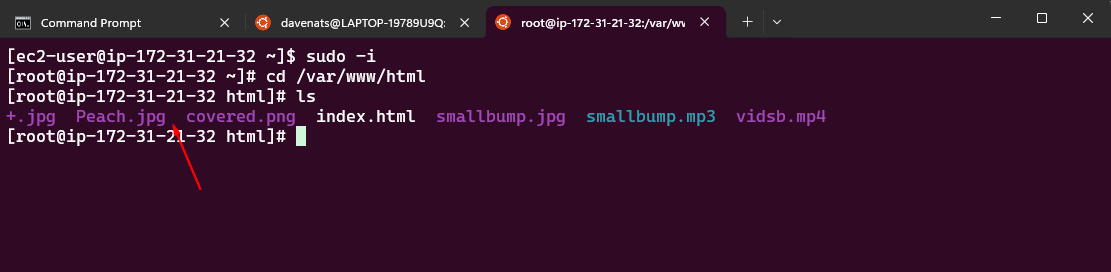
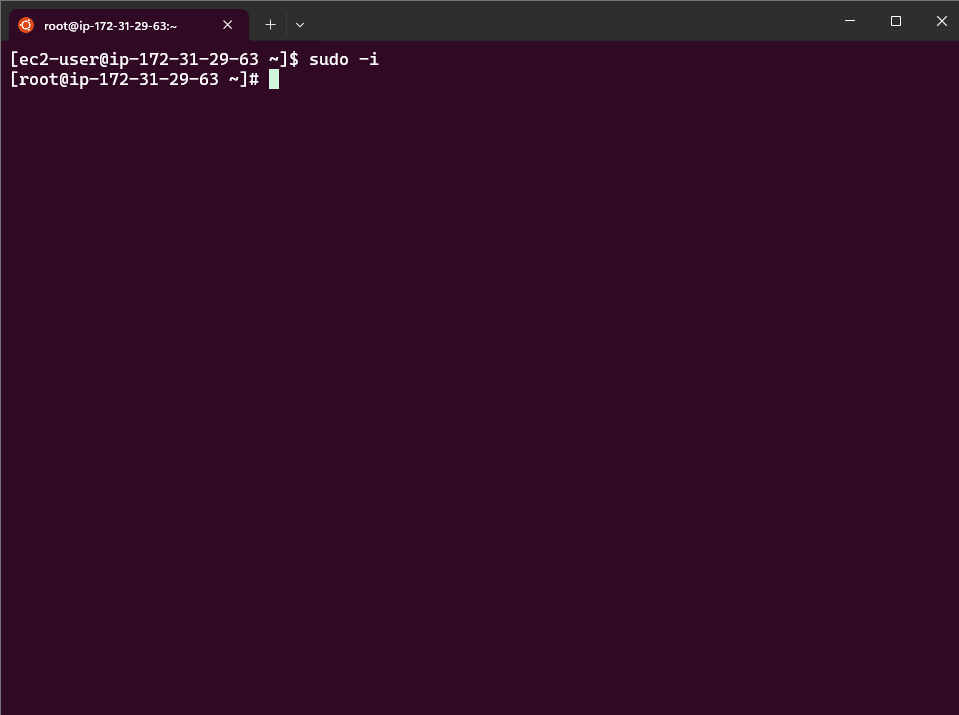
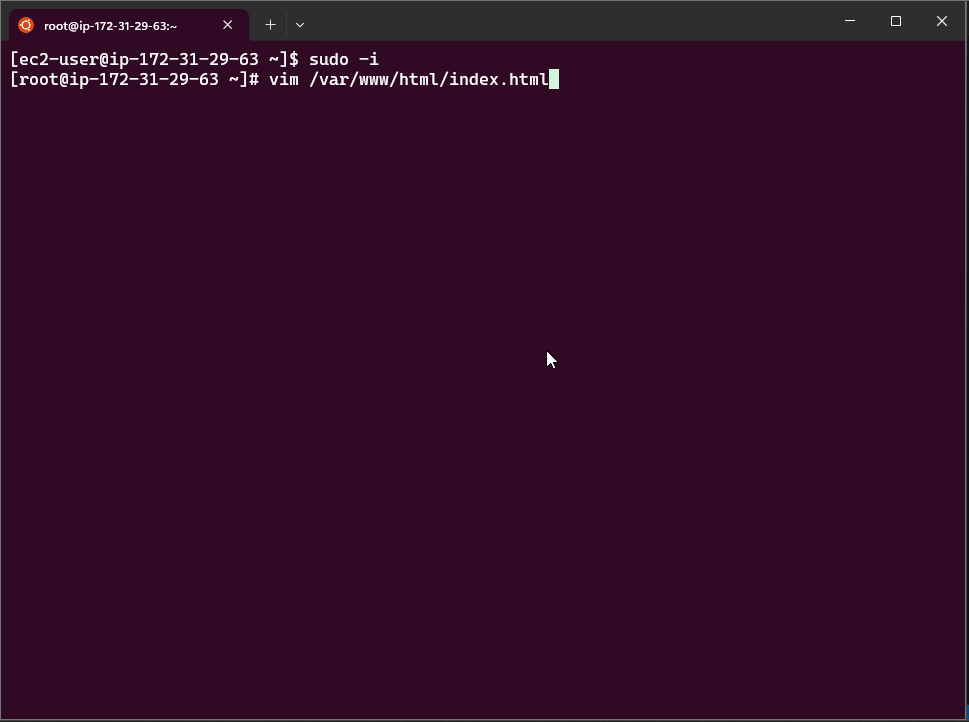
4. Switch to Root User
The command sudo -i allows a user to switch to the root user (the superuser) with full administrative privileges:
1
sudo -i

5. Navigate to the Apache Web Directory
Navigate to the directory where Apache will look for the index.html file (the default directory):
1
cd /var/www/html
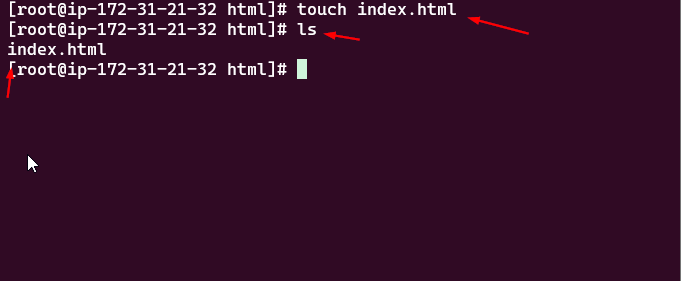
6. Create an index.html Page
Create a simple index.html file:
1
touch index.html
Verify the file exists by listing the directory contents:
1
ls
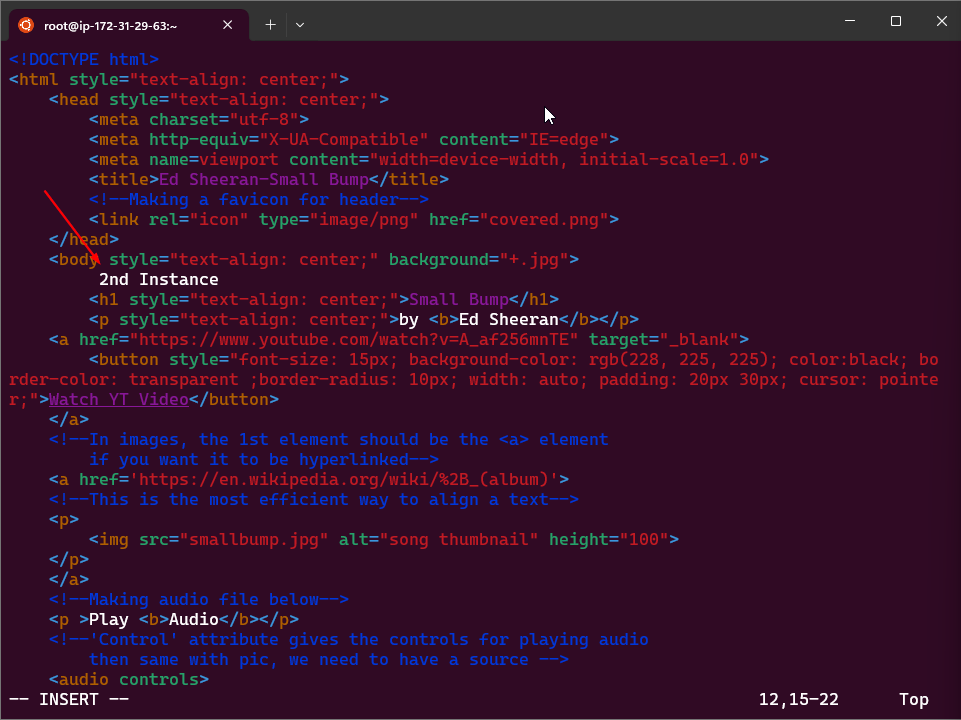
7. Edit the index.html File
Use vim or nano to add content to the index.html file:
1
2
3
vim index.html
# or
nano index.html
For vim: Press i to enter insert mode and enter the following content:
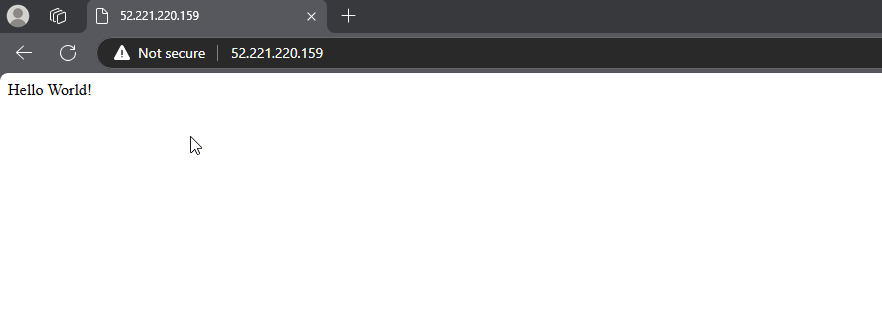
1
Hello World!

Save and exit the editor by pressing Esc, typing :wq, and pressing Enter.
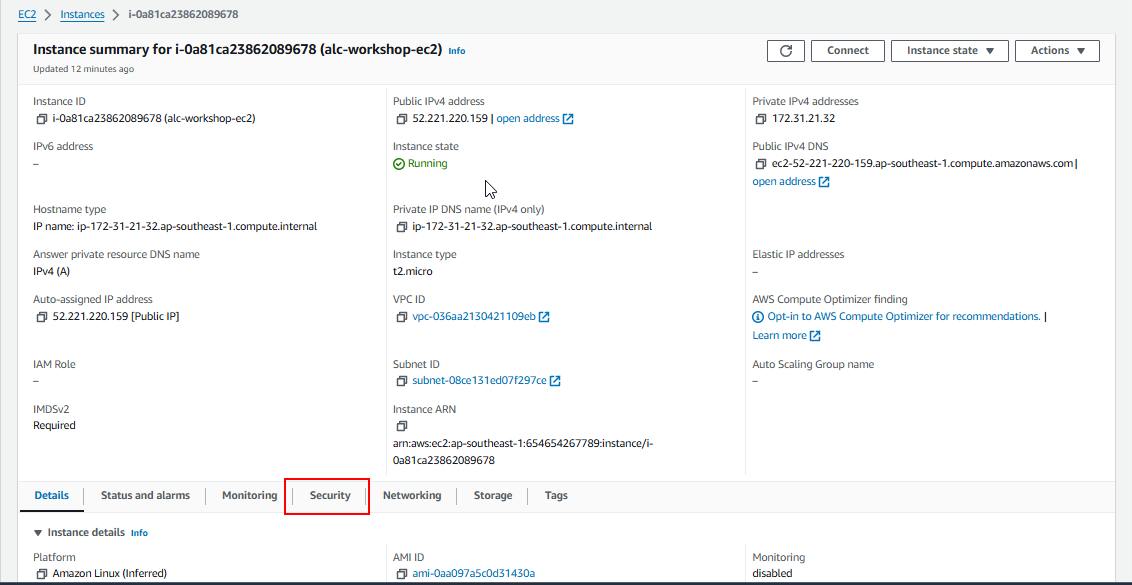
8. Find Your Instance Public IPv4 Address
In the AWS EC2 console, click the instance ID to find its details. Copy the Public IPv4 address.
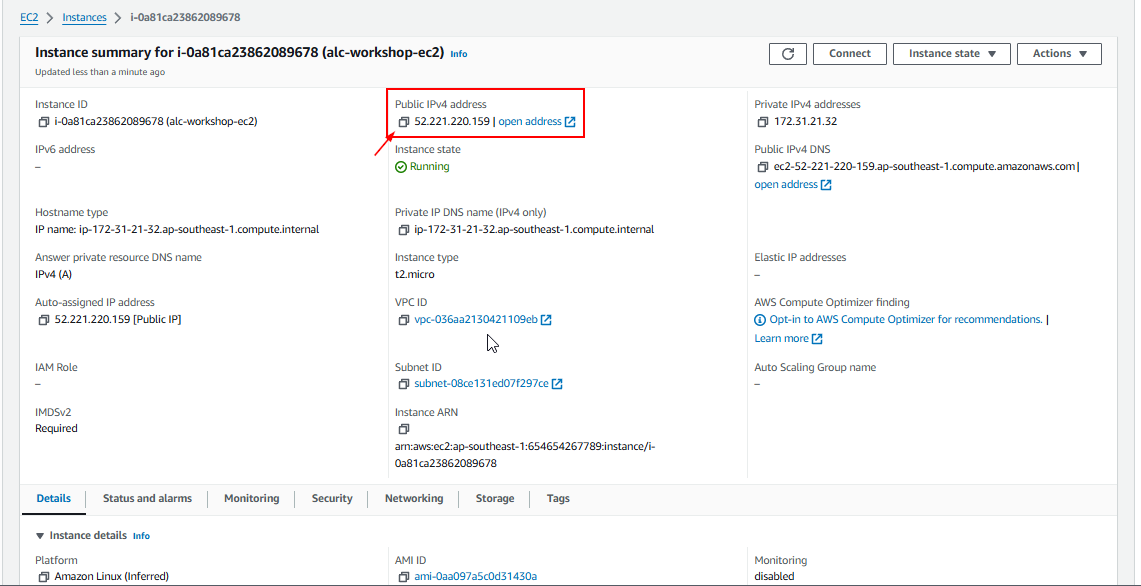
9. Test the Web Server
Open a browser and navigate to:
1
http://<your-public-ipv4-address>
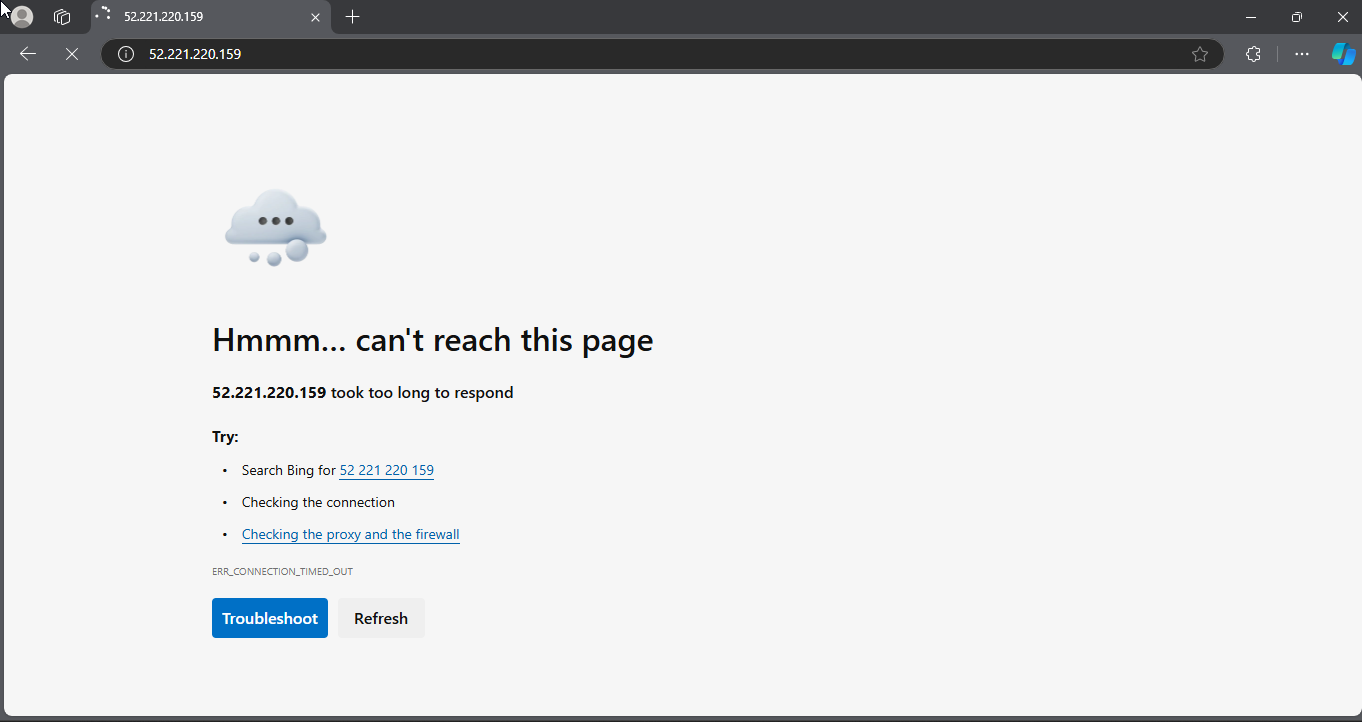
If the website is not accessible, this means that there is a problem with our security group settings. We need to modify the security group settings to allow incoming traffic on port 80 (HTTP).
10. Modify Security Group Settings
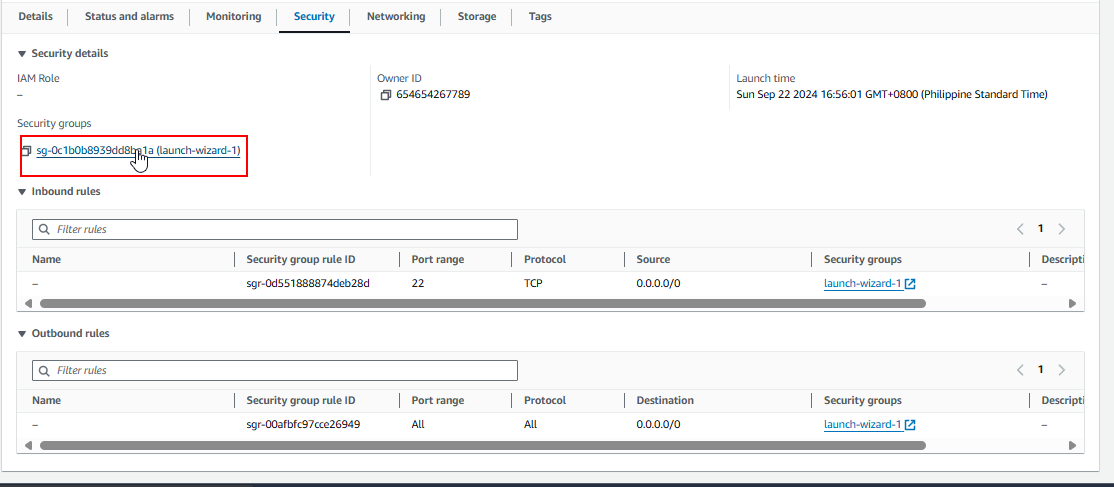
Scroll down to the “Security” section, and click on your security group.
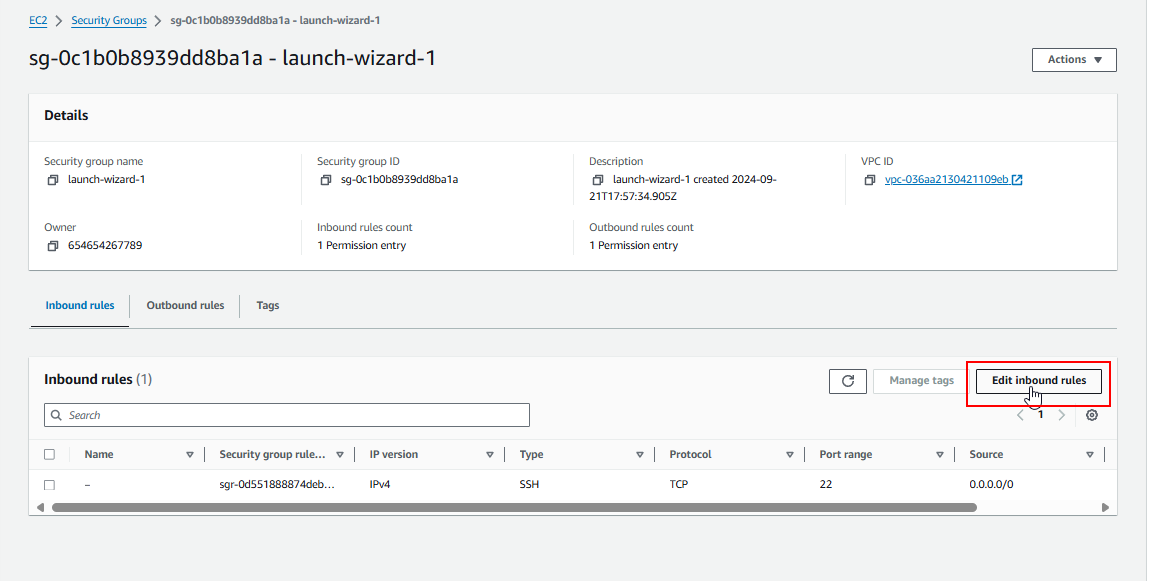
11. Edit Inbound Rules
Click Edit Inbound Rules to control incoming traffic to your server.
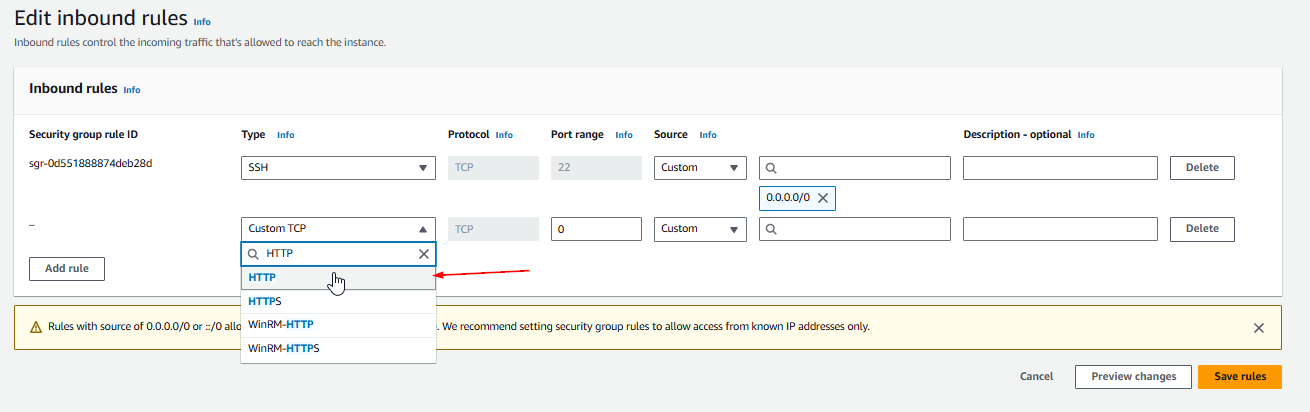
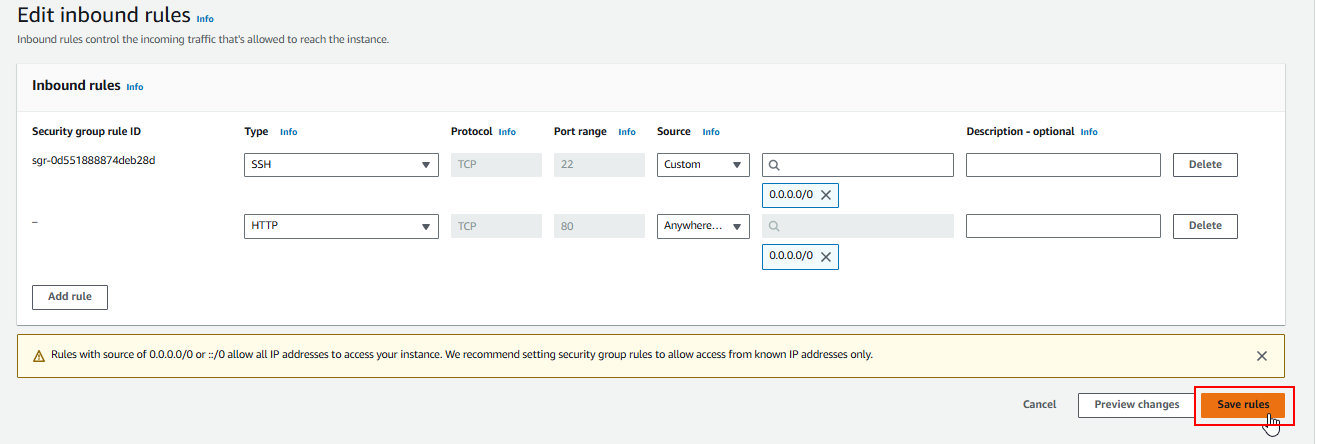
12. Allow Incoming Traffic on Port 80
Add a rule to allow incoming traffic on port 80 (HTTP). Ensure that traffic is allowed from any IP address (making it publicly accessible over the web).
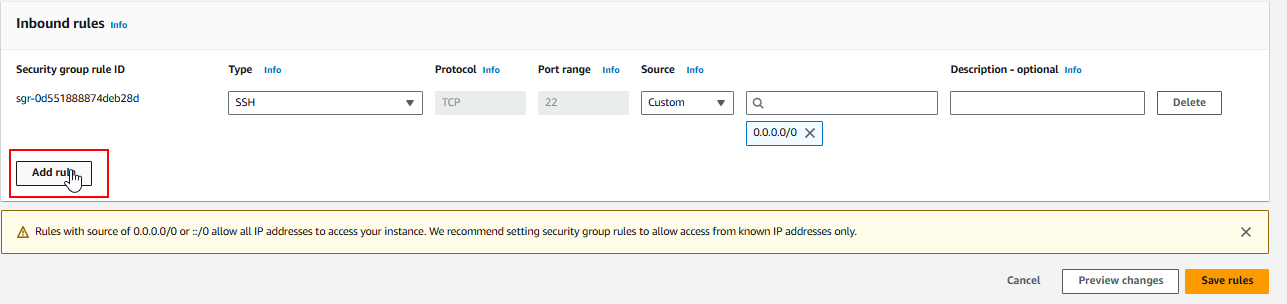

Save the changes.
12.1 Configuring Security Group using AWS CLI
-
Describe the Security Group:
-
Run the following command to describe the security group:
1
2
3
 ```bash
 aws ec2 describe-security-groups
 ```
Find the security group ID that you want to modify. In our case, the security group name is
launch-wizard-1.
-
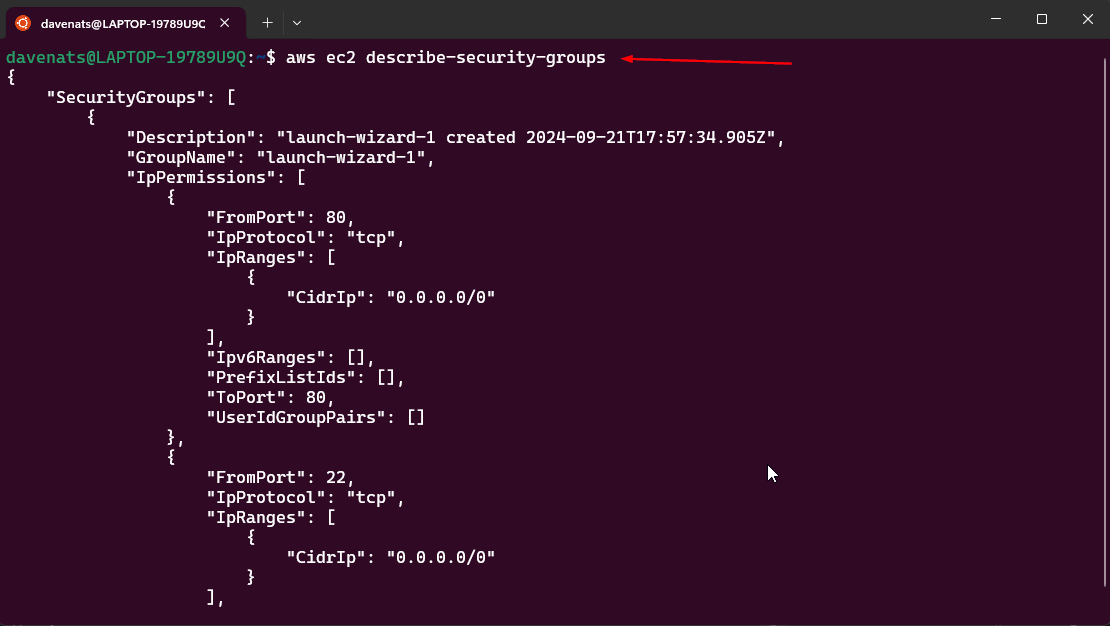
As you can see it already had permission to part 80 and port 22. Those are for HTTP and SSH respectively.
Find its security group ID, which is in my case is sg-0c1b0b8939dd8ba1a.
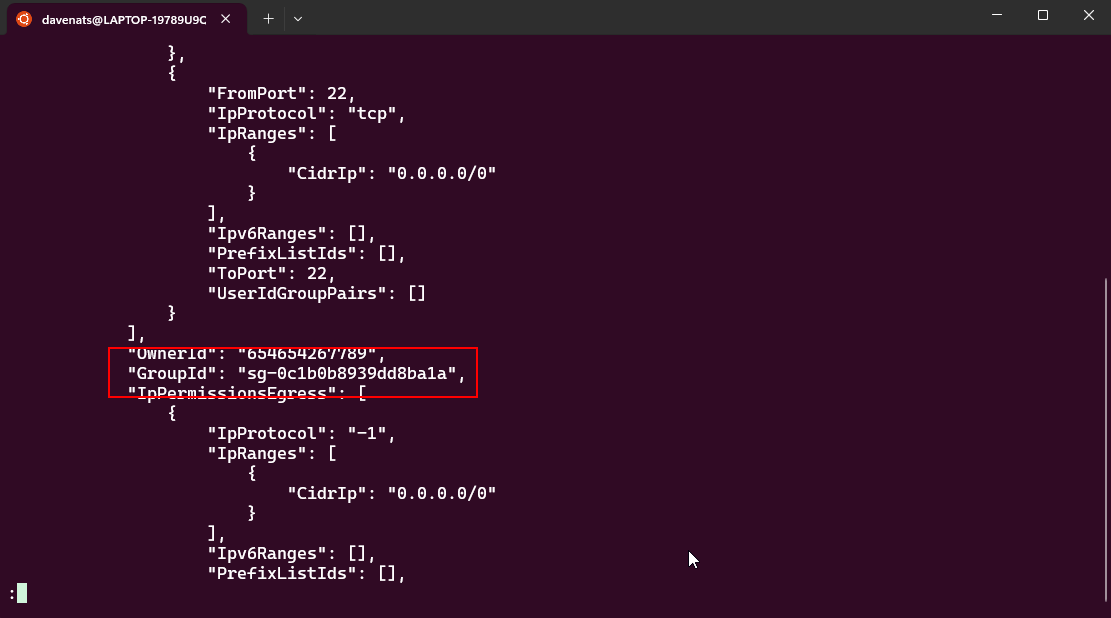
copy this to a text file for later use.
press q to exit the output.
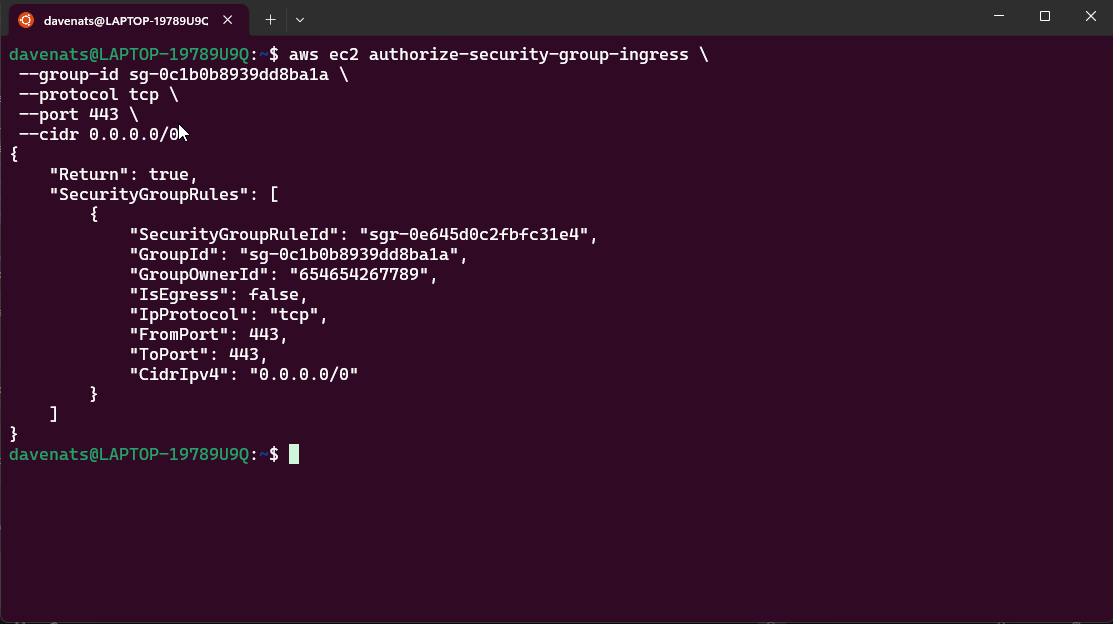
- Update the Security Group:
- What if we want to add a new inbound rule for HTTPS (port 443)? Run the following command:
1
2
3
4
5
aws ec2 authorize-security-group-ingress \
 --group-id <your-security-groupID> \
 --protocol tcp \
 --port 443 \
 --cidr 0.0.0.0/0
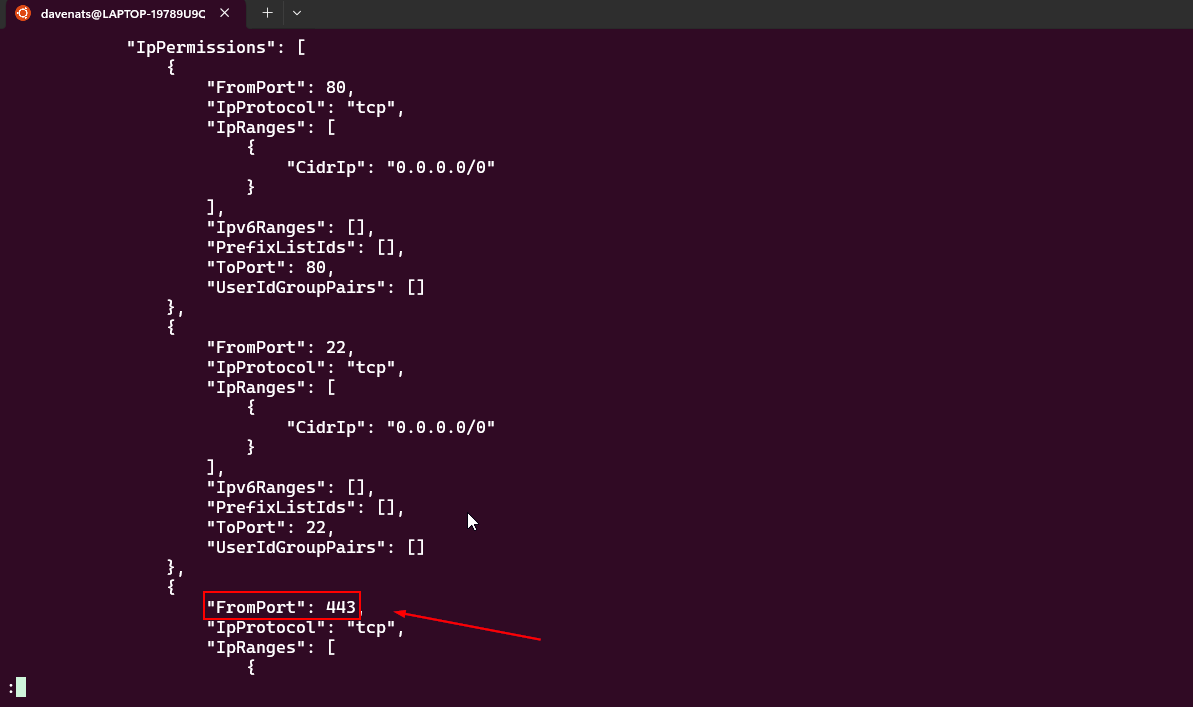
-
Verify the Changes:
-
Run the following command to verify the changes:
1
aws ec2 describe-security-groups
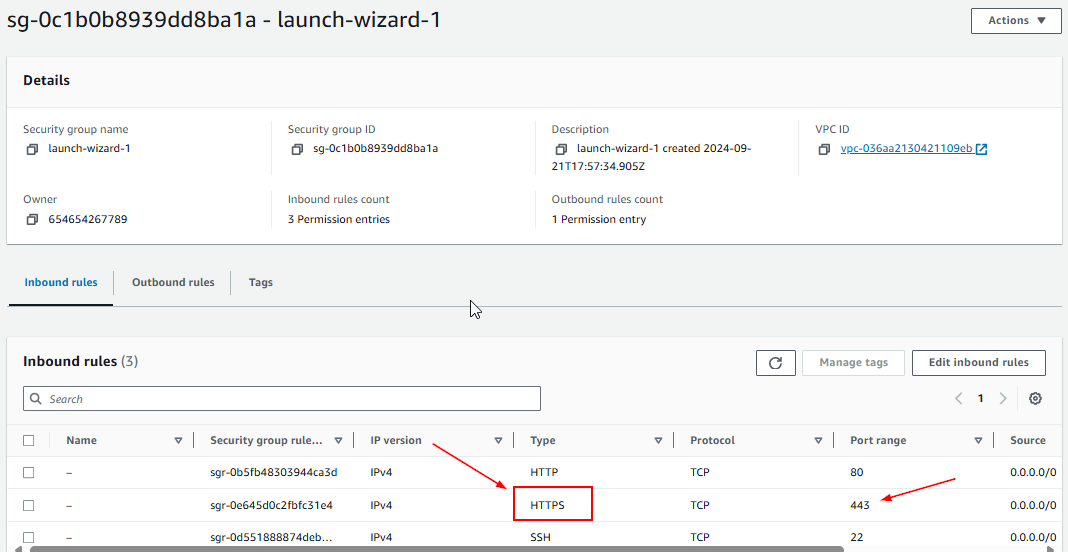
-
- Also check using the AWS console if the changes are reflected.
13. Revisit the Public IPv4 Address
Visit your public IPv4 address in a browser again. Your Apache web server should now be accessible.
14. Customize Your Website
For funsies, copy-paste your favorite static HTML website into this server and watch it run! Better if it had external pictures or videos to see if it works.
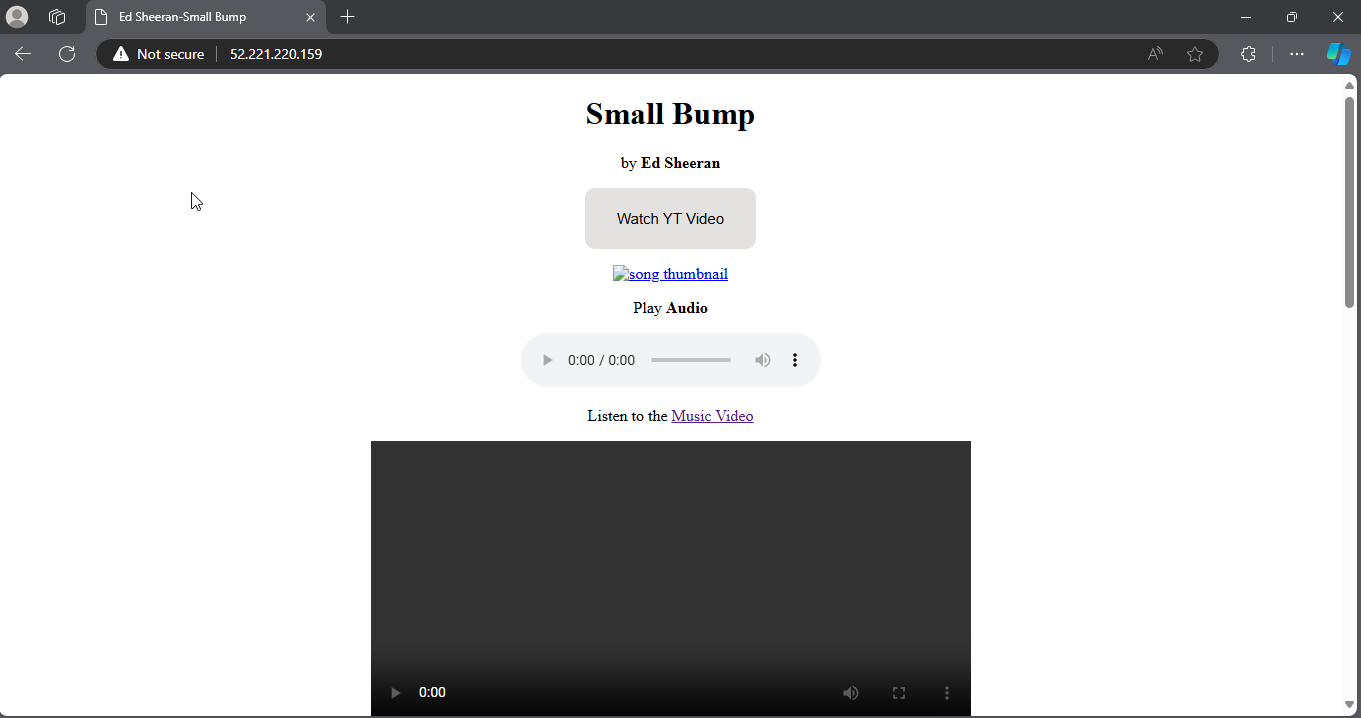
This is mine, lets watch yours!
15. What if I don’t have a static website?
- We will provide you with a simple HTML template that you can use.
Copy and paste this to vim:
1
2
3
4
5
6
7
8
9
10
<!DOCTYPE html>
<html lang="en">
<head>
    <title>EC2 Instance</title>
</head>
<body>
    <h1>Instance 1</h1>
    <img src="path/to/your/image.png" ">
</body>
</html>
- Prepare some image for later use of the workshop.
As you can see, pictures and videos won’t load. Let’s solve that.
Adding files to your EC2 Instance Using S3 and IAM
What is Amazon S3?
Amazon S3 is an object storage service that provides industry-leading scalability, data availability, and security. It allows you to store and retrieve any amount of data at any time. In this guide, we will use S3 to store image files and transfer them to your EC2 instance.
What is IAM?
IAM allows you to manage access to AWS services and resources securely. You create policies that define which actions are allowed on specific AWS resources. Here, we will create an IAM role to give our EC2 instance permission to access files stored in S3.
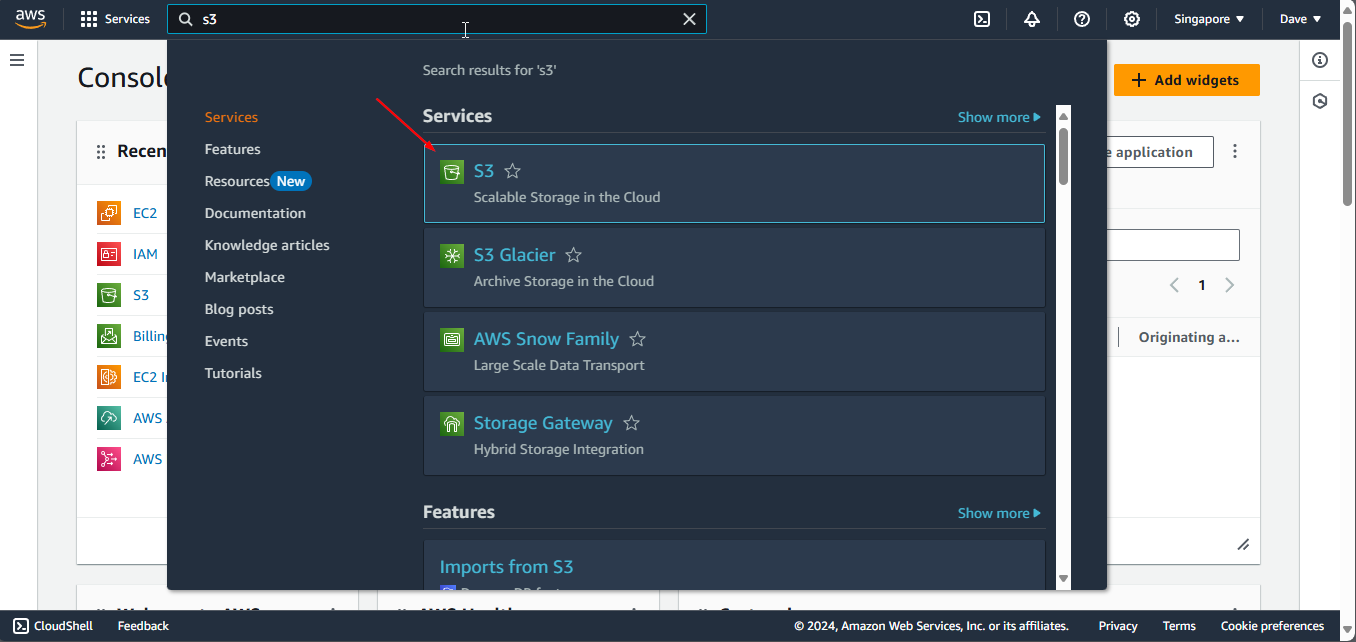
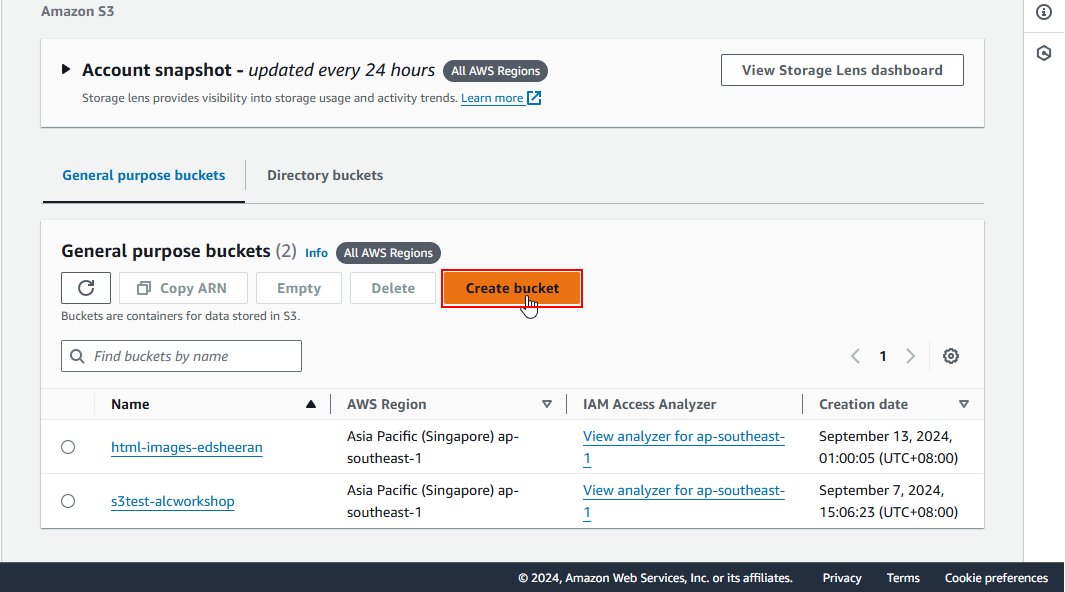
Step 1: Create an S3 Bucket and Upload Images
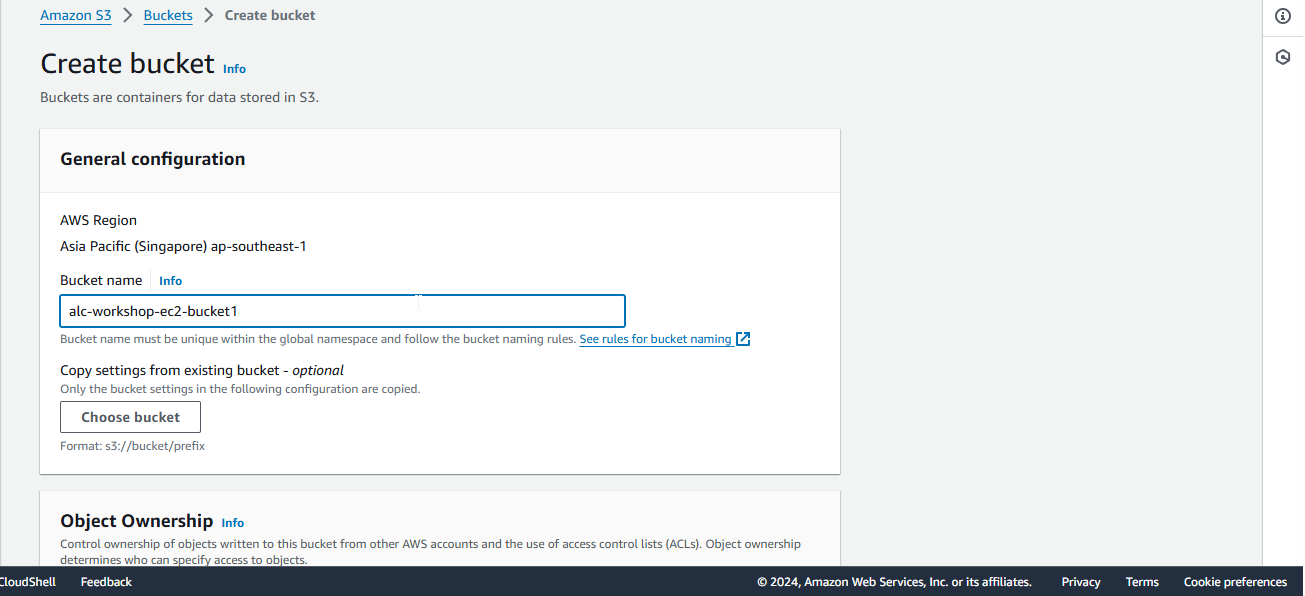
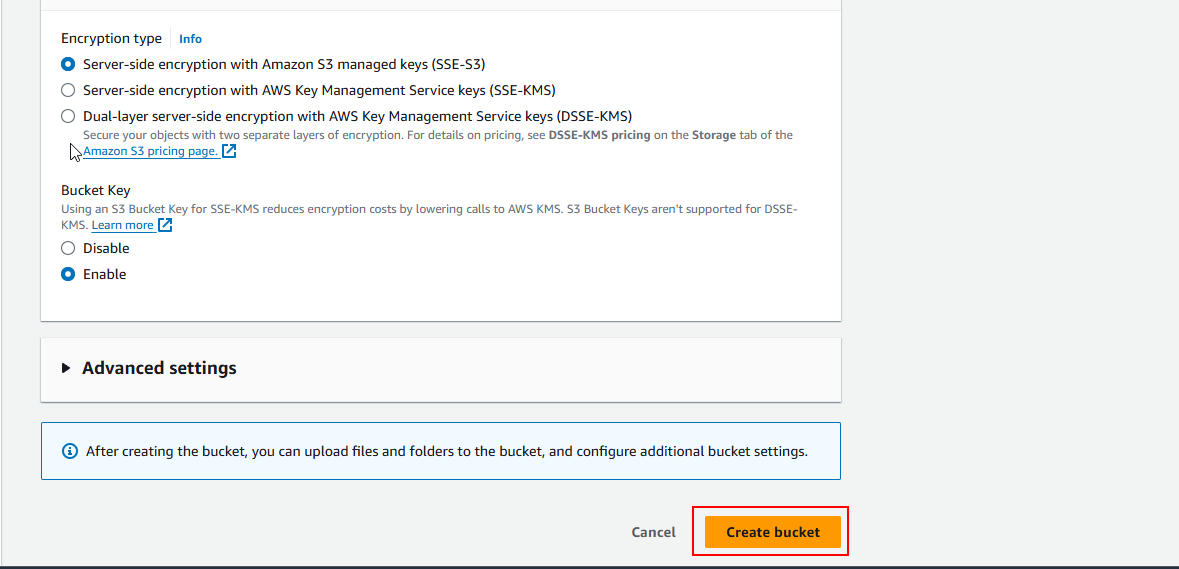
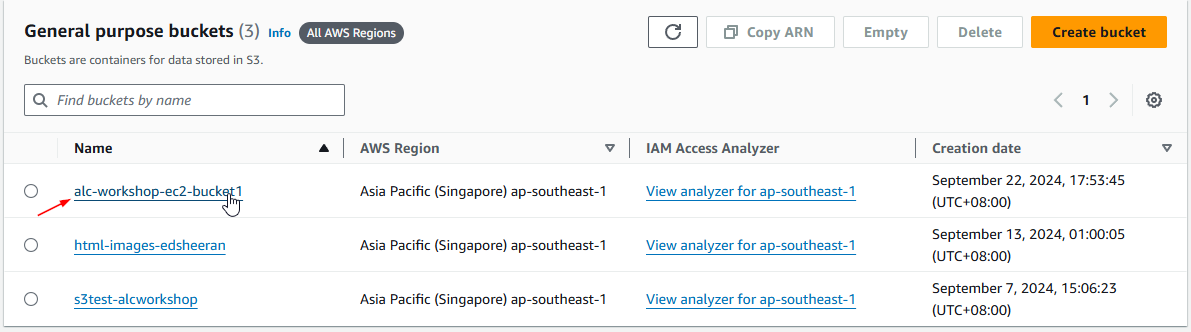
1.1 Create an S3 bucket in the S3 Console. A bucket is a container for storing objects in S3 (like images, videos, or any file). Give your bucket a unique name (globally across AWS).
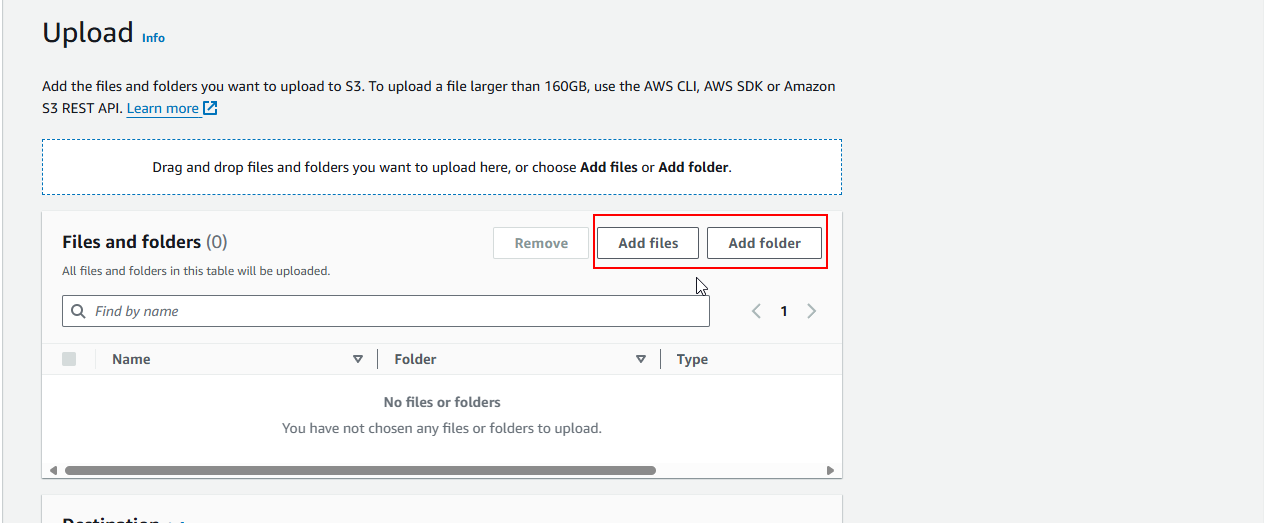
1.2 In the bucket, click Upload, and then Add files/folder. Select the image files you want to upload.
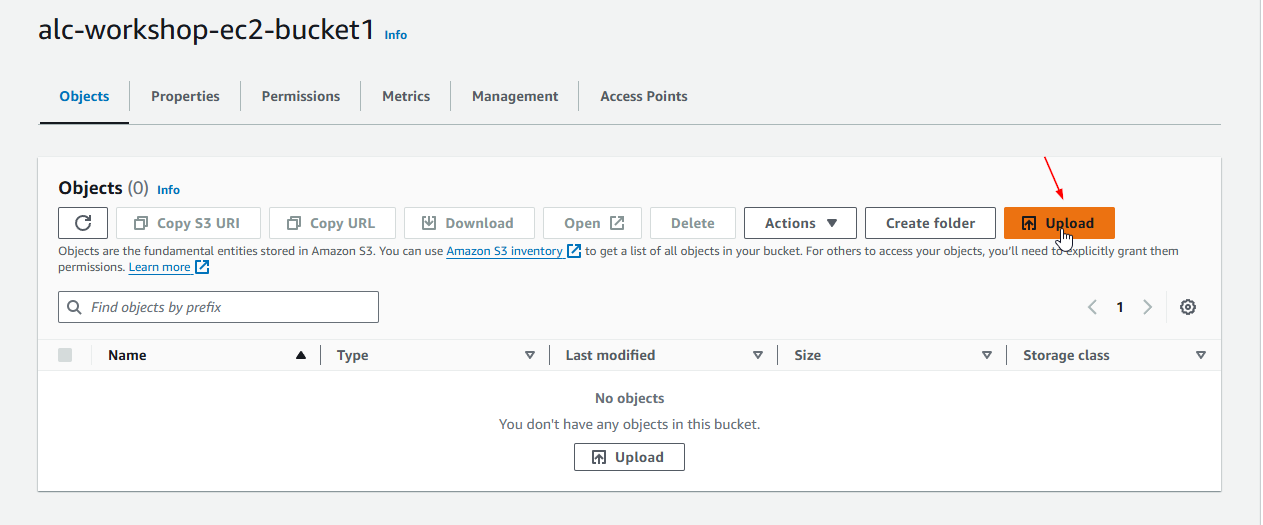
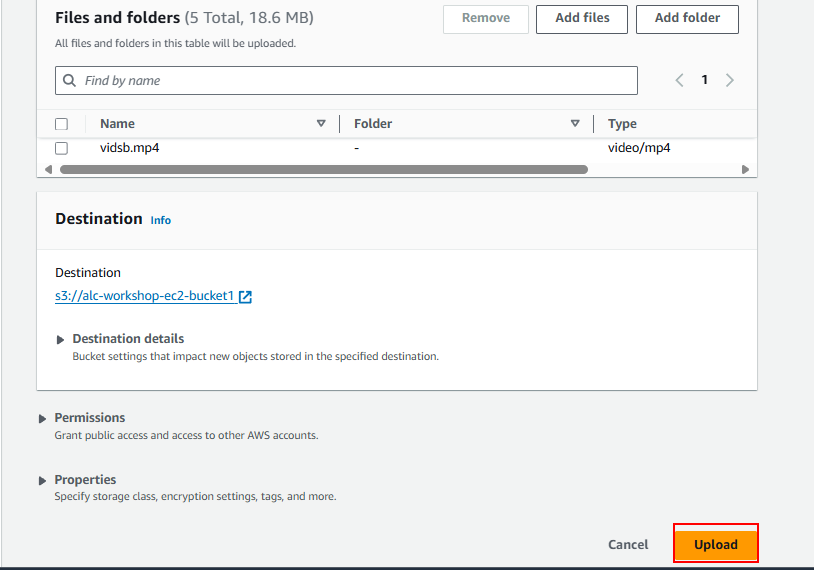
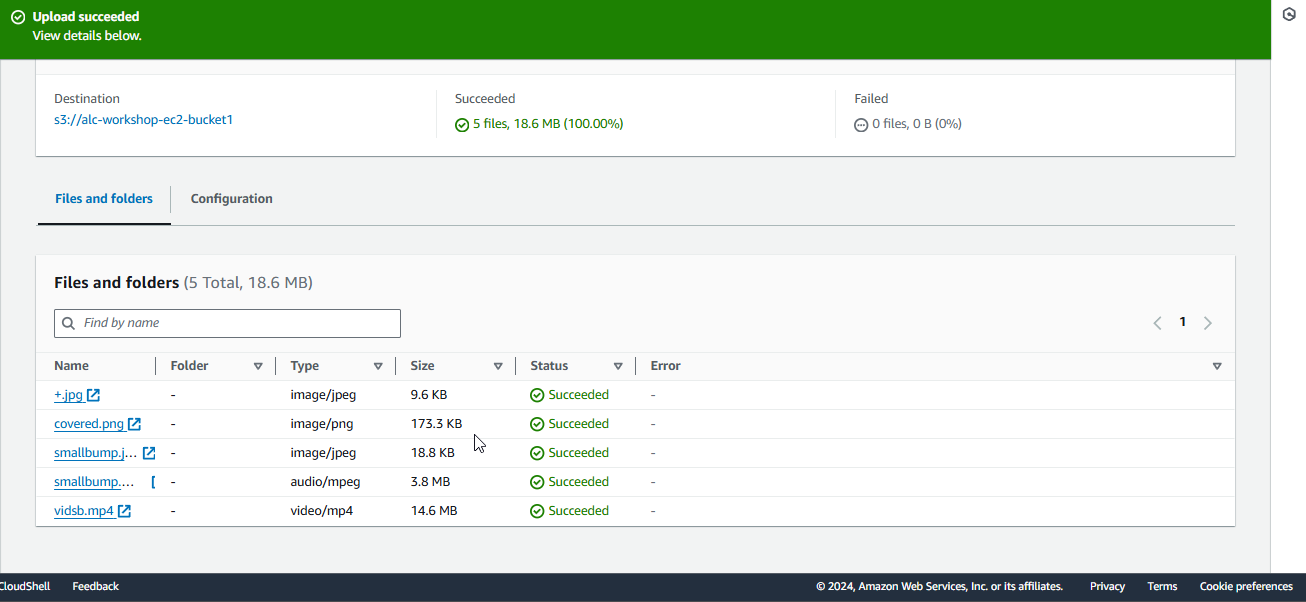
1.3 Upload the files to the S3 bucket. The files will now be stored in your S3 bucket, ready to be used in your application.
Step 2: Create an IAM Role with S3 Access
IAM roles allow AWS services (such as EC2) to perform actions on your behalf. In this case, we need to grant EC2 the ability to interact with S3.
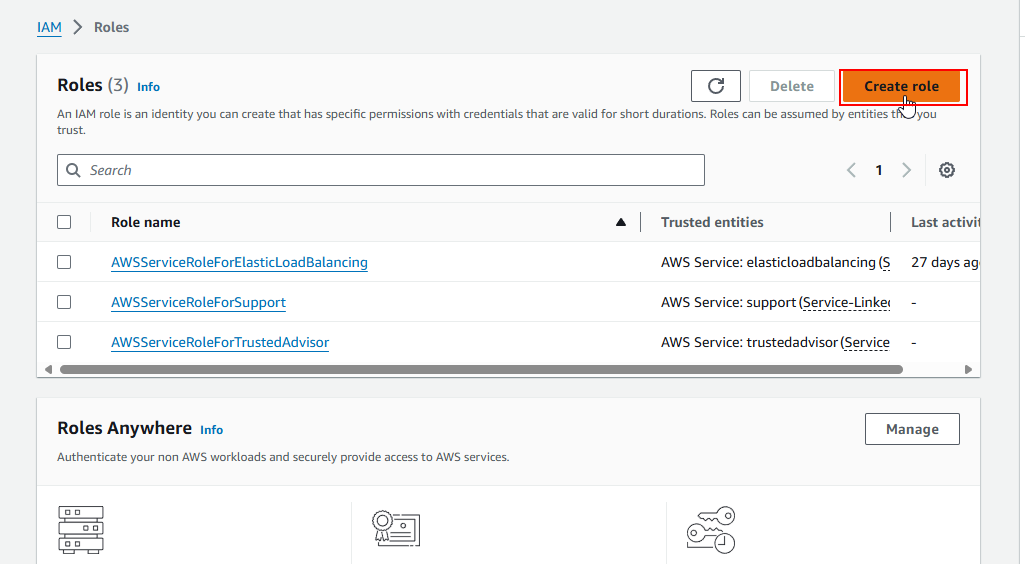
2.1 Go to the IAM Console in the AWS Management Console.
2.2 Click Roles, then click Create role. Roles enable EC2 to assume temporary credentials to access AWS services like S3.
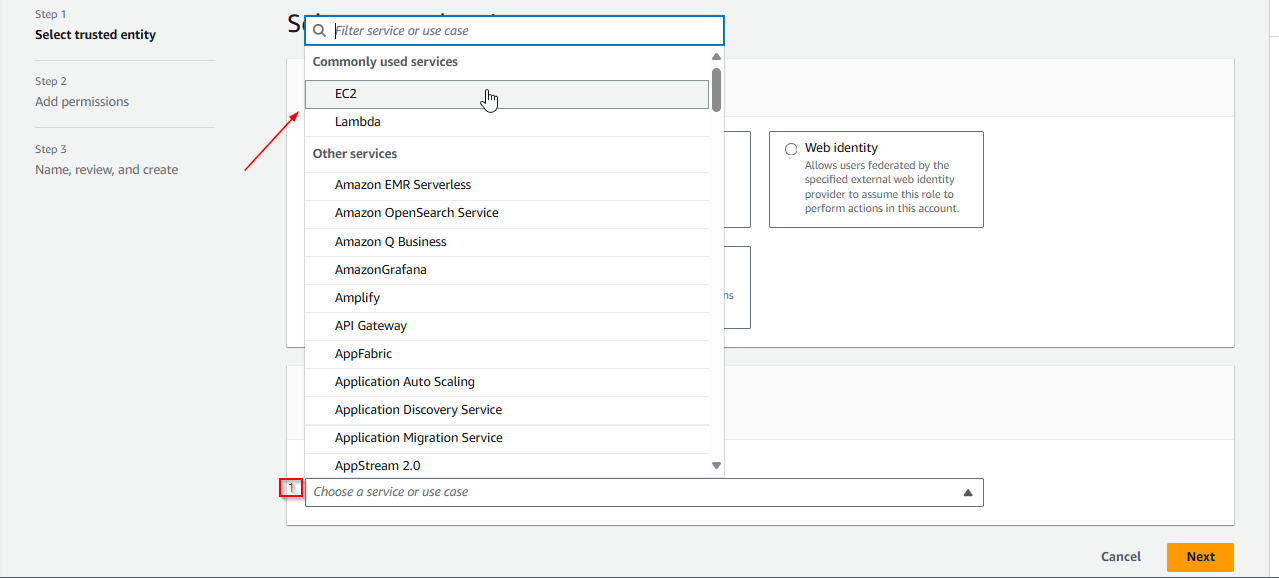
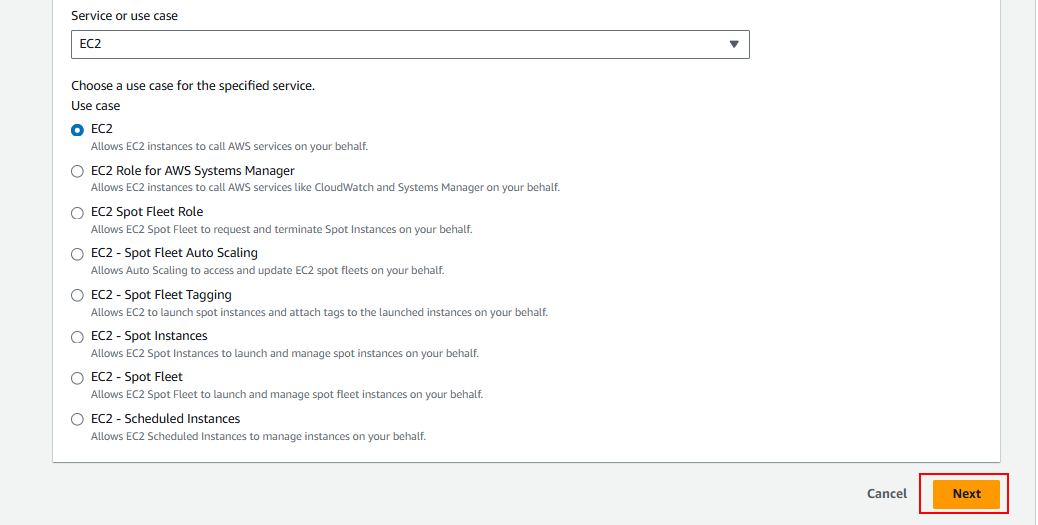
2.3 Select EC2 as the trusted entity. This step ensures that only your EC2 instance will use this role to interact with S3.
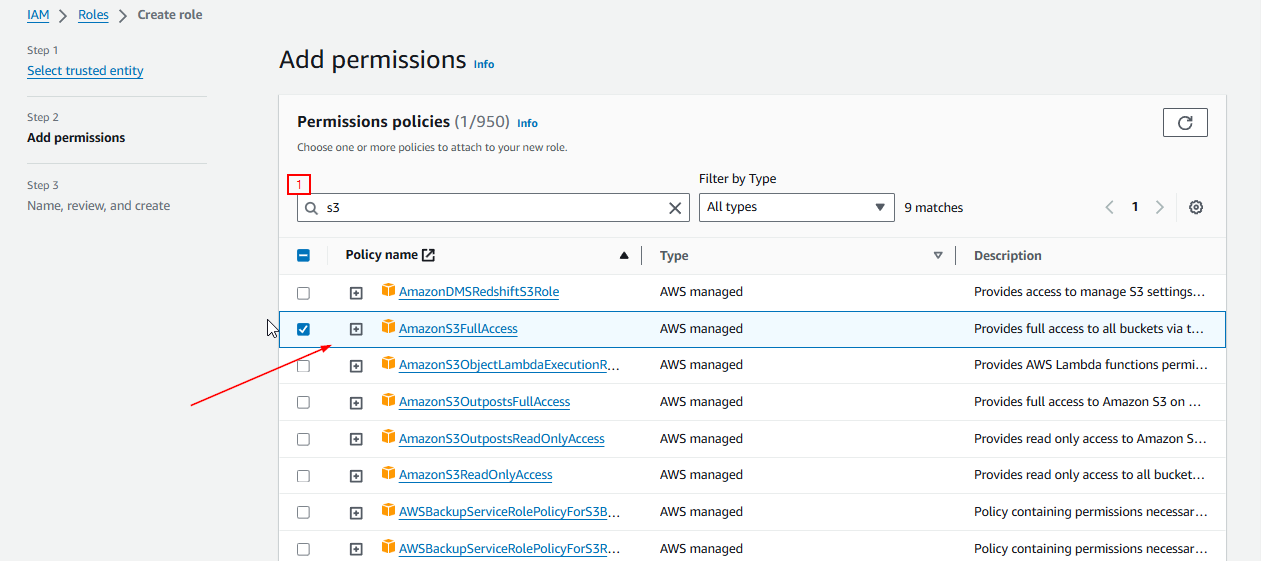
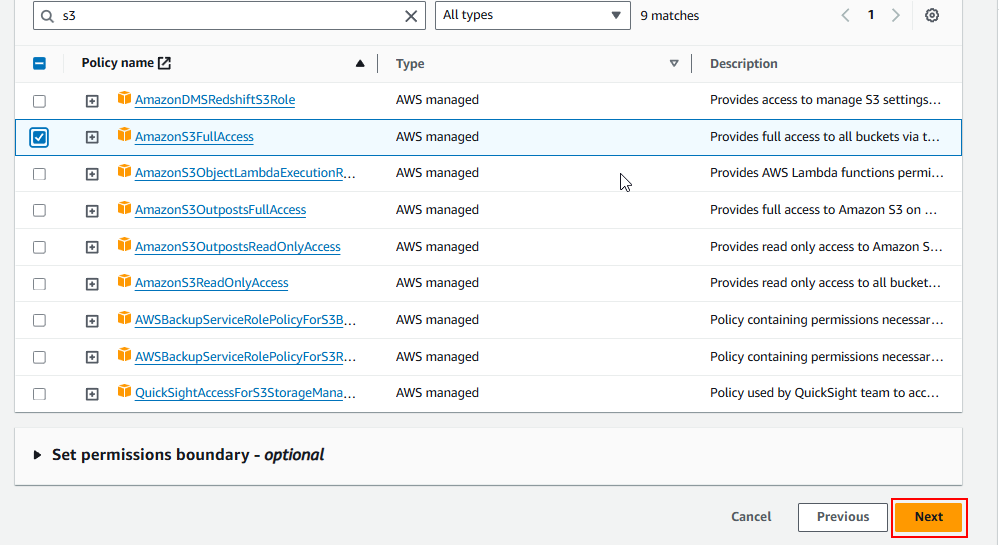
2.4 Attach the policy AmazonS3FullAccess. This policy allows full access to all S3 buckets and objects (though this can be customized for more fine-grained control).
2.5 Click Next: Tags. Give your role a name (e.g., EC2-S3-Access) and a description.
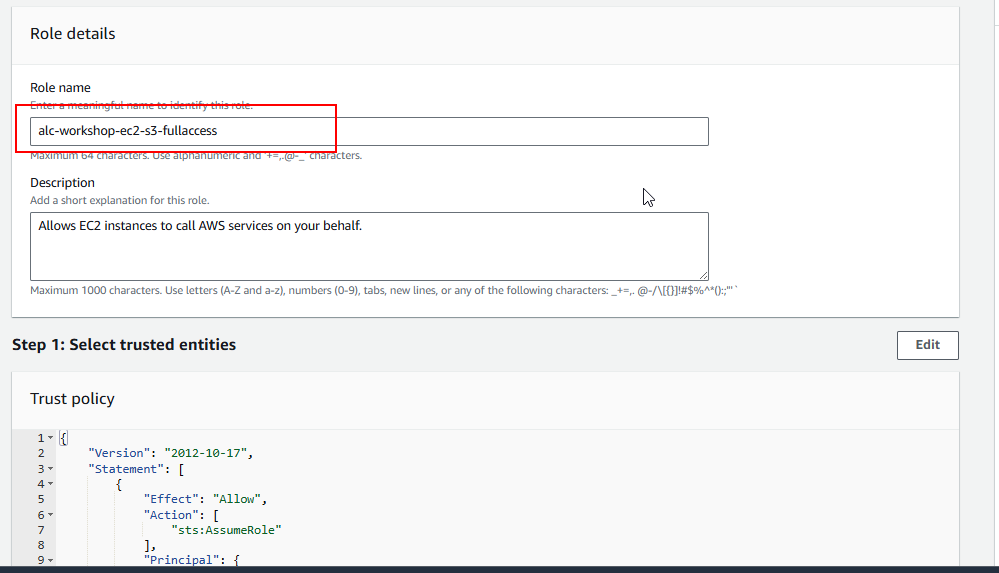
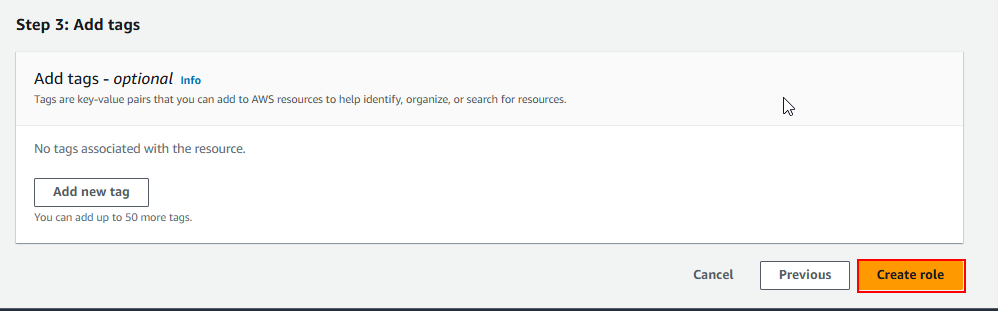
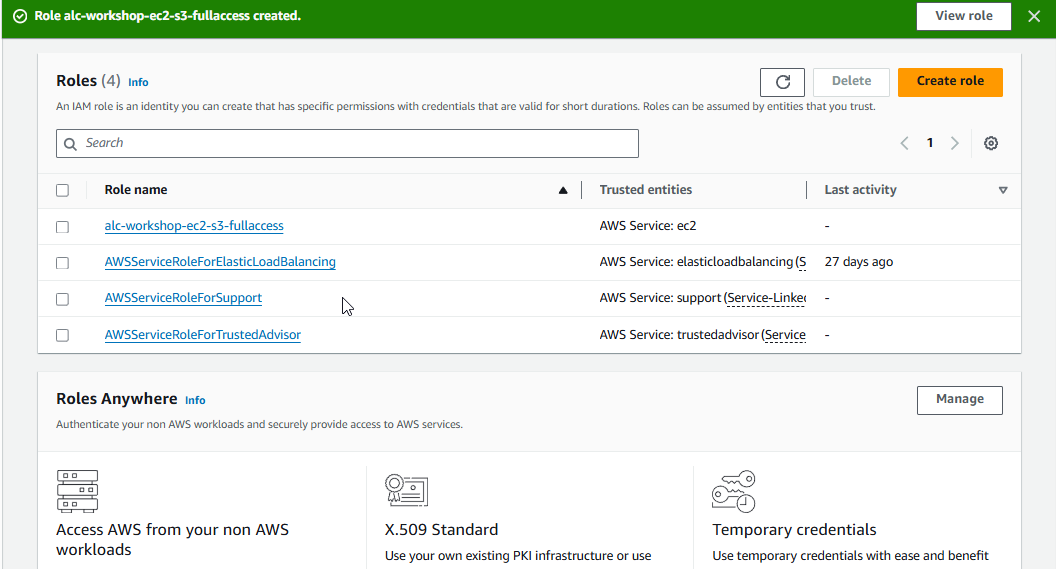
2.5 Click Create role at the bottom of the page. You’ve now created a role with permissions to access S3.
Step 3: Attach the IAM Role to Your EC2 Instance
Your EC2 instance needs permission to access your S3 bucket. We will now attach the IAM role to the instance.
3.1 Go back to the EC2 Console. You should see a list of running instances.
3.2 Click the Instance ID of the instance you want to grant S3 access. Then, go to Actions > Security > Modify IAM Role. This is where you attach an IAM role to your instance, enabling it to use AWS resources.
3.3 Or, you can just simply right-click on the instance and select Security > Modify IAM Role.
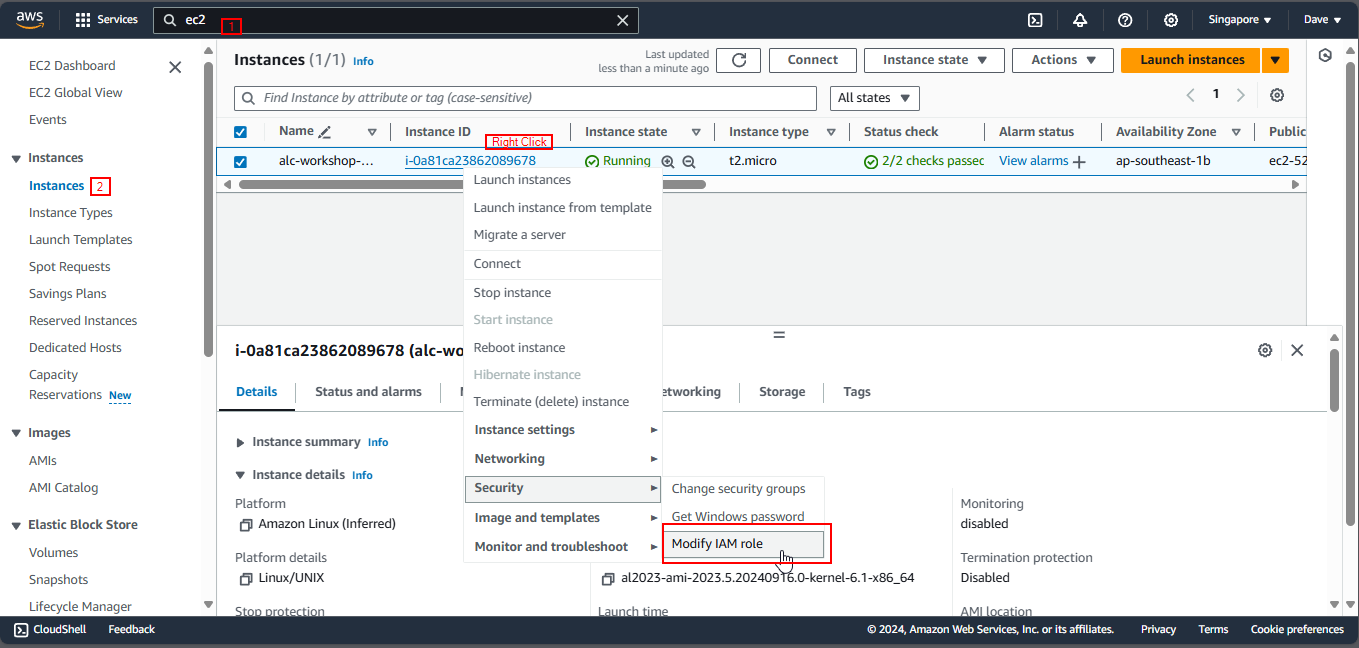
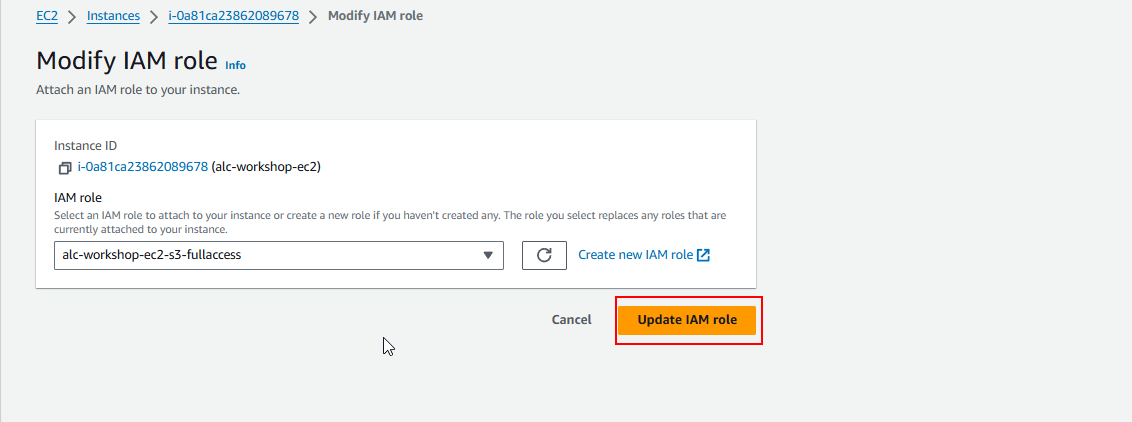
3.4 Choose the IAM role you created earlier, and then click Update IAM role. Now, your instance has the necessary permissions to access your S3 bucket.
Step 4: Access the S3 Bucket from Your EC2 Instance
Now that your instance has S3 access, let’s transfer the images from your S3 bucket to the EC2 instance.
4.1 Open the EC2 CLI (either via SSH or the AWS Console).
4.2 Run the following command to verify your S3 bucket exists:
1
aws s3 ls
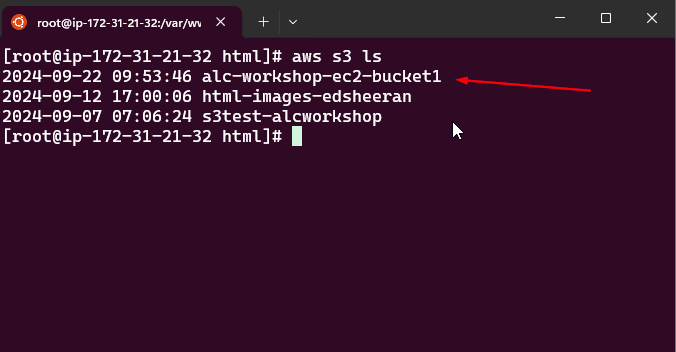
This lists all the S3 buckets associated with your AWS account. You should see your bucket name here.
4.3 Sync the files from your S3 bucket to the /var/www/html directory on your EC2 instance (this is the default web root directory for the Apache server):
1
aws s3 sync s3://<your-bucket-name> /var/www/html
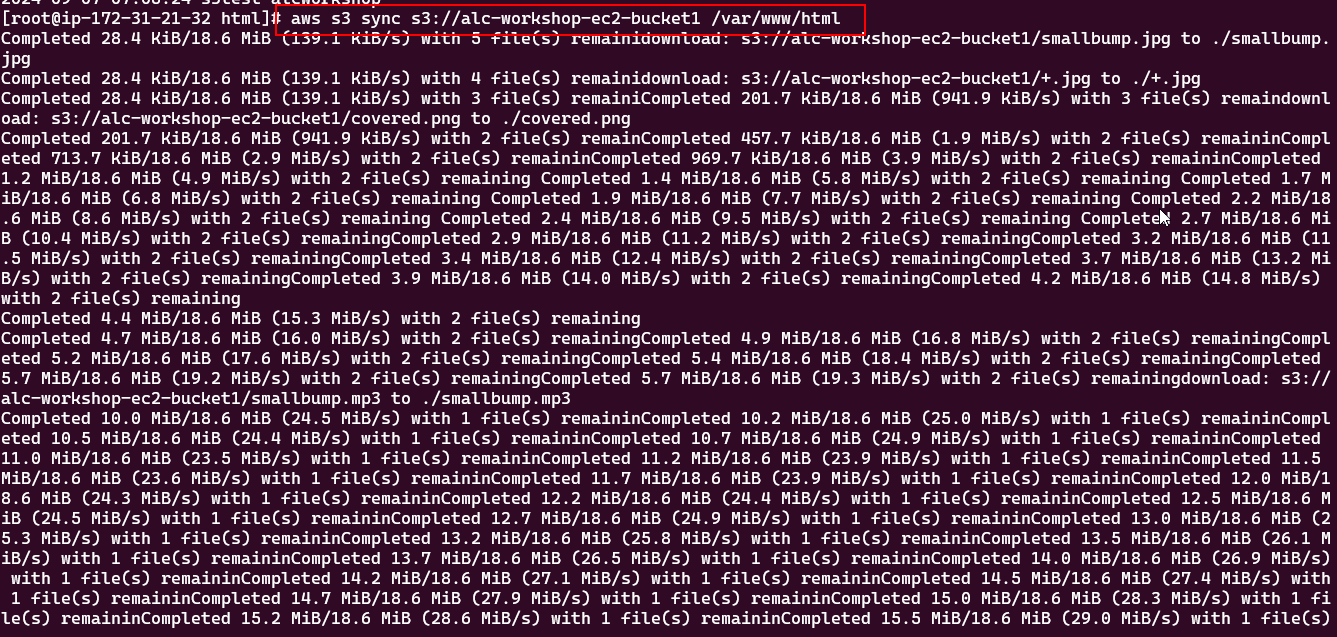
Replace
4.4 To ensure the files were downloaded, list the contents of /var/www/html:
1
ls

If your images are listed here, the sync process was successful.
Make sure that the directory of your files is aligned with directory inside the index.html file.
Step 5: Test Your Webpage Now that your images are on your server, let’s check if everything works.
5.1 Open a web browser and go to:
1
http://<your-public-ipv4-address>

If everything is set up correctly, you should now see the images from your S3 bucket displayed on your website.
Optional: Adding files from local machine to EC2 instance
If you want to add files from your local machine to your EC2 instance, you can use the scp command. Here’s an example:
1
scp -i <your-key-pair>.pem /path/to/local/file ec2-user@<Public DNS>:/path/to/remote/directory
Remember this command requires the path to your key pair, the path to your local file, the username of your EC2 instance (e.g., ec2-user), the Public DNS of your instance, and the path to the remote directory on your instance.
Additional notes: we will be doing these commands to the wsl terminal instead of the ec2 instance
- Keypair - The key pair you use to connect to your instance. For our case we used
keypair.pem
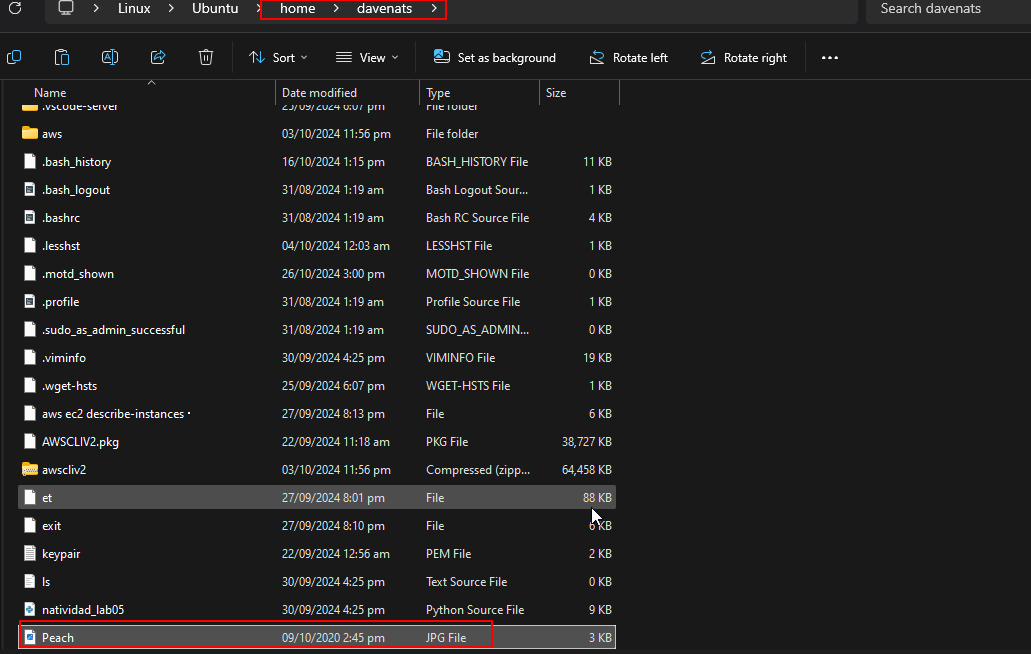
- Local file - The path to the file you want to transfer. For example,
/home/Davenats/Peach.jpg
- Username - The username of your EC2 instance. For Amazon Linux, it is
ec2-user. - Public DNS - The Public DNS of your instance. You can find this in the EC2 Console.
You can find these both in here
- Remote directory - The path to the directory on your instance where you want to store the file. For example,
:
We will not use /var/www/html as the directory to store the file as it needs root access to write files in that directory. Instead, we will use the home directory of the ec2-user.
Completing this we have
1
scp -i keypair.pem Peach.jpg ec2-user@ec2-13-229-248-87.ap-southeast-1.compute.amazonaws.com:
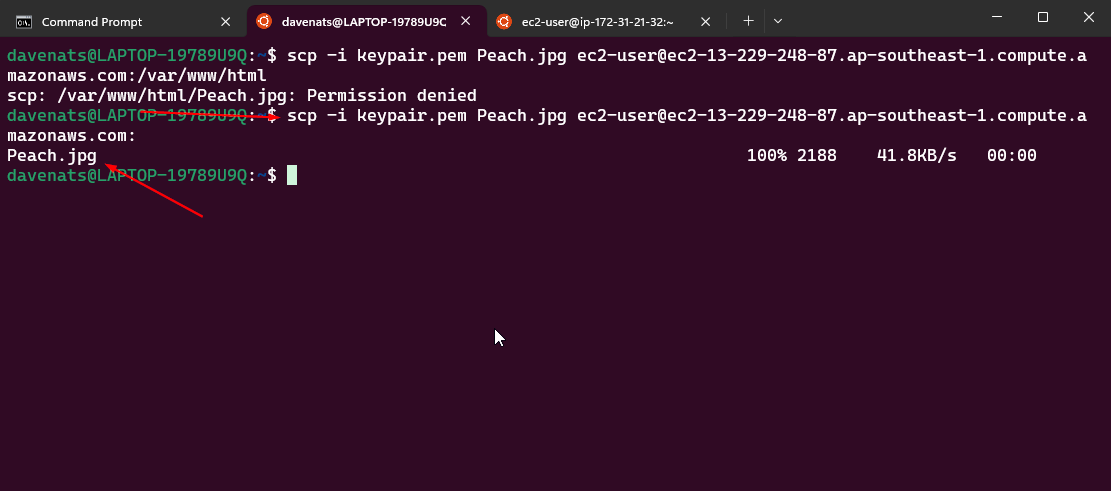
Lets verify if the file is transferred to the ec2 instance
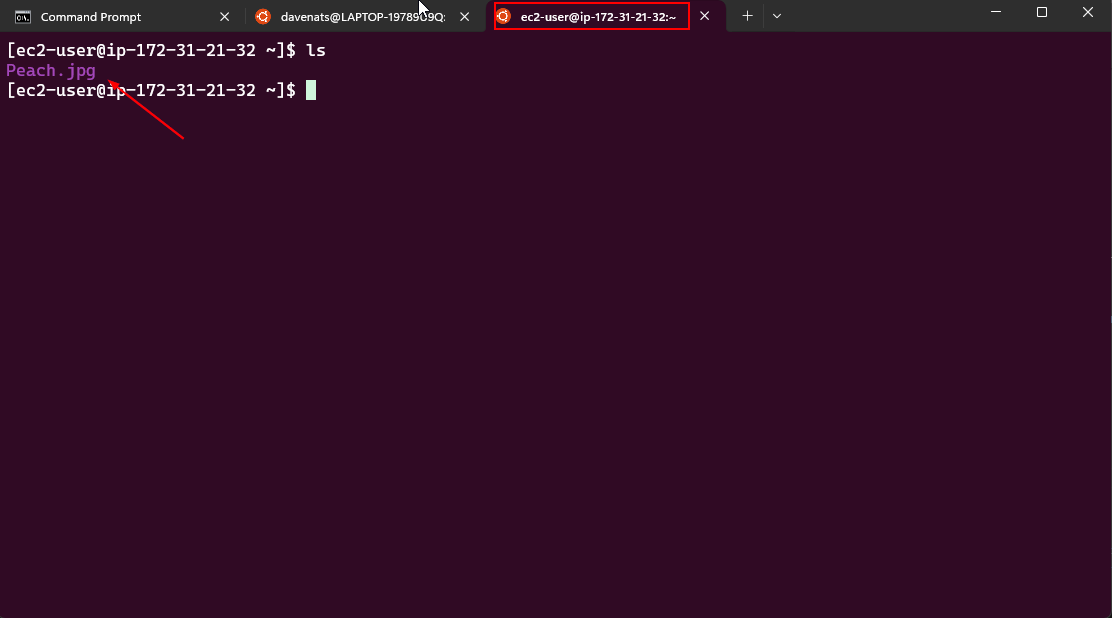
We will now transfer the file from the home directory of the ec2-user to the /var/www/html directory. Where the apache server can access the file.
1
sudo mv /home/ec2-user/Peach.jpg /var/www/html/

Verify if the file is transferred to the /var/www/html directory
Cleanup
- Remember to delete the IAM role and S3 bucket if you no longer need them to avoid unnecessary charges.
What is AMI and Images?
An Amazon Machine Image (AMI) is an image that provides the software that is required to set up and boot an Amazon EC2 instance. Each AMI also contains a block device mapping that specifies the block devices to attach to the instances that you launch. You must specify an AMI when you launch an instance. The AMI must be compatible with the instance type that you chose for your instance. You can use an AMI provided by AWS, a public AMI, an AMI that someone else shared with you, or an AMI that you purchased from the AWS Marketplace.
An AMI is specific to the following
-
Region
AMIs are tied to a specific AWS region (ie. ap-southeast-1) and are only available for launching instances in that region. You cannot directly use an AMI from one region in another region without copying it over. -
Operating system
An AMI is specific to the operating system that is installed on the root volume of the instance. This includes both Linux distributions (e.g., Amazon Linux, Ubuntu, Red Hat Enterprise Linux) and Windows Server AMIs. -
Processor architecture
AMIs are tied to specific processor architectures, such as x86 (64-bit, Intel/AMD architecture) or ARM (64-bit, AWS Graviton architecture). Instances launched from an AMI must be compatible with the processor architecture of the underlying hardware. -
Root device type
AMIs are either EBS-backed or instance store-backed, and the type of root device affects how the instance stores and retains data.- EBS-backed AMI: The root device is an Amazon EBS volume, which allows for persistent storage, meaning data remains even if the instance is stopped.
- Instance store-backed AMI: The root device is an instance store volume, which is ephemeral, meaning data is lost when the instance stops or terminates.
-
Virtualization type
AMIs support two types of virtualization: HVM (Hardware Virtual Machine) and PV (Paravirtual).- HVM: Instances launched from HVM AMIs are fully virtualized and take advantage of hardware-level features like enhanced networking, GPU access, and more. These instances are compatible with modern EC2 instance types.
- PV: PV instances use paravirtualization, which is an older virtualization method that has lower performance compared to HVM. PV instances do not have access to the same hardware-level features as HVM.
AMIs are the foundation for launching EC2 instances, and they provide a quick and efficient way to launch instances with pre-configured software and settings. This is throua a process called Image Builder. By creating custom AMIs, you can capture the configuration of an instance and use it to launch identical instances in the future.
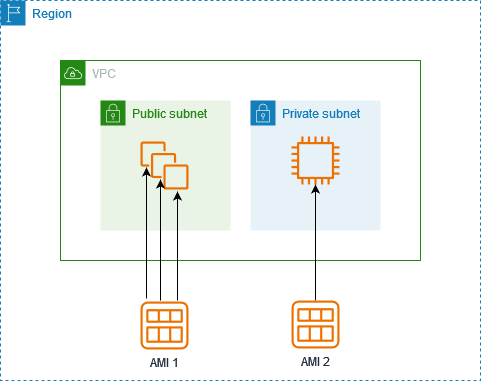
You can launch multiple instances from a single AMI when you require multiple instances with the same configuration.
Image Builder is offered at no cost, other than the cost of the underlying AWS resources used to create store ang share the images.
Creating a Pre-built AMI from an Instance
Now, we will try to create a pre-built AMI with the image captured from our instance. This AMI already had the downloaded web server, static HTML, and any files uploaded in our server.
Steps to Create an Image of Your Instance
- Go back to the instance page.
- Right-click on the instance ID.
- Navigate to Image and templates > Create Image.

Name Your Instance
- Save the image.
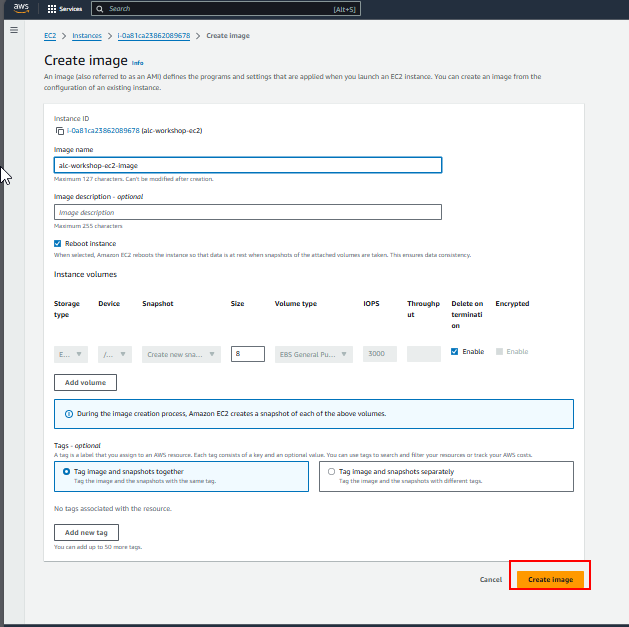
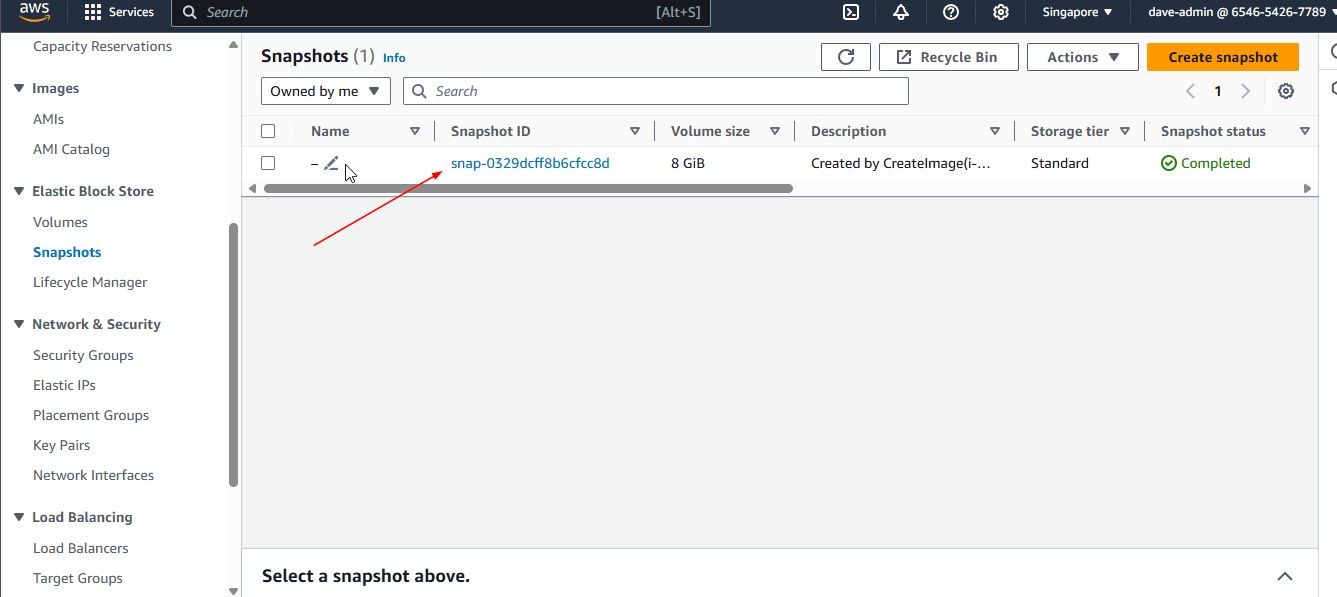
As you save the image, you will see that a snapshot is also made. When you create an AMI from an EC2 instance, AWS takes snapshots of all attached EBS volumes, enabling you to launch new instances with the same configuration and data. These incremental snapshots allow for version control, making it easy to manage changes and revert to previous states as needed.
Check the State of Your AMI
- Go to AMI then check the state of your AMI by clicking the AMI ID.
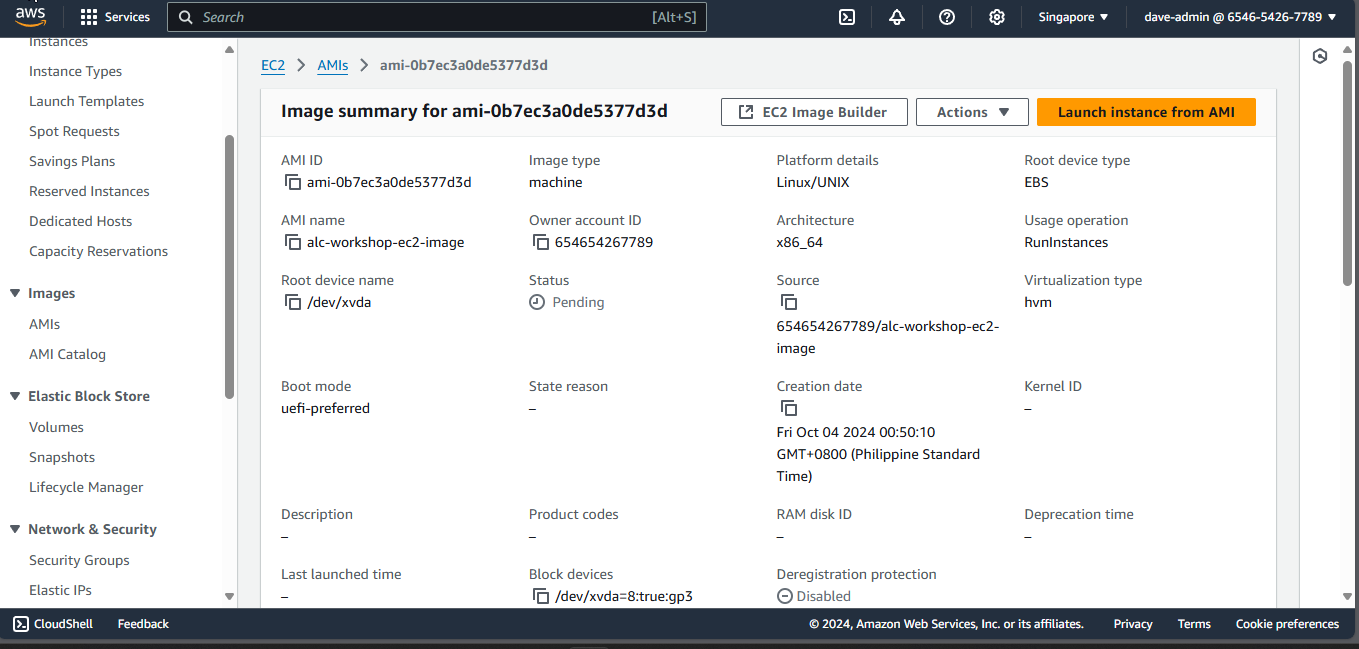
You have now successfully created an image of your instance.
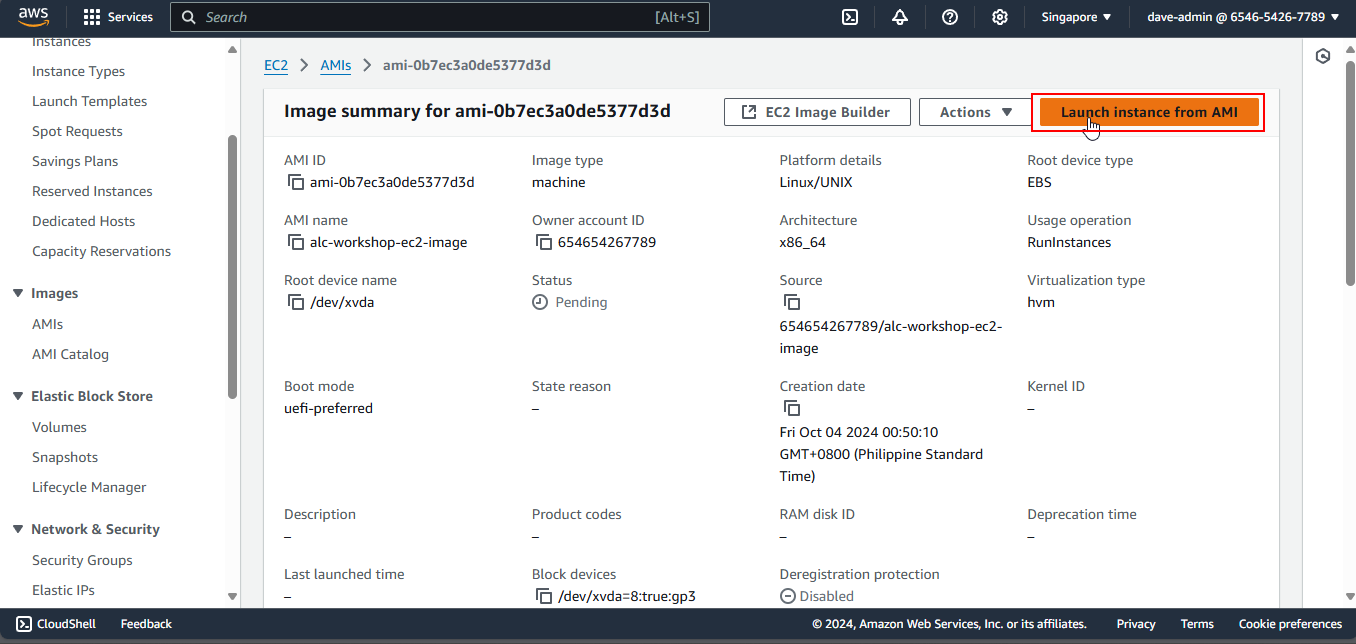
Creating a New Instance from Your Image
Let’s try to create a new instance with our image.
- Start with clicking Launch Instance from AMI.
- Just do name of instance -
<AMI1>. For naming convention sake, this helps to properly track our AMIs.
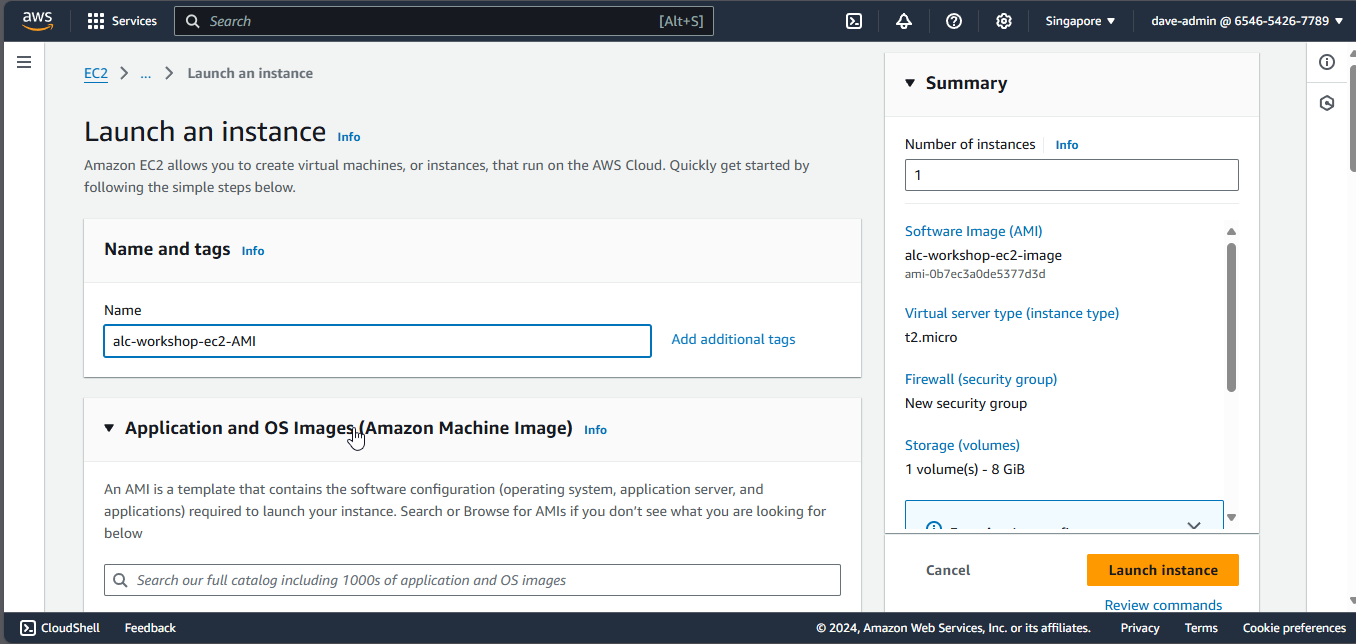
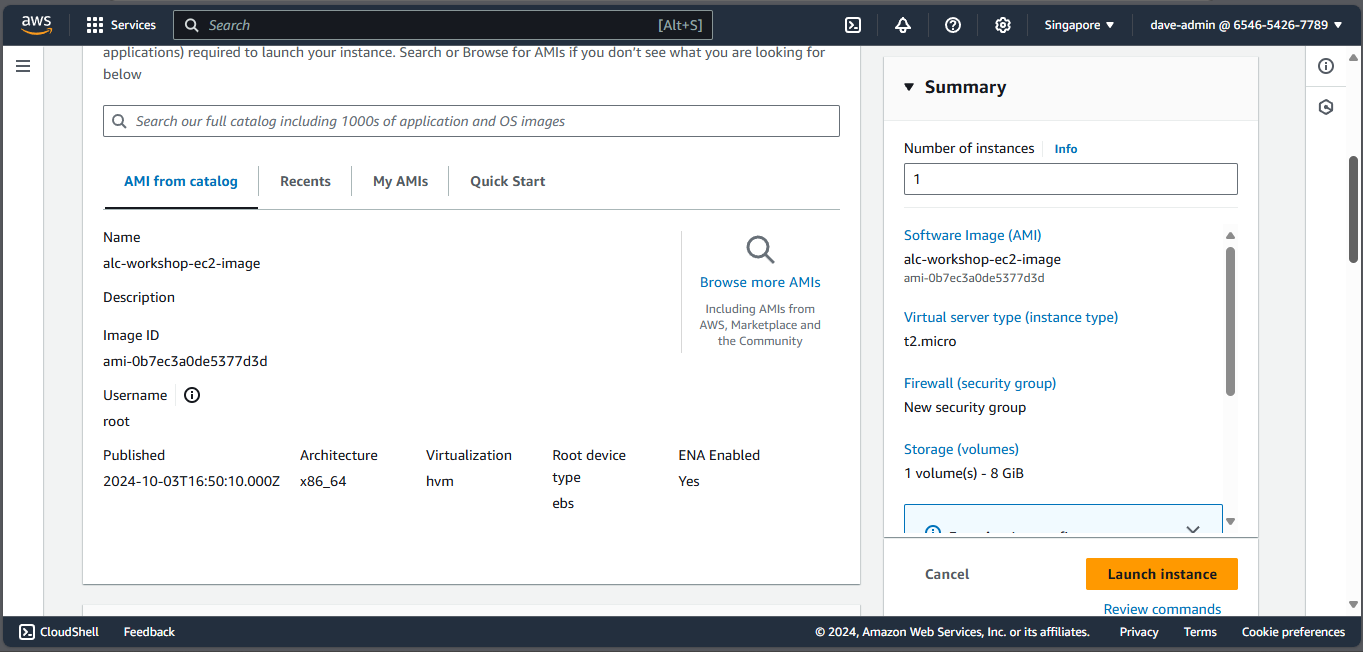
As you can see, the AMI is already set from the image we captured from the first instance.
Assign a Key Pair

- Select the security group we made from our first instance. This will ensure that the specific inbound rules are made for port 80 (HTTP), which will show our webpage in our public IPv4 address.
Review the Summary of the Instance
- After all is done, launch the instance.
Congratulations! You successfully made an instance from a captured image of an instance.
Testing the Instance Configuration
Let’s test if the instance has the same configuration as the first, including the Apache web server and the static HTML.
- Copy the IPv4 address.
- Search in the internet as
http://<your IPv4 address>.

As you can see, the webpage is the same as the first instance. This means that the image captured from the first instance was successfully created and launched as a new instance.
Creating an Image from an Instance using AWS CLI
- Show all the instances in the region.
1
aws ec2 describe-instance-status --include-all-instances --output table
Copy the instance ID of the instance you want to create an image from.
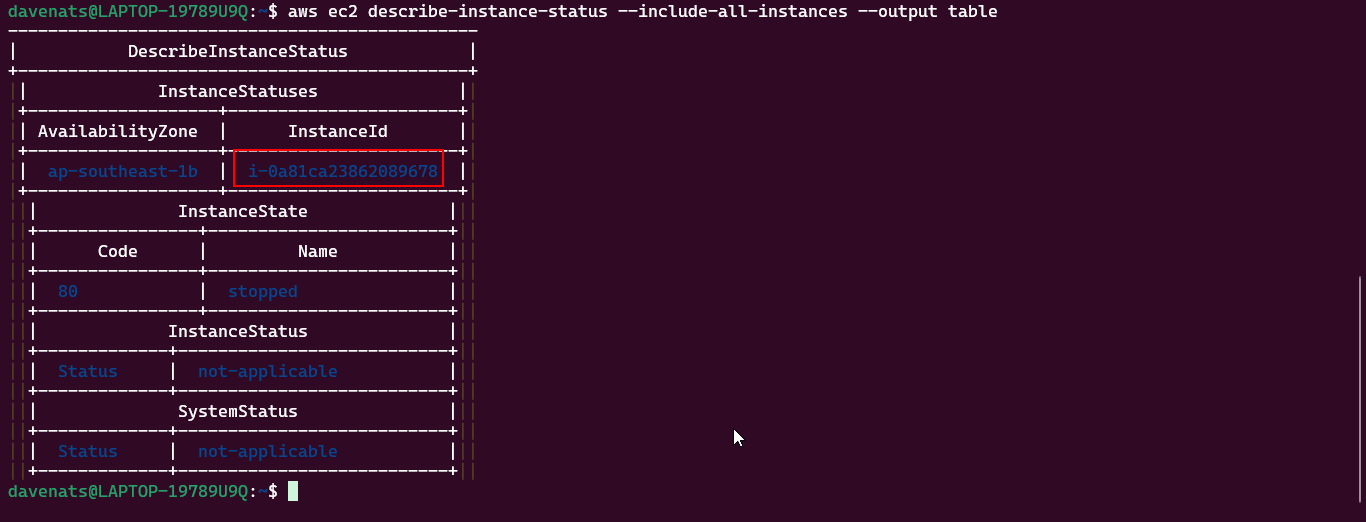
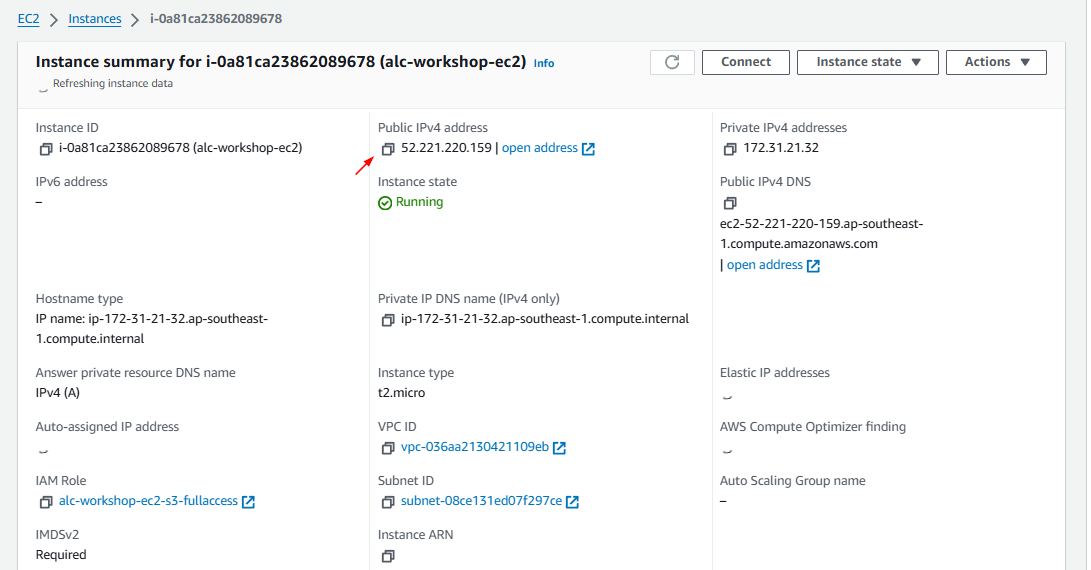
In this case, we will use the instance ID of the first instance we created. Which for mine is i-0a81ca23862089678.
- Create an image from the instance.
1
2
3
4
aws ec2 create-image \
    --instance-id i-0a81ca23862089678 \
    --name "alc-ec2-workshop-Image" \
    --description "An AMI of my web server instance"

- List all the images in the region created by you.
1
aws ec2 describe-images --owners self
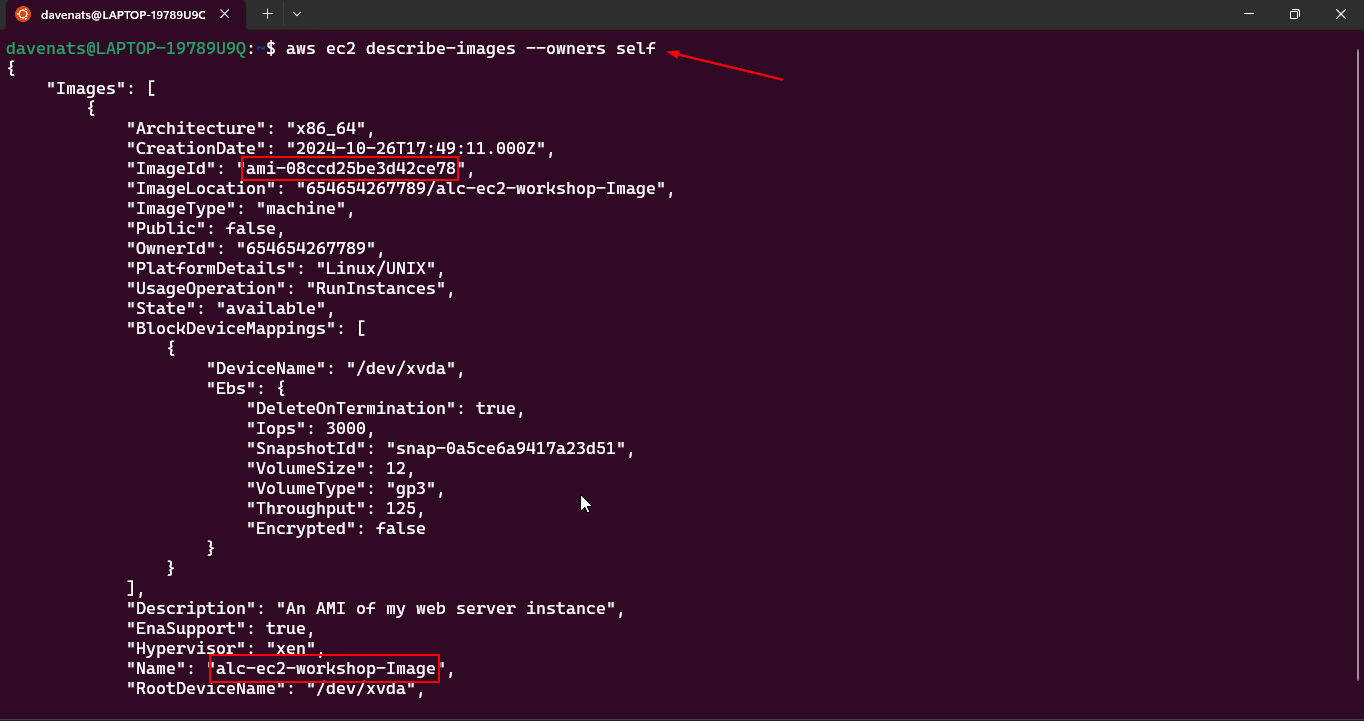
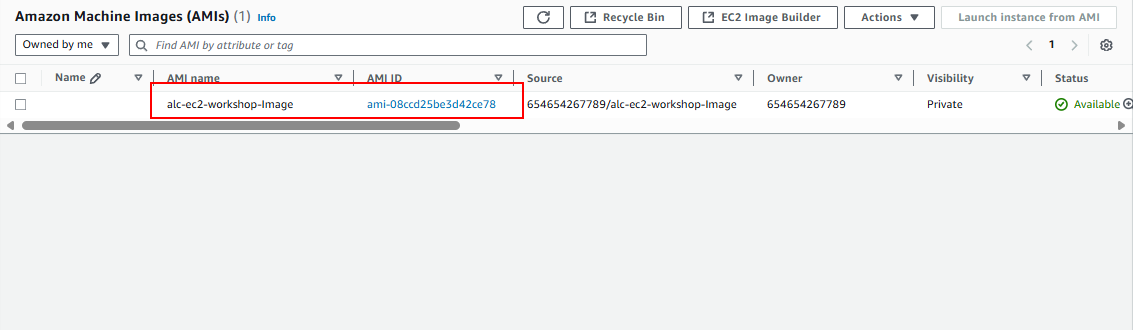
- Verify the existence of the image on the AWS Console.
- Create a new instance from the image.
We will use this command:
1
2
3
4
5
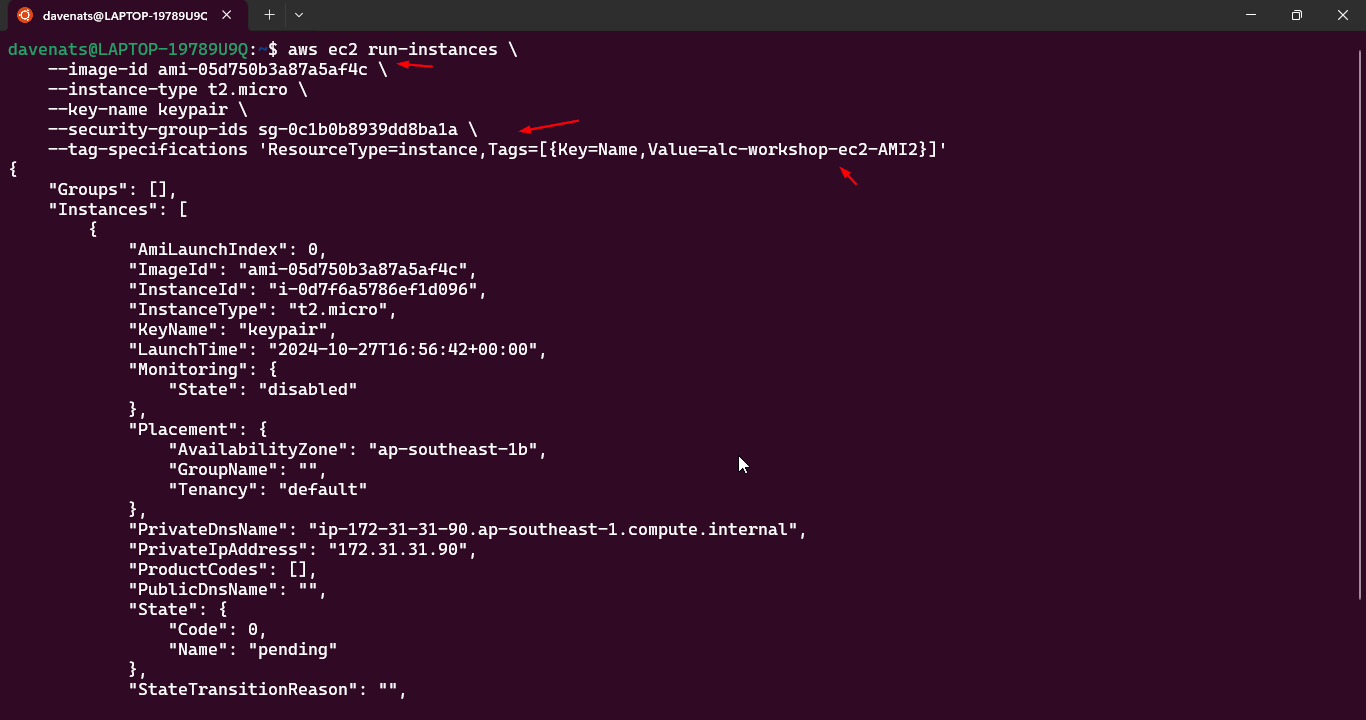
6
aws ec2 run-instances \
--image-id <ami-id> \
--instance-type t2.micro \
--key-name <your-key-pair> \
--security-group-ids <your-security-group-id> \
--tag-specifications 'ResourceType=instance,Tags=[{Key=Name,Value=<Instance Name>}]'
- We already have the AMI ID from the previous command. (
aws ec2 describe-images --owners self) - We also have a keypair named ‘keypair’.
-
Lets name the instance as
alc-ec2-workshop-AMI2. As our 2nd AMI instance. - Now we only need to find the security group ID. Use the following command:
1
aws ec2 describe-security-groups
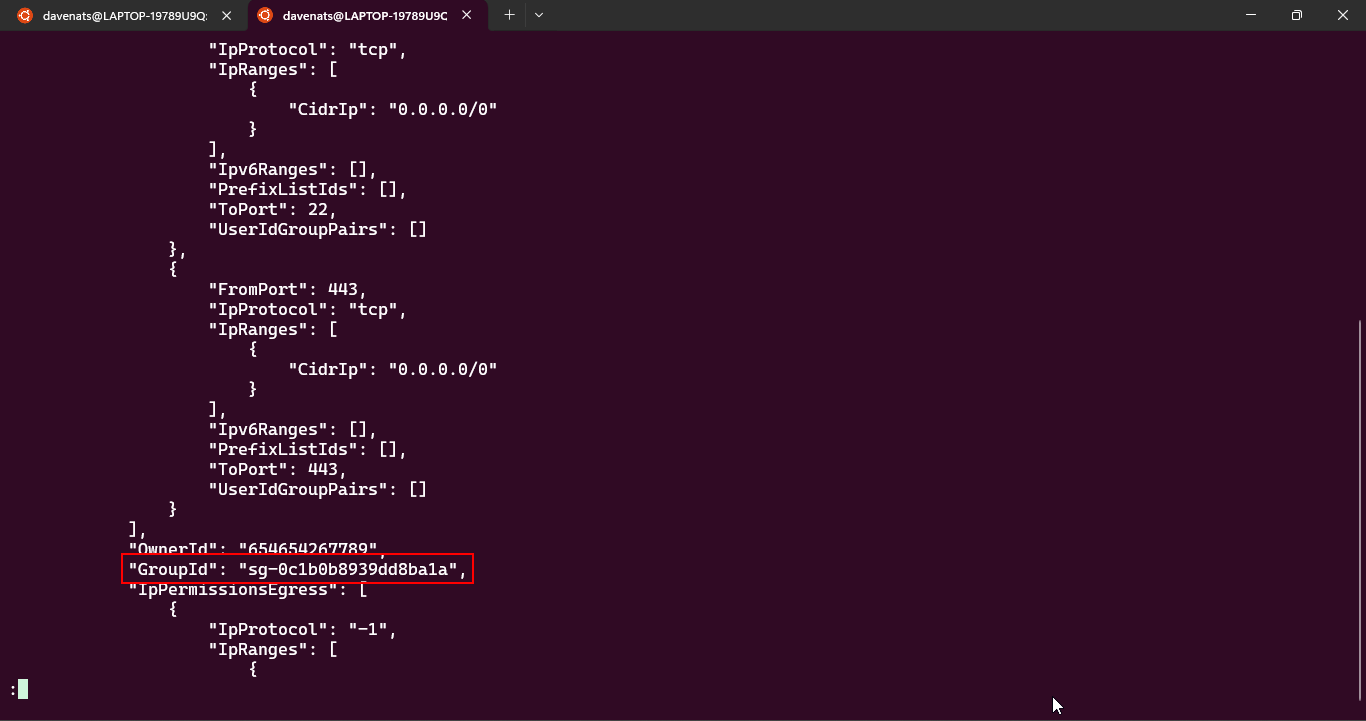
-
Copy the security group ID of the security group that we had on the first instance. In this case, the security group ID is
sg-0c1b0b8939dd8ba1a. -
Now we can create a new instance from the image.
Connecting to the Instance
If you want to connect to the instance, you can do so by using the same steps as before.
- Copy the ssh command from the SSH Client.
- Connect using the terminal. Paste the copied command and press enter.
What seems to be the problem?
- An AMI provided by AWS, the Amazon Linux AMI, has a default user of
ec2-user. When we create an image based on this instance, the new instance will also have the same default user.
Based on the ssh command we copied:

- The username become root, this is because when creating an image from an instance, the default user is not copied over on the console of the SSH Client Connect. This is why we need to change the username to
ec2-user.
Lets do some minor edits on our Apache webpage.
NOTE: This will be useful in the following sections.
- Go to the instance and edit the
index.htmlfile.
1
sudo -i
1
vim var/www/html/index.html
- Let’s add new details to the webpage.
 :
:

save and exit file
1
:wq
- Verify the changes by refreshing the webpage.

- Repeat the process to our 2nd AMI instance made using AWS CLI, add content such as
3rd Instance.

Cleanup
- Remember to remove remove the image and the instances to avoid unnecessary charges.
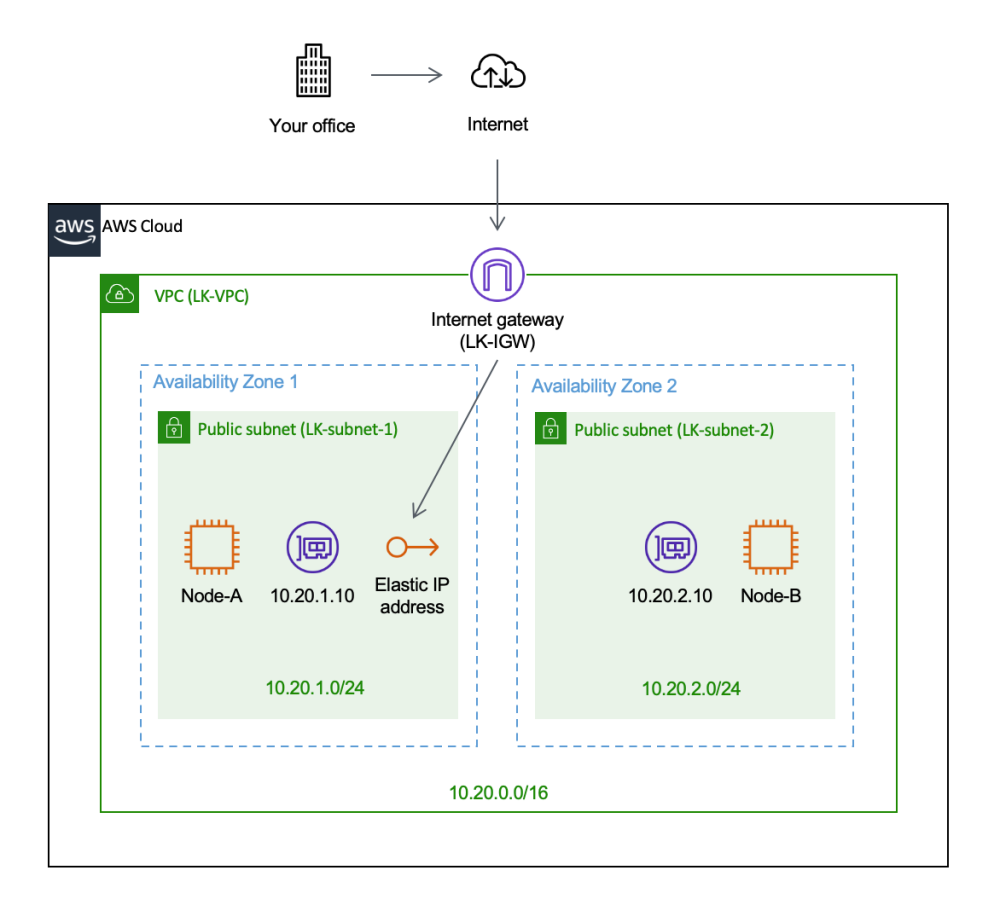
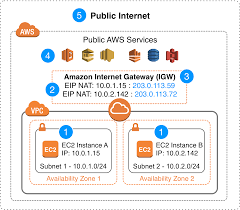
Elastic IP Address
An Elastic IP address (EIP) is a static, public IPv4 address in AWS, designed for the dynamic nature of cloud computing. EIPs allow users to manage resilient public endpoints in cloud infrastructure, offering flexibility in instance management and failover.
Key Features and Benefits of Elastic IPs
- Instance Failover: If an EC2 instance fails, EIPs can be quickly reassigned to another instance in the same VPC, maintaining a consistent public endpoint and reducing downtime.
- Flexible Traffic Management: EIPs can be programmatically associated or disassociated with instances to direct traffic as business needs evolve.
- Persistent Public Endpoint: EIPs provide stable identifiers for resources, which is helpful when configuring DNS records or firewall rules, ensuring reliable connectivity.
Important Considerations
- Single Association: Each EIP can be attached to one instance or network interface at a time. However, it can be moved to another as needed.
- Automatic IP Release: Associating an EIP with an instance’s primary network interface (eth0) releases its existing public IPv4 address back to AWS.
- IPv4 Limitation: AWS limits users to five Elastic IPs per region; using a NAT device is recommended to conserve them.
- IPv6 Support: Currently, EIPs support only IPv4, not IPv6.
Security and Access
EIPs are accessible from the internet when allowed by the instance’s security groups and network ACLs. For returning traffic, an internet gateway is required within the VPC.
Cost and Tagging
Elastic IPs incur charges when not associated with a running instance. Tags can be applied to EIPs for tracking usage costs in AWS Cost Explorer:
- Active IP Costs: Costs can be tracked under
PublicIPv4InUseAddress. - Idle IP Costs: EIPs attached to stopped instances are considered idle and can be tracked under
PublicIPv4IdleAddress. AWS charges around $0.005 per hour (approximately $3.60 per month) for each Elastic IP address that is allocated but not associated with a running instance. - Additional Elastic IPs: AWS allows one Elastic IP address to be associated with a running instance at no charge, but additional Elastic IPs associated with the same instance incur a cost of about $0.005 per hour.
- IP Remapping: Frequent remapping of Elastic IPs (i.e., more than 100 times per month) can incur additional costs.
Note: Tags must be activated for cost tracking in AWS Cost Explorer, and it may take up to 24 hours for the tags to appear in the cost allocation tags page.
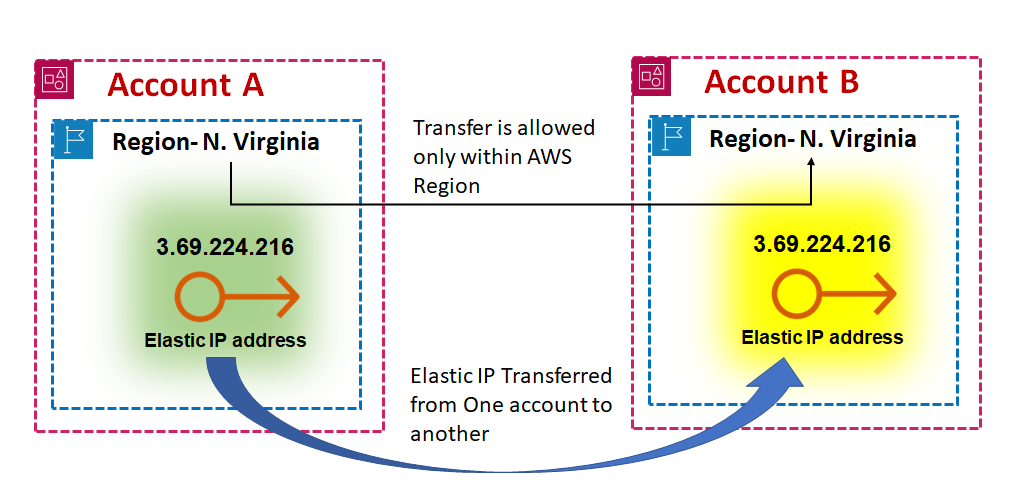
Regional Availability
Elastic IP addresses are regional, and users can select a network border group to limit CIDR blocks to a specific region, optimizing latency and availability.
Classless Inter-Domain Routing (CIDR) is an IP address allocation method that improves data routing efficiency on the internet.
Bring Your Own IP (BYOIP)
AWS allows users to bring their own IP addresses to EIPs for specific use cases. See the AWS documentation on BYOIP for details.
Elastic IPs provide a robust solution for maintaining stable and resilient cloud-based infrastructure, helping AWS users dynamically adapt to evolving networking needs.
Setting Up an Elastic IP
Prerequisites
- An existing EC2 instance to associate the Elastic IP with
Steps to Set Up an Elastic IP
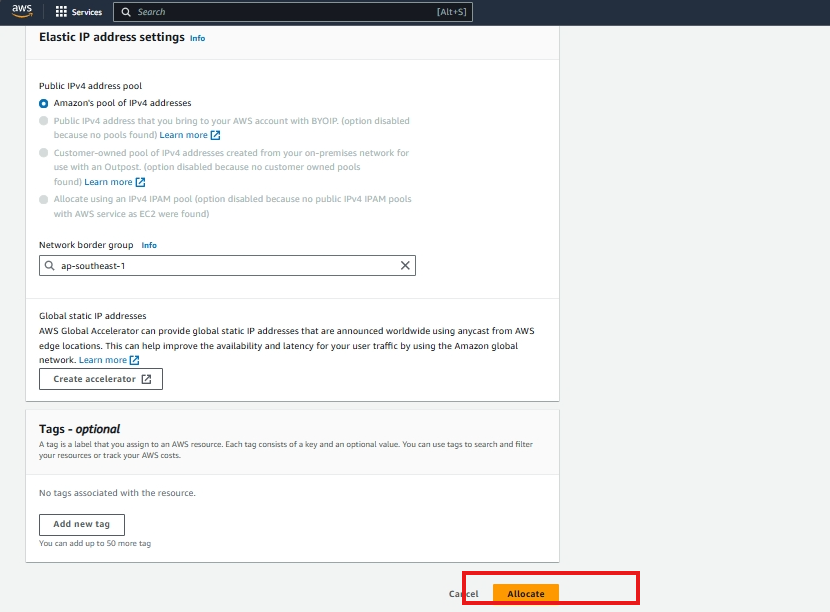
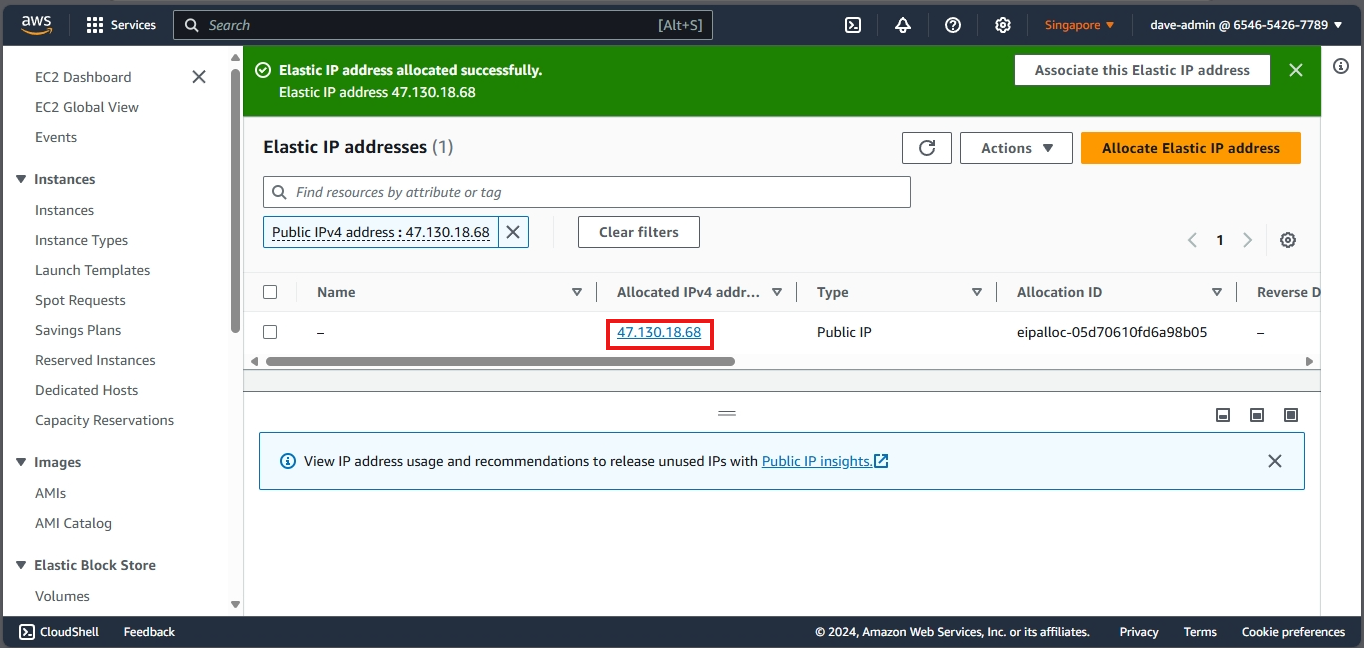
Step 1: Allocate an Elastic IP Address
- In the left navigation pane, click on Elastic IPs under the Network & Security section.
- Click the Allocate Elastic IP address button.
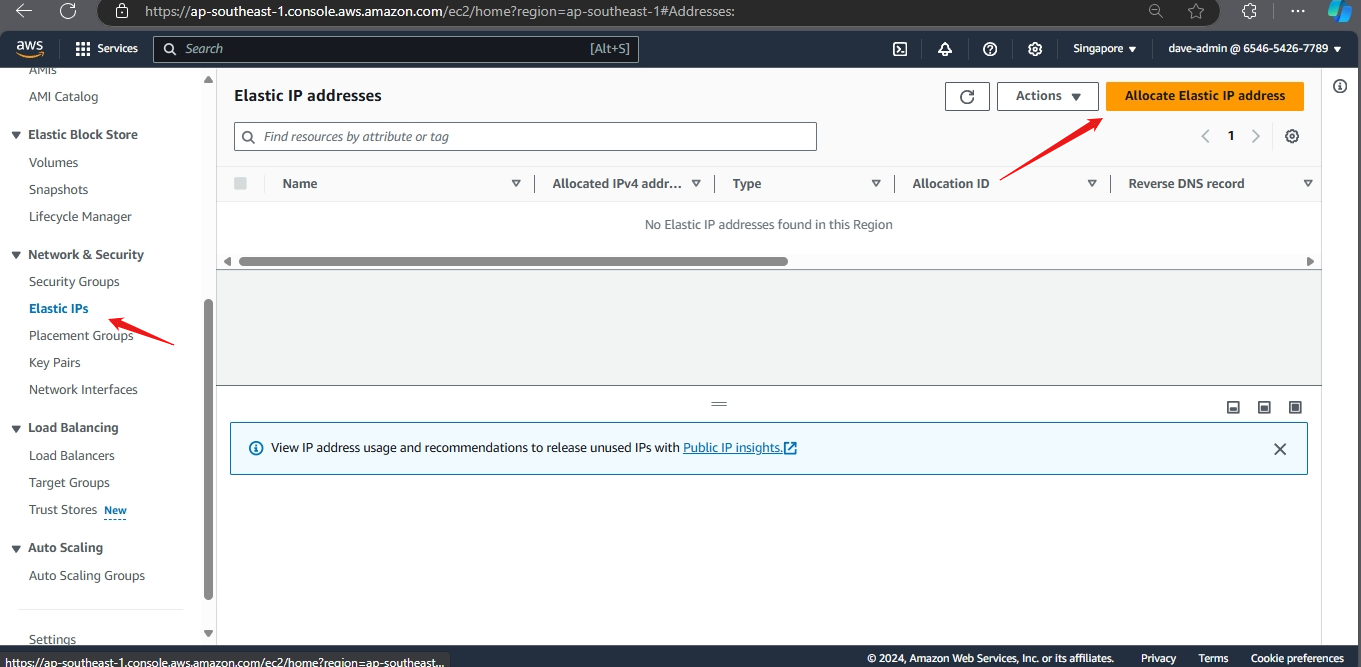
- Click Allocate. You will see a confirmation message, and your new Elastic IP will be displayed.
Step 1.1: Allocate an Elastic IP Address using AWS CLI
You can also allocate an Elastic IP address using the AWS CLI. Run the following command:
1
aws ec2 allocate-address --domain vpc
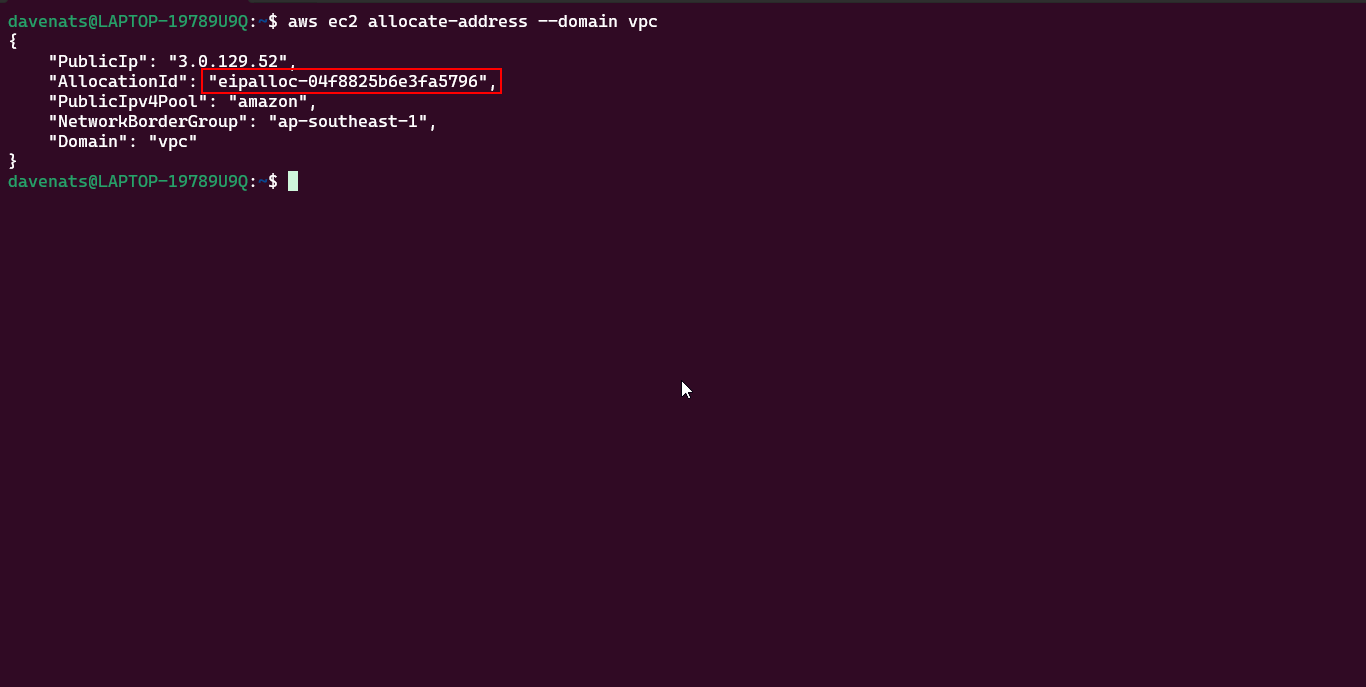
This command will return the details of the newly allocated Elastic IP address.
Copy the Allocation ID for the next step. Mine is eipalloc-04f8825b6e3fa5796
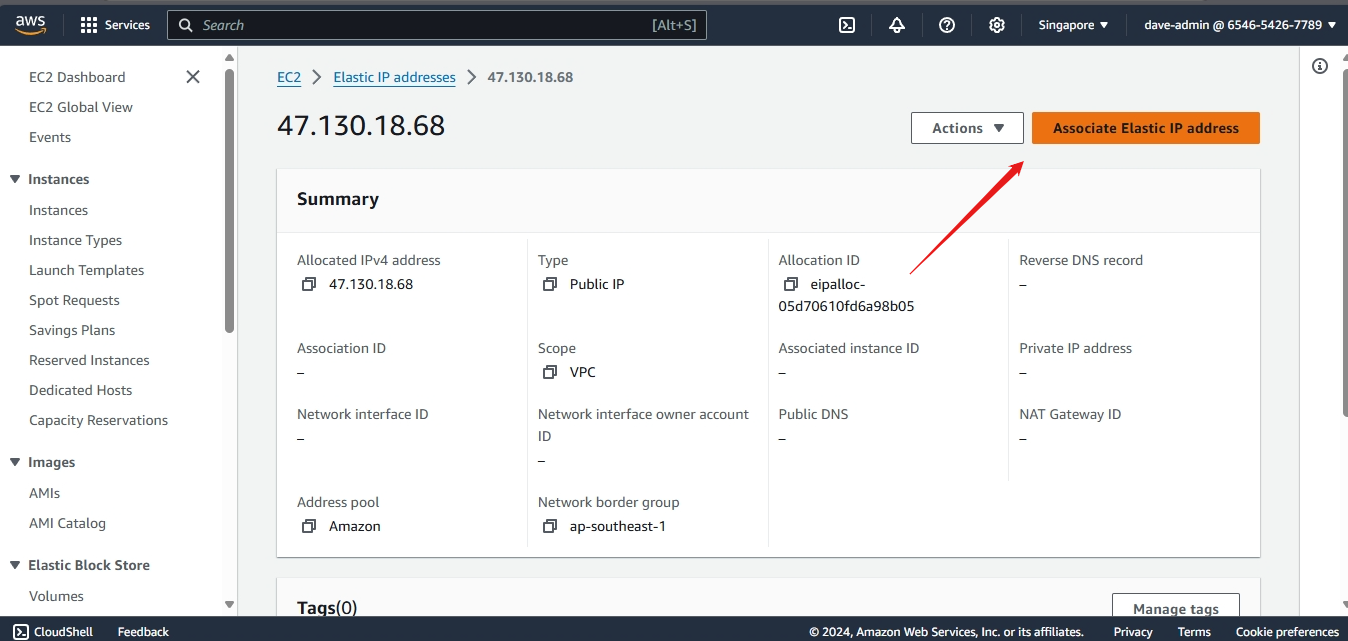
Step 2: Associate the Elastic IP with an EC2 Instance
- Select the newly allocated Elastic IP from the list.
- Choose Associate Elastic IP address.
- In the Instance field, start typing the ID or name of your EC2 instance and select it from the dropdown.
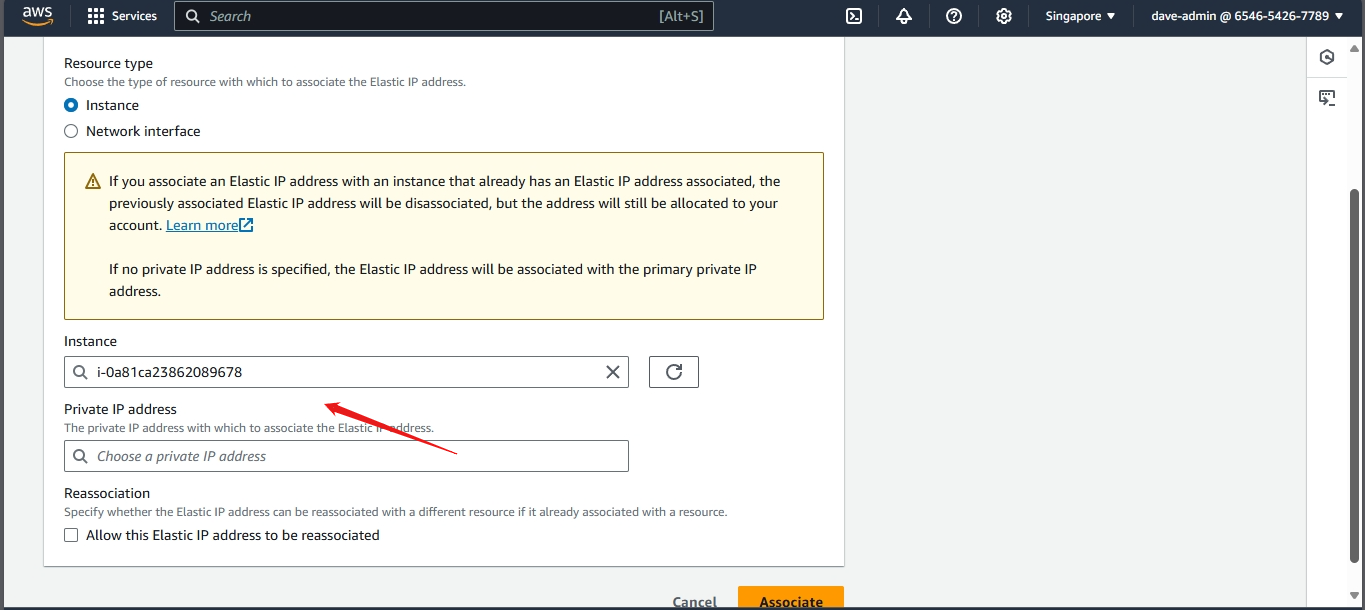
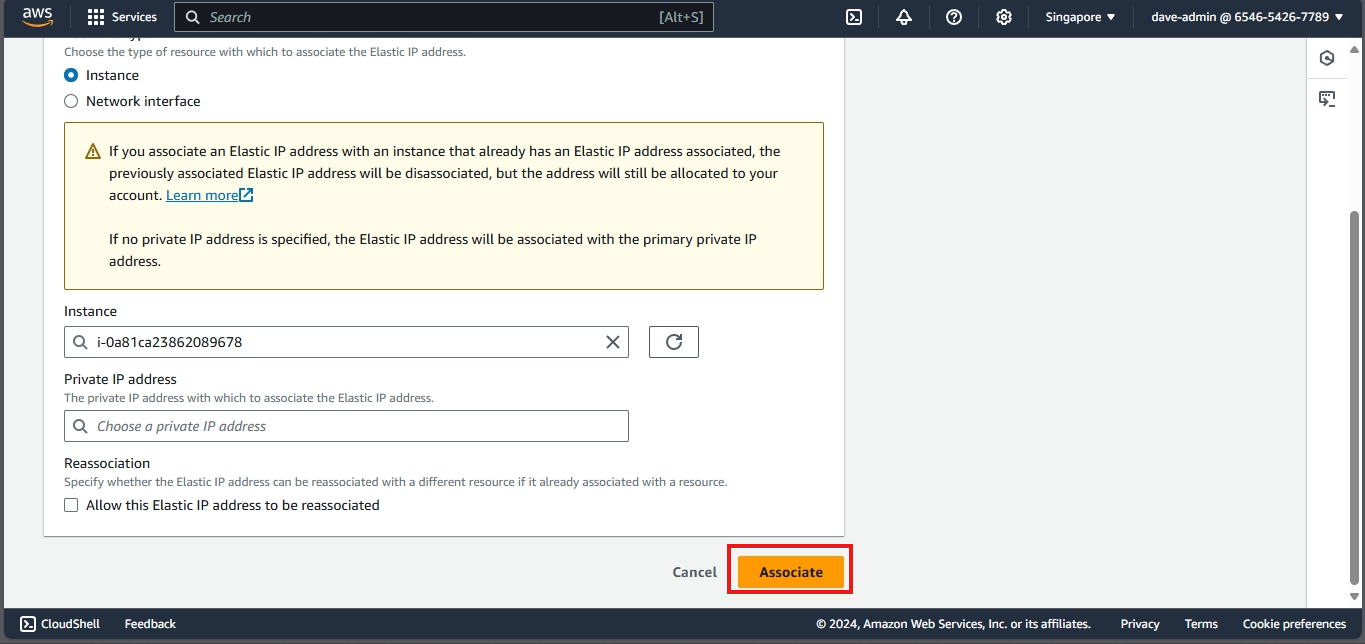
- Leave the Private IP address field as default unless you have specific configurations.
- Click Associate.
Step 2.1: Associate the Elastic IP with an EC2 Instance using AWS CLI
You can also associate the Elastic IP address with an EC2 instance using the AWS CLI. Run the following command:
- Lets first check the instance ID of the instance we want to associate the Elastic IP with.
1
aws ec2 describe-instance-status --include-all-instances --output table
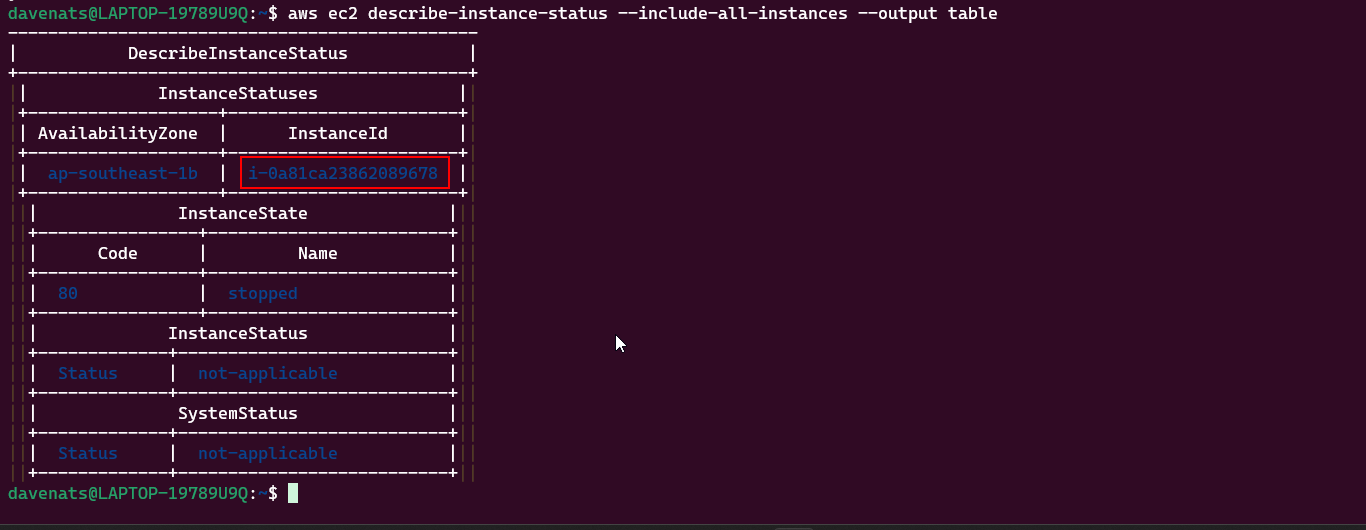
Copy the instance ID of the instance you want to associate the Elastic IP with.
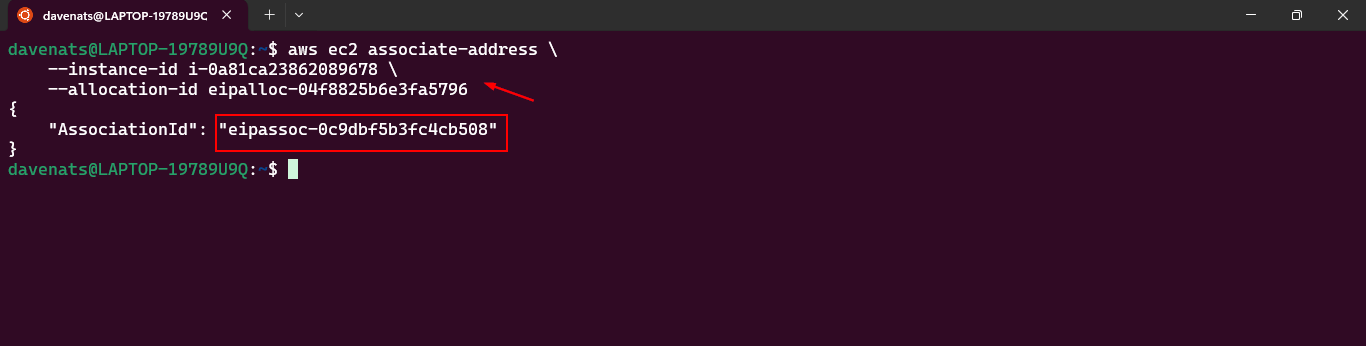
- With the instance ID and the allocation ID, run the following command:
1
2
3
aws ec2 associate-address \
    --instance-id <instance-id> \
    --allocation-id <allocation-id>
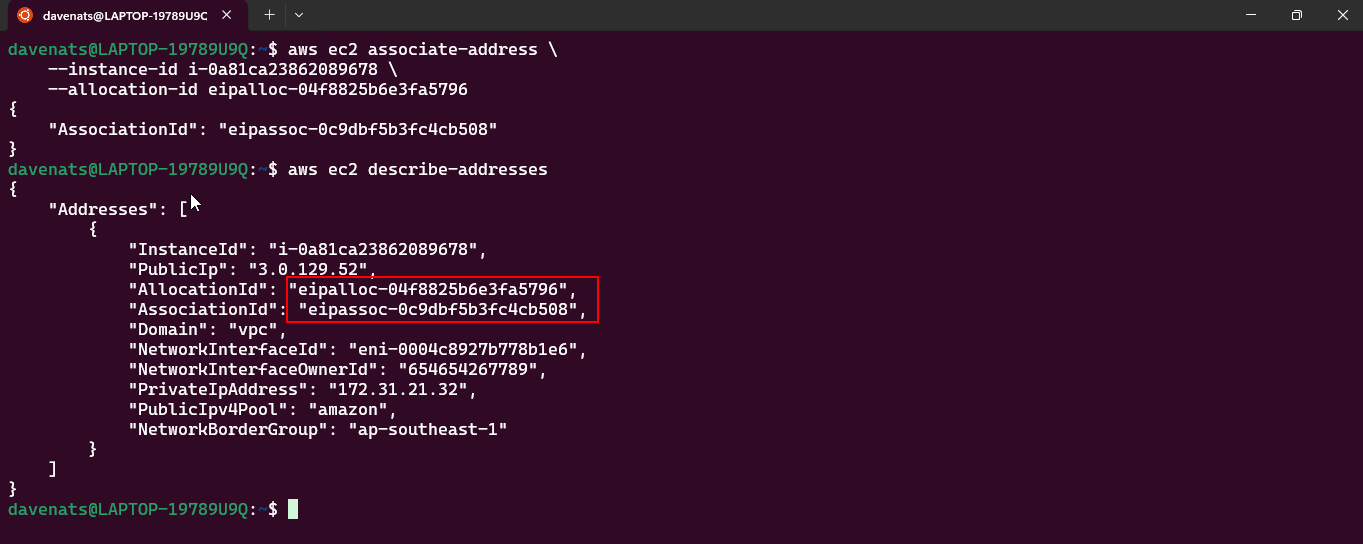
- Lets check the Elastic IP address to see if it has been associated with the instance.
1
aws ec2 describe-addresses
Step 3: Verify the Association
- Navigate back to the Instances section in the EC2 dashboard.
- Select your EC2 instance and scroll down to the Description tab.
- Verify that the Elastic IP is now listed under the instance’s public IP address.
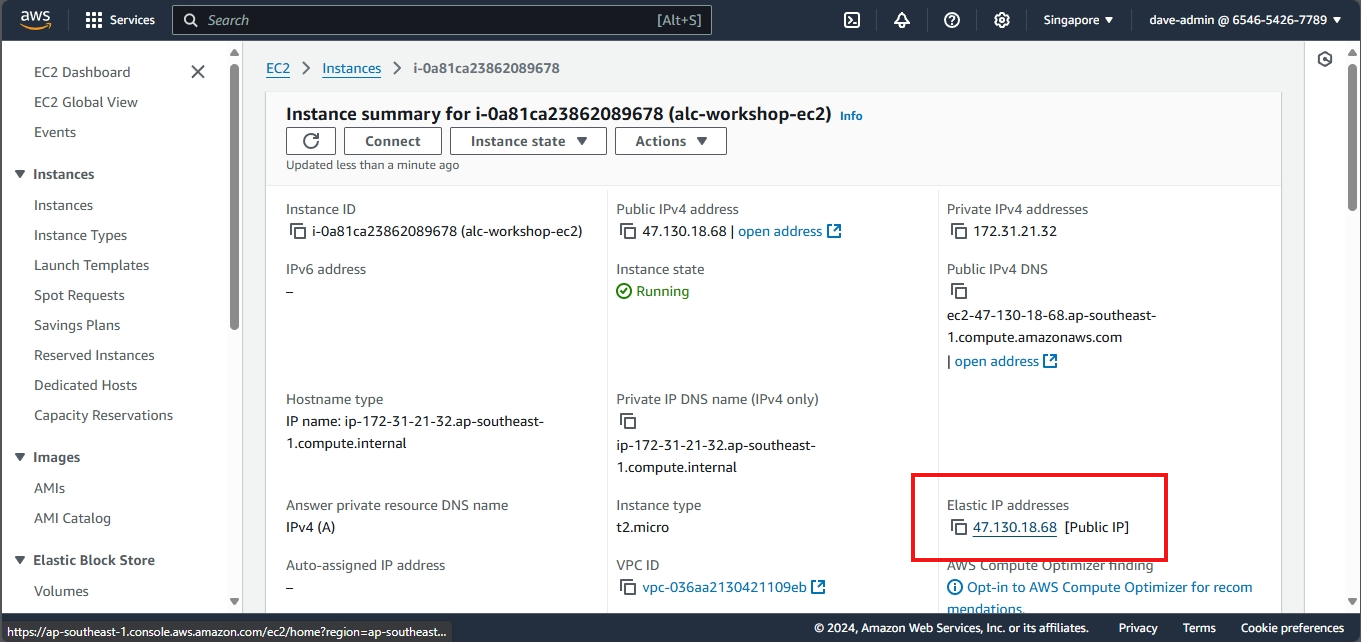
Step 4: Test the Elastic IP using web browser
- Open a web browser.
- Enter the Elastic IP address in the address bar.
- If a web server is running on your instance, you should see the expected response.

Step 5: Testing the Elastic IP by comparing it with the Public IP
- The public IP address of an EC2 instance can change when the instance is stopped and started, while an Elastic IP remains the same until you release it.
Testing the Public IP
-
Find an instance with a public IP address. (without an Elastic IP)
-
Check the public IP address of the instance.
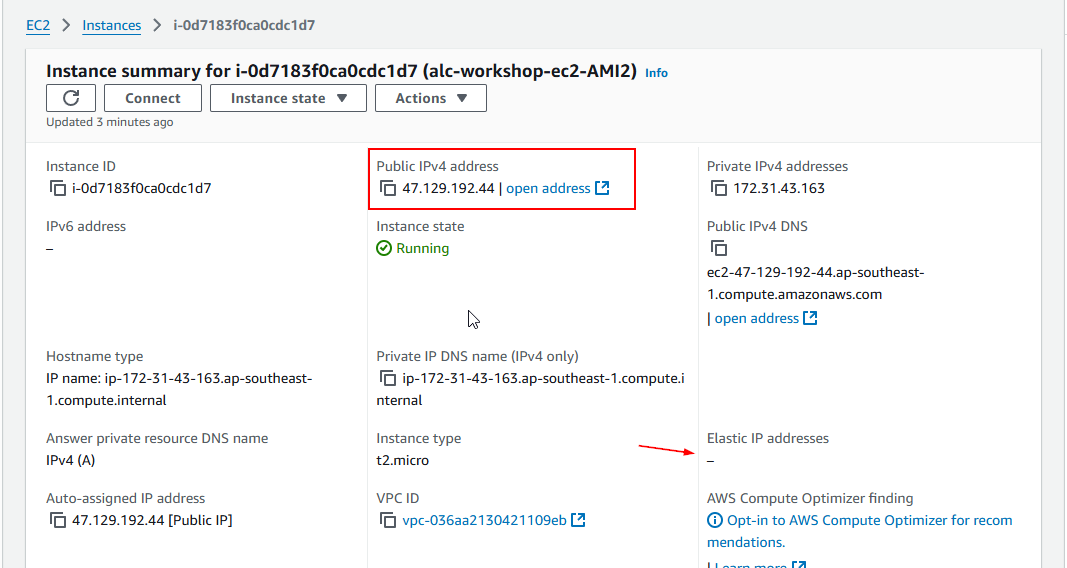
47.129.192.44 is the public IP address of the instance.
- Stop the instance.
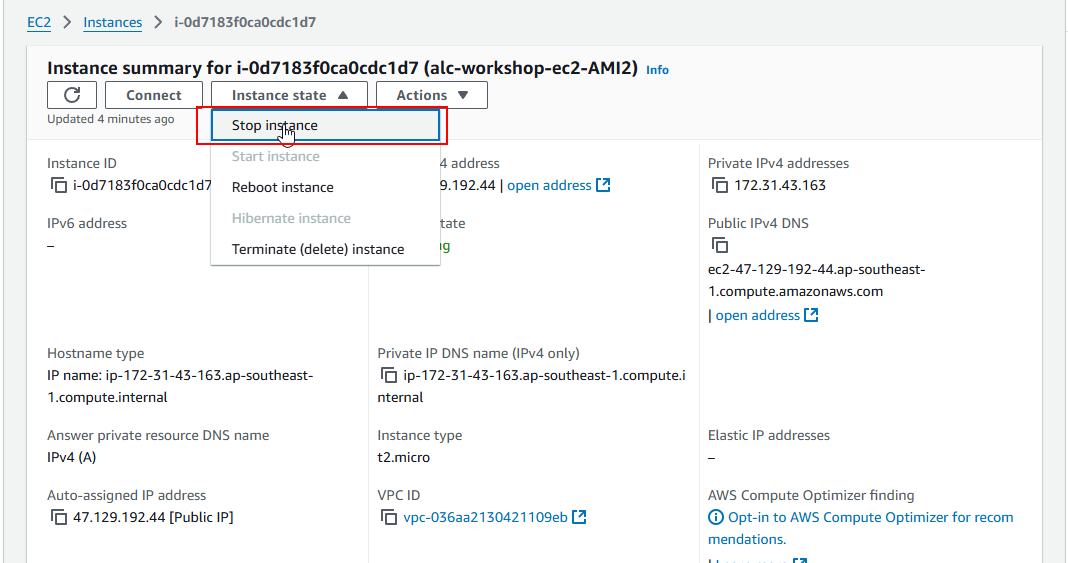
- Start it again and watch the public IP address change.

Testing the Elastic IP
- Find the instance with an Elastic IP address.
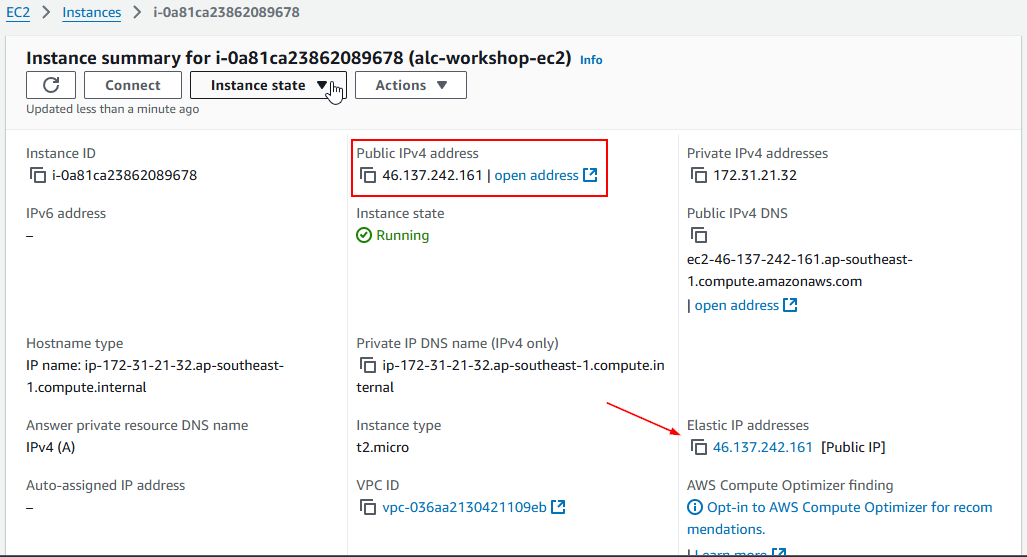
- Stop the instance.
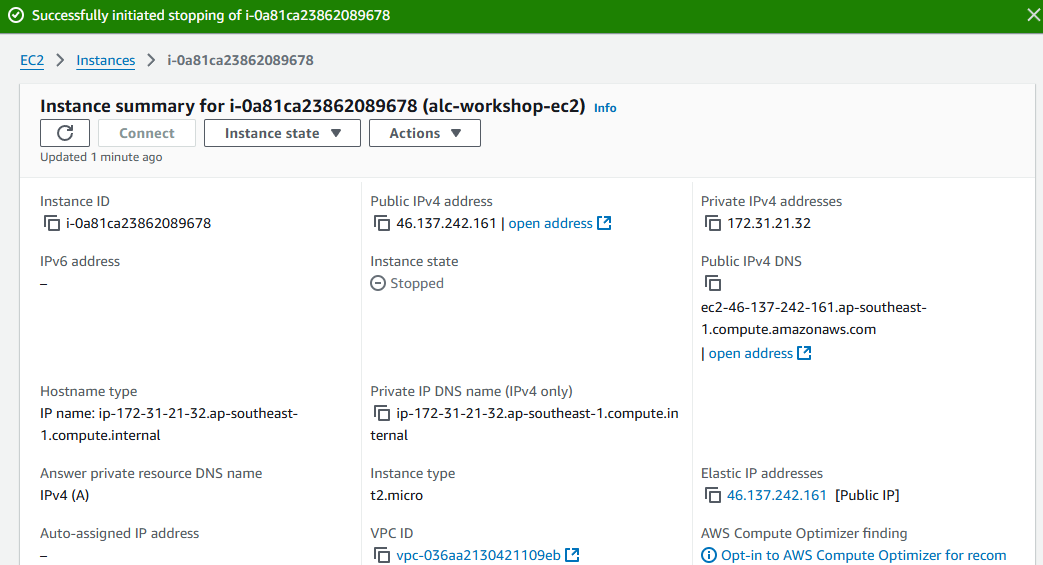
- Start it again and check the Elastic IP address. It should remain the same.
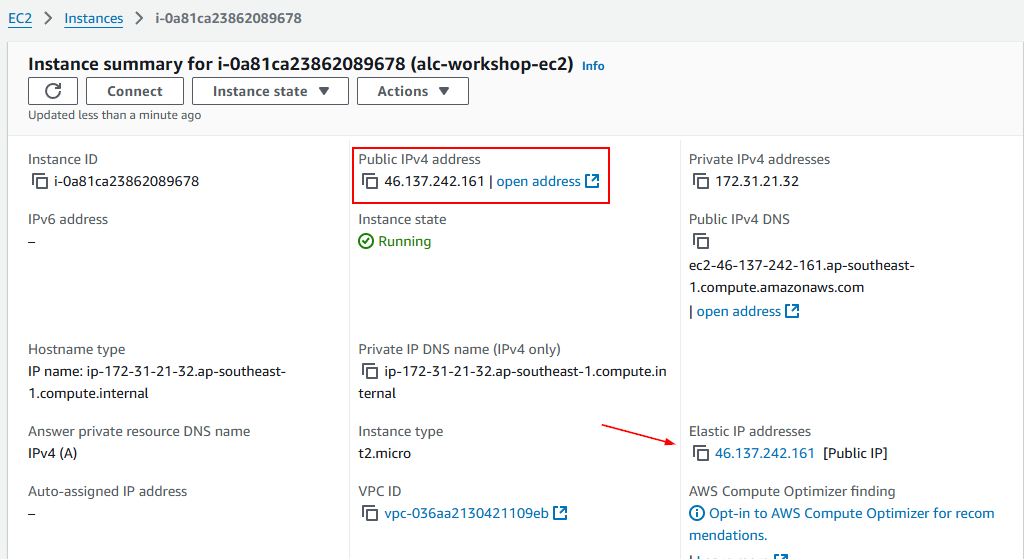
Cleanup
- If you no longer need the Elastic IP, go back to the Elastic IPs section.
- Select the Elastic IP and choose Disassociate Elastic IP address from the Actions dropdown.
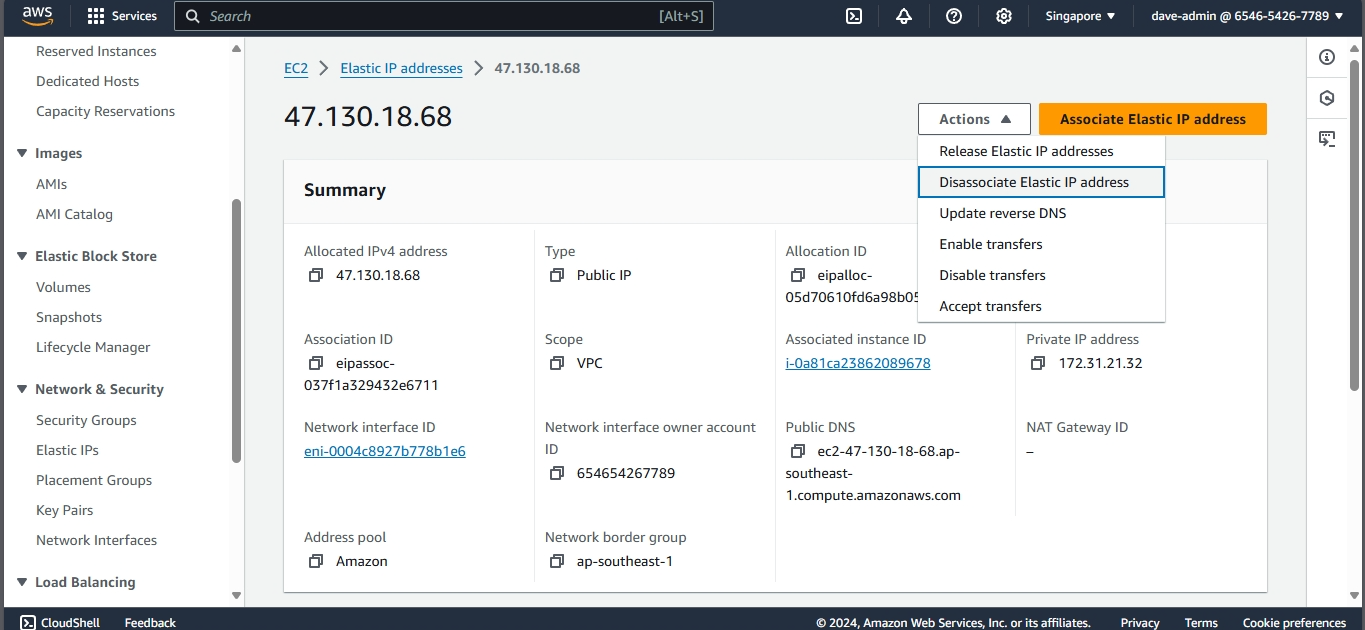
- Release the Elastic IP by selecting Release Elastic IP address from the Actions dropdown.
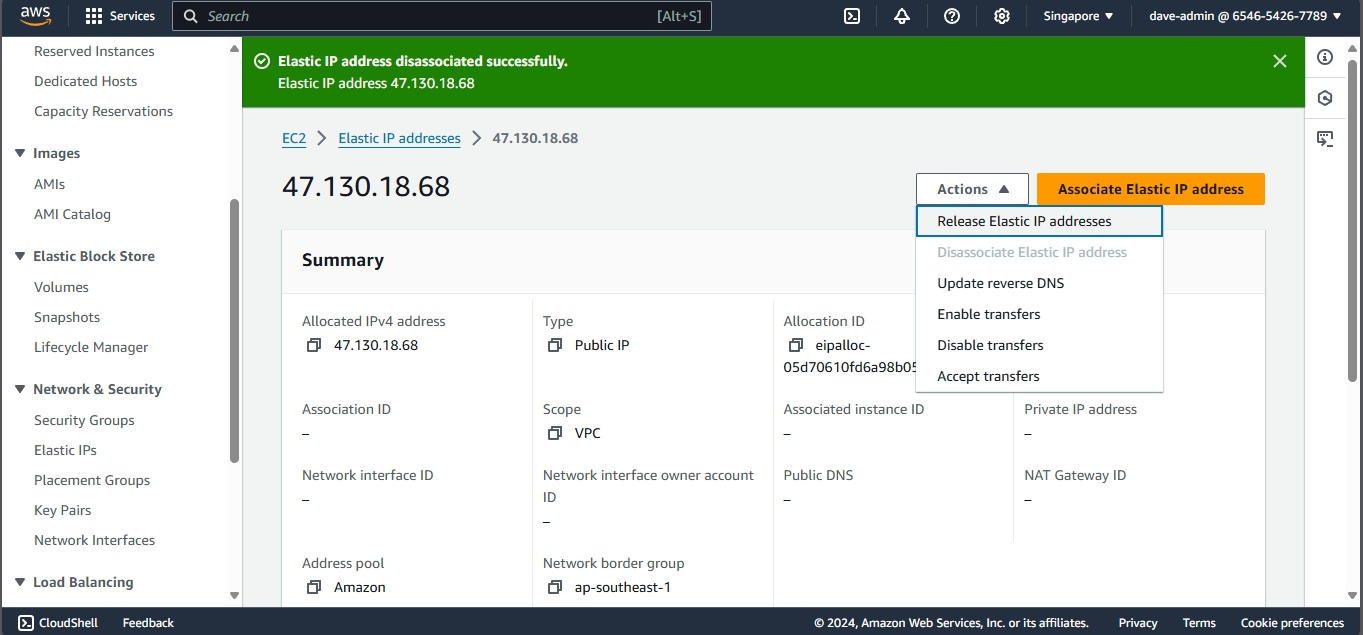
- Confirm the release.
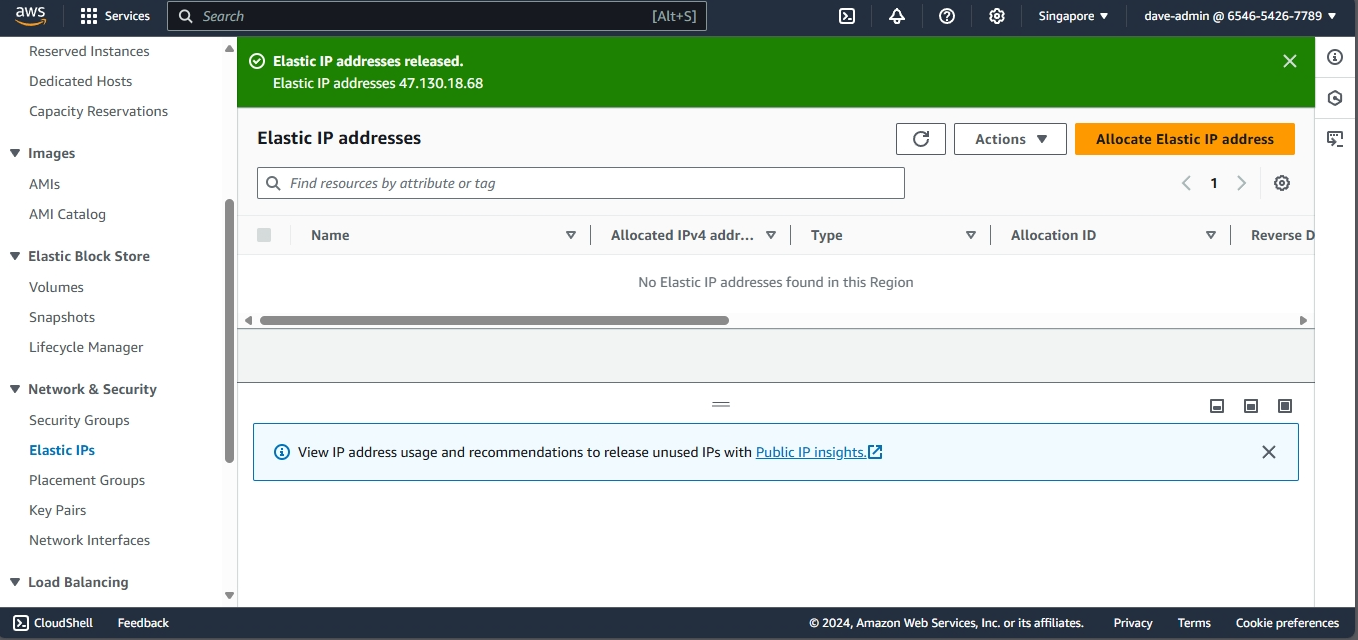
Clean up using AWS CLI
- To disassociate the Elastic IP from the instance later, you can use the disassociate-address command:
- You first need to get the AssociatedID using the following command:
1
aws ec2 describe-addresses
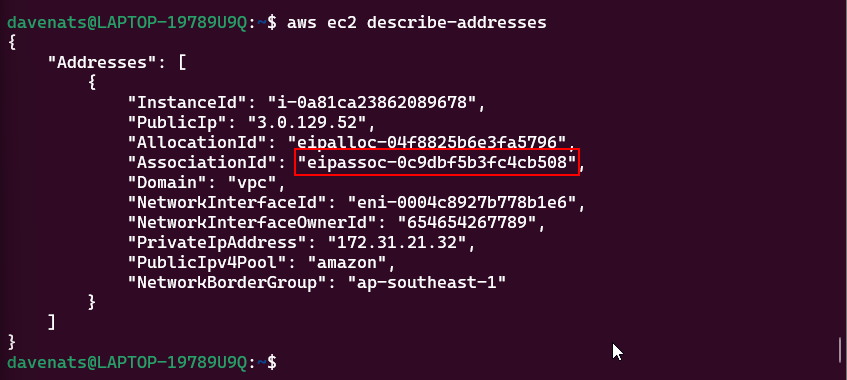
Using the copied association ID, run the following command:
1
aws ec2 disassociate-address --association-id <association-id>
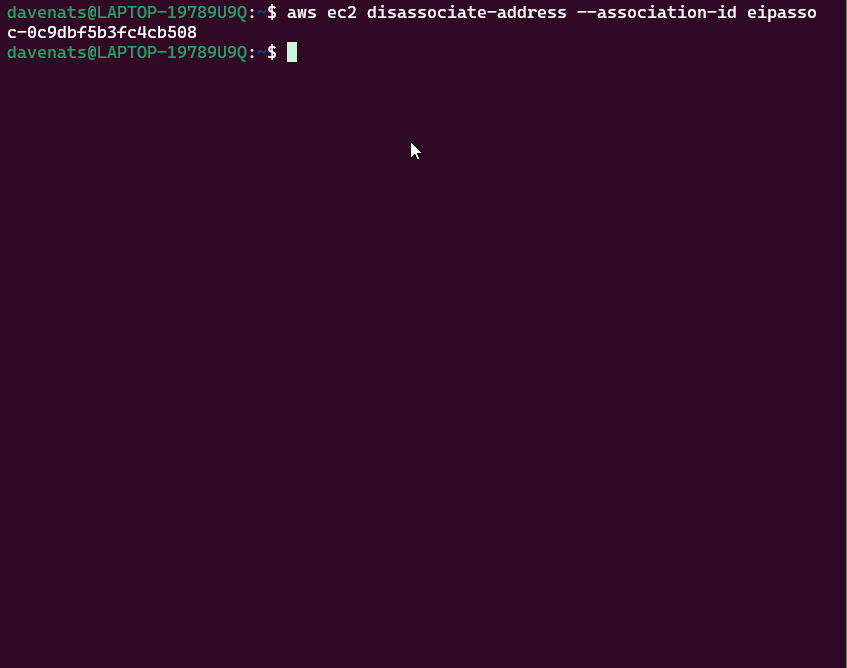
Checking the Elastic IP address again, you will see that it is no longer associated with the instance.
1
aws ec2 describe-addresses
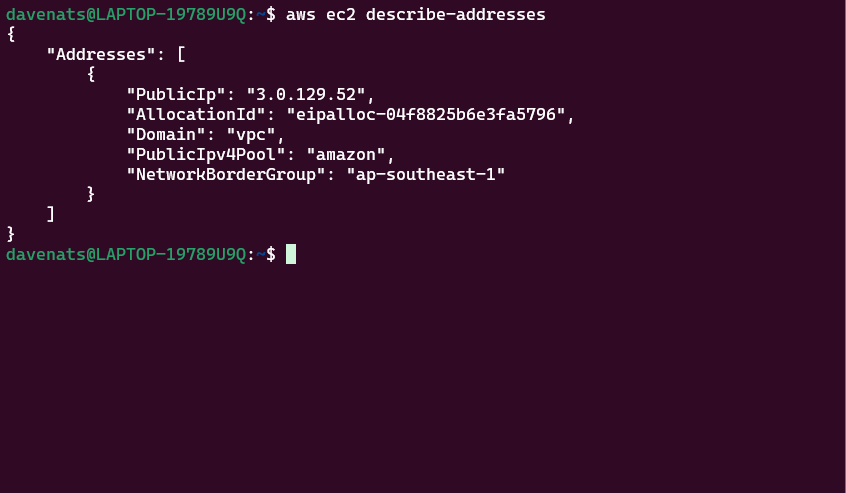
- If you want to release the Elastic IP when you no longer need it, use with the allocation-id earlier:
1
aws ec2 release-address --allocation-id <allocation-id>
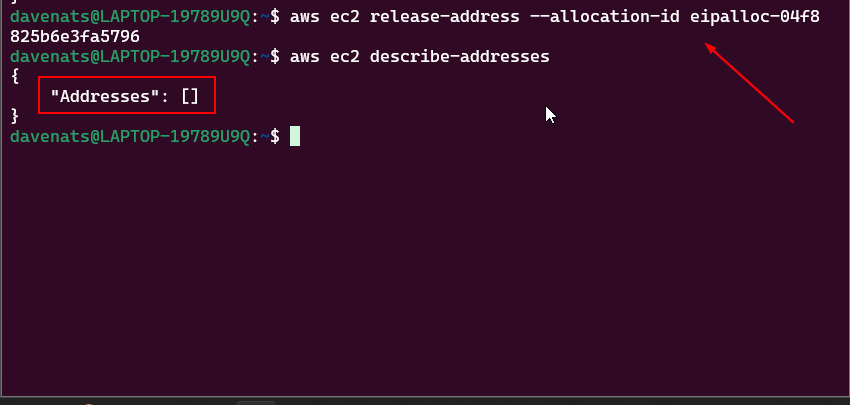
Additional Resources
Storage in EC2
Amazon EC2 provides you with flexible, cost effective, and easy-to-use data storage options for your instances. Each option has a unique combination of performance and durability. These storage options can be used independently or in combination to suit your requirements.
Block Storage
Amazon EBS
Amazon EBS provides durable, block-level storage volumes that you can attach and detach from your instances.
Instance store temporary block storage for EC2 instances
Instance store provides temporary block-level storage for instances. The number, size, and type of instance store volumes are determined by the instance type and instance size.
Object storage
Amazon S3
Amazon S3 provides access to reliable and inexpensive data storage infrastructure. It is designed to make web-scale computing easier by enabling you to store and retrieve any amount of data, at any time, from within Amazon EC2 or anywhere on the web.For example, you can use Amazon S3 to store backup copies of your data and applications. Amazon EC2 uses Amazon S3 to store EBS snapshots and instance store-backed AMIs.
File Storage
Amazon EFS (Linux instances only)
Amazon EFS provides scalable file storage for use with Amazon EC2. You can create an EFS file system and configure your instances to mount the file system. You can use an EFS file system as a common data source for workloads and applications running on multiple instances.
Amazon FSx
- With Amazon FSx, you can launch, run, and scale feature-rich, high-performance file systems in the cloud. Amazon FSx is a fully-managed service that supports a wide range of workloads. You can choose between these widely-used file systems: Lustre, NetApp ONTAP, OpenZFS, and Windows File Server.
File Caching
Amazon File Cache provides temporary, high-performance cache on AWS for processing file data. The cache provides read and write data access to compute workloads on Amazon EC2 with sub-millisecond latencies, up to hundreds of GB/s of throughput, and up to millions of IOPS.
The following figure shows the relationship between these storage options and your instance.
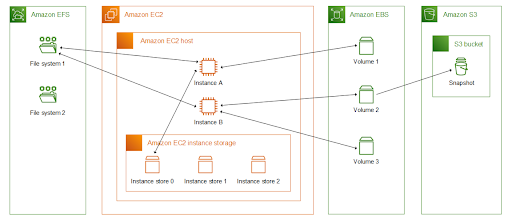
EBS

Amazon Elastic Block Store (Amazon EBS) provides scalable, high-performance block storage resources that can be used with Amazon Elastic Compute Cloud (Amazon EC2) instances. With Amazon Elastic Block Store, you can create and manage the following block storage resources:
Amazon EBS volumes
These are storage volumes that you attach to Amazon EC2 instances. After you attach a volume to an instance, you can use it in the same way you would use a local hard drive attached to a computer, for example to store files or to install applications.
Amazon EBS snapshots
These are point-in-time backups of Amazon EBS volumes that persist independently from the volume itself. You can create snapshots to back up the data on your Amazon EBS volumes. You can then restore new volumes from those snapshots at any time.
Accessing Amazon EBS
You can create and manage your Amazon EBS resources using the following interfaces:
- AWS Command Line Interface
- AWS Tools for PowerShell
- AWS CloudFormation
- Amazon EC2 Query API
- AWS SDKs
Pricing
Pricing Calculator - https://calculator.aws/#/createCalculator/EBS
Amazon EBS provides the following volume types
General Purpose SSD (gp2 and gp3) and Provisioned IOPS SSD (io1 and io2)
- SSD-backed volumes are optimized for transactional workloads involving frequent read/write operations with small I/O size, where the dominant performance attribute is IOPS.
Throughput Optimized HDD (st1), Cold HDD (sc1)
- HDD-backed volumes are optimized for large streaming workloads where the dominant performance attribute is throughput. HDD volume types include Throughput Optimized HDD and Cold HDD.
Magnetic (standard)
- Magnetic (standard) volumes are previous generation volumes that are backed by magnetic drives. They are suited for workloads with small datasets where data is accessed infrequently and performance is not of primary importance.
Basic Steps
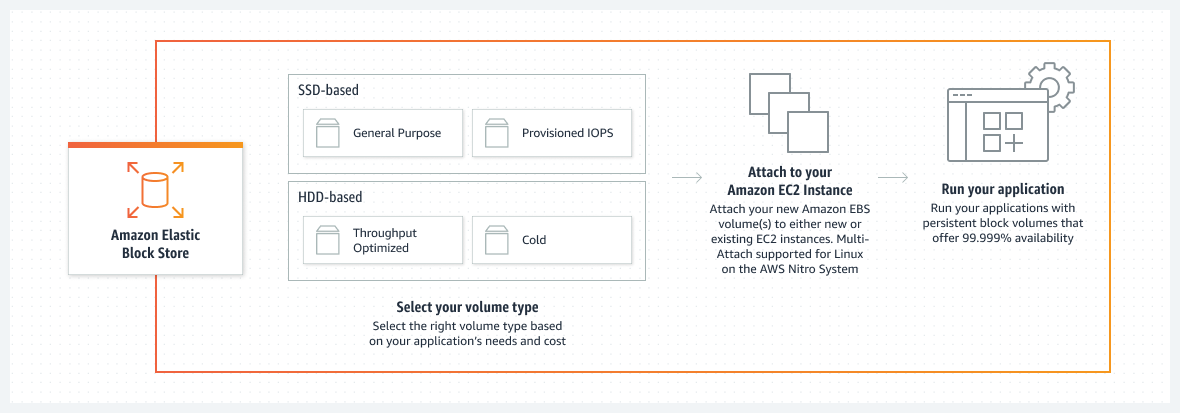
Features and benefits of Amazon EBS volumes
-
Data availability. When you create an EBS volume, it is automatically replicated within its Availability Zone to prevent data loss due to failure of any single hardware component.
-
Data persistence. An EBS volume is off-instance storage that can persist independently from the life of an instance. You continue to pay for the volume usage as long as the data persists.
- Data encryption. For simplified data encryption, you can create encrypted EBS volumes with the Amazon EBS encryption feature. All EBS volume types support encryption. You can use encrypted EBS volumes to meet a wide range of data-at-rest encryption requirements for regulated/audited data and applications.
-
Data security.
-
Snapshots. Amazon EBS provides the ability to create snapshots (backups) of any EBS volume and write a copy of the data in the volume to Amazon S3, where it is stored redundantly in multiple Availability Zones.
-
The volume does not need to be attached to a running instance in order to take a snapshot. As you continue to write data to a volume, you can periodically create a snapshot of the volume to use as a baseline for new volumes.
-
These snapshots can be used to create multiple new EBS volumes or move volumes across Availability Zones. Snapshots of encrypted EBS volumes are automatically encrypted.
-
When you create a new volume from a snapshot, it’s an exact copy of the original volume at the time the snapshot was taken.
-
Snapshots are incremental backups, meaning that only the blocks on the volume that have changed after your most recent snapshot are saved. If you have a volume with 100 GiB of data, but only 5 GiB of data have changed since your last snapshot, only the 5 GiB of modified data is written to Amazon S3.
-
Even though snapshots are saved incrementally, the snapshot deletion process is designed so that you need to retain only the most recent
- Flexibility. EBS volumes support live configuration changes while in production. You can modify volume type, volume size, and IOPS capacity without service interruptions.
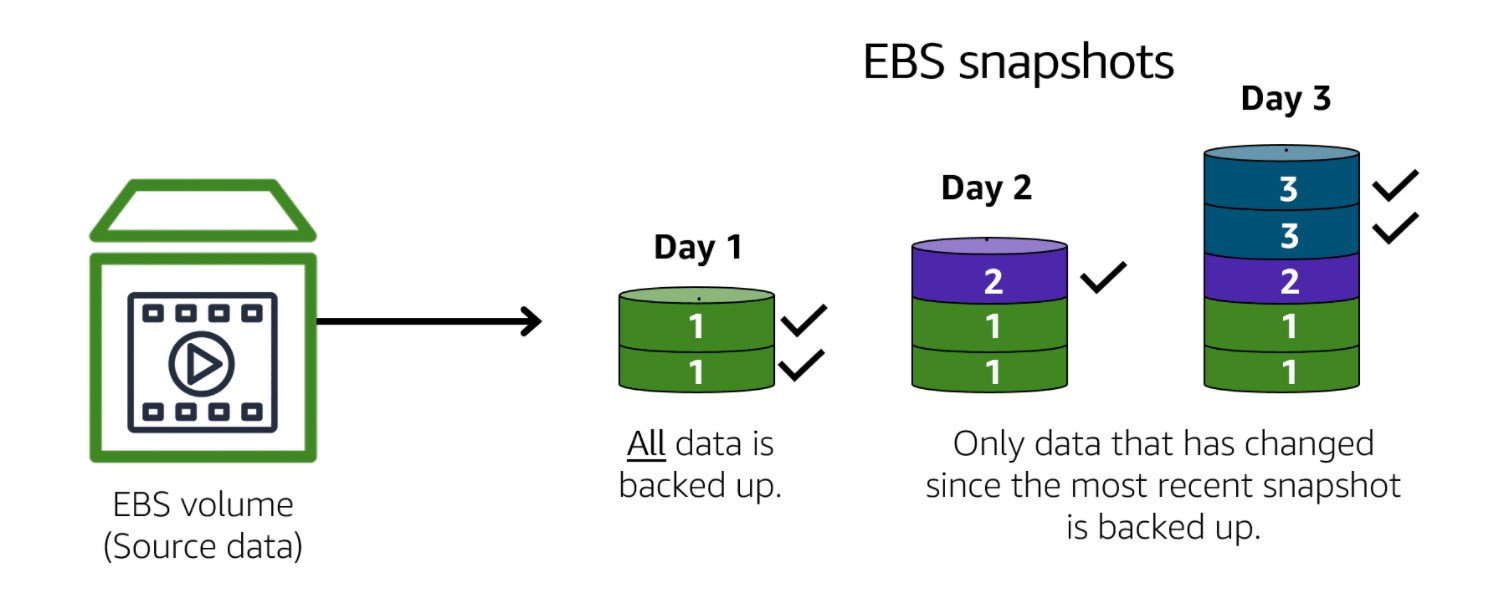
Volume Lifecycle: Attach an EBS volume to multiple EC2 instances using Multi-Attach
Amazon EBS Multi-Attach enables you to attach a single Provisioned IOPS SSD (io1 or io2) volume to multiple instances that are in the same Availability Zone. You can attach multiple Multi-Attach enabled volumes to an instance or set of instances.
- Multi-Attach makes it easier for you to achieve higher application availability in applications that manage concurrent write operations.
Pricing and billing
- There are no additional charges for using Amazon EBS Multi-Attach. You are billed the standard charges that apply to Provisioned IOPS SSD (io1 and io2) volumes.
Migrate Amazon EBS volumes from gp2 to gp3
The standard across many AWS services (including Amazon EC2) is gp2. The performance is closely coupled with the size of the volume. For every 1 GB of capacity, gp2 volumes get 3 IOPS of performance. That is, a 2,000 GB gp2 volume is capable of 6,000 IOPS. The third generation of general purpose SSDs, called gp3. For gp3 volumes, performance can be customized independently from the storage capacity. This enables even small capacity volumes to achieve performance capabilities up to 16,000 IOPS and 1,000 Mb/s throughput.
Note: IOPS are a unit of measure representing input/output operations per second.
Cost Impact
- For gp2 volumes, pricing is based on provisioned capacity at $0.10 per GiB-month. For gp3 volumes, have a capacity price at $0.08 per GiB-month (20 percent less expensive than gp2) and separate costs for IOPS at $0.005 per provisioned IOPS-month over 3,000 and $0.04 per provisioned MiBs-month over 125 MiBs for throughput.
Modify Amazon EBS snapshots
Deleting EBS volumes and managing the retention and archiving of snapshots is an important aspect to control costs from the start. You can back up the data on your EBS volumes to Amazon Simple Storage Service (Amazon S3) by taking point-in-time snapshots.
-
Snapshots are incremental backups, so they save only the blocks on the devices that changed after your most recent snapshot. This minimizes the time required to create the snapshot and saves on storage costs by not duplicating data.
-
Each snapshot contains all the information that’s required to restore your data (from when the snapshot was created) to a new EBS volume.
Charges for EBS snapshots are calculated by the gigabyte-month. You’re billed for how large the snapshot is and how long you keep the snapshot. Pricing varies depending on the storage tier.
- Standard tier – You have a volume that’s storing 100 GB of data. You’re billed for the full 100 GB of data for the first snapshot (snap A). At the time of the next snapshot (snap B), you have 105 GB of data. You’re then billed for only the additional 5 GB of storage for incremental snap B.
- Archive tier – You archive snap B. The snapshot is then moved to the Archive tier, and you’re billed for the full 105 GB snapshot block.
Cost Impact
- Charges for EBS volumes and snapshots are managed separately. The following table compares the standard and archive tiers per month at just 50 TB of usage. Even at this lower scale it’s still thousands of dollars of savings annually.
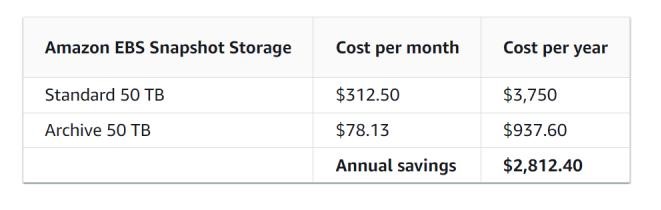
Delete unattached Amazon EBS volumes
Unattached (orphaned) EBS volumes can lead to unnecessary storage costs in your AWS environment.
- It’s a best practice to have a process in place to continually review the usage of EBS volumes.
Cost impact
- Unattached EBS volumes, also referred to as unused or orphaned volumes, incur the same charges as attached volumes based on the provisioned storage size and storage type. Although it’s only 0.10 per GB-month, it’s crucial to recognize that the accumulation of unused EBS volumes can result in significant costs over time.
Cost optimization recommendations
You can use AWS to easily automate the deletion of unattached EBS volumes.
-
For example, use AWS Lambda, AWS Config, Amazon CloudWatch, and AWS Systems Manager to define criteria for deleting unattached volumes based on age, tags, and other specifications.
-
You can also use these AWS services to automate the cleanup process at scale.
Amazon EBS Volume Lifecycle
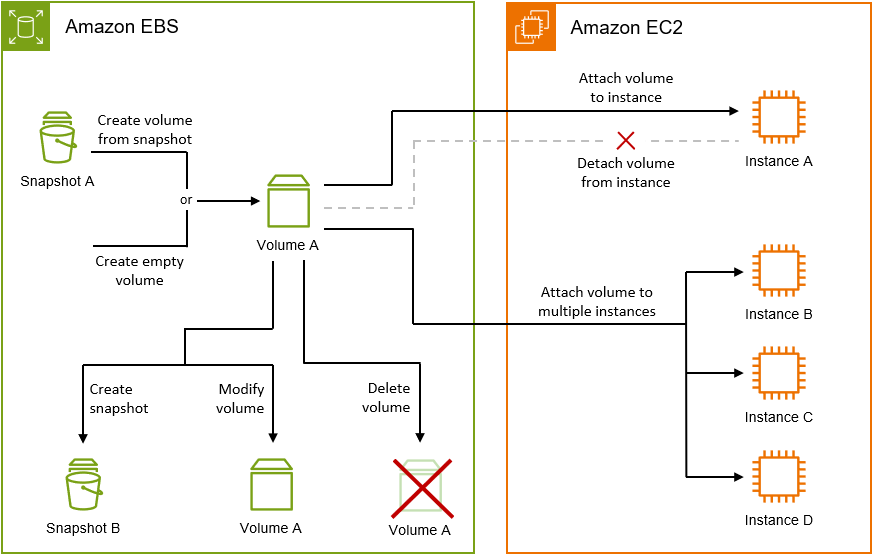
Elastic File System (EFS)
Amazon EFS provides scalable file storage for use with Amazon EC2. You can use an EFS file system as a common data source for workloads and applications running on multiple instances.
-
EFS is a fully managed, scalable, elastic file storage service that can be shared across multiple EC2 instances.
-
It is designed to provide a simple, scalable, and fully managed file storage solution for use with AWS Cloud services and on-premises resources.
How it works: Amazon Elastic File System (Amazon EFS) automatically grows and shrinks as you add and remove files with no need for management or provisioning.

Features:
-
File System Storage: EFS provides a file system interface and file system semantics, meaning you can access files in a directory structure (like a traditional file system).
-
Shared Access: Multiple EC2 instances can access the same EFS file system simultaneously, making it ideal for applications that require shared access to files, such as content management systems, web servers, and data analytics.
-
Automatic Scaling: EFS automatically scales up or down as files are added or removed, so you only pay for what you use.
-
Performance Modes: Supports two performance modes (General Purpose and Max I/O) for various performance requirements.
-
Durability: Data is redundantly stored across multiple Availability Zones, ensuring high availability and durability.
EBS Lifecycle Manager
You can use Amazon Data Lifecycle Manager to automate the creation, retention, and deletion of EBS snapshots and EBS-backed AMIs.
- EBS Data Lifecycle Manager (DLM) is an automation tool that helps manage the lifecycle of your EBS volumes and snapshots. It allows you to define policies that automatically create, retain, and delete EBS snapshots and volumes according to your specified criteria. Quotas Your AWS account has the following quotas related to Amazon Data Lifecycle Manager:

Features:
-
Automation: Set up rules to automatically create snapshots or delete old ones based on age or other factors.
-
Cost Management: Ensure that you only keep the snapshots or volumes you need, helping you optimize storage costs.
-
Compliance: Retain snapshots according to your compliance or data retention requirements.
-
Retention Policies: Specify how many snapshots to keep, and automatically delete older ones when a new one is created.
Expanding an EBS Volume
Step 1: Modify the EBS Volume in the AWS Console
- Select the instance where we want to expand the EBS volume.
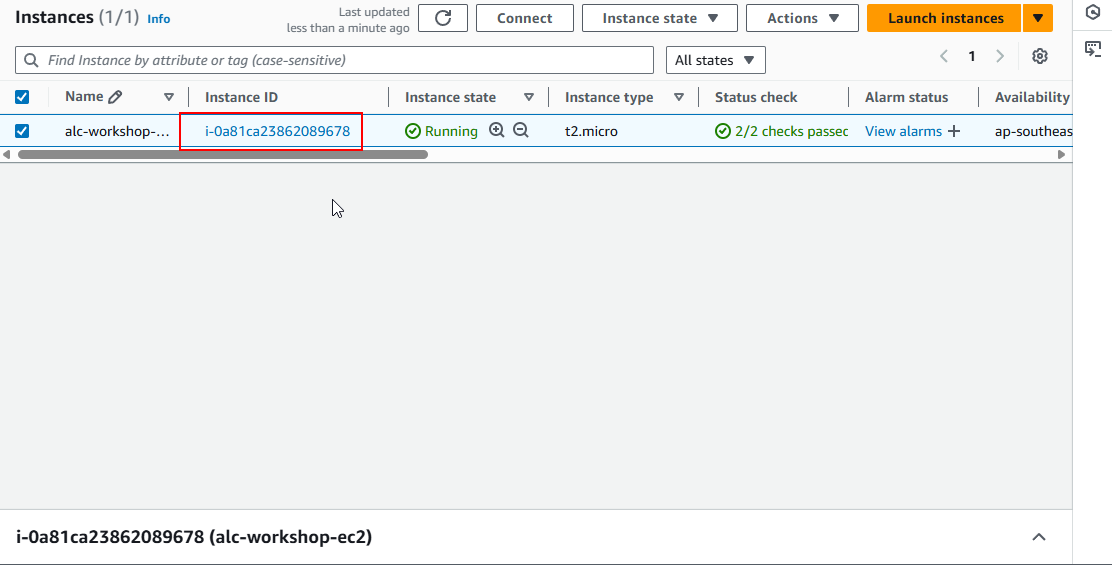
- Scroll down to the storage section and click on the EBS volume.
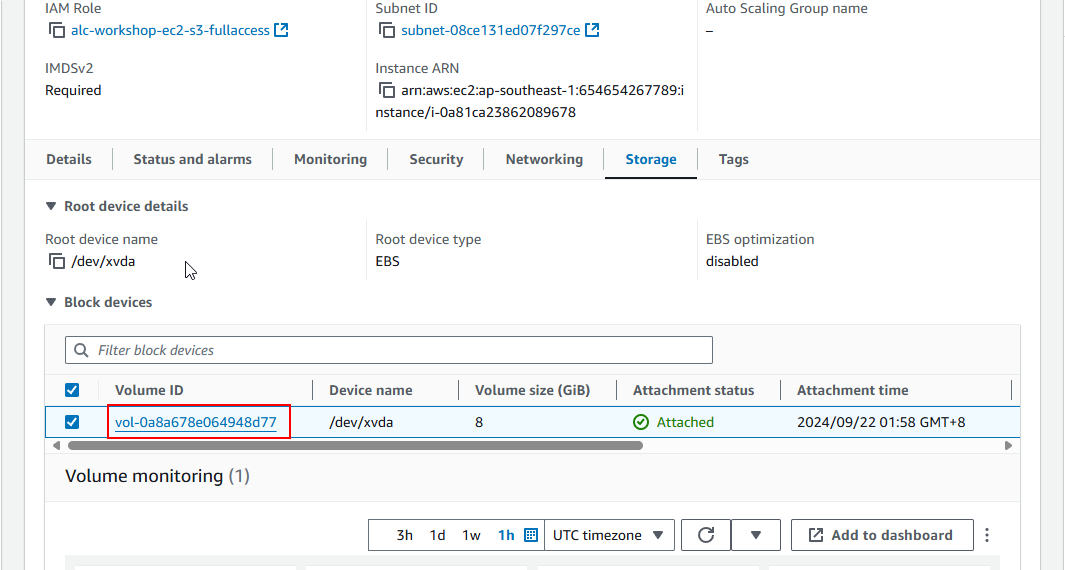
- Click the EBS volume ID to view its details.
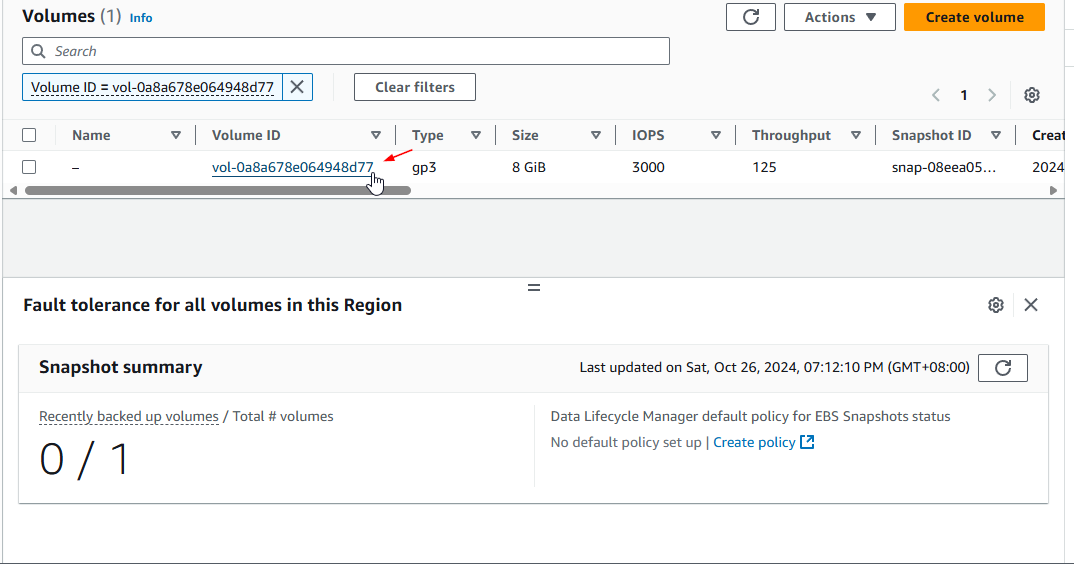
- Click the Modify button.
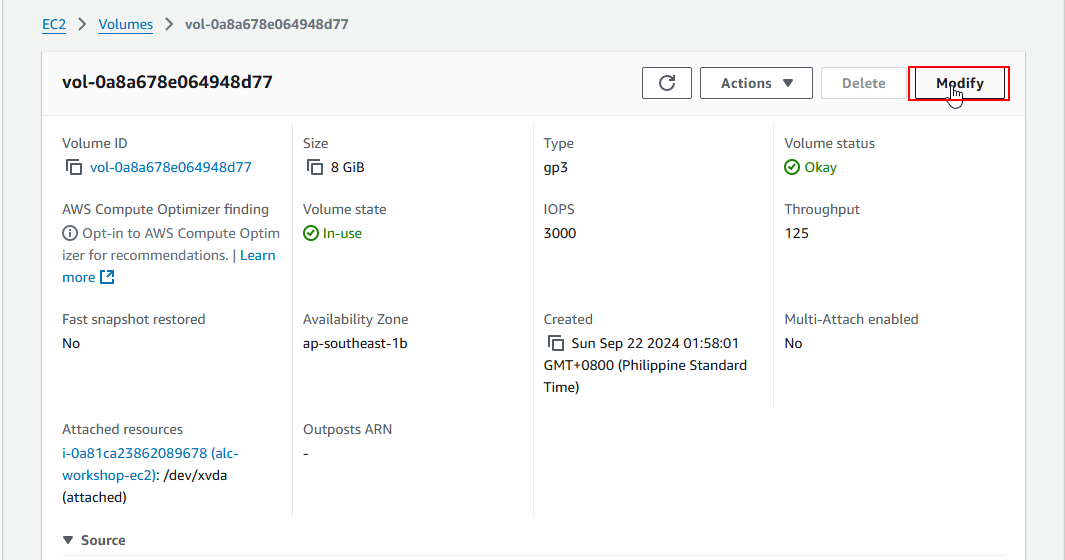
- Modify the volume size from
8 GiBto12 GiBand click Modify.
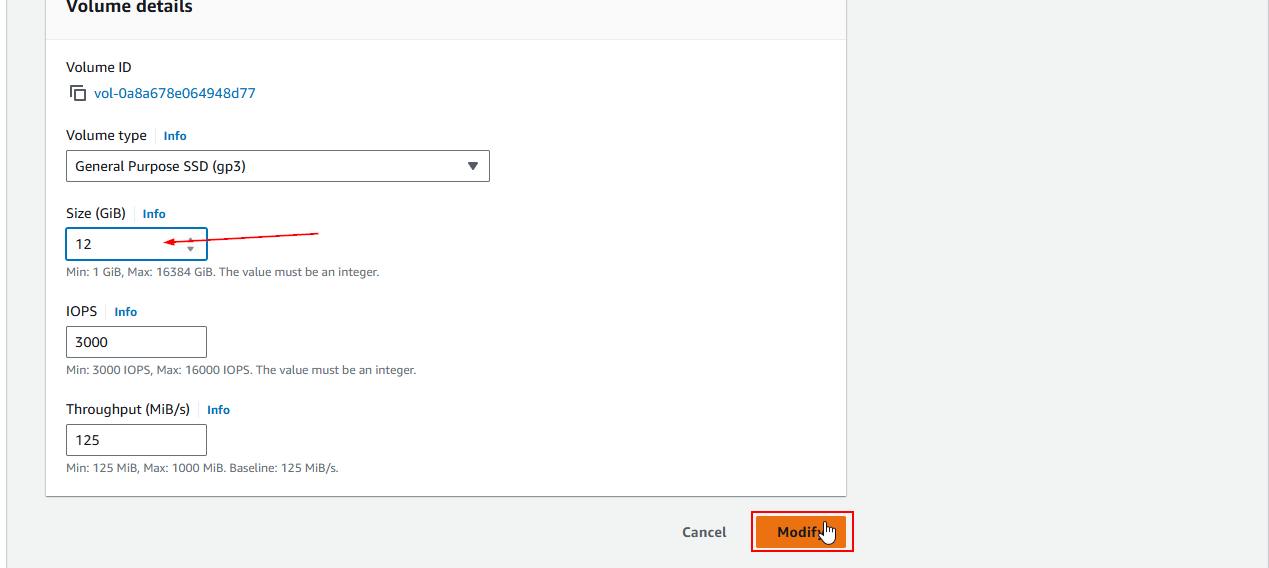
- Wait for Update:
- AWS will modify the volume in the background. You can monitor the State in the Volumes section until it shows as available.
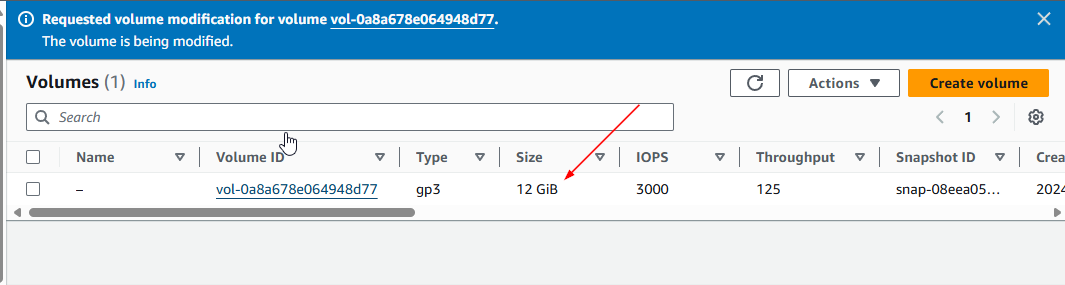
Step 1.1: Modify the EBS Volume Using AWS CLI
- Check the Volume ID:
- Run the following command to list all the volumes in the region:
1
aws ec2 describe-volumes
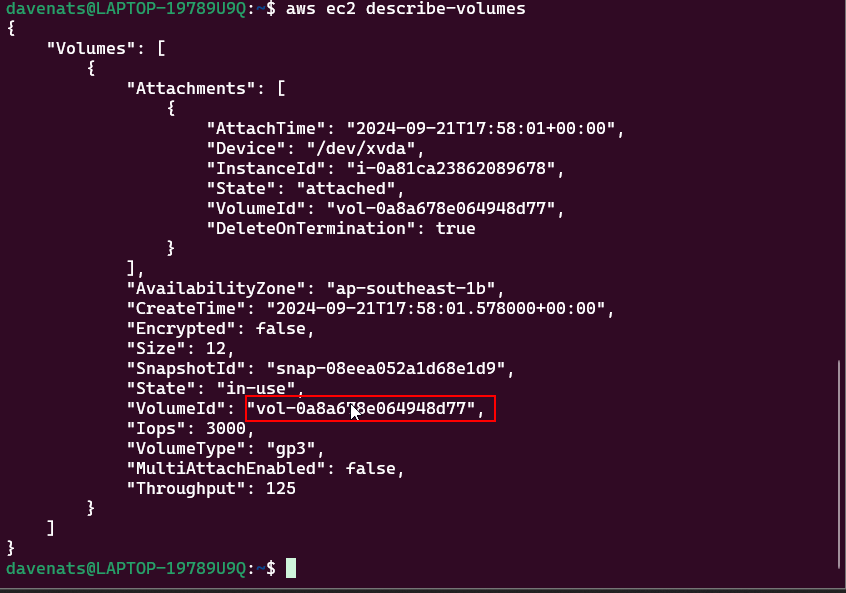
- Copy the
VolumeIdof the volume you want to modify.
- Modify the Volume:
- Run the following command to modify the volume size. For example we want to modify the volume with
VolumeIdvol-0a8a678e064948d77to16 GiB:
- Run the following command to modify the volume size. For example we want to modify the volume with
1
2
3
aws ec2 modify-volume \
    --volume-id <VolumeId> \
    --size 16
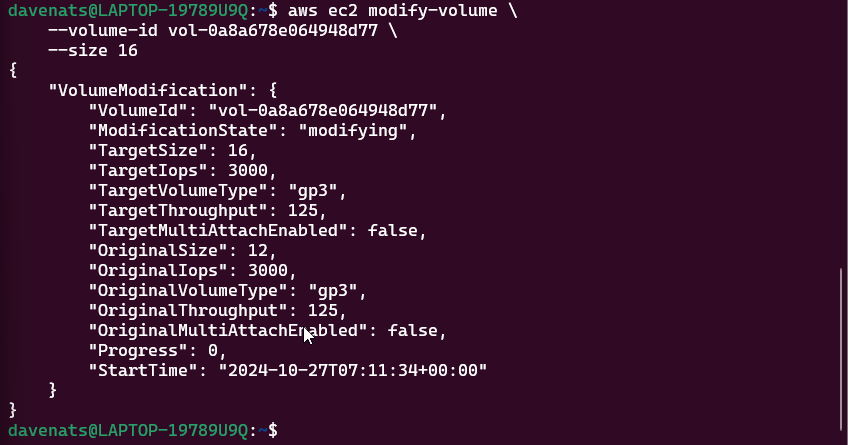
Step 2: Reflect the Changes on the EC2 Instance Using SSH Connection
- Verify the New Size on the Instance:
- SSH into your EC2 instance.
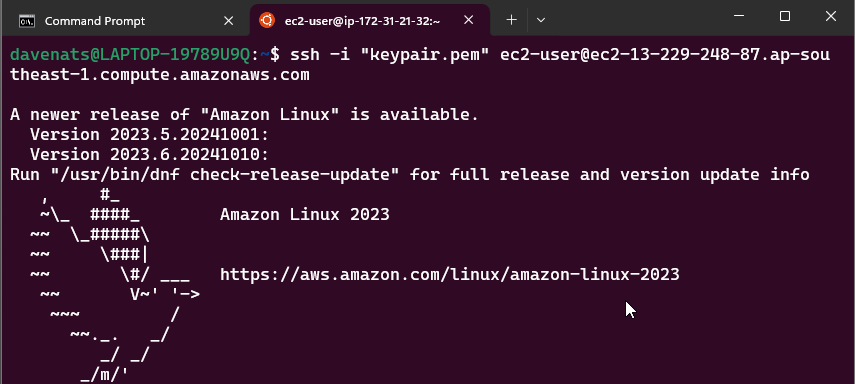
- Check if the OS recognizes the new volume size, and lets use it to see the file system type:
1
lsblk
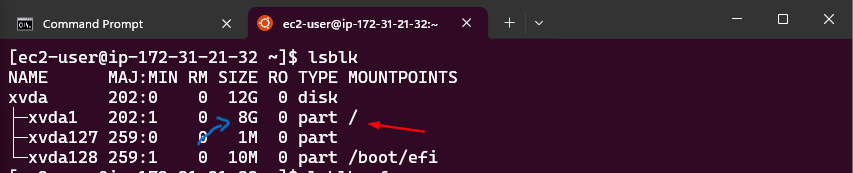
1
lsblk -f
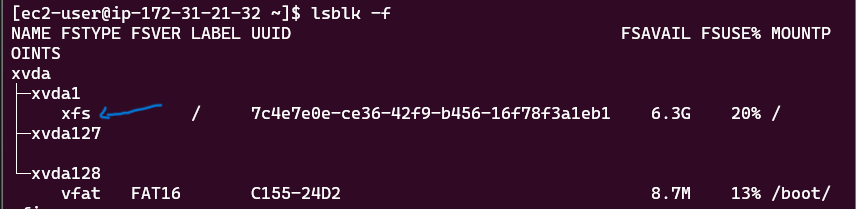
From the output, we can see that the file system type is xfs.
- Resize the partition
1
sudo growpart /dev/xvda 1
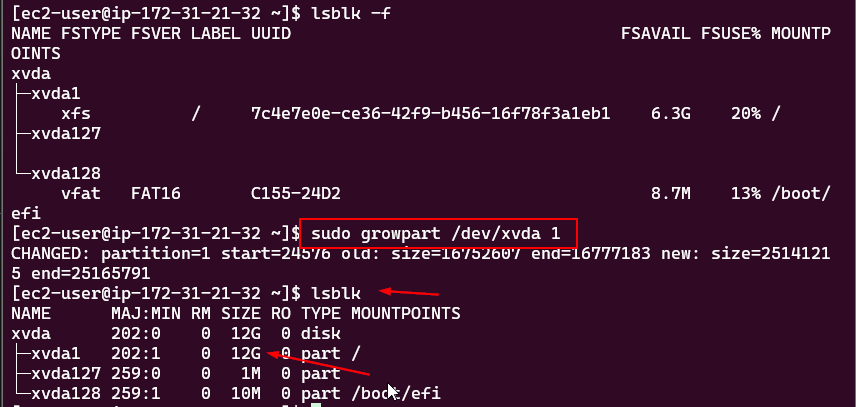
This command will resize the storage partition to the maximum size available.
-
Expand the File System:
-
Run the following commands based on the file system type.
-
For ext2/ext3/ext4 file systems:
1
sudo resize2fs /dev/xvdf -
For XFS file systems, the same one that we had in the instance:
1
sudo xfs_growfs -d /mount/point
-
Replace
/dev/xvdfand/mount/pointwith your specific device name or mount point as listed bylsblk. From the output oflsblk, you can see the mount point of the volume. Use that mount point in the command.
-
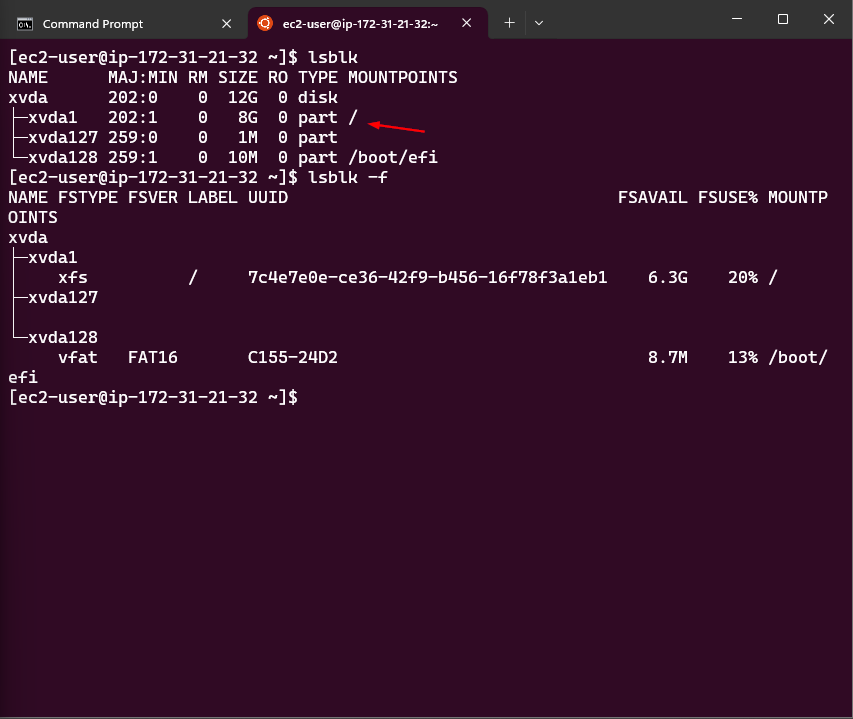
- Type in the command that suits your file system and press
Enter. We have a XFS file system in this instance and/is the mount point. The command is:
1
sudo xfs_growfs -d /
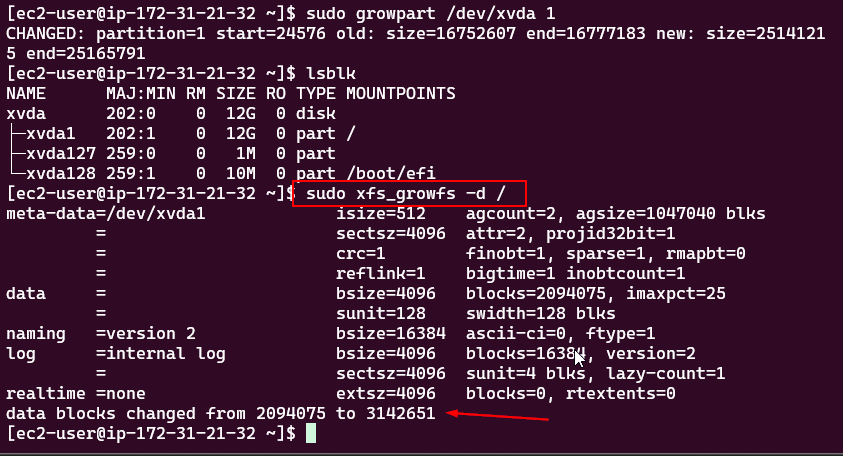
- Verify Expansion:
- Run
df -hto ensure the file system reflects the new volume size.
- Run
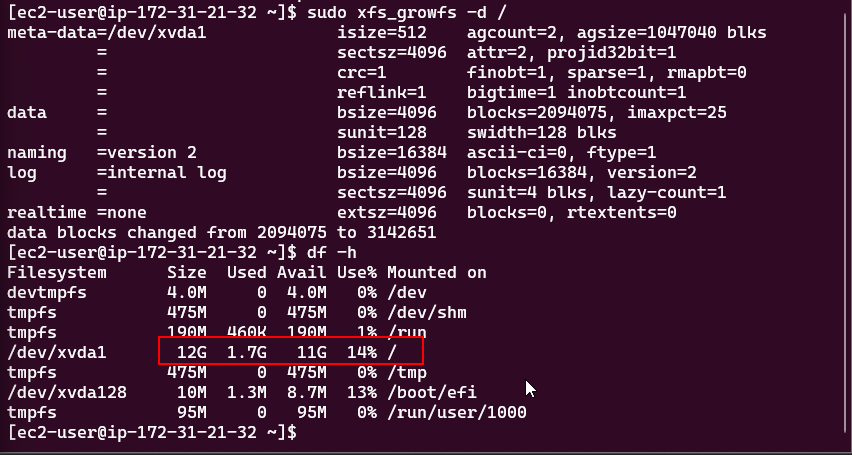
We have successfully expanded the EBS volume and the file system on the EC2 instance.
What is Elastic Load Balancing?
Elastic Load Balancing distributes incoming traffic among different targets, it includes EC2 instances, containers, and IP addresses, in one or more Availability Zones. It checks the health of the registered targets and directs traffic simply to the healthy targets. Elastic Load Balancing automatically adjusts load balancer capacity in response to fluctuations in incoming traffic.
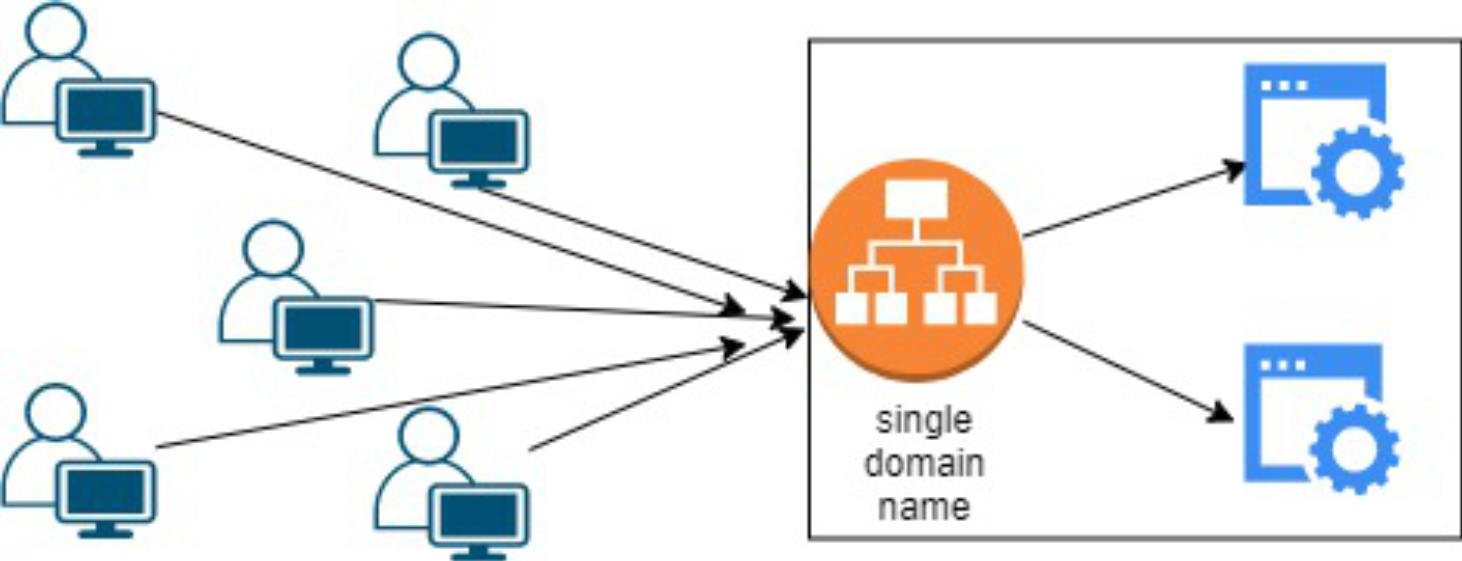
BENEFITS/SIGNIFICANCE of Elastic Load Balancing
- Increased Availability: By dividing traffic over multiple EC2 instances, it ensures high availability while reducing downtime during peak demand.
- Fault Tolerance: It proactively detects unhealthy instances and reroutes traffic to improve application fault tolerance.
- Scalability: It dynamically changes resources based on traffic when it is used with Auto Scaling providing peak performance without any user intervention.
- Improved Performance: The load is divided evenly across instances to avoid delays and ensure constant response times.
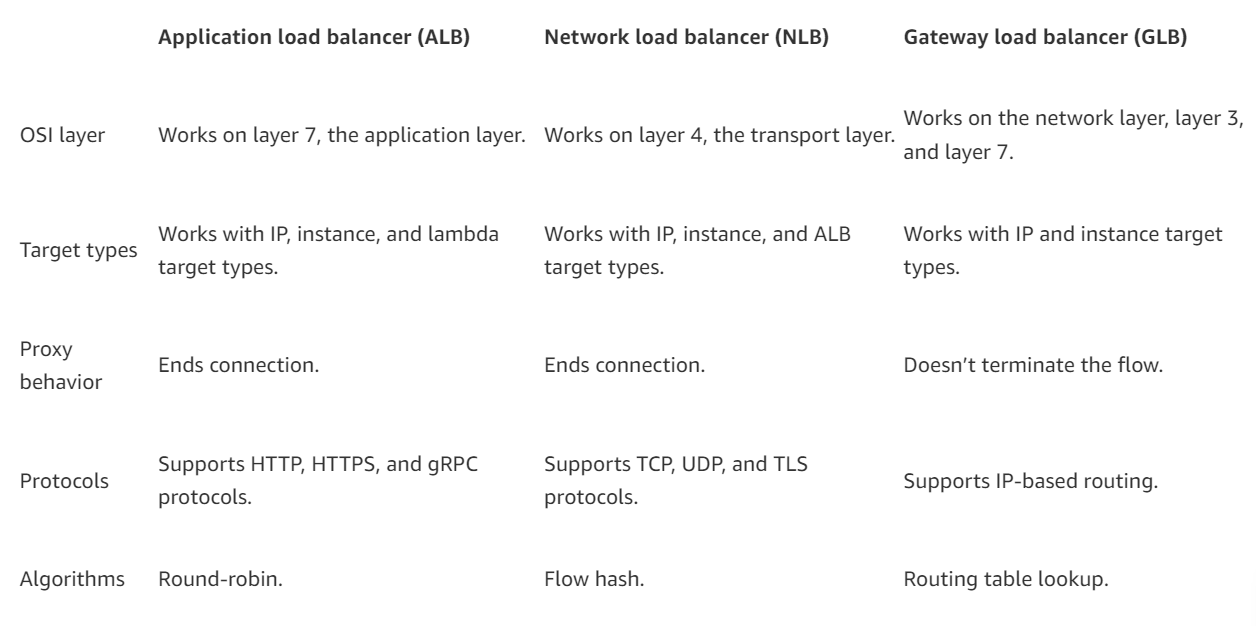
Types of Load Balancers
AWS offers different types of load balancers for specific use cases. There are three main types: Application Load Balancer, Network Load Balancer, and Gateway Load Balancer.
1. Application Load Balancer (ALB)
- Use case: Best for web applications.
- Layer: Operates at Layer 7 (Application Layer).
- How it works: The ALB routes traffic based on the content of the request, such as URL paths or HTTP headers. This makes it ideal for applications that need intelligent routing, such as microservices or container-based apps.
2. Network load balancer (NLB)
- Use case: Ideal for high-performance applications requiring TCP/UDP traffic or low latency.
- Layer: It operates at Layer 4 (Transport Layer).
- How it works: The NLB directs traffic using IP addresses and ports. It is intended for high performance and can handle millions of requests per second with little latency. It works well for apps that do not need to assess the request’s content.
3. Gateway Load Balancer (GWLB)
- Use case: Ideal for combining virtual appliances from third parties, such as intrusion detection systems (IDS), firewalls, and other security appliances.
- Layer: Utilizes the Network Layer, or Layer 3.
- How it works: It integrates virtual appliances into the network by placing the GWLB in between network and the appliances. Traffic is sent to the appliances for logging, filtering, or inspection, and then it is forwarded back to the original destination.
The main differences between load balancer types
- ALB: Works best for HTTP/HTTPS applications that require traffic routing according to the content of the requests.
- NLB: Optimal for applications requiring high speed and low latency while managing high TCP/UDP traffic volumes.
- GLB: Ideal for adding surveillance or security appliances, such as firewalls and threat detection systems to the network.
Components of a basic Application Load Balancer
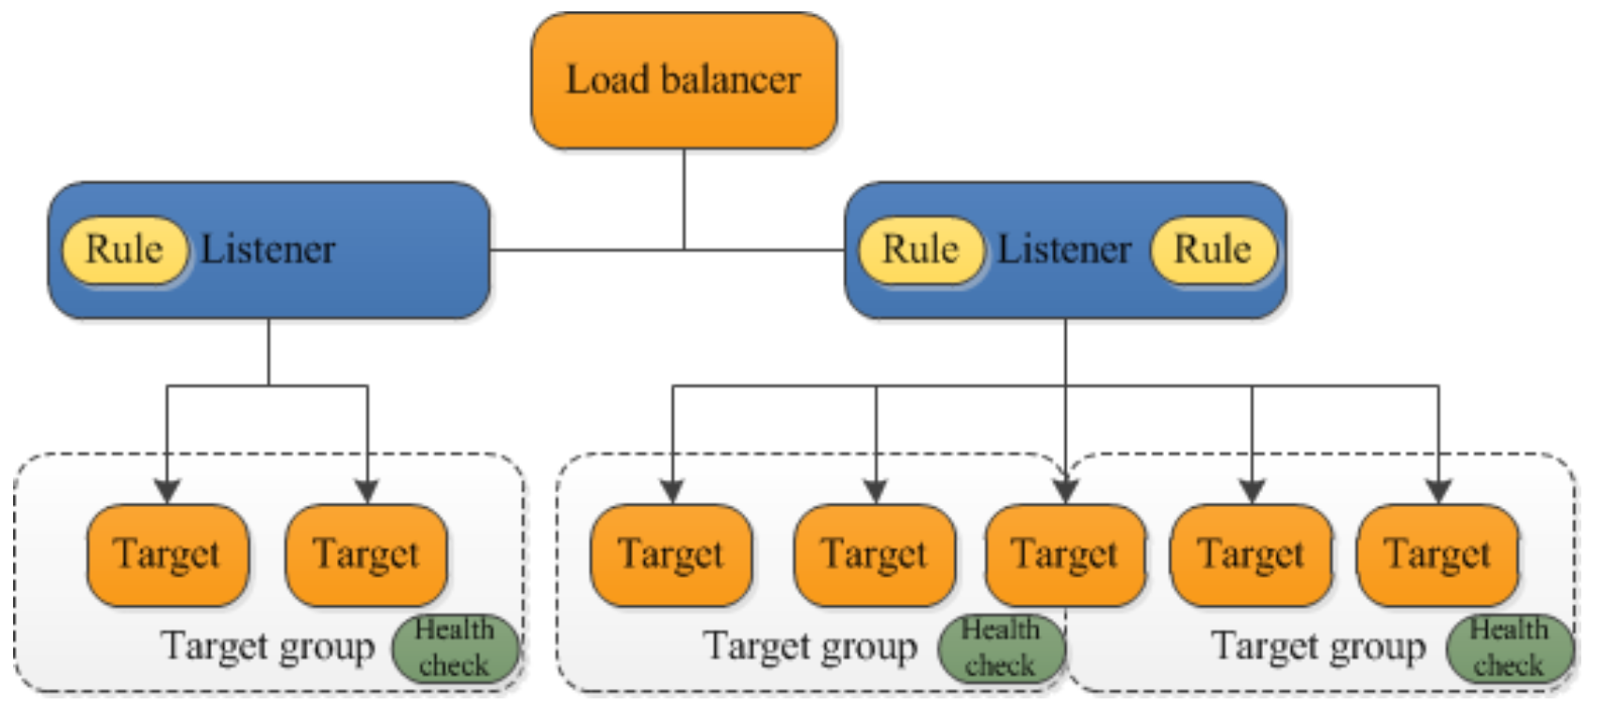
- Load balancer
- Listener
- Target Group
Listener: A listener is a process that monitors the set protocol and port for connection requests. It needs at least one listener before using application load balancer. If a load balancer does not have listeners, it will be unable to receive client traffic. The load balancer routes requests to the register targets, such as EC2 instances, depending on the rules provided for listeners.
Target Groups for Application Load Balancers: Application load balancers (ALBs) use target groups to direct requests to certain resources, such as EC2 instances. Every target group has a defined protocol and port assigned to it. By controlling the distribution of requests across the resources, target groups contribute to effective and balanced traffic routing. It maximizes the dependability and performance of the application by properly establishing them.
How does application load balancer work?
-
A client/user sends a request to the load balancer, which serves as the application’s main point of access.
-
Initially, the listener on the load balancer checks the incoming request, using the protocol and port that was configured.
-
The listener then prioritizes its rules to decide which one fulfills the request’s requirements.
-
Following that, the load balancer picks a target group to route the request to based on the rule action.
-
Within the defined target group, the load balancer selects a specific target using a routing strategy. Round robin is the default routing method, however it may alternatively select the routing algorithm that has the fewest outstanding requests.
-
The load balancer then runs a health check to confirm that the specified target is working.
-
Afterward, the load balancer forwards the request to the specified healthy target. If the target is considered unhealthy, the load balancer selects another healthy target.
-
Lastly, the target processes the request and sends a response to the load balancer, which forwards it to the client.
Key Features
Rules are used to indicate the target group to deliver traffic depending on predefined circumstances for the load balancer’s listener. Making routing effective and flexible possible.
Each target group may register a target with more than one load balancer, but each load balancer may only be connected to a single target group.
Routing Requests: Traffic can be directed to one or more registered targets by each target group. Various target groups can be made for various kinds of requests, including:
- General requests
- Microservice requests
- Health Checks
Why test load balancer instances?
A load balancer is tested to ensure that traffic is distributed across servers correctly, problems are managed in the case of a server failure and configurations such as routing and health checks are up to order.
Elastic Load Balancer automatically stops forwarding requests to an unhealthy instance when it fails health checks. This keeps the application from experiencing problems or delays by guaranteeing that traffic is only sent to instances that are stable and operating. The load balancer returns sending traffic to the instance when it passes health checks again.
Monitoring Health of Each Instance
-
An Elastic Load Balancer only routes traffic to healthy targets, such as EC2 instances, containers, IP addresses, microservices, Lambda functions, and appliances.
Health Checks: These checks are usually set up to display specific error codes when something goes wrong and to monitor every service operating behind the load balancer. This aids in promptly locating and resolving problems.
EC2 Load Balancing Pricing
AWS charges for load balancers depending on two key factors: hours utilized and capacity units consumed.
Application Load Balancers (ALB)
Hourly charge: Charged for each hour (or partial hour) while the load balancer is operational, regardless of the amount of traffic it manages.
LCU (Load Balancer Capacity Unit): In addition to the hourly fee, it is charged according to the number of LCUs utilized every hour.
The LCUs measure:
- New connections (the number of new requests)
- Active connections (ongoing traffic)
- Data processed (total number of bytes transmitted).
Network load balancer (NLB)
Hourly charge: Like ALB, it is charged for each hour (or partial hour) while the NLB is operational. NLCU (Network Load Balancer Capacity Unit): Charges vary depending on how many NLCUs are utilized per hour. NLCUs measure:
- Bandwidth ( the amount of data transmitted)
- New and active connections (the number of connections formed or maintained),
- TLS termination (if the load balancer is handling encrypted connections).
Gateway Load Balancer(GWLB)
Hourly charge: charges for every hour (or partial hour) that the GWLB is operational.
GLCU (Gateway Load Balancer Capacity Unit): Charges depend on the number of GLCUs used per hour, which measure traffic passing through the gateway.
Gateway Load Balancer Endpoint: A separate service used to securely exchange traffic across VPCs, and it is billed separately from the GWLB.
AWS Load balancer Free Tier
Use the AWS Free Tier to begin using elastic load balancing for free. New AWS users get 15 GB of data processing for Classic load balancers and 15 LCUs for Application load balancers upon sign up, along with 750 hours per month split between Classic and Application load balancers.
Configuring an Elastic Load Balancer with Multiple Instances
This part will walk you through the process of setting up an Elastic Load Balancer (ELB) with three EC2 instances that provide slightly different outputs. This setup will help demonstrate how load balancing works by distributing traffic across the instances.
Step 1: Prepare 3 instances
- We already made three from our
What is AMI and Images?part.
Step 2: Create a target group
- Create Target Group:
- Create a new target group for the instances.
- Select “Instance” as the target type.
- Add all three instances to the target group.
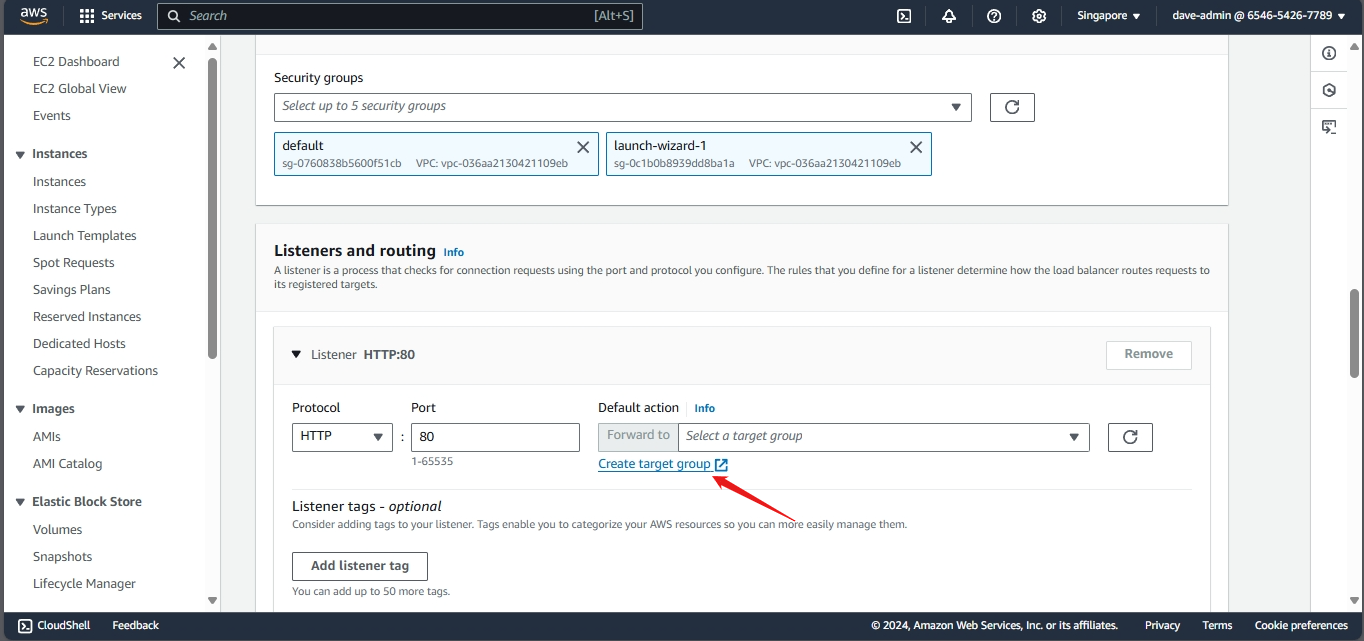
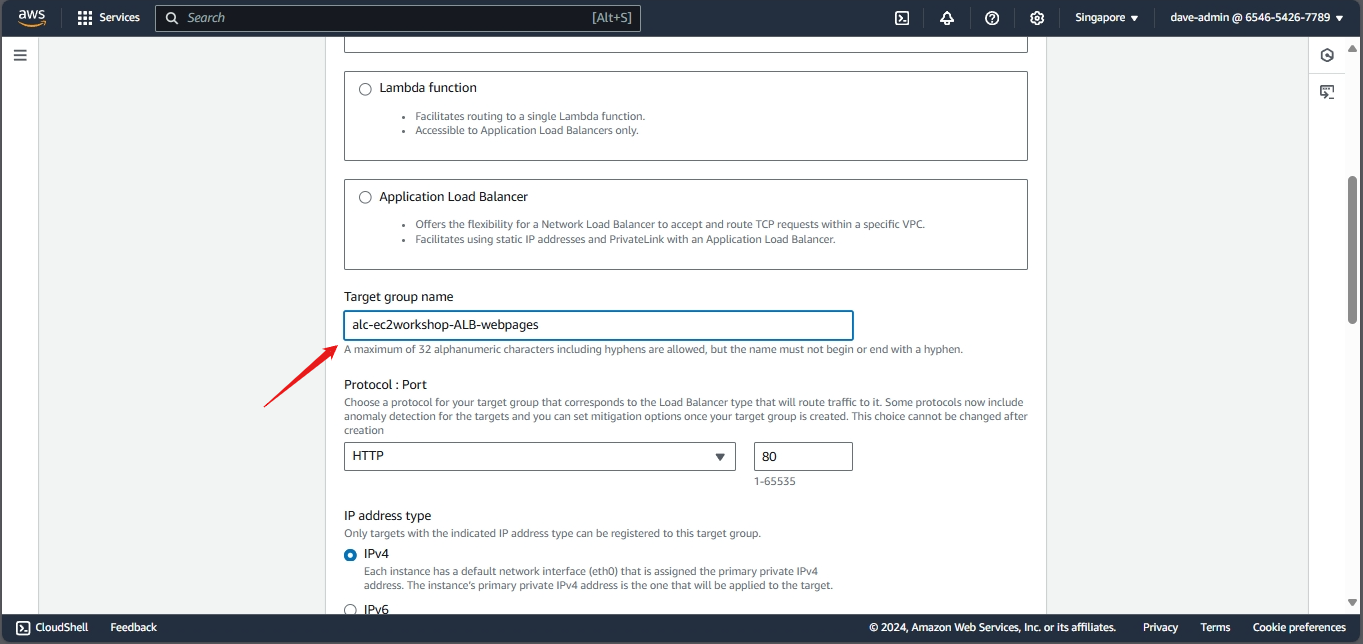
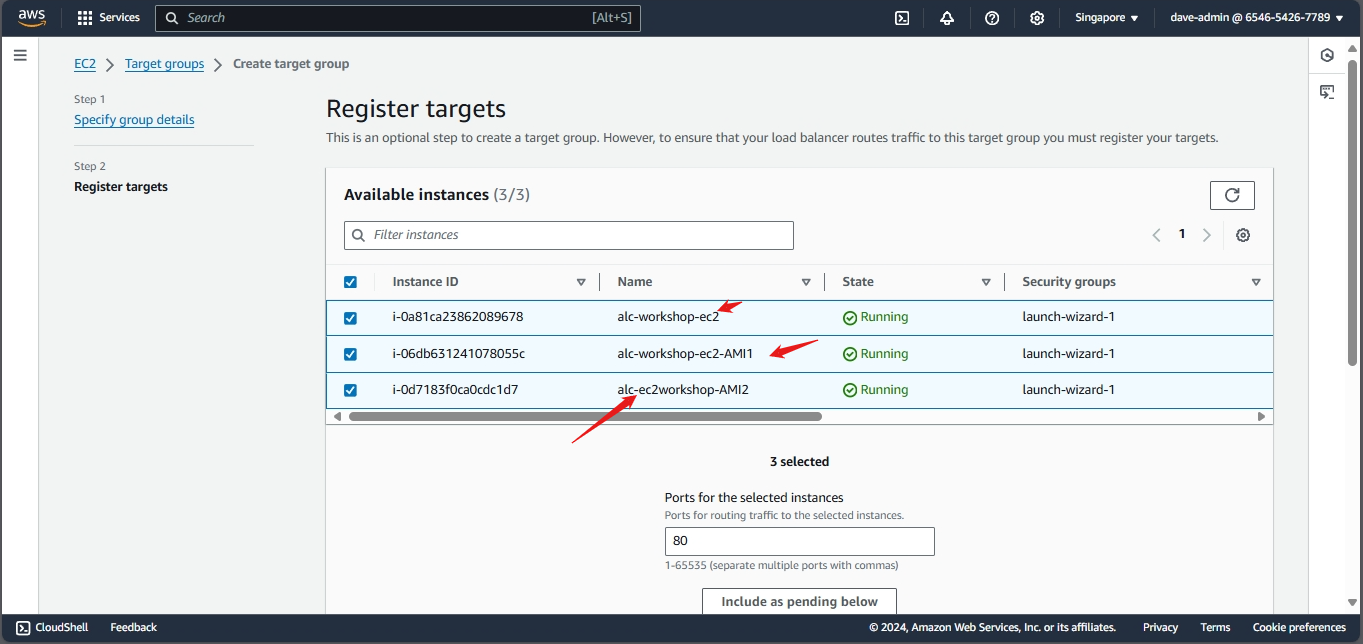
Click Include as pending below:
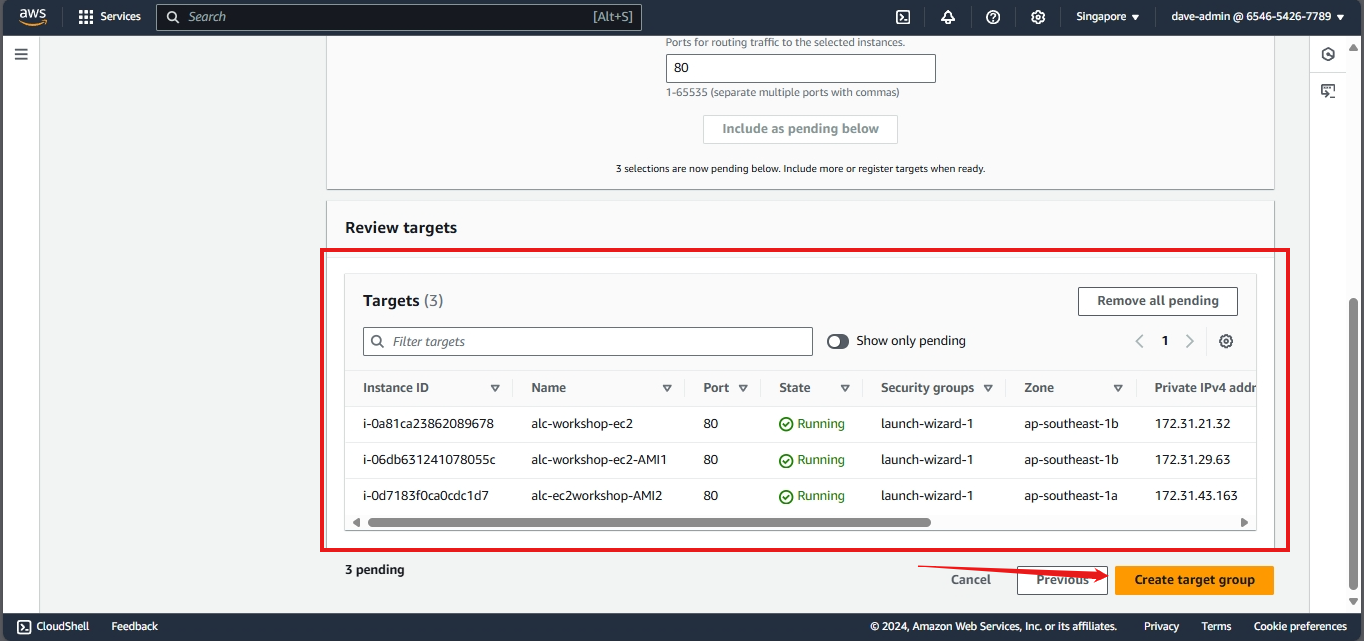
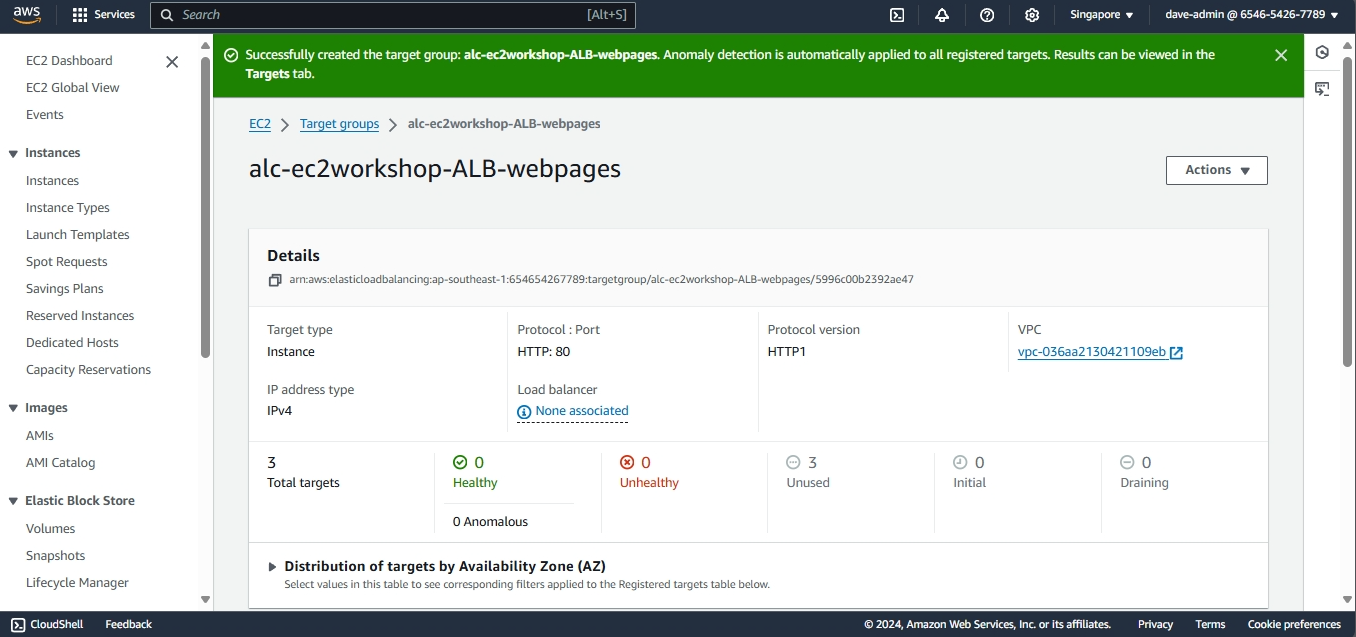
You have now created a target group with three instances. The next step is to create a load balancer and configure it to use this target group.
Step 2: Configure the Elastic Load Balancer
- Navigate to Load Balancers:
- In the EC2 Dashboard, click on “Load Balancers” under “Load Balancing”.
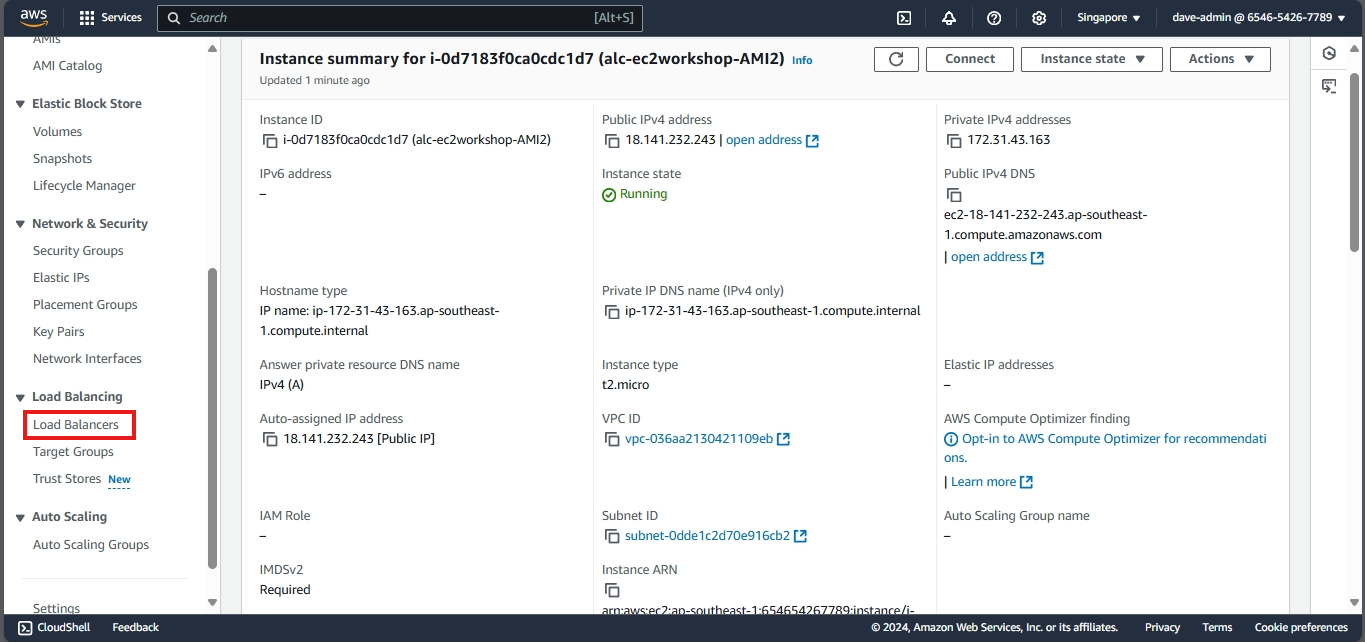
- Create Load Balancer:
- Click on “Create Load Balancer” and select “Application Load Balancer”.
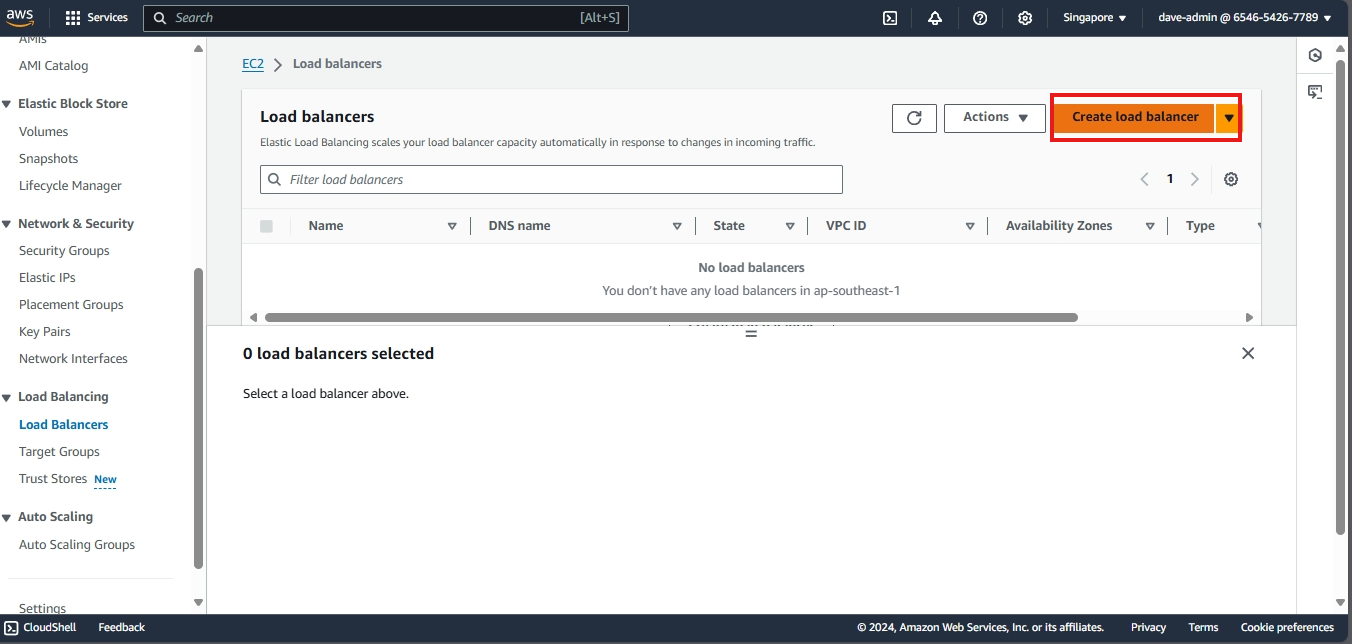
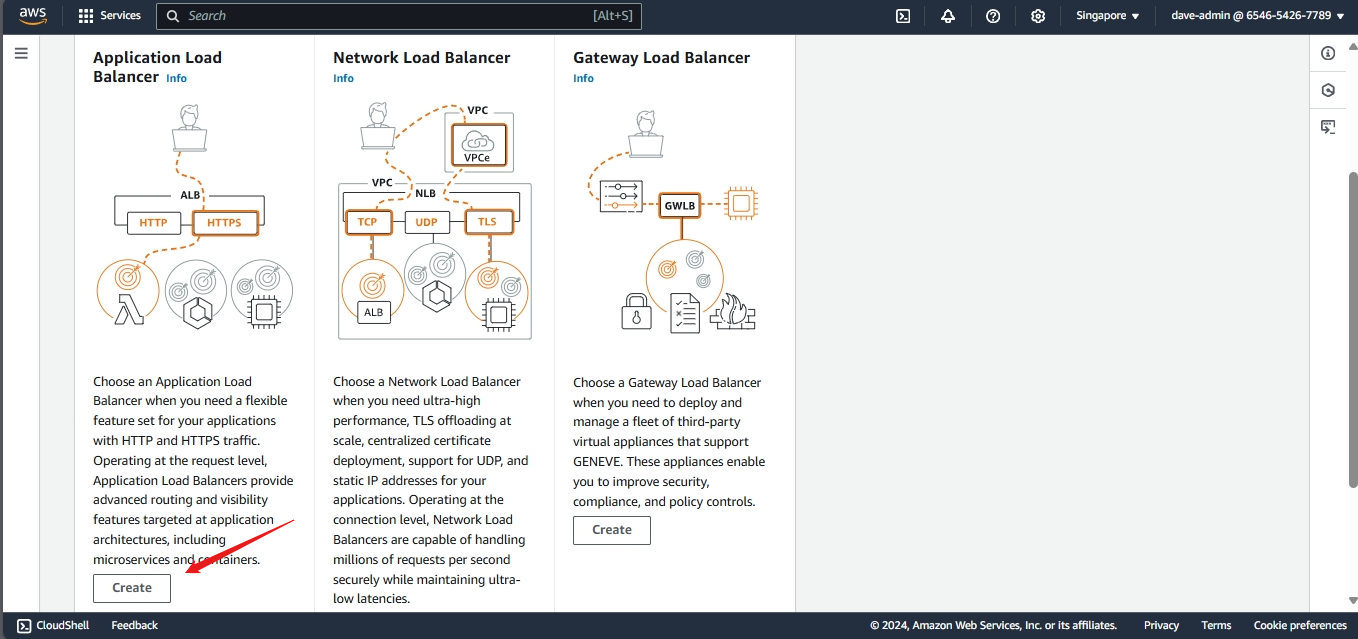
- Configure Load Balancer:
- Name: Enter the name
alc-ec2workshop-ALB - Scheme: Select “Internet-facing”.
- Name: Enter the name
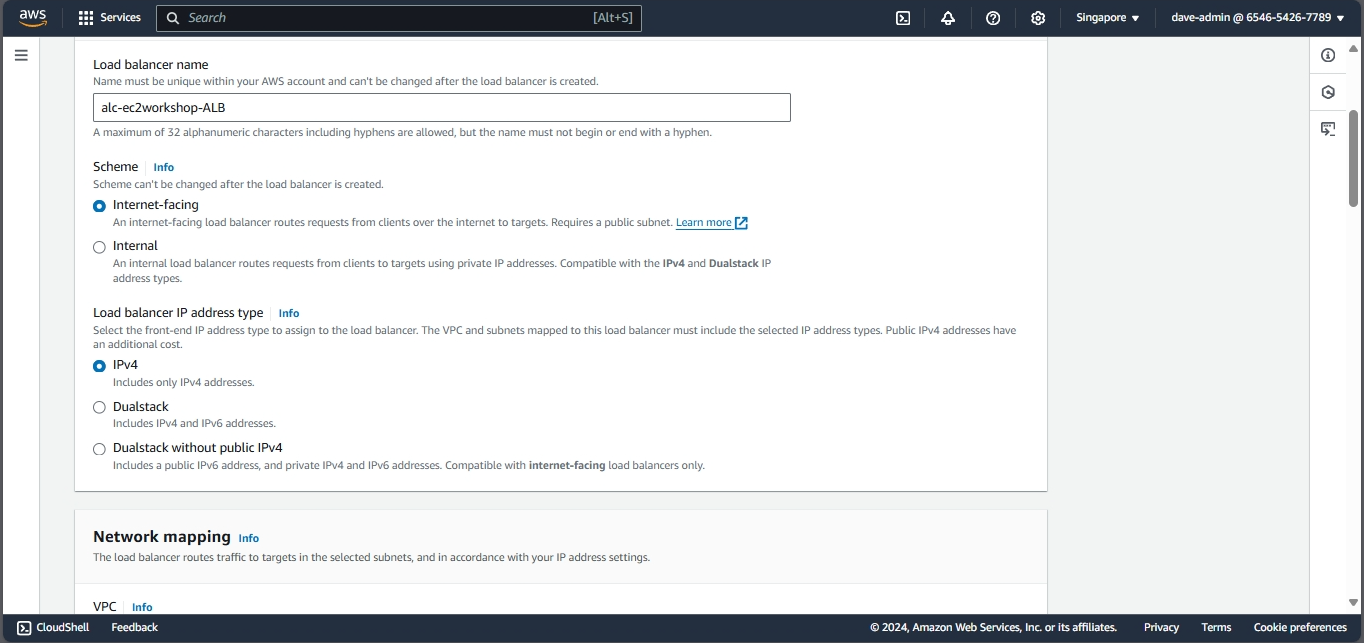
- VPC and Subnets: Choose the same VPC and select all availability zones where your instances are located.
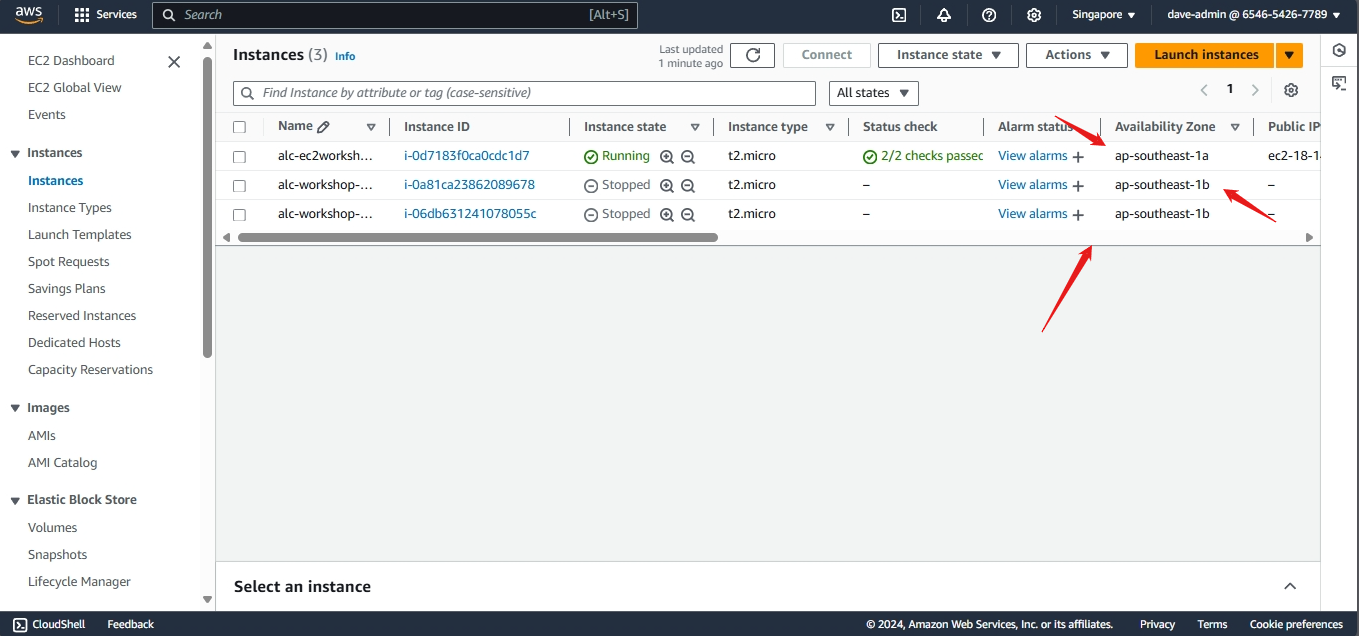
- To check the availability zone of your instances:
- Go back to the instance page and check the availability zone of the instances
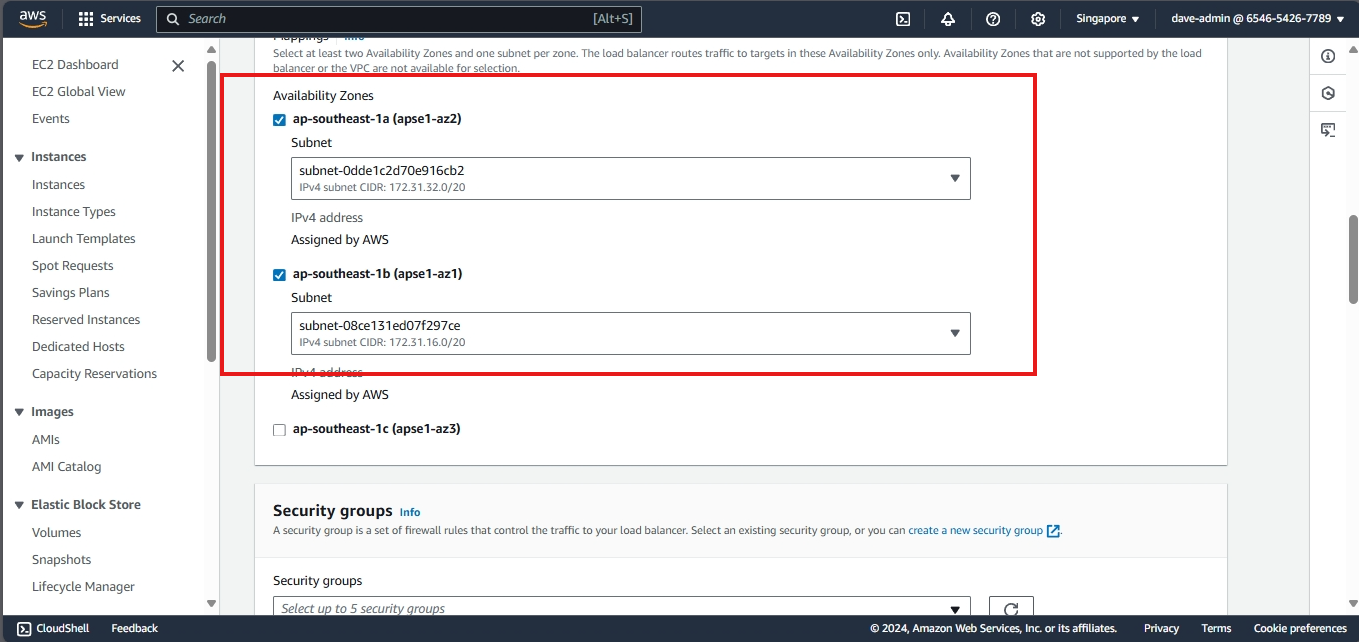
- Select Security Group:
- Choose the security group that applies to all instances.
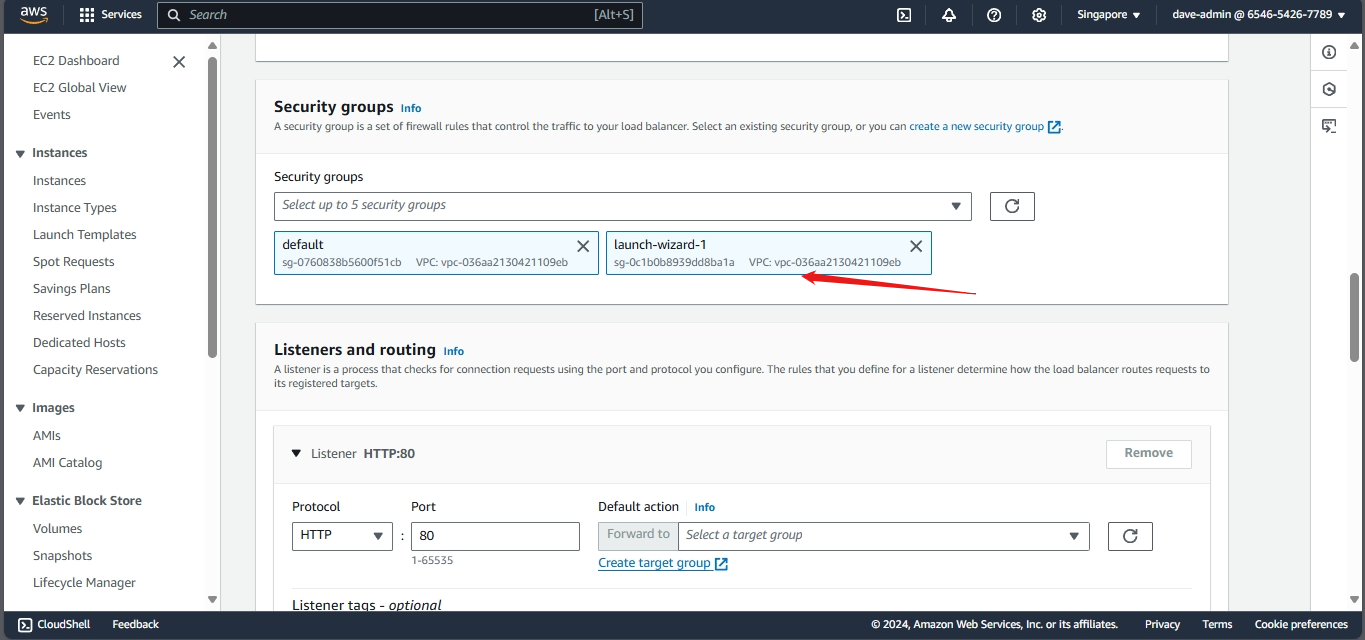
-
Listeners and Routing:
- Leave the default listener set to port 80 (HTTP).
-
Configure Routing:
- Select the target group you created earlier.
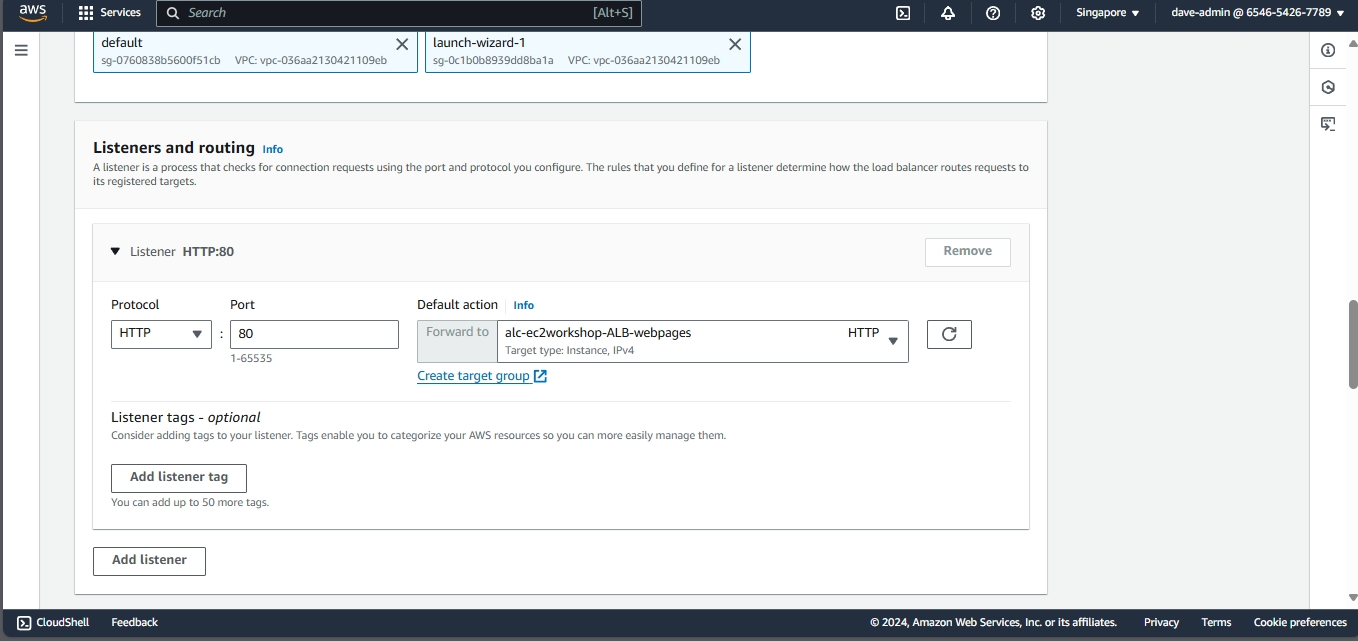
- Launch the Load Balancer:
- Review the settings and click “Create”.
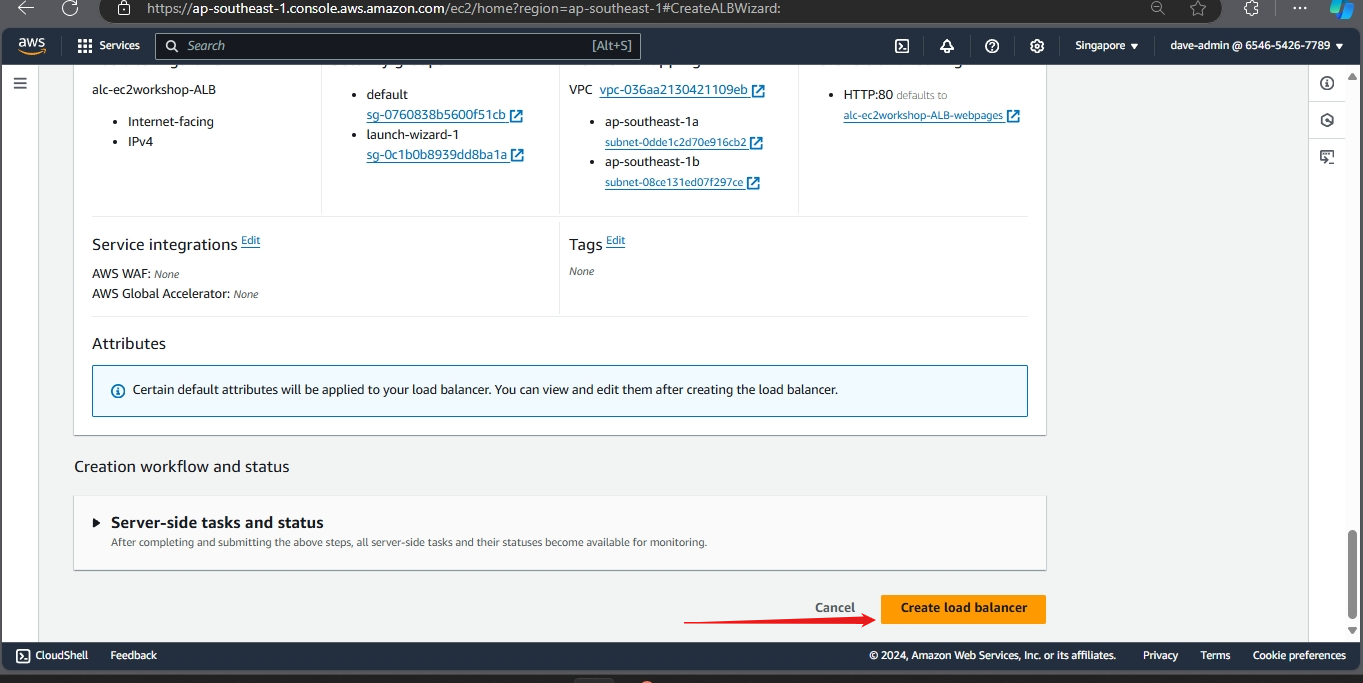
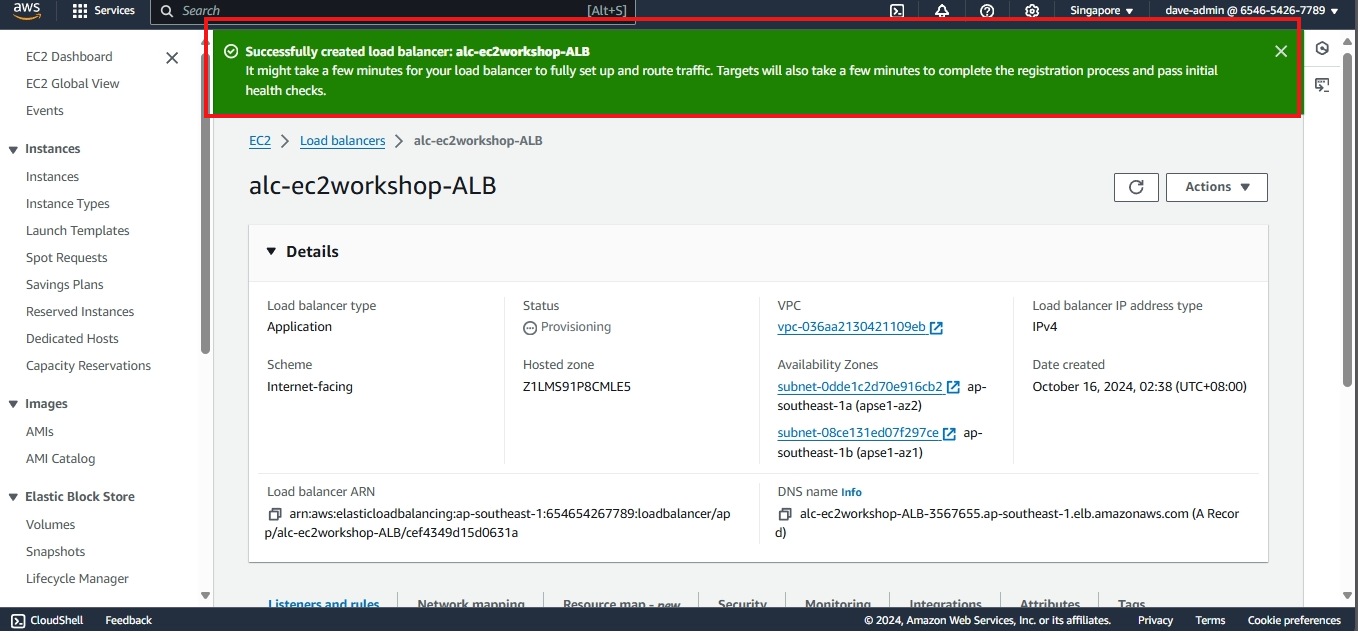
Step 3: Test the Load Balancer
- Obtain Load Balancer DNS:
- Once the load balancer is created, obtain its DNS name from the Load Balancers section.
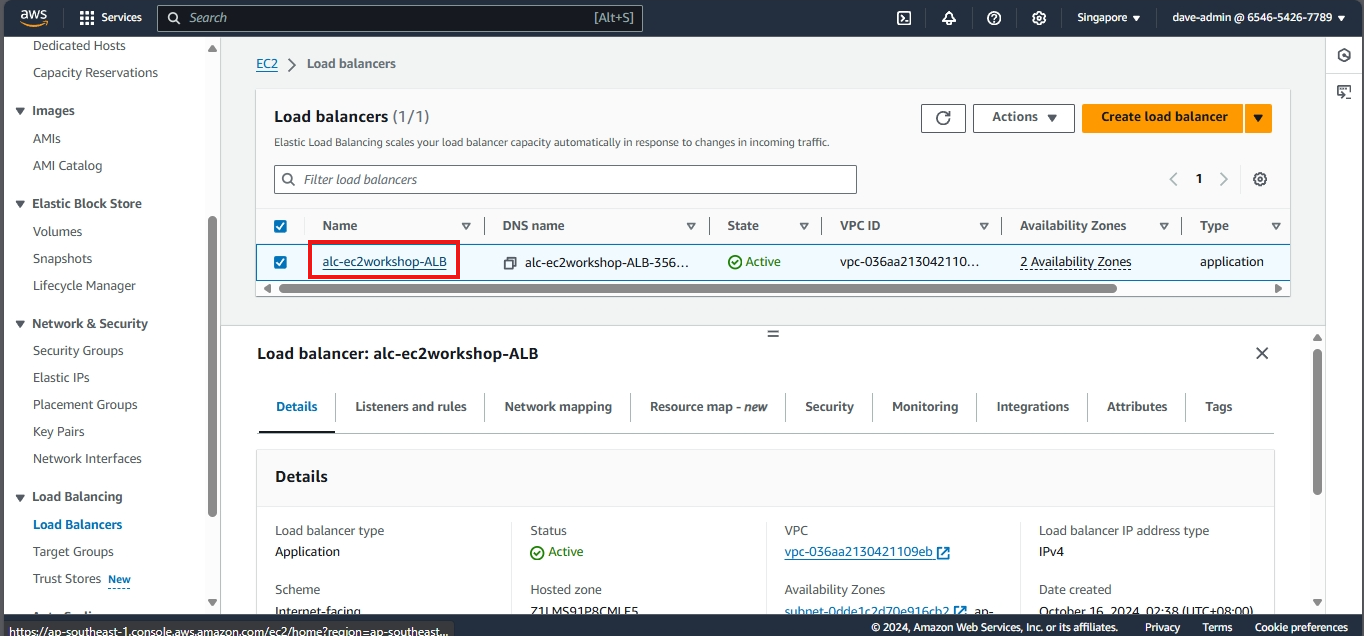
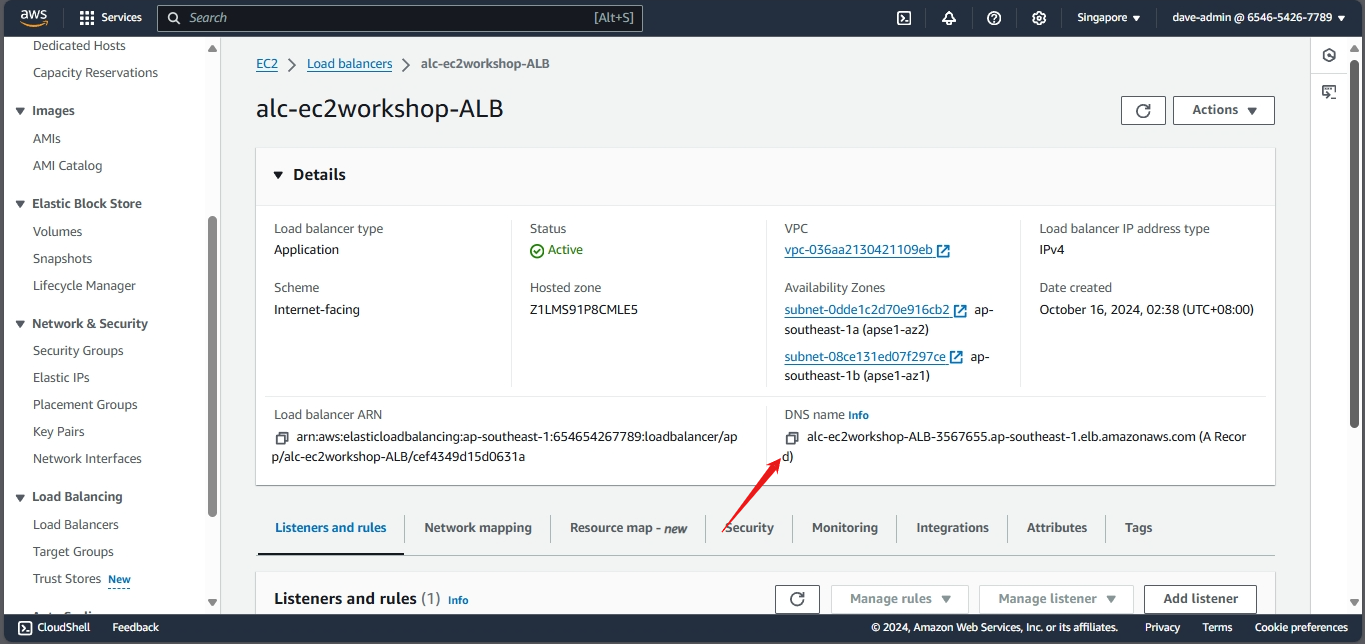
- Access the Load Balancer:
- Open a web browser and enter the DNS name of the load balancer.
- Refresh the page multiple times to see the different instance outputs:
- Instance 1

- Instance 2

- Instance 3

Step 4: Monitor Load Balancer and Instances
- Check Target Group Health Status:
- Select the target group associated with your instances.
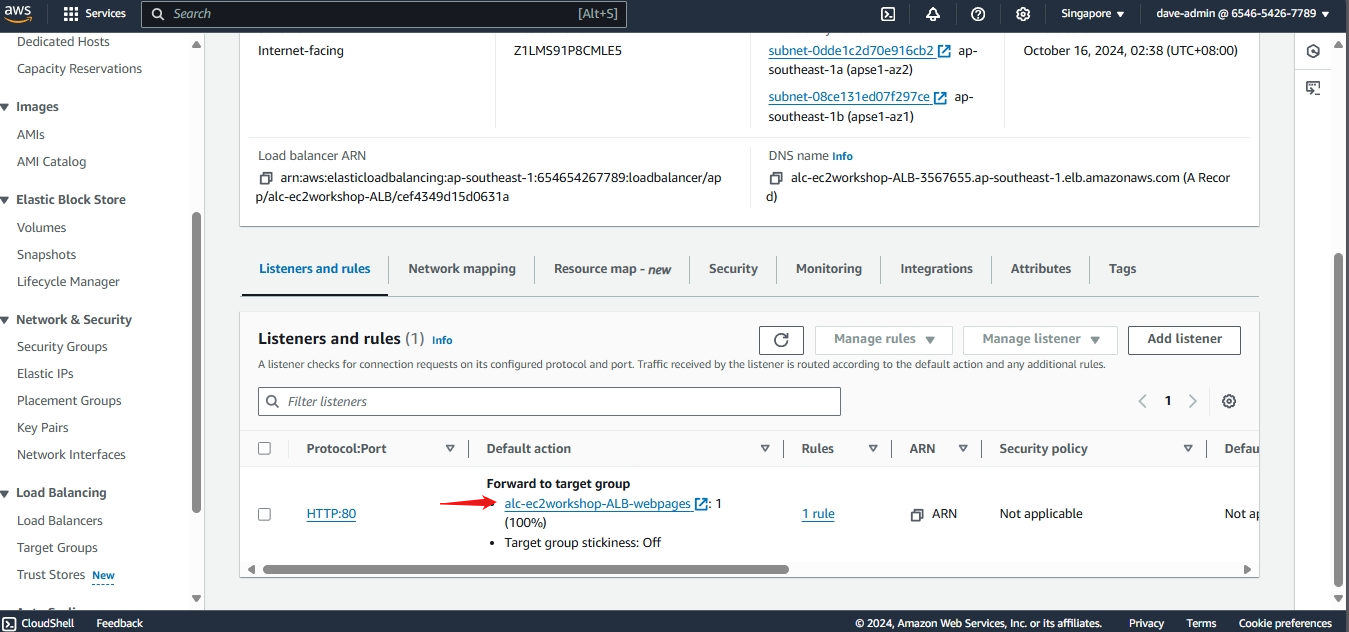
- Check the health status of each instance to ensure they are properly registered and healthy.
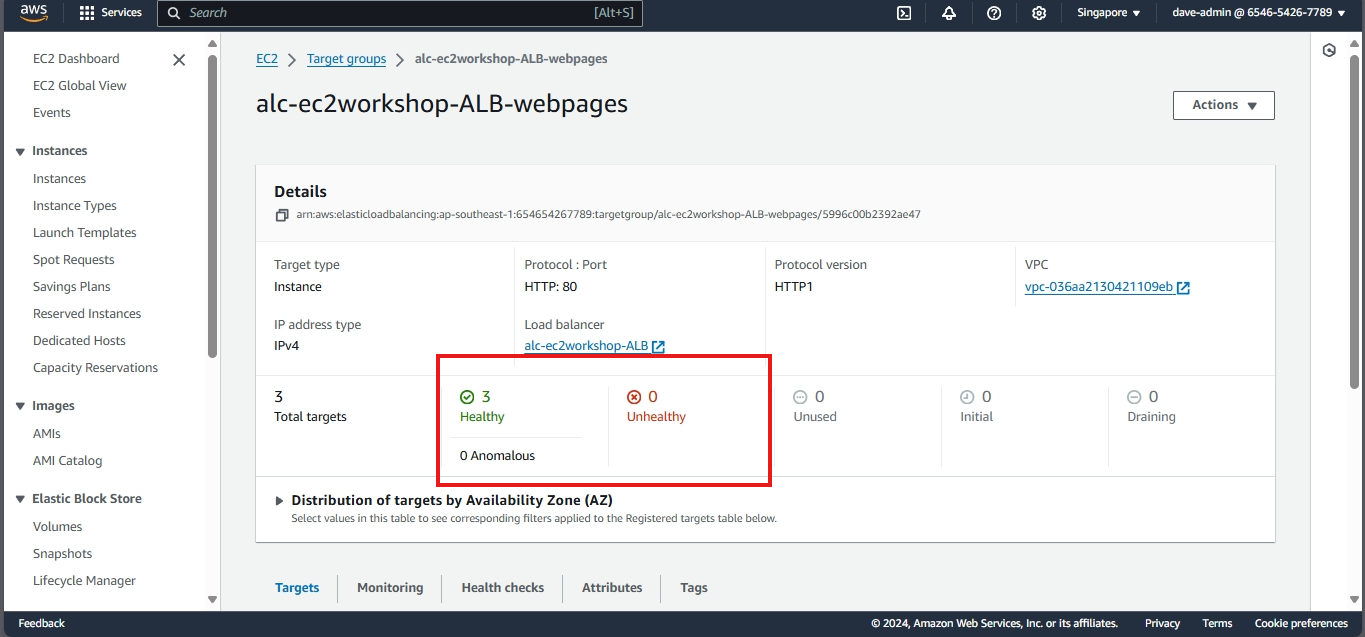
Creating a Load Balancer with Multiple Instances using AWS CLI
- Lets go back to AWS ClI. Make sure to copy all your ARN’s and ID’s as we will be using them in the following steps. You can use notepad or any other text editor to store them.
- Create a Target Group:
- Use the
create-target-groupcommand to create a target group with the desired settings.
- Use the
1
2
3
4
5
6
7
8
aws elbv2 create-target-group \
    --name <target-group-name> \
    --protocol HTTP \
    --port 80 \
    --vpc-id <your-vpc-id> \
    --health-check-protocol HTTP \
    --health-check-path / \
    --target-type instance
- Note: Replace
<your-vpc-id>with your VPC ID. Use the following command to get your VPC ID:
1
aws ec2 describe-vpcs
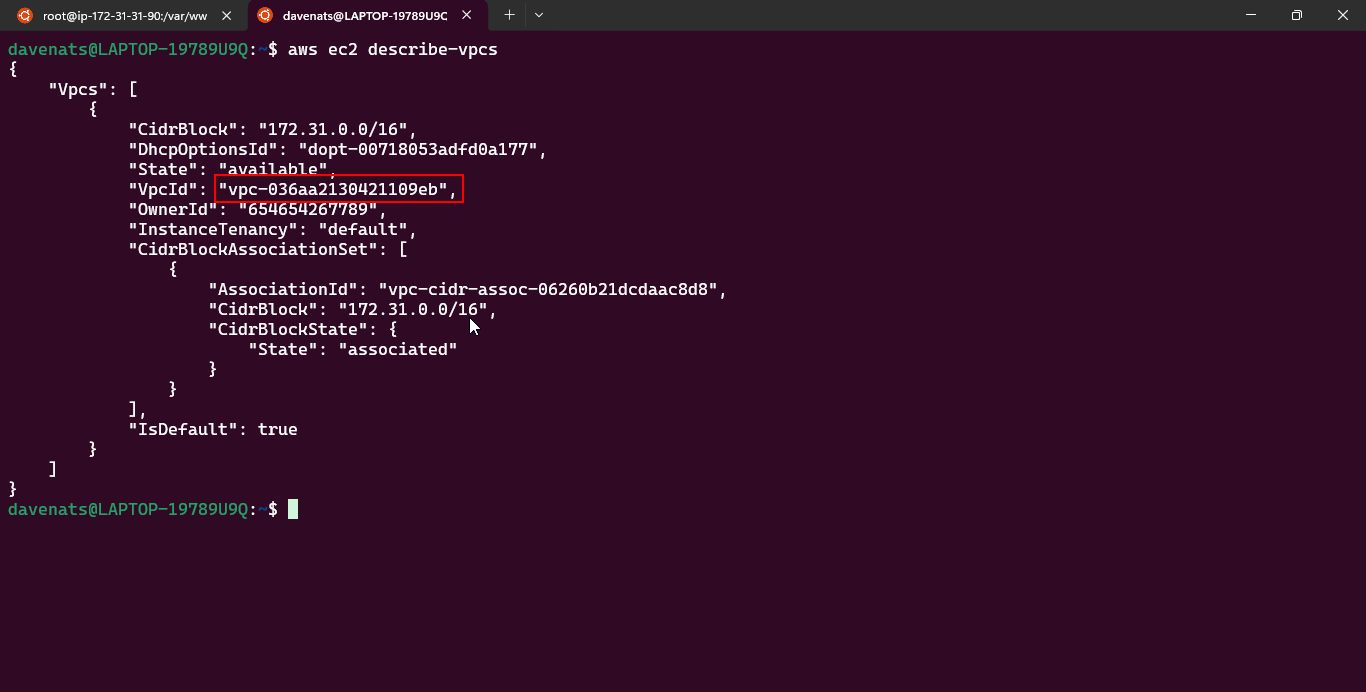
- In my case, the VPC ID is
vpc-036aa2130421109eb. My command is a follows:
1
2
3
4
5
6
7
8
aws elbv2 create-target-group \
    --name alc-workshop-ec2-TG \
    --protocol HTTP \
    --port 80 \
    --vpc-id vpc-036aa2130421109eb \
    --health-check-protocol HTTP \
    --health-check-path / \
    --target-type instance
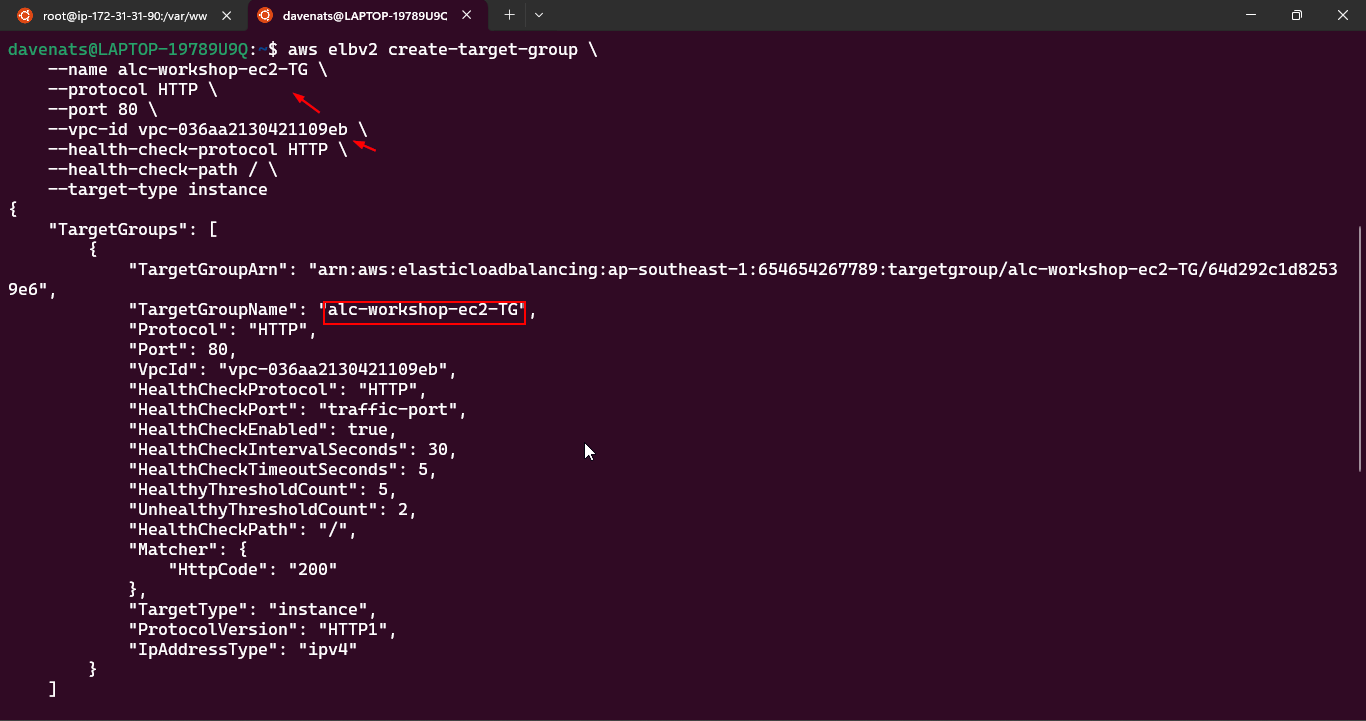
- Lets check the target group we created:
1
aws elbv2 describe-target-groups
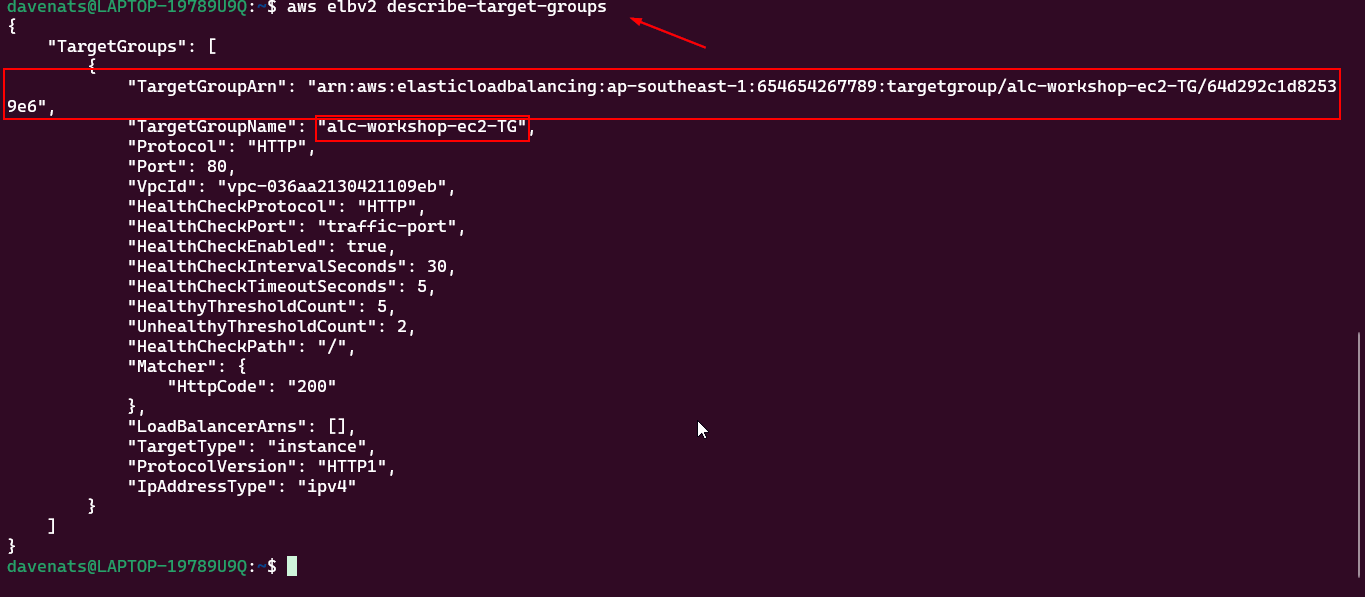
- Register Instances with the Target Group:
- Use the
register-targetscommand to register the instances with the target group.
- Use the
1
2
3
aws elbv2 register-targets \
    --target-group-arn <your-target-group-arn> \
    --targets Id=<instance-id-1> Id=<instance-id-2> Id=<instance-id-3>
- We have our target group ARN from the previous command. (
aws elbv2 describe-target-groups). In my case, the ARN isarn:aws:elasticloadbalancing:ap-southeast-1:654654267789:targetgroup/alc-workshop-ec2-TG/64d292c1d82539e6.

- We also have the instance IDs from the previous command. (
aws ec2 describe-instances)
1
2
3
4
aws ec2 describe-instances \
    --filters "Name=instance-state-name,Values=running" \
    --query "Reservations[*].Instances[*].[InstanceId,InstanceType,State.Name,PublicIpAddress,Placement.AvailabilityZone,Tags[?Key=='Name'].Value | [0]]" \
    --output table
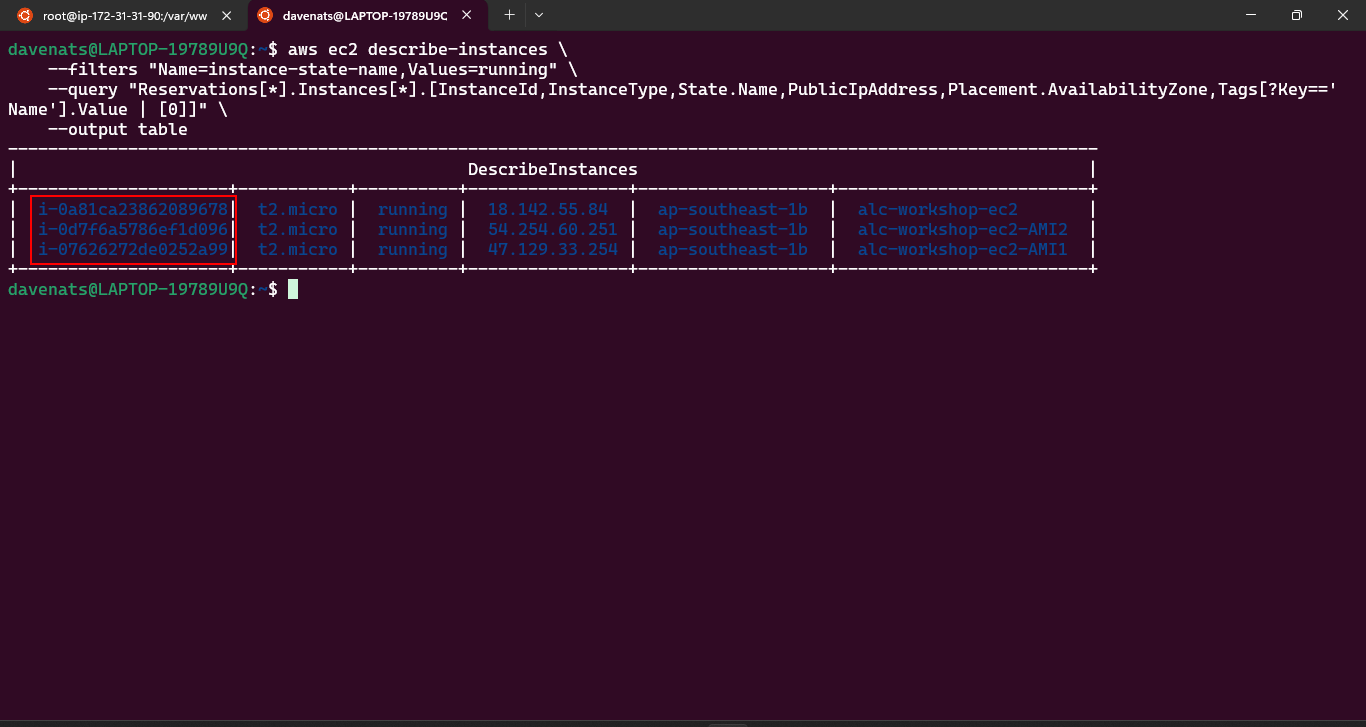
- All in all, my command is as follows:
1
2
3
aws elbv2 register-targets \
    --target-group-arn arn:aws:elasticloadbalancing:ap-southeast-1:654654267789:targetgroup/alc-workshop-ec2-TG/64d292c1d82539e6 \
    --targets Id=i-0a81ca23862089678 Id=i-0d7f6a5786ef1d096 Id=i-07626272de0252a99
- Lets check the target group we created:
1
2
3
4
aws elbv2 describe-target-health \
    --target-group-arn arn:aws:elasticloadbalancing:ap-southeast-1:654654267789:targetgroup/alc-workshop-ec2-TG/64d292c1d82539e6 \
    --query "TargetHealthDescriptions[*].[Target.Id, TargetHealth.State, TargetAvailabilityZone]" \
    --output table
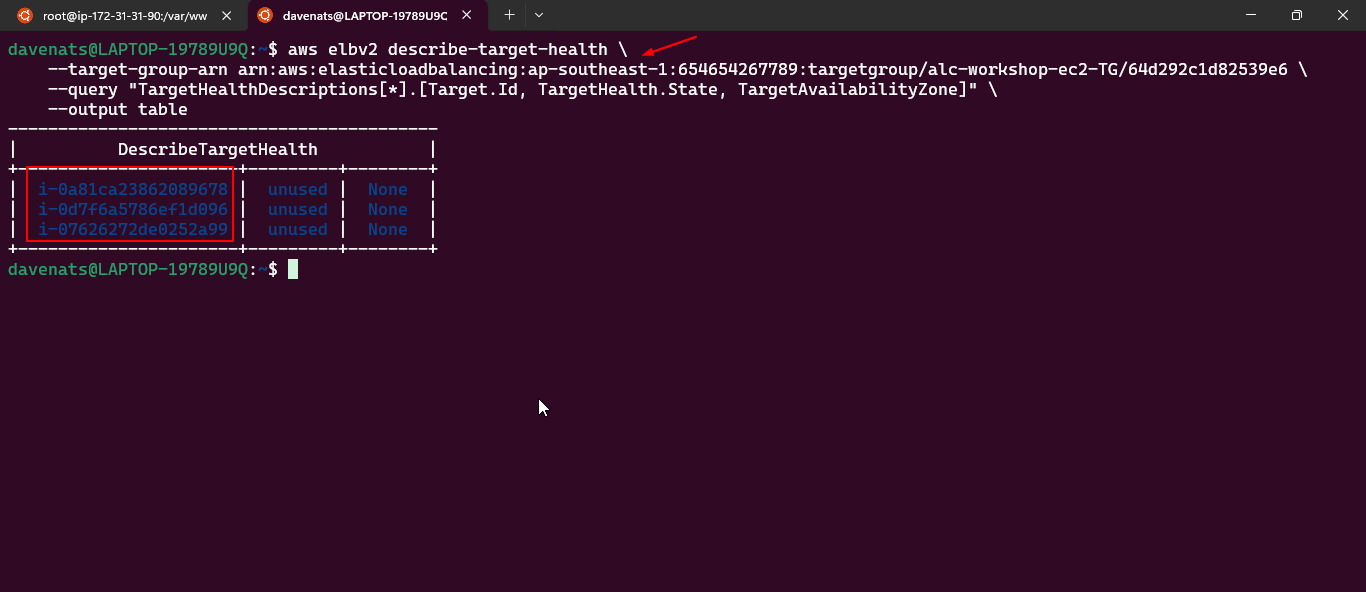
- As you notice both the target health and the target availability zone are none. This is because we still have to create the load balancer.
- Create a Load Balancer:
- Use the
create-load-balancercommand to create a load balancer with the desired settings.
- Use the
1
2
3
4
5
6
7
aws elbv2 create-load-balancer \
    --name <load-balancer-name> \
    --subnets <subnet-id-1> <subnet-id-2> \
    --security-groups <security-group-id> \
    --scheme internet-facing \
    --type application \
    --ip-address-type ipv4
- We first need to get the subnet ID’s. Use the following command:
1
2
3
aws ec2 describe-instances \
    --query "Reservations[*].Instances[*].[InstanceId, SubnetId, Placement.AvailabilityZone]" \
    --output table
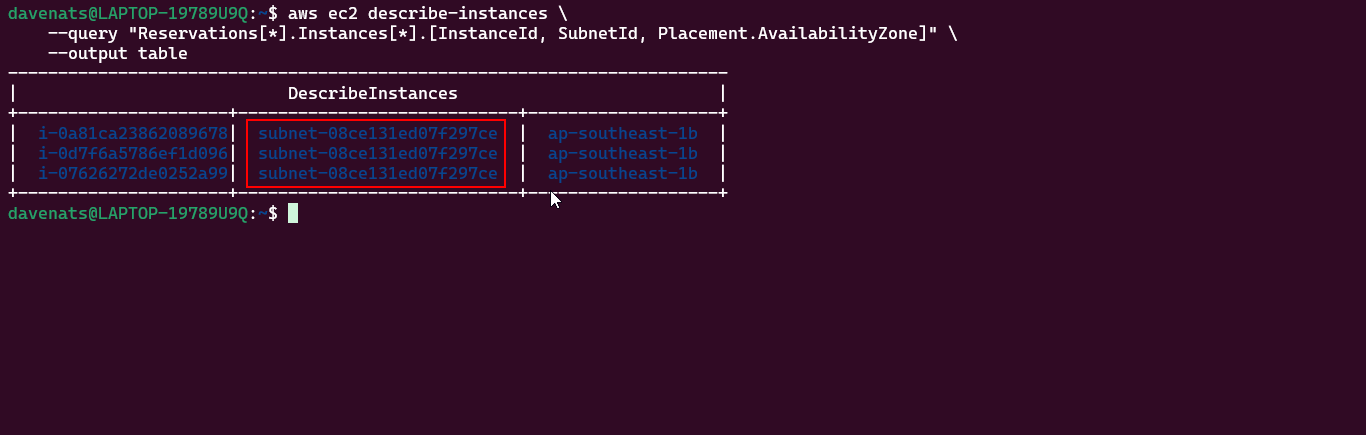
- Now we need to get the security group ID. Use the following command, In this case, the security group ID is
sg-0c1b0b8939dd8ba1a.:
1
aws ec2 describe-security-groups
- All in all, my command is as follows:
1
2
3
4
5
6
7
aws elbv2 create-load-balancer \
    --name my-app-load-balancer \
    --subnets subnet-08ce131ed07f297ce subnet-0dde1c2d70e916cb2 \
    --security-groups sg-0c1b0b8939dd8ba1a \
    --scheme internet-facing \
    --type application \
    --ip-address-type ipv4
- Notice that I only have one subnet ID. This is because I only have one availability zone in my 3 instances. I added one because load balancers require at least two subnets in two different availability zones.
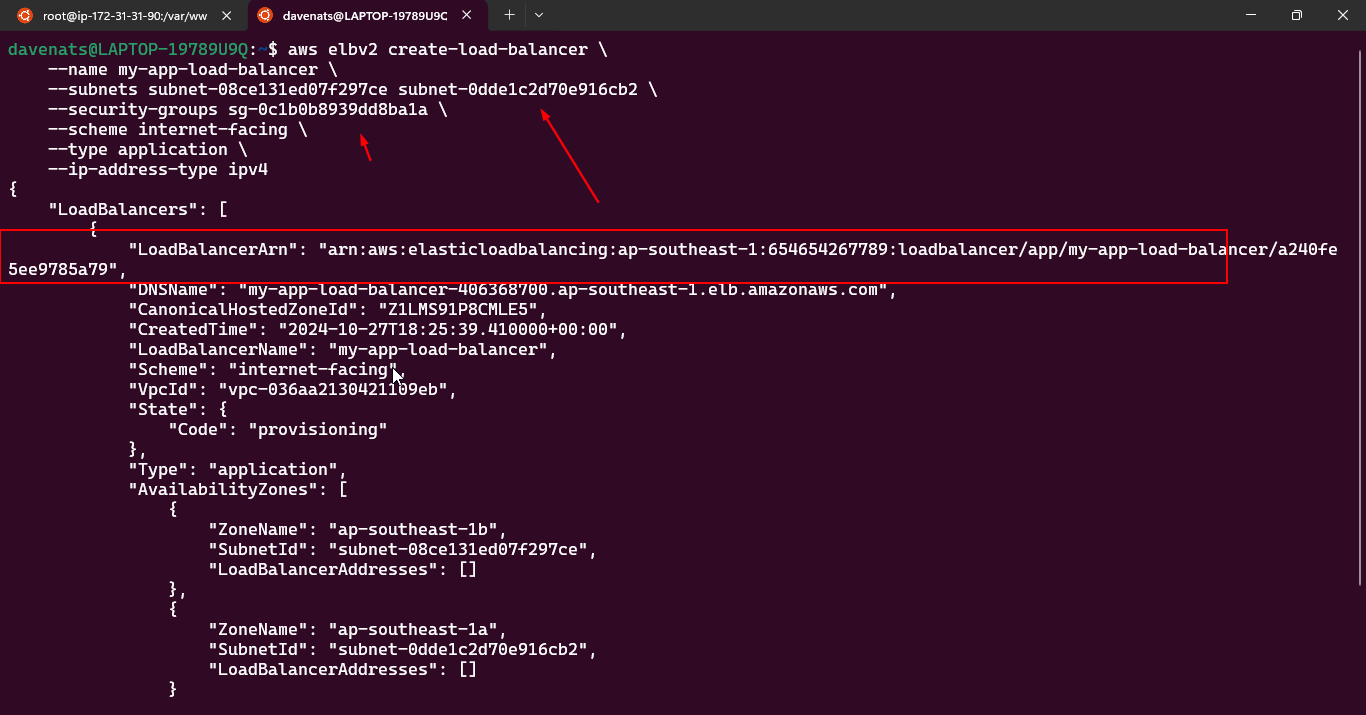
- Create a Listener:
- Use the
create-listenercommand to create a listener for the load balancer.
- Use the
1
2
3
4
5
aws elbv2 create-listener \
    --load-balancer-arn <your-load-balancer-arn> \
    --protocol HTTP \
    --port 80 \
    --default-actions Type=forward,TargetGroupArn=<your-target-group-arn>
- My load balancer ARN is
arn:aws:elasticloadbalancing:ap-southeast-1:654654267789:loadbalancer/app/my-app-load-balancer/a240fe5ee9785a79 -
My target group ARN is
arn:aws:elasticloadbalancing:ap-southeast-1:654654267789:targetgroup/alc-workshop-ec2-TG/64d292c1d82539e6 - All in all, my command is as follows:
1
2
3
4
5
aws elbv2 create-listener \
    --load-balancer-arn arn:aws:elasticloadbalancing:ap-southeast-1:654654267789:loadbalancer/app/my-app-load-balancer/a240fe5ee9785a79 \
    --protocol HTTP \
    --port 80 \
    --default-actions Type=forward,TargetGroupArn=arn:aws:elasticloadbalancing:ap-southeast-1:654654267789:targetgroup/alc-workshop-ec2-TG/64d292c1d82539e6
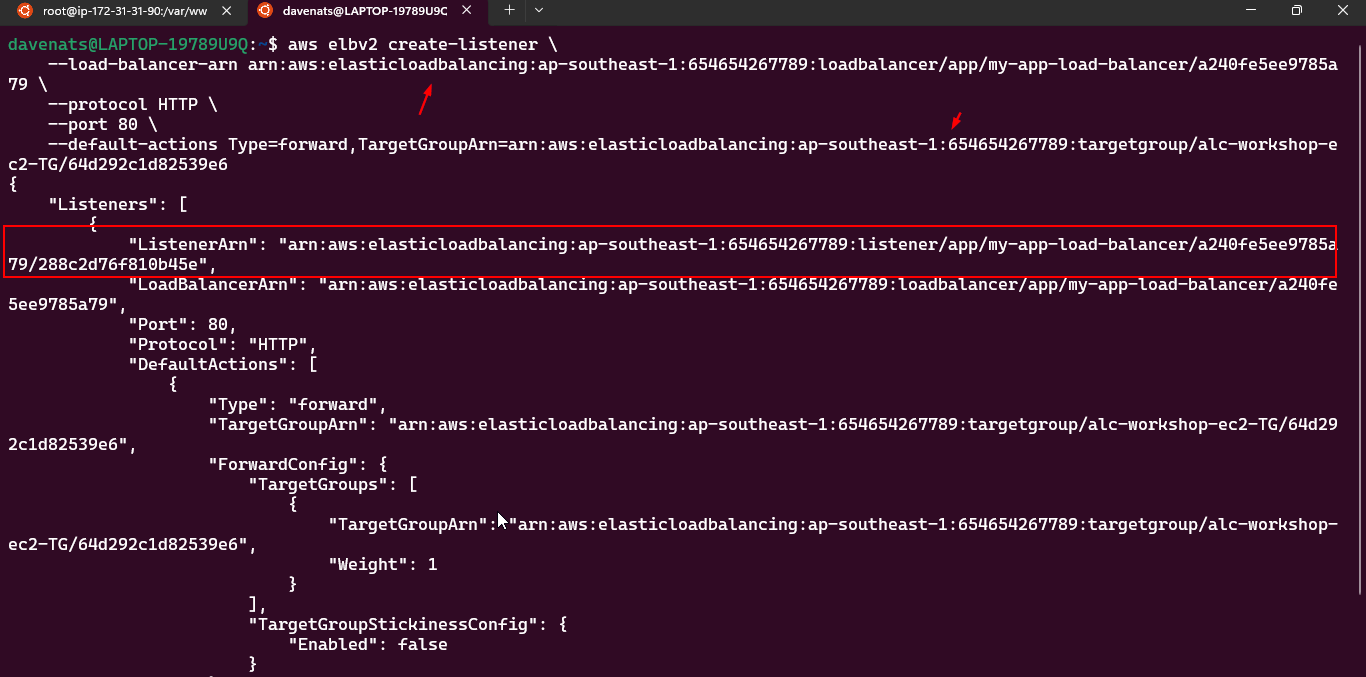
- Lets verify the load balancer we created:
1
aws elbv2 describe-load-balancers --names my-app-load-balancer
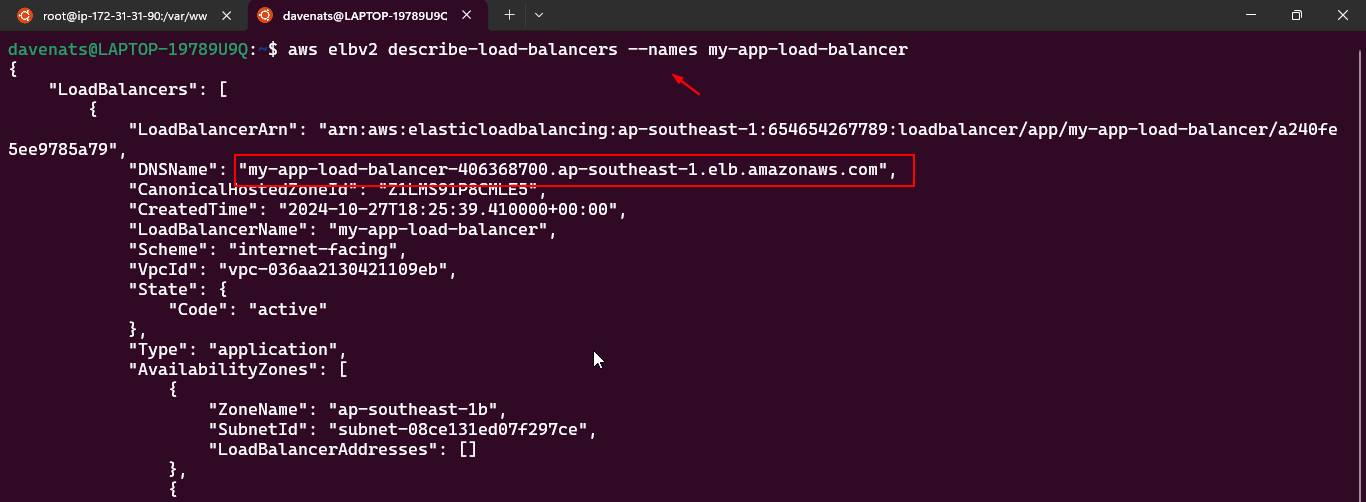
- Lets verify the listener we created:
1
2
3
4
aws elbv2 describe-target-health \
    --target-group-arn arn:aws:elasticloadbalancing:ap-southeast-1:654654267789:targetgroup/alc-workshop-ec2-TG/64d292c1d82539e6 \
    --query "TargetHealthDescriptions[*].[Target.Id, TargetHealth.State, TargetAvailabilityZone]" \
    --output table
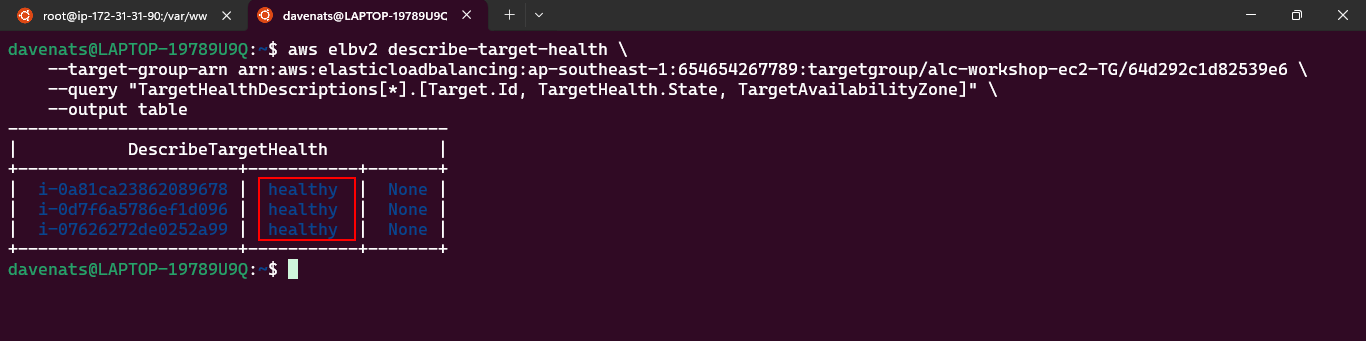
- As you can see, the target health. This means that the load balancer is now working.
- Access the Load Balancer:
- Open a web browser and enter the DNS name of the load balancer.

- Refresh the page multiple times to see the different instance outputs.
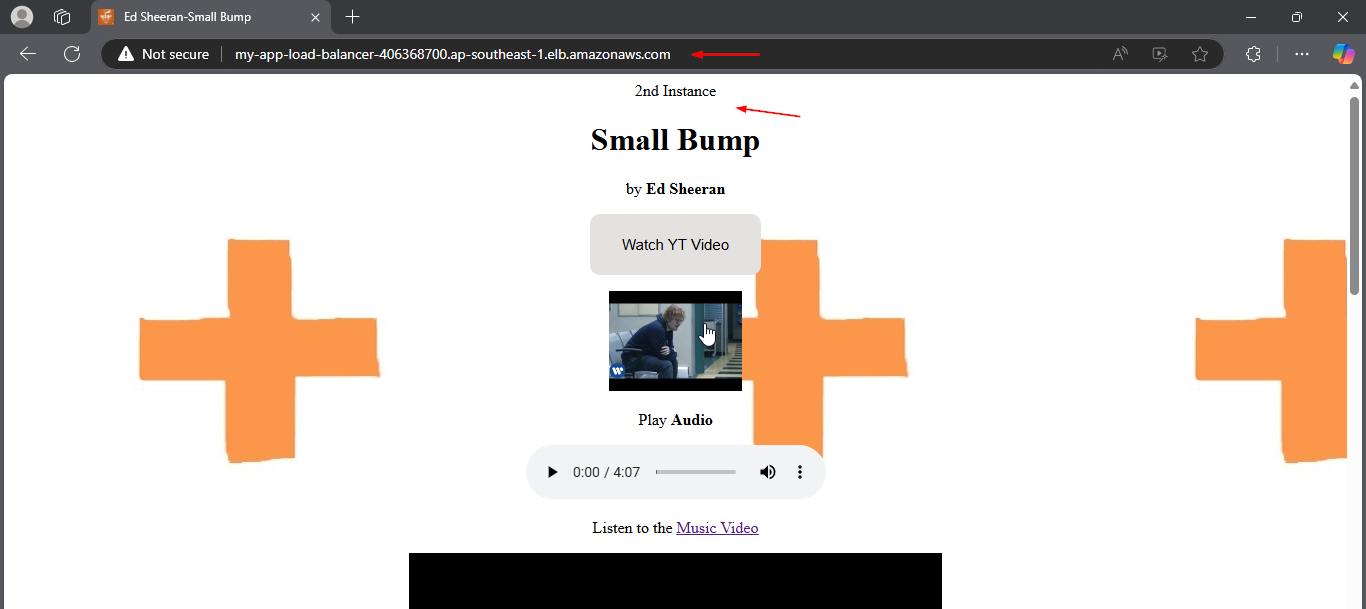

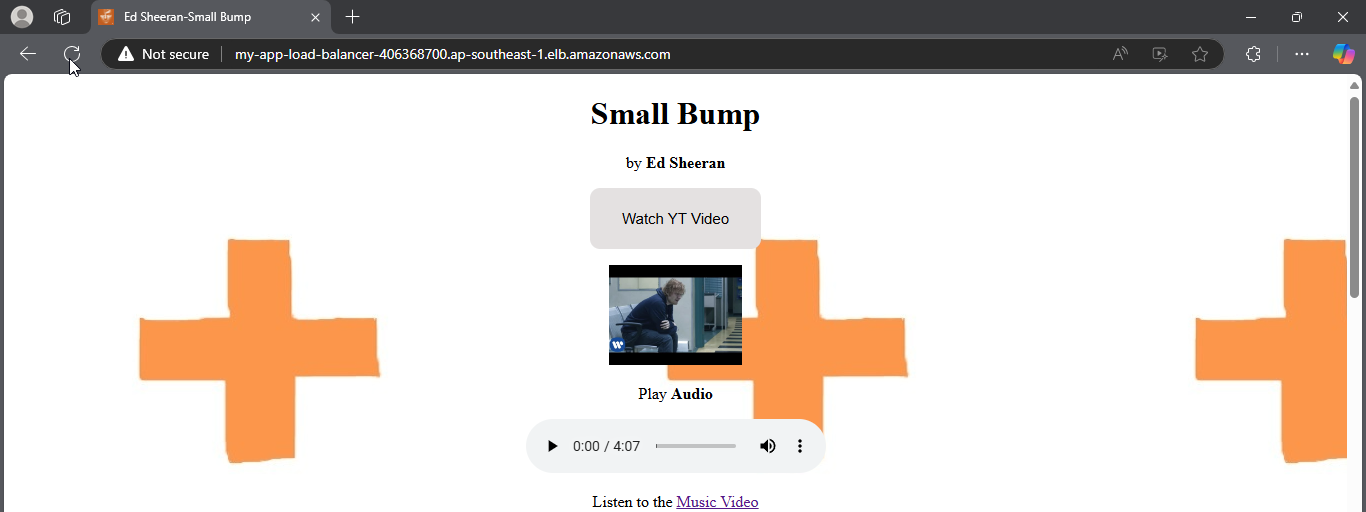
Note:
- If you want to attach a domain name to the load balancer, you can use Route 53 to create an alias record that points to the load balancer’s DNS name.
Cleanup
- Remove the load balancer and target group to avoid incurring additional costs if you no longer need them.
Auto Scaling Groups
Amazon EC2 Auto Scaling helps you ensure that you have the correct number of Amazon EC2 instances available to handle the load for your application. You create collections of EC2 instances, called Auto Scaling groups.
- You can specify the minimum and maximum number of instances in each Auto Scaling group, and Amazon EC2 Auto Scaling ensures that your group never goes beyond this size.
- If you specify the desired capacity, either when you create the group or at any time thereafter, Amazon EC2 Auto Scaling ensures that your group has this many instances.
- If you specify scaling policies, then Amazon EC2 Auto Scaling can launch or terminate instances as demand on your application increases or decreases.
Example
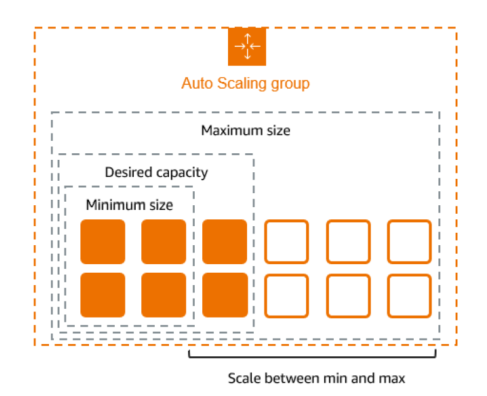
Pricing for Amazon EC2 Auto Scaling
There are no additional fees with Amazon EC2 Auto Scaling, so it’s easy to try it out and see how it can benefit your AWS architecture. You only pay for the AWS resources (for example, EC2 instances, EBS volumes, and CloudWatch alarms) that you use.
Work with Auto Scaling groups
You can create, access, and manage your Auto Scaling groups using any of the following interfaces:
- AWS Management Console
- AWS Command Line Interface (AWS CLI)
- AWS SDKs
- Query API
- AWS CloudFormation
Create a launch template for an Auto Scaling group
Before you can create an Auto Scaling group using a launch template, you must create a launch template that contains the configuration information to launch an instance, including the ID of the Amazon Machine Image (AMI). To create new launch templates, use the following procedures.
- Create your launch template (console)
- Change the default network interface settings (console)
- Modify the storage configuration (console)
- Create a launch template from an existing instance (console)
- Related resources
- Limitations
Create Auto Scaling groups using launch templates
If you have created a launch template, you can create an Auto Scaling group that uses a launch template as a configuration template for its EC2 instances. The launch template specifies information such as the AMI ID, instance type, key pair, security groups, and block device mapping for your instances.
Create Auto Scaling groups using launch configurations
If you have created a launch configuration or an EC2 instance, you can create an Auto Scaling group that uses a launch configuration as a configuration template for its EC2 instances. The launch configuration specifies information such as the AMI ID, instance type, key pair, security groups, and block device mapping for your instances. For information about creating launch configurations,
The following describes how to create a launch configuration.After you create a launch configuration, you cannot modify it. Instead, you must create a new launch configuration.
- Create a launch configuration
- Configure the instance metadata options
- Create a launch configuration using an EC2 instance
Choose your scaling method
Amazon EC2 Auto Scaling provides several ways for you to scale your Auto Scaling group.
Maintain a fixed number of instances
-
The default for an Auto Scaling group is to not have any attached scaling policies or scheduled actions, which causes it to maintain a fixed size. After you create your Auto Scaling group, it starts by launching enough instances to meet its desired capacity.
-
If there are no scaling conditions attached to the group, it continues to maintain its desired capacity even if an instance becomes unhealthy.
Amazon EC2 Auto Scaling monitors the health of each instance in your Auto Scaling group. When it finds that an instance has become unhealthy, it replaces it with a new instance. You can read a more in-depth description of this process in Health checks for instances in an Auto Scaling group.
Scale manually
- Manual scaling is the most basic way to scale your Auto Scaling group. You can either update the desired capacity of the Auto Scaling group or terminate instances in the Auto Scaling group.
- Manual scaling is an alternative to auto scaling, especially if you want to make one-time capacity changes.
- After you manually scale your group, Amazon EC2 Auto Scaling resumes normal auto scaling activities based on the scaling policies and scheduled actions that you defined. For groups with default instance warm up enabled, any new instances go through a warm up period before they start contributing to the metrics used for auto scaling. This warmup period assists in stabilizing the group at the new capacity.
Scale based on a schedule
- Scaling by schedule means that scaling actions are performed automatically as a function of date and time.
- This is useful when you know exactly when to increase or decrease the number of instances in your group, simply because the need arises on a predictable schedule.
Scale dynamically based on demand
A more advanced way to scale your resources, using dynamic scaling, lets you define a scaling policy that dynamically resizes your Auto Scaling group to meet changes in demand.
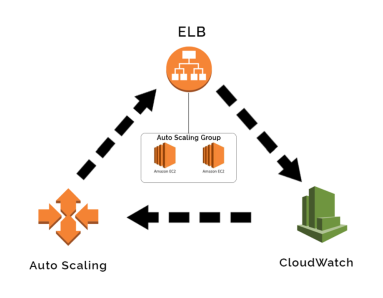
Fig. Dynamic AWS EC2 Autoscaling
Scale proactively
- You can also combine predictive scaling and dynamic scaling (proactive and reactive approaches, respectively) to scale your EC2 capacity faster.
- Use predictive scaling to increase the number of EC2 instances in your Auto Scaling group in advance of daily and weekly patterns in traffic flows.
How does EC2 Auto Scaling work?
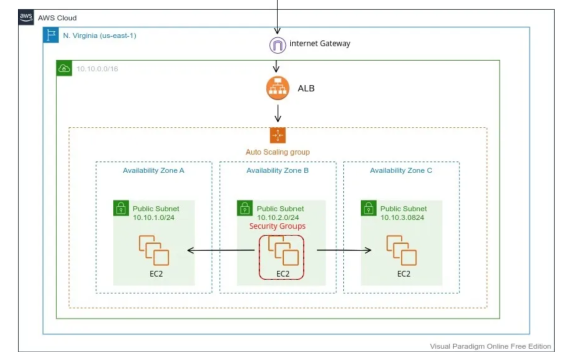
Fig. How to Build an Auto-scaling Group of AWS EC2 Instance
When configuring EC2 Auto Scaling, you’ll need to follow these basic steps in the AWS console.
Step #1: Draft a Launch Template
- Launch Templates in Amazon EC2 define the settings for launching instances. It contains the ID of the Amazon Machine Image (AMI), the instance type, a key pair, security groups, and other parameters used to launch EC2 instances.
- This replaces the legacy Launch Configuration option, while adding additional features.
Step #2: Set up Auto Scaling Groups:
- Auto Scaling Groups are logical collections of EC2 instances, used to manage how instances are scaled out or in using Launch Templates / Launch Configurations. Once the Launch Template defines what to scale, the ASG determines where to launch the EC2 instances.
- You can specify the initial, minimum, maximum, and preferred number of instances.
Step #3: Implement Elastic Load Balancer
ELBs help evenly distribute incoming traffic among Amazon EC2 instances within your Auto Scaling groups as they scale up and down. And when an EC2 instance fails, the load balancer can reroute traffic to the next available healthy EC2 instance.
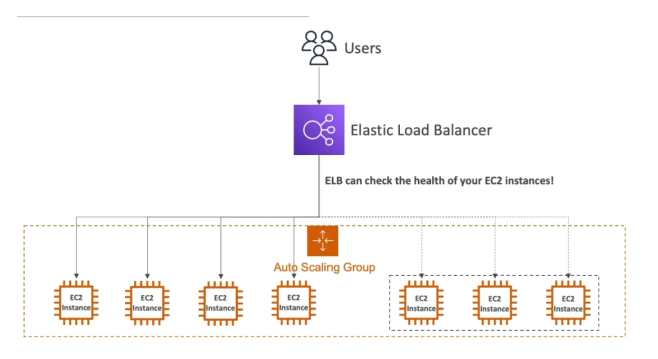
Step #4: Set Auto Scaling Policies
- Scaling policies dictate how and when the ASG should scale up or down. For example, a policy might be to scale out (add instances) when CPU utilization exceeds 80% for a period and to scale in (remove instances) when it drops below 30%.
- An advanced scaling configuration might consist of scaling policies tracking multiple targets and/or step scaling policies for coverage of various scenarios.
Challenges of using EC2 Auto Scaling
EC2 Auto Scaling can help improve fault tolerance, availability and cost management. However, there are also challenges associated with Auto Scaling.
Running Spot instances in ASG with Mixed Instance Families:
- Spot can sometimes be cheaper. However, the unpredictable nature of Spot Instance terminations and 2-minute warning provided by AWS means that it can be complex, time-consuming, and even risky to run Spot.
Choosing the right combination of Spot instances
- Spot instances vary in type, price and availability zone, and the market constantly fluctuates in terms of (1) what is available and (2) how much it costs.
Compatibility of instance families with workloads
- Selecting the right instance types for your Auto Scaling group depends on factors such as CPU, memory, network performance, and storage requirements.
Setting Up an Auto Scaling Group
Prerequisites
Before creating an Auto Scaling Group, ensure that:
- You have an EC2 instance or an Amazon Machine Image (AMI).
- You’ve configured a key pair for SSH access.
- A VPC (Virtual Private Cloud) and subnets are available for your instances.
- Ensure that you have the necessary IAM permissions to create Auto Scaling Groups, Launch Templates, and EC2 Instances.
Step 1: Create a Launch Template or Launch Configuration
A Launch Template or Launch Configuration defines the configuration for instances in your Auto Scaling Group, including the AMI, instance type, key pair, security group, and block storage options.
Using the AWS Management Console
-
Navigate to the EC2 Dashboard:
- Log in to the AWS Management Console.
- In the search bar, type “EC2” and select EC2 from the results.
-
Create a Launch Template:
- On the left sidebar, under Instances, click Launch Templates.
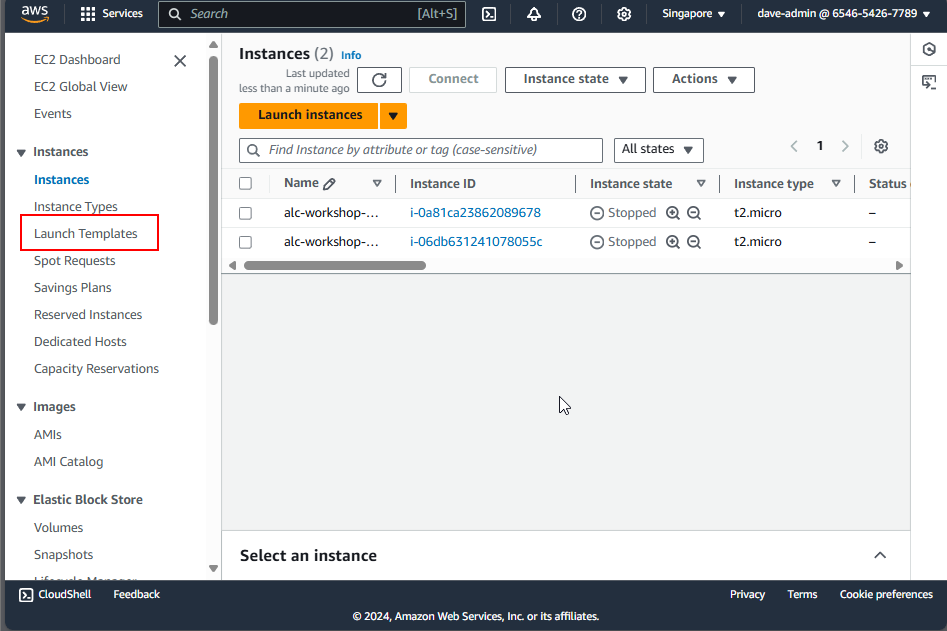
- Click Create launch template.
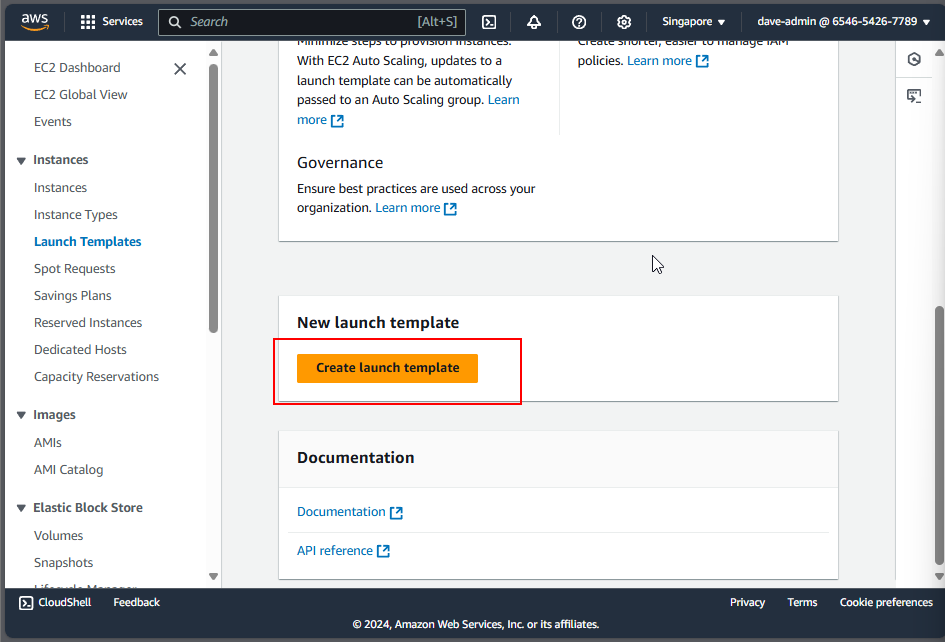
- Provide a Name and Description for the template.
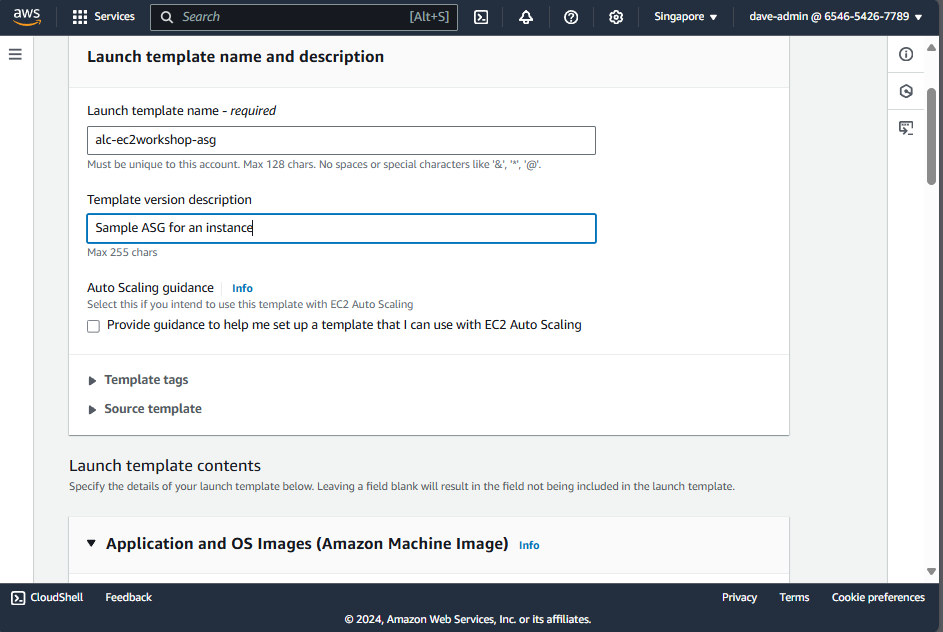
- Under Source AMI, select the AMI we made earlier.
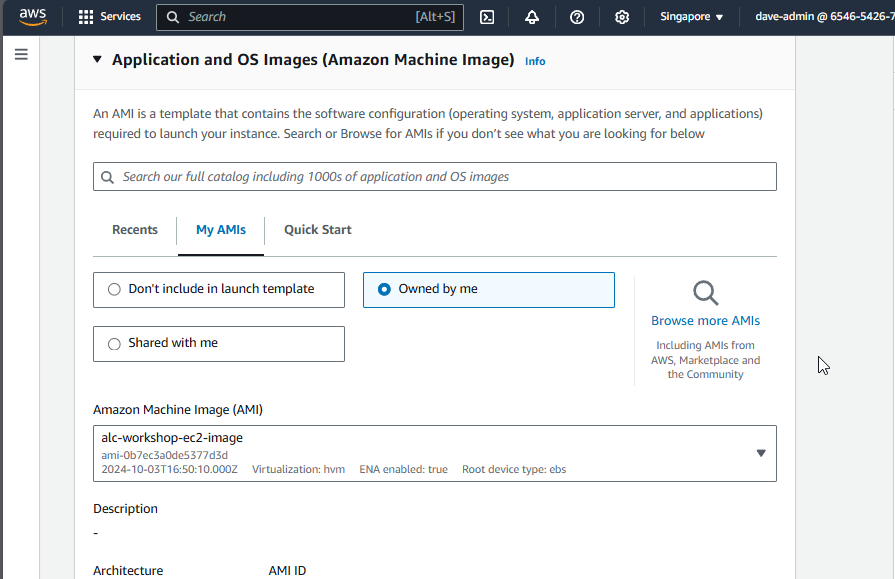
- Choose an Instance type (e.g., t2.micro for free tier).
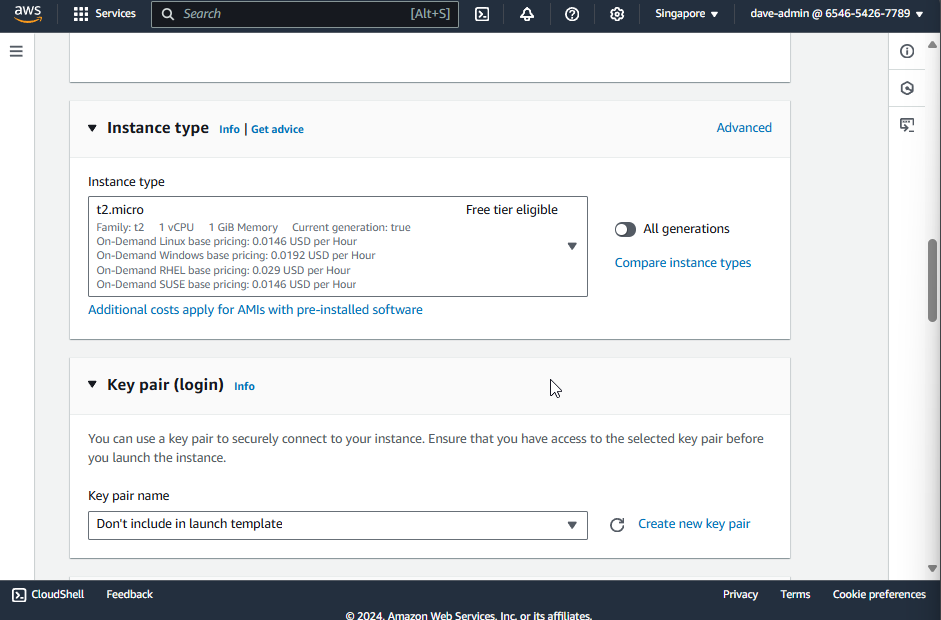
- Assign a Key Pair for SSH access to your instances.
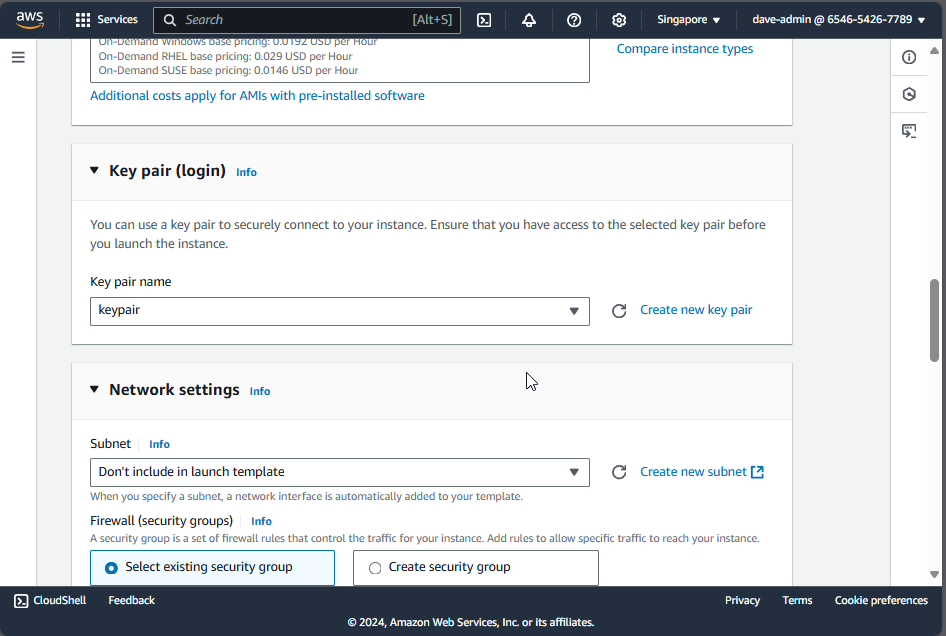
- In the Network settings, select your VPC and choose the subnet where your instances are located.
- Under Security Groups, select the security group we chose earlier.
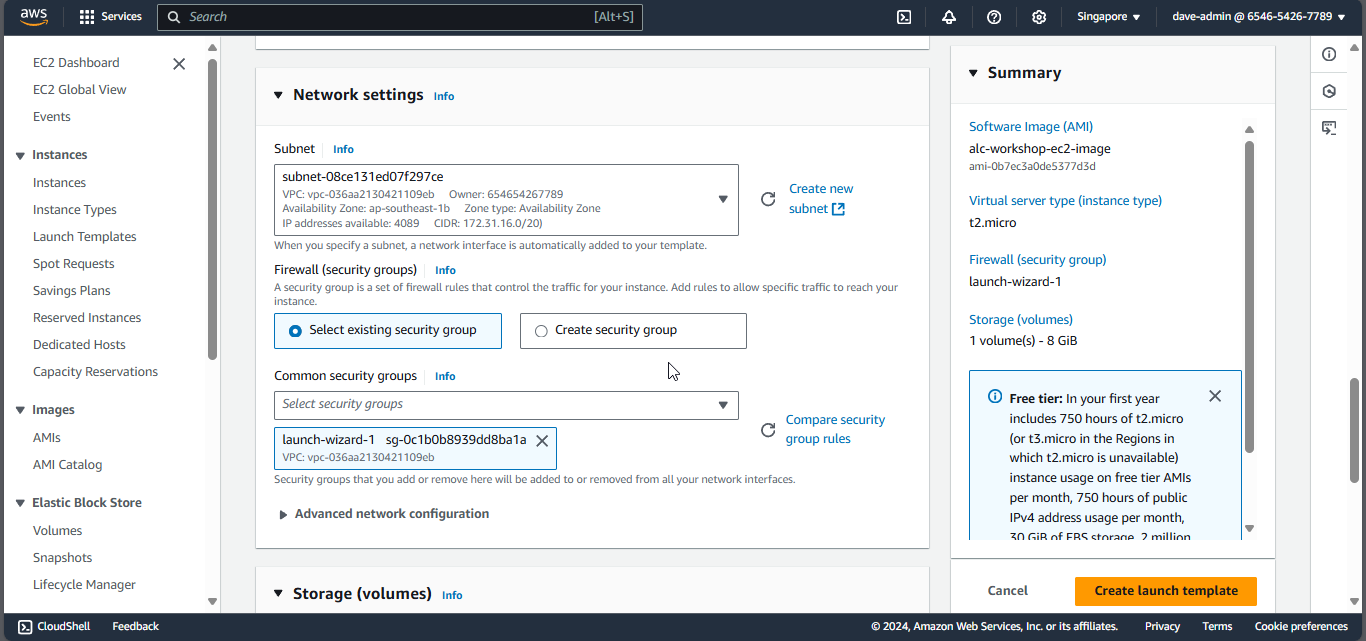
-
Leave storage as it is as it is already defined in the AMI.
-
Click Create launch template.
Using AWS CLI
You can also create a Launch Template using the AWS CLI:
1
2
3
4
5
6
7
8
9
aws ec2 create-launch-template \
    --launch-template-name alc-workshop-ec2-launchtemplate \
    --version-description "Initial version" \
    --launch-template-data '{
        "ImageId": "<ami-id>",
        "InstanceType": "<instance-type>",
        "KeyName": "<key-pair-name>",
        "SecurityGroupIds": ["<security-group-id>"]
    }'
- Replace
<ami-id>,<instance-type>,<security-group-id>, and<key-pair-name>with your values. For mine it would be:
1
2
3
4
5
6
7
8
9
10
aws ec2 create-launch-template \
    --launch-template-name alc-workshop-ec2-launchtemplate \
    --version-description "Initial version" \
    --launch-template-data '{
        "imageId": "ami-05d750b3a87a5af4c",
        "instanceType": "t2.micro",
        "keyName": "keypair",
        "securityGroupIds": ["sg-0c1b0b8939dd8ba1a"]
    }'
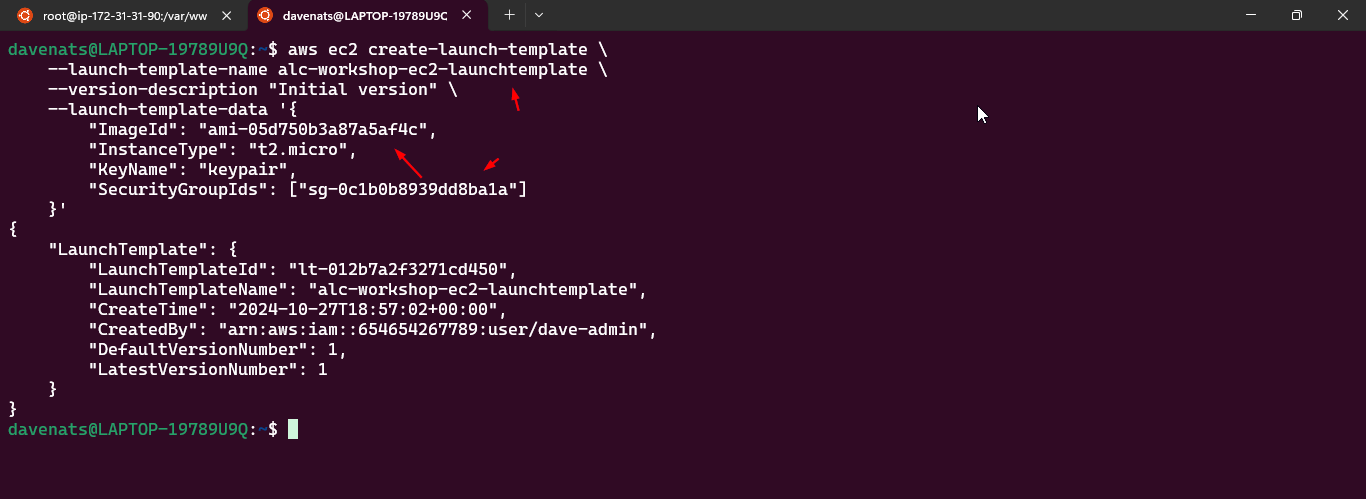
Step 2: Create an Auto Scaling Group
An Auto Scaling Group ensures that you always have the right number of EC2 instances running to handle your application’s load. It automatically increases or decreases the number of instances according to your defined policies.
Using the AWS Management Console
- Navigate to Auto Scaling Groups:
- In the EC2 Dashboard, under Auto Scaling, click Auto Scaling Groups.
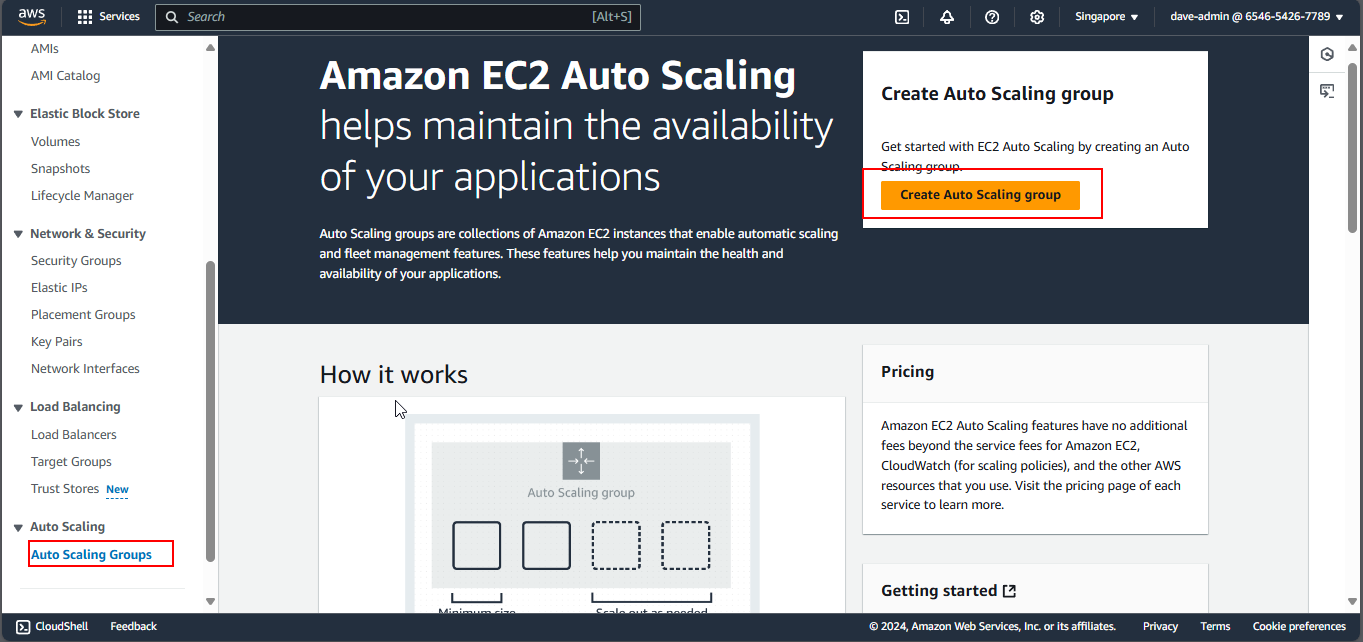
Click Create Auto Scaling group.
- Configure Basic Settings:
- Name your Auto Scaling group. Select the Launch Template or Launch Configuration created earlier.
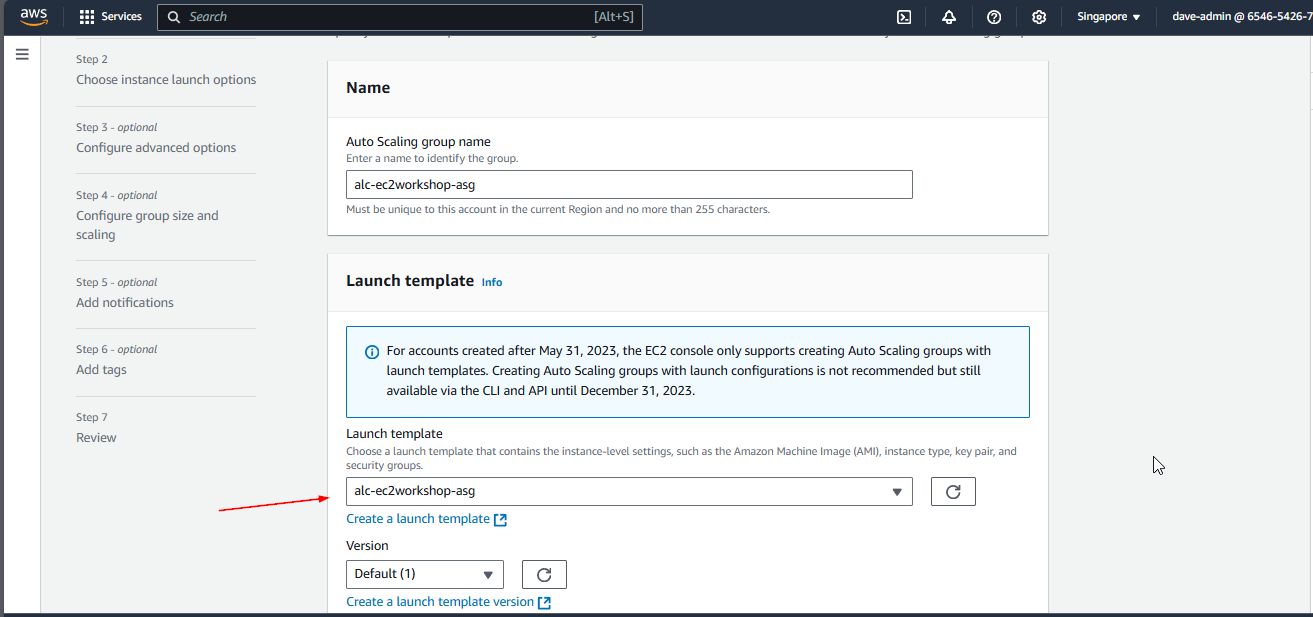
- Choose a VPC and Subnets:
- Select a VPC and subnets where your instances will be launched. Select all subnets for high availability.
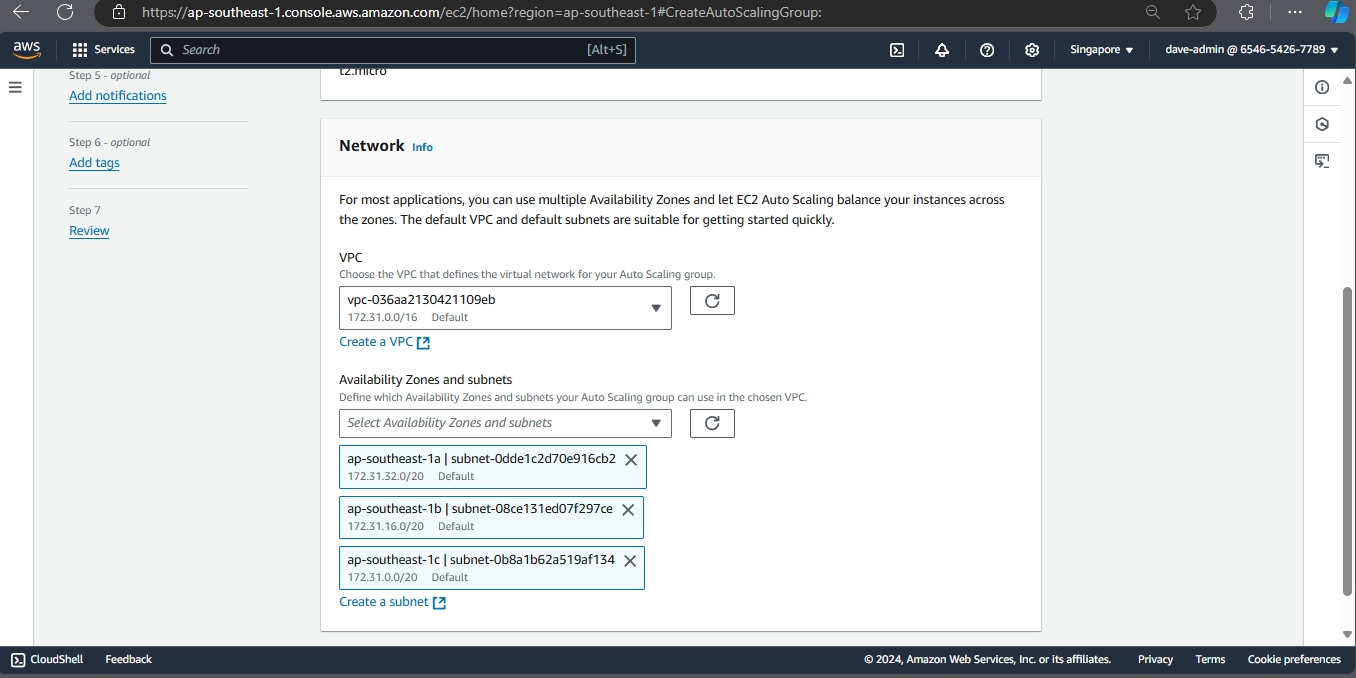
- Attach Load Balancers:
- Attach our the target group on the load balancer we made to the Auto Scaling group.
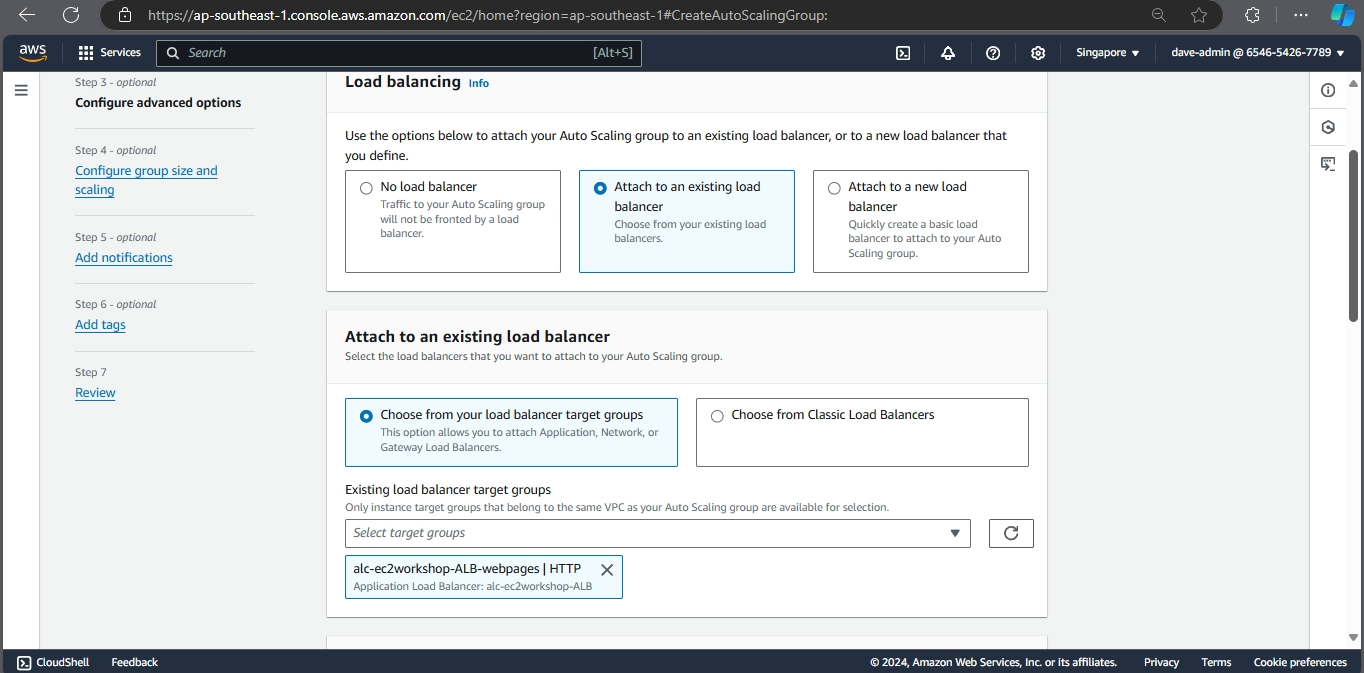
- For health check, select EC2 or ELB health check.
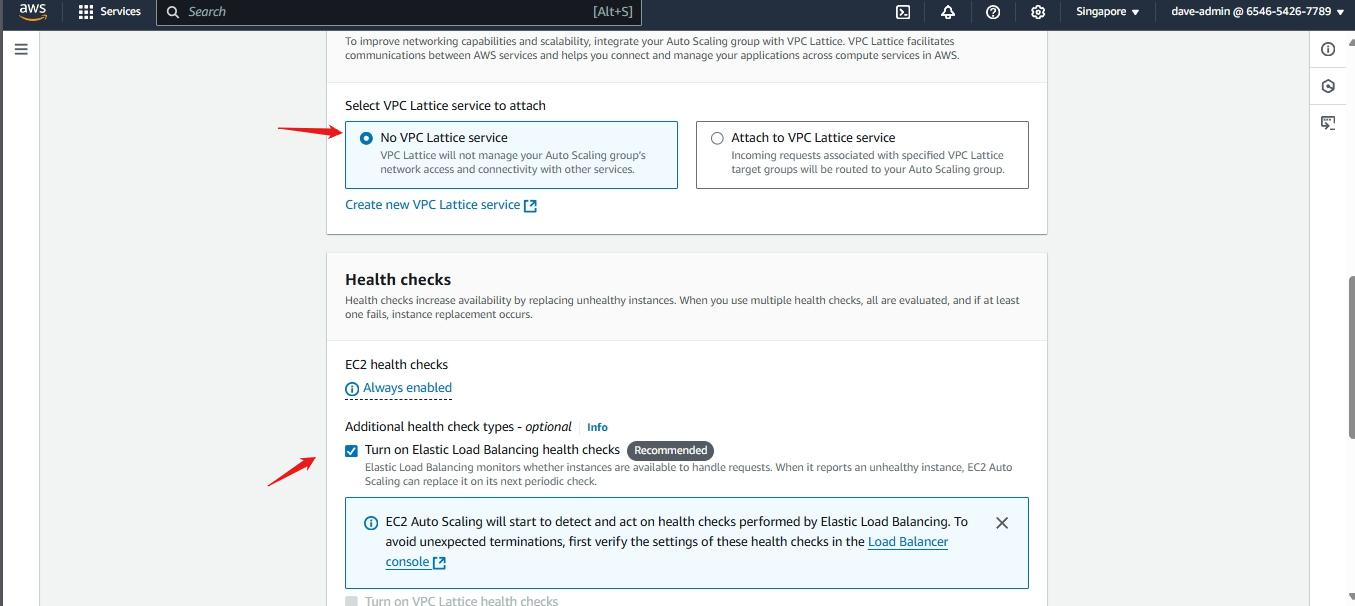
- Configure Instance Scaling
- Set the Minimum, Desired, and Maximum number of instances.
Example:
- Minimum: 2 - If one instance fails, the other will still handle traffic.
- Desired: 3 - All target instances are running under normal circumstances.
- Maximum: 5 - During traffic spikes or high demand periods
- Set the Minimum, Desired, and Maximum number of instances.
Example:
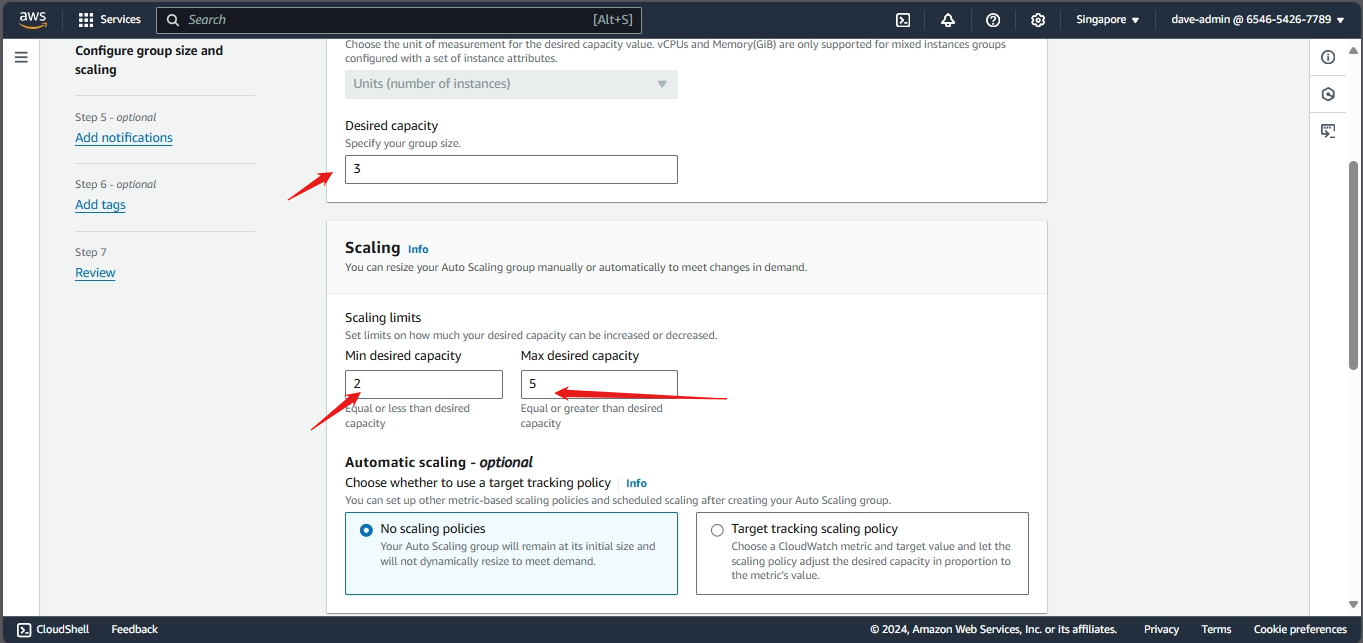
just click next until you reach the end.
- Review and Create:
- Review the configuration and click Create Auto Scaling group.
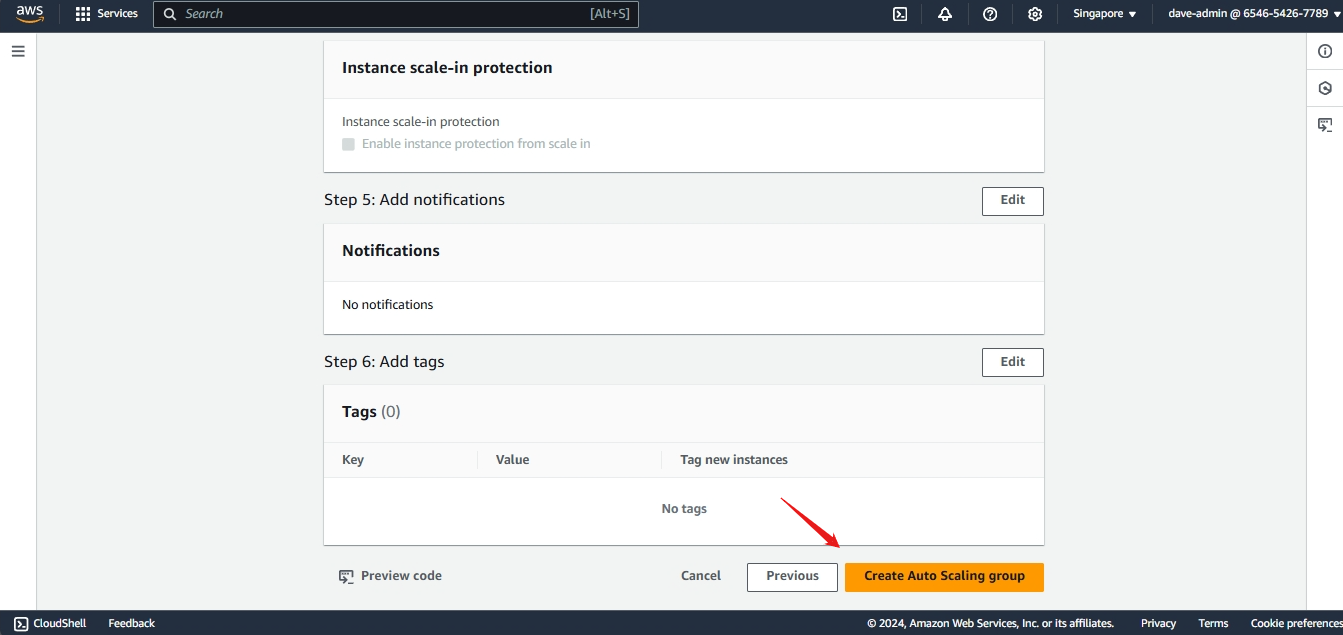
Using AWS CLI
- You can also create an Auto Scaling Group using the AWS CLI:
1
2
3
4
5
6
7
8
aws autoscaling create-auto-scaling-group \
    --auto-scaling-group-name <asg-name> \
    --launch-template LaunchTemplateName=<launch-template-name> \
    --min-size 2 \
    --max-size 5 \
    --desired-capacity 3 \
    --vpc-zone-identifier "<subnet-id,subnet-id2...>" \
    --tags Key=Name,Value=<asg-name>,PropagateAtLaunch=true
- Replace
<asg-name>with the name of your Auto Scaling Group. - Replace
<launch-template-name>with the name of the Launch Template you created. Mine isalc-workshop-ec2-launchtemplate. - Replace
<subnet-id>with the subnet ID where your instances will be launched. Include all subnets as it will be used for high availability. Use this command to get all the subnet IDs in your VPC:
1
aws ec2 describe-subnets --query 'Subnets[*].[SubnetId, AvailabilityZone]' --output table
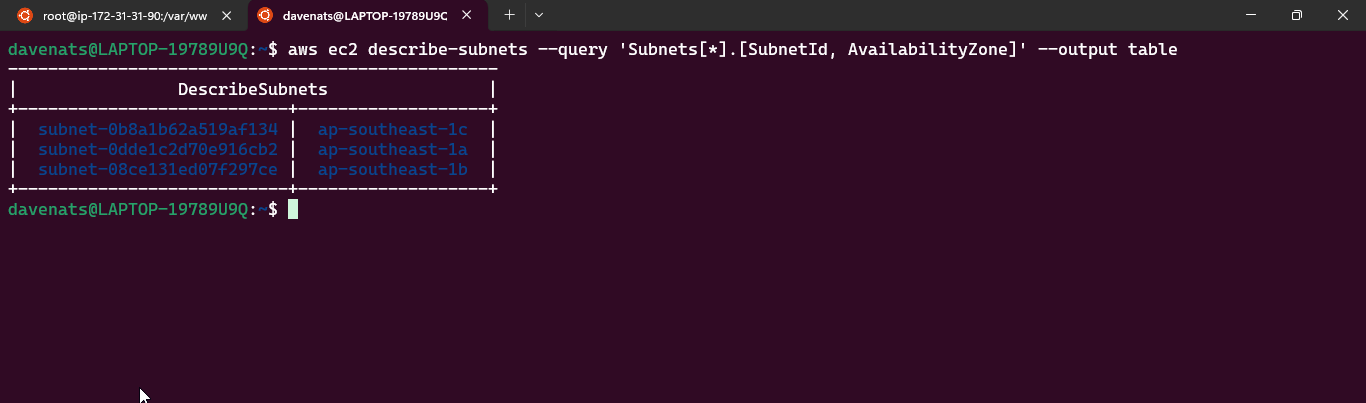
The subnet’s are as follows: subnet-0b8a1b62a519af134 , subnet-0dde1c2d70e916cb2 and subnet-08ce131ed07f297ce.
- My command would be:
1
2
3
4
5
6
7
8
aws autoscaling create-auto-scaling-group \
    --auto-scaling-group-name alc-workshop-asg \
    --launch-template LaunchTemplateName=alc-workshop-ec2-launchtemplate \
    --min-size 2 \
    --max-size 5 \
    --desired-capacity 3 \
    --vpc-zone-identifier "subnet-0b8a1b62a519af134,subnet-0dde1c2d70e916cb2,subnet-08ce131ed07f297ce"  \
    --tags Key=Name,Value=alc-workshop-ec2-asg,PropagateAtLaunch=true
Then, use to verify the auto scaling group:
1
aws autoscaling describe-auto-scaling-groups --output table
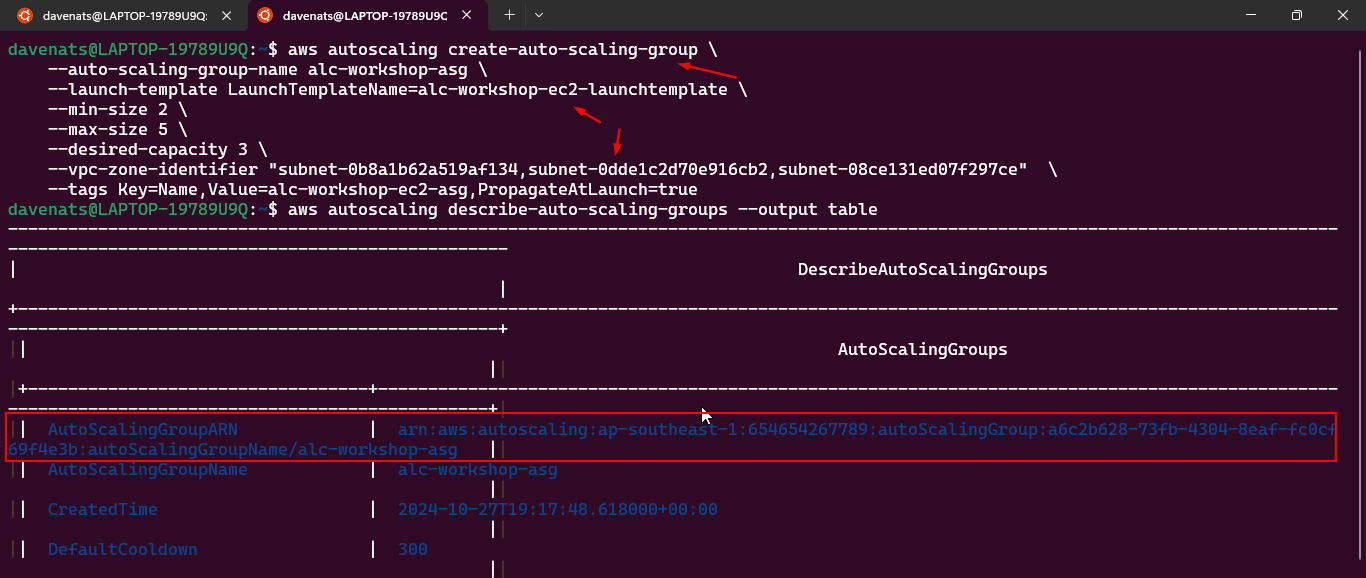
- Attach the Auto Scaling Group to the Load Balancer:
- You can attach the Auto Scaling Group to the Load Balancer using the AWS Management Console or the AWS CLI. Run the following command:
1
2
3
aws autoscaling attach-load-balancer-target-groups \
    --auto-scaling-group-name alc-workshop-asg \
    --target-group-arns <your-target-group-arn>
- My target group ARN is
arn:aws:elasticloadbalancing:ap-southeast-1:654654267789:targetgroup/alc-workshop-ec2-TG/64d292c1d82539e6.
- My command would be:
1
2
3
aws autoscaling attach-load-balancer-target-groups \
    --auto-scaling-group-name alc-workshop-asg \
    --target-group-arns arn:aws:elasticloadbalancing:ap-southeast-1:654654267789:targetgroup/alc-workshop-ec2-TG/64d292c1d82539e6
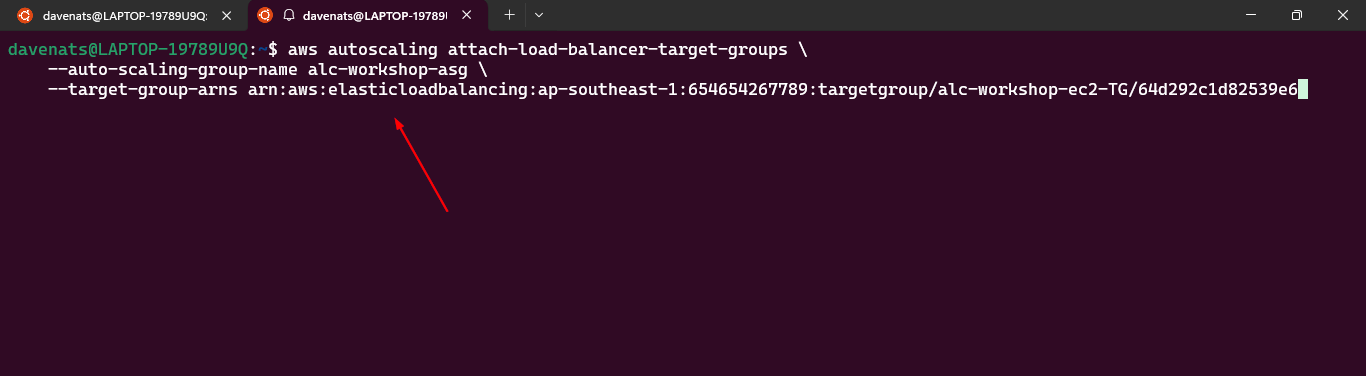
- Also verify the target group is attached to the Auto Scaling Group using the command:
1
aws autoscaling describe-auto-scaling-groups --auto-scaling-group-names <auto-scaling-group-name> --query "AutoScalingGroups[*].[AutoScalingGroupName,TargetGroupARNs]" --output table
- My command is:
1
aws autoscaling describe-auto-scaling-groups --auto-scaling-group-names alc-workshop-asg --query "AutoScalingGroups[*].[AutoScalingGroupName,TargetGroupARNs]" --output table

Note
- To verify auto scaling behaviour, refer to this documentation https://docs.aws.amazon.com/sagemaker/latest/dg/endpoint-scaling-loadtest.html
Cleanup
- Remember to delete the Auto Scaling Group and Launch Template when you’re done to avoid incurring unnecessary costs.