First Line of Defense
Learn how to secure your cloud with access control, MFA, key management, and more. Plus, get tips on managing AWS budgets and billing access for total security and financial control.
First Line of Defense: AWS Account Security 101 with IAM
Table of Contents
- Workshop Overview
- Prerequisites
- Workshop Elements
Workshop Overview
In this workshop, you’ll gain a deep understanding of AWS Account Security, with a focus on Identity and Access Management (IAM). Through hands-on activities, you’ll learn to establish secure AWS environments by managing user accounts, permissions, and enforcing Multi-Factor Authentication (MFA).
By the end of the session, you will have the skills to safeguard your AWS accounts, manage user access efficiently, and optimize your cloud expenses.
Prerequisites
Ensure you have the following tools installed before starting:
- Password Manager: Bitwarden
- Windows Subsystem for Linux (WSL): Install WSL
- Multi-Factor Authenticator App: Install an MFA app like Duo Mobile Google Authenticator.
Workshop Elements
AWS Accounts: The Basics
This module covers the essential elements of AWS account structures and their importance for securing cloud resources. Topics include:
- AWS Account Hierarchy: Understand the different types of AWS accounts and their roles.
- Account Settings and Configuration: Learn how to configure your account for optimal security.
- Security Best Practices: Implement foundational security measures and understand AWS’s built-in security features.
Shared Responsibility Model
Dive deep into the Shared Responsibility Model, which defines the division of security responsibilities between AWS and its users. Key points include:
- Understanding AWS Responsibilities: What AWS manages, including hardware, software, networking, and facilities.
- User Responsibilities: Your role in managing data, applications, and access controls.
- Security and Compliance: How to leverage AWS tools and services to meet compliance requirements.
Creating AWS Accounts
Learn the step-by-step process for creating and configuring AWS accounts, focusing on security and best practices:
- Creating New Accounts: Detailed instructions on setting up new AWS accounts.
- Account Structure Best Practices: Guidelines for organizing accounts for different environments (development, testing, production).
- Account Security Configuration: How to configure security settings and enable necessary features.
Setting Up Multi-Factor Authentication (MFA)
Master the implementation of MFA to enhance account security. This module includes:
- MFA Overview: The importance of MFA in protecting AWS accounts.
- Enabling MFA: Step-by-step instructions for setting up MFA for root and IAM users.
- MFA Types: Different MFA methods (hardware tokens, mobile apps) and their applications.
- Troubleshooting MFA Issues: Common problems and how to resolve them.
Identity and Access Management (IAM)
Explore the core components of IAM and how to use them effectively:
Users and ARNs
- IAM Users: How to create and manage IAM users.
- Amazon Resource Names (ARNs): Understanding and using ARNs to specify resources.
Creating an Admin IAM User
- Admin User Creation: Detailed process for setting up an admin IAM user with appropriate permissions.
- Securing Admin Users: Best practices for securing admin accounts.
Access Keys and AWS CLI v2
- Generating Access Keys: How to create and manage access keys for programmatic access.
- Using AWS CLI v2: Configuring and using AWS CLI v2 with access keys.
Groups and Permission Management
- IAM Groups: How to create and manage IAM groups for organizing users.
- Permissions Management: Assigning permissions to groups and understanding permission policies.
Defining IAM Roles
- Defining IAM Roles: How to create and configure IAM roles for various use cases.
IAM Policies
- Attaching Policies: Best practices for attaching and managing policies.
Policy Simulator
- Using the Policy Simulator: How to test and validate IAM policies to ensure they meet your security requirements.
- Interpreting Results: Understanding simulation results to refine policies.
Granting Billing Console Access
Learn to manage access to the billing console:
- Granting Access: Detailed steps for providing IAM users with access to the billing console.
- Configuring Billing Permissions: Setting up appropriate permissions to control billing information access.
- Monitoring Billing Activity: How to monitor and review billing activity to ensure proper access controls.
Budget Alarms and Budget Creation
Gain expertise in managing and controlling your cloud spend with these topics:
- Creating Budget Alarms: How to set up alarms for monitoring spending thresholds.
- Setting Up Budgets: Detailed steps to create and manage budgets within AWS.
- Cost Optimization Tips: Best practices for managing and reducing AWS costs.
- Reviewing Budget Reports: How to interpret budget reports and adjust configurations accordingly.
AWS Getting Started
What is AWS? What is it all about?
Amazon Web Services (AWS) is a secure and comprehensive cloud computing platform provided by Amazon. A cloud platform offers a range of services like computing power, storage, databases, and networking over the internet, allowing users to manage and scale resources without owning physical hardware. AWS embodies this concept by delivering a vast array of services on a “pay-as-you-go” basis, meaning you only pay for what you use. Known for its reliability, scalability, and flexibility, AWS supports a wide range of applications and use cases.
An AWS account is like a container where you keep all your AWS resources and manage them. It handles two main things: access control (who can use the resources) and billing (how much you are charged).

A Brief Overview of AWS Services
AWS provides a broad spectrum of services that cater to various needs:
- Compute Services:
- EC2 (Elastic Compute Cloud): Virtual servers to run applications.
- AWS Lambda: Serverless computing that automatically scales.
- Storage Services:
- Amazon S3 (Simple Storage Service): Scalable object storage.
- EBS (Elastic Block Store): Block storage for EC2 instances.
- Database Services:
- Amazon RDS (Relational Database Service): Managed relational databases like MySQL and PostgreSQL.
- DynamoDB: Managed NoSQL database.
- Networking Services:
- Amazon VPC (Virtual Private Cloud): Isolated network environment.
- Elastic Load Balancing: Distributes incoming traffic across multiple targets.
- Other Domains:
- Machine Learning: Services like SageMaker for building and deploying ML models.
- Internet of Things (IoT): Services for connecting and managing IoT devices.
- Blockchain: Managed blockchain services.
- Analytics: Tools for big data processing and analysis.
AWS: Shared Responsibility Model
The AWS Shared Responsibility Model is a foundational concept in cloud security. It defines the division of security responsibilities between AWS and its customers, ensuring both parties contribute to a secure cloud environment.
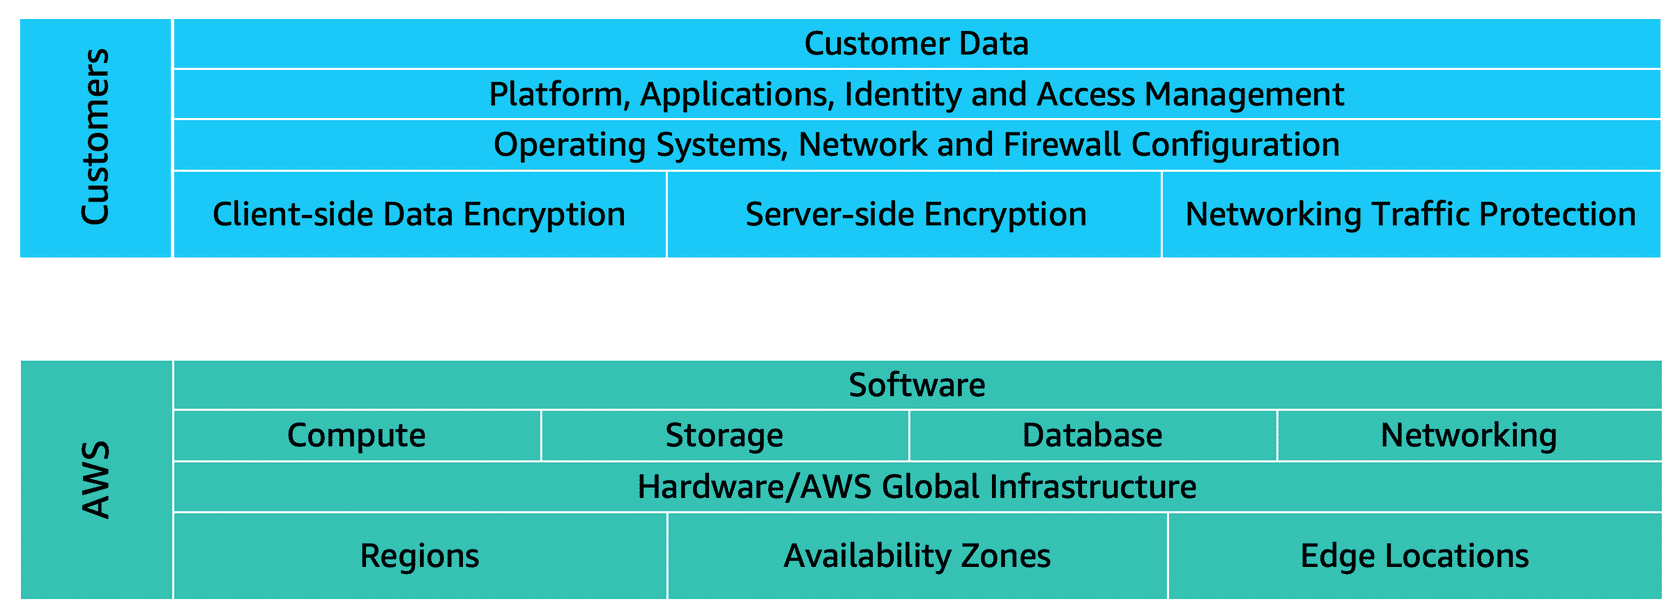
Customers: Security in the Cloud
Customers are responsible for the security of everything that they create and put in the AWS Cloud.
- Data Control: Deciding which data to store in AWS, managing permissions, and ensuring proper access controls.
- Configuration Management: Configuring and managing security settings for AWS services, including Identity and Access Management (IAM) policies.
- Data Protection: Implementing measures such as encryption, backup, and compliance with relevant regulations.
- Application Security: Ensuring the security of applications, including patch management and application-level encryption.
AWS: Security of the Cloud
AWS is responsible for securing the infrastructure that runs all of the services offered in the AWS Cloud. This includes:
- AWS operates, manages, and controls the components at all layers of infrastructure. This includes areas such as the host operating system, the virtualization layer, and even the physical security of the data centers from which services operate.
- AWS is responsible for protecting the global infrastructure that runs all of the services offered in the AWS Cloud. This infrastructure includes AWS Regions, Availability Zones, and edge locations.
- Infrastructure Security: Managing the physical security of data centers, including hardware, software, networking, and facilities.
- Service Availability: Ensuring the resilience and redundancy of the global infrastructure, including AWS Regions, Availability Zones, and edge locations.
- Operational Security: Protecting the underlying infrastructure through robust security measures, such as intrusion detection systems and regular audits.
Creating an AWS User Account
Prerequisite
- Payment Method - provide a valid credit card or another payment method for identity verification and billing purposes.
The AWS offers a free tier with limited free resources, you must provide a valid credit card or another payment method for identity verification and billing purposes.
Steps to Create an AWS User Account
- Visit the AWS’s official website and click ‘Create an AWS Account’ at the top right corner of the page.
-
Input your account information. This will serve as an entry to the AWS Console.
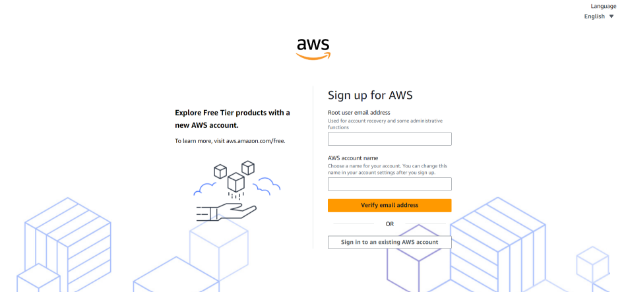
- Input your Root User Email Address. If you wish to open a personal account, use your email account, otherwise use your corporate email distribution list or email box for a professional AWS account.
- Provide an AWS Account Name. Choose a unique name for your account. This can be your name, company name, or anything you prefer.
-
Verify your email address. Check the code sent to your email and choose Verify.
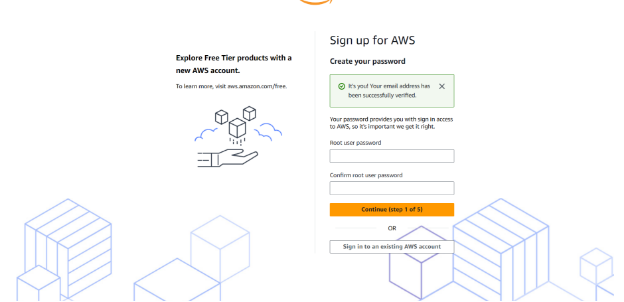
- Input a Secure Password. Create a strong root user password for your AWS account then choose Continue.
-
Select Account Type. Select ‘Personal’ or ‘Professional’ depending on your use case.
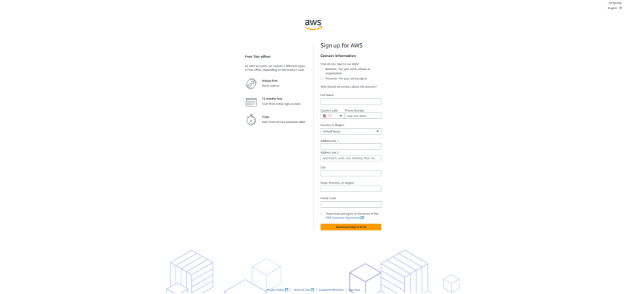
Business and personal accounts have similar features and functions. In business AWS accounts, it is essential to provide the company’s credentials including the phone number, email address, and payment details. Read and accept the AWS Customer Agreement and select Continue.
-
Check your Email. An email will be sent to your email address to confirm that your account has been created.
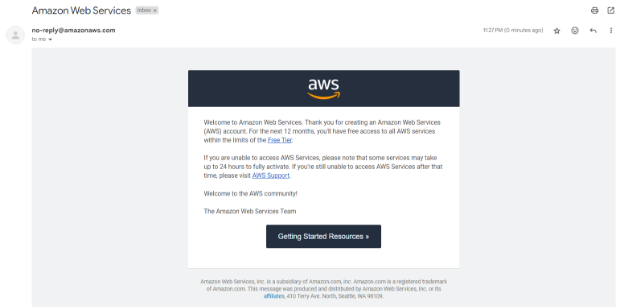
NOTE: You cannot fully utilize AWS services until your account is fully activated. This process includes verifying your email, entering billing information, and completing phone verification.
-
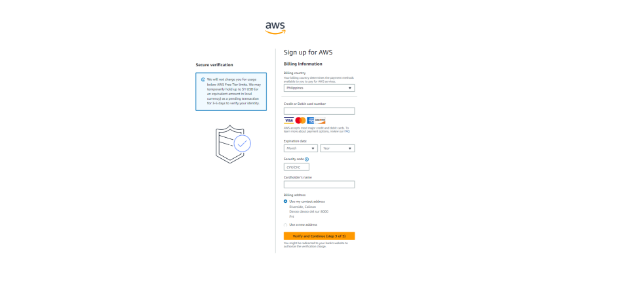
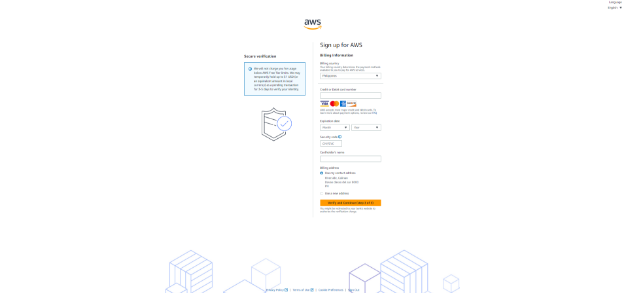
Input your payment information. Navigate to the Billing information page and select your preferred payment method then choose Verify and Add. AWS requires this for identity verification and to bill you for any resources you use beyond the free tier.
-
Verify your identity. Visit the Confirm your Identity page, select your phone number country (+63) code from the list and AWS will send a code to your phone number for verification. Enter the code when prompted. If CAPTCHA is presented, input the displayed code then hit Submit. Enter the pin and choose Continue.
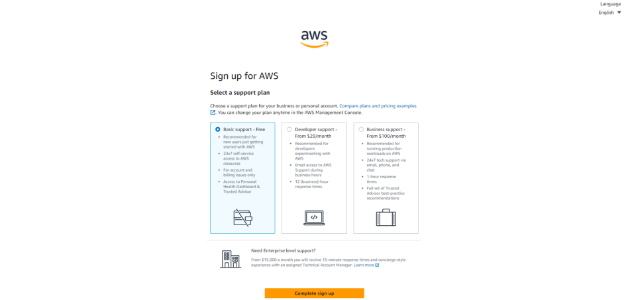
- Select a Support Plan. AWS offers different support plans. For beginners, the Basic Support plan (which is free) is usually sufficient.
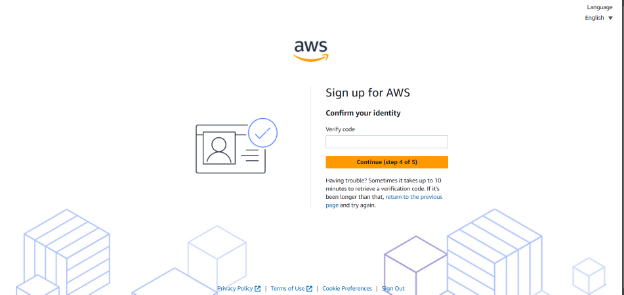
-
Choose Complete signup and check your email inbox for confirmation.
Some instances occur where the process may usually take up to 24 hours. When this happens, you can still sign in to your AWS Account but the Complete Sign Up button shows up despite completing the steps of the sign-up process.
Multi-factor Authentication
Before we delve into the actual application of MFA, let’s first understand the key concepts surrounding it.
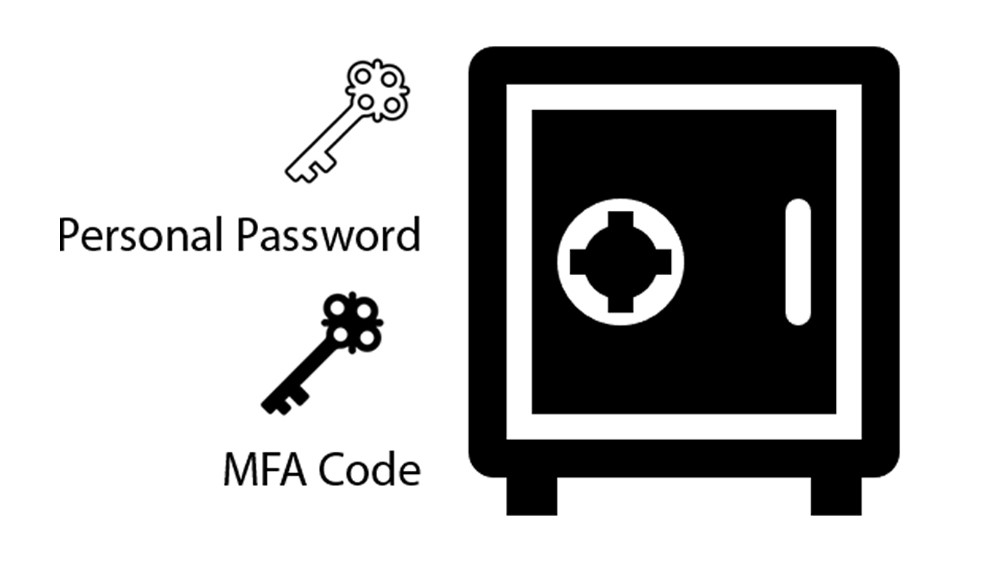
MFA Concept: A safe with two locks
Imagine a safe that requires two keys to open. One key is something that you have, but you also need the second key to unlock the safe. Just as a safe with two locks requires two keys to be opened, MFA requires two different factors to access your account. Even if someone has the first key (personal password), they cannot open the safe without the second key (MFA code).
Authenticator Concept: The Gatekeeper
Authenticator is like a gatekeeper who verifies your identity before granting you access to a secure area. It is the giver of the second key (MFA code). A gatekeeper checks credentials to ensure only authorized individuals can enter, an authenticator generates and verifies codes to confirm that the person trying to access the account is genuinely who they claim to be.

Enabling MFA for Root User [DEMO]
Now that you understand some of the basic concepts, let’s delve into the actual implementation of MFA in a user account.
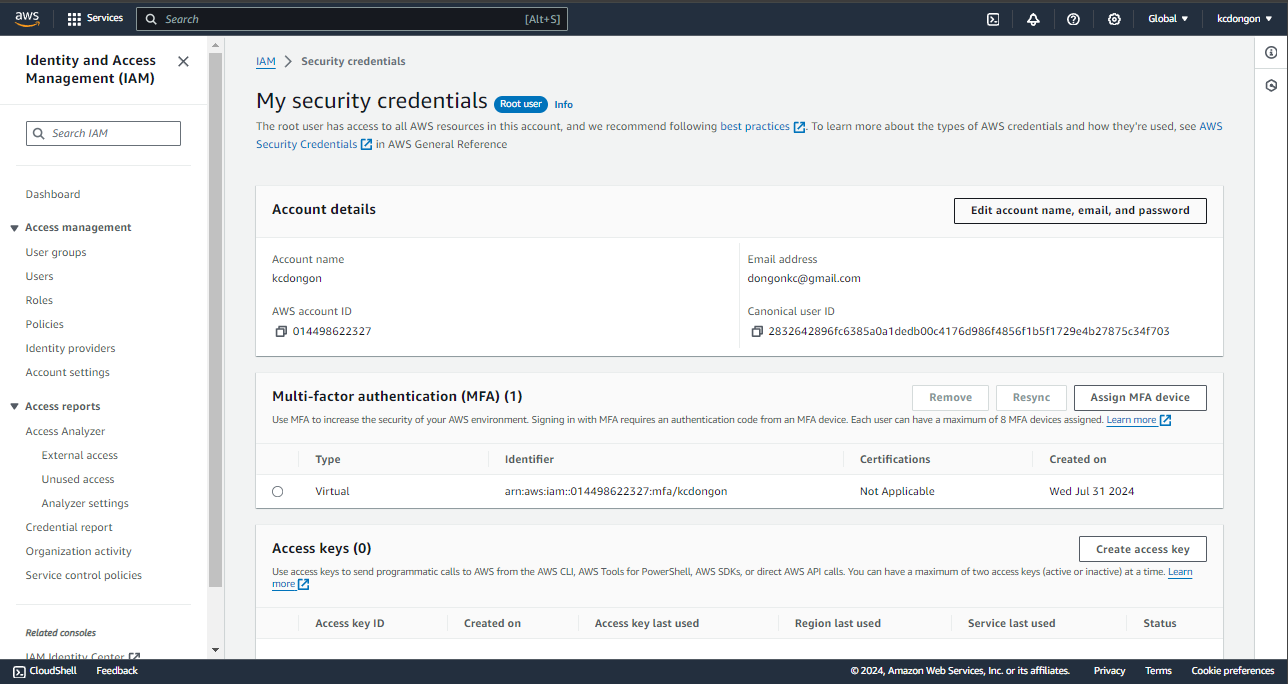
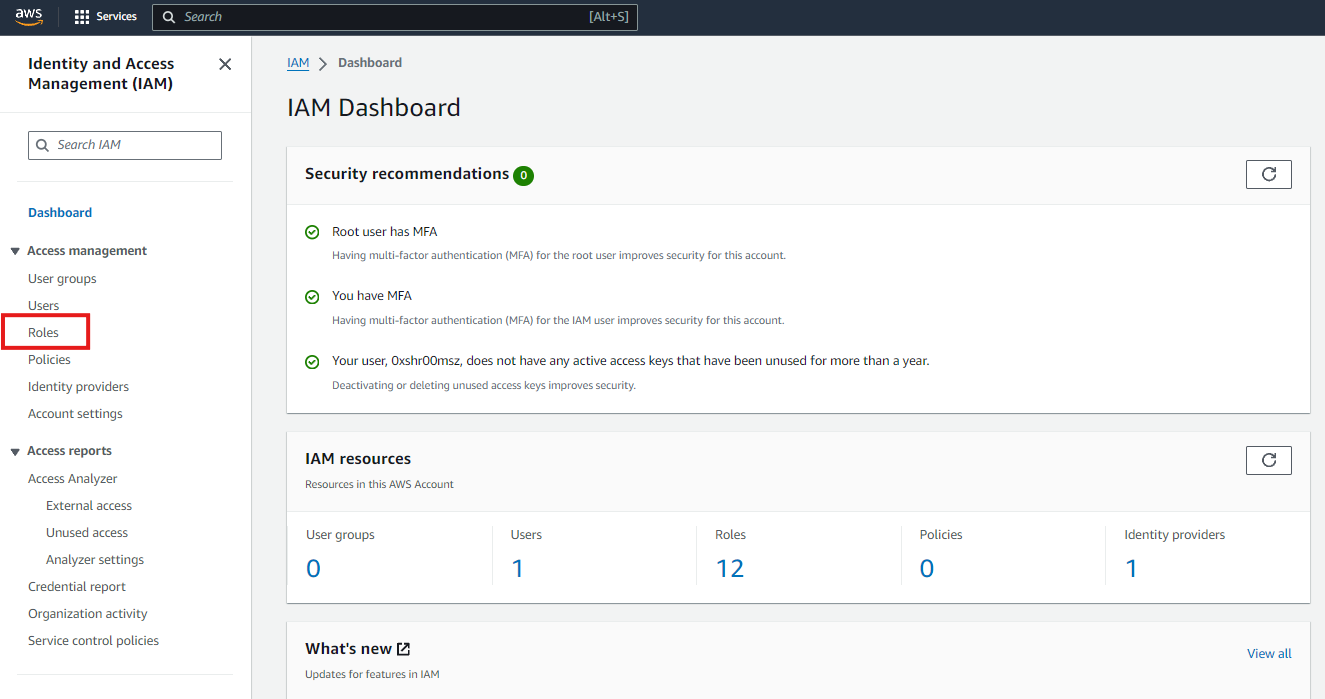
Upon creation of your root user account, you will see in the IAM Dashboard the security recommendations. It is saying that it is better for you to add MFA for root user.
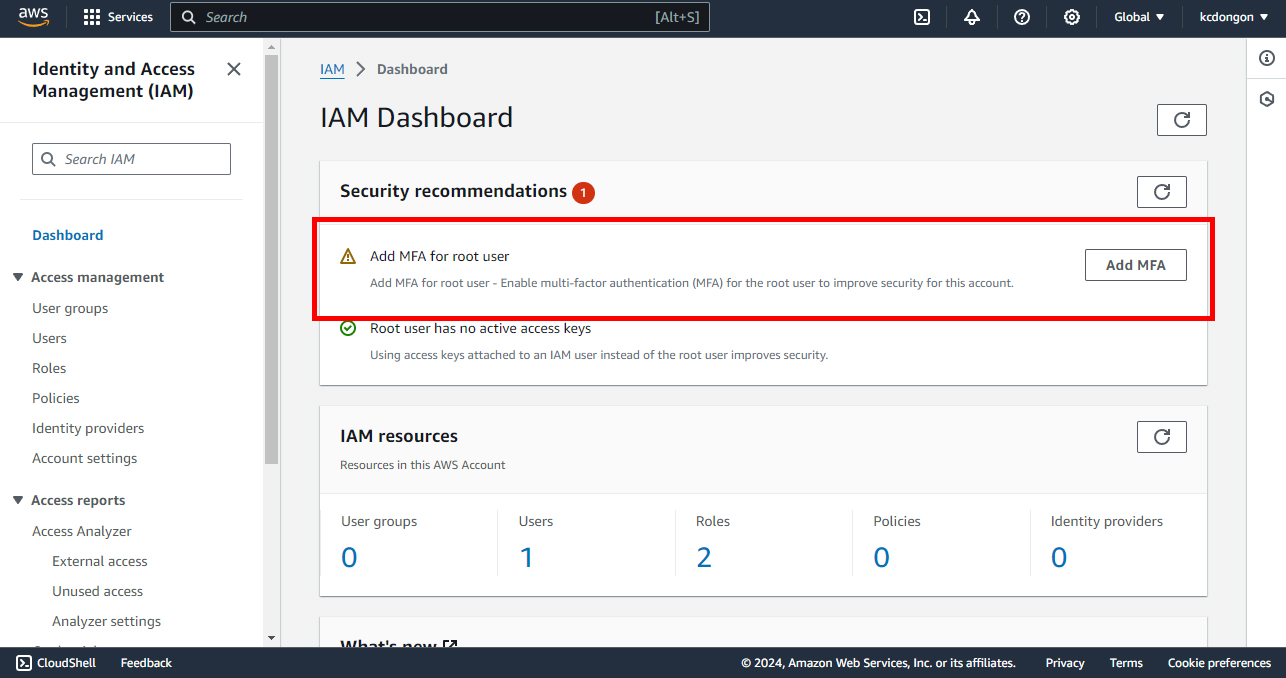
With these foundational concepts in mind, we can now proceed to implement multifactor authentication (MFA) on your account. This step will enhance your security by adding an additional layer of protection, ensuring that your sensitive information remains safe from unauthorized access. Let’s walk through the process of setting up MFA and explore how it can help safeguard your account against potential threats. Now, click “Add MFA”.
Step 1: Select MFA Device
It should take you to this section wherein you can set up your MFA.
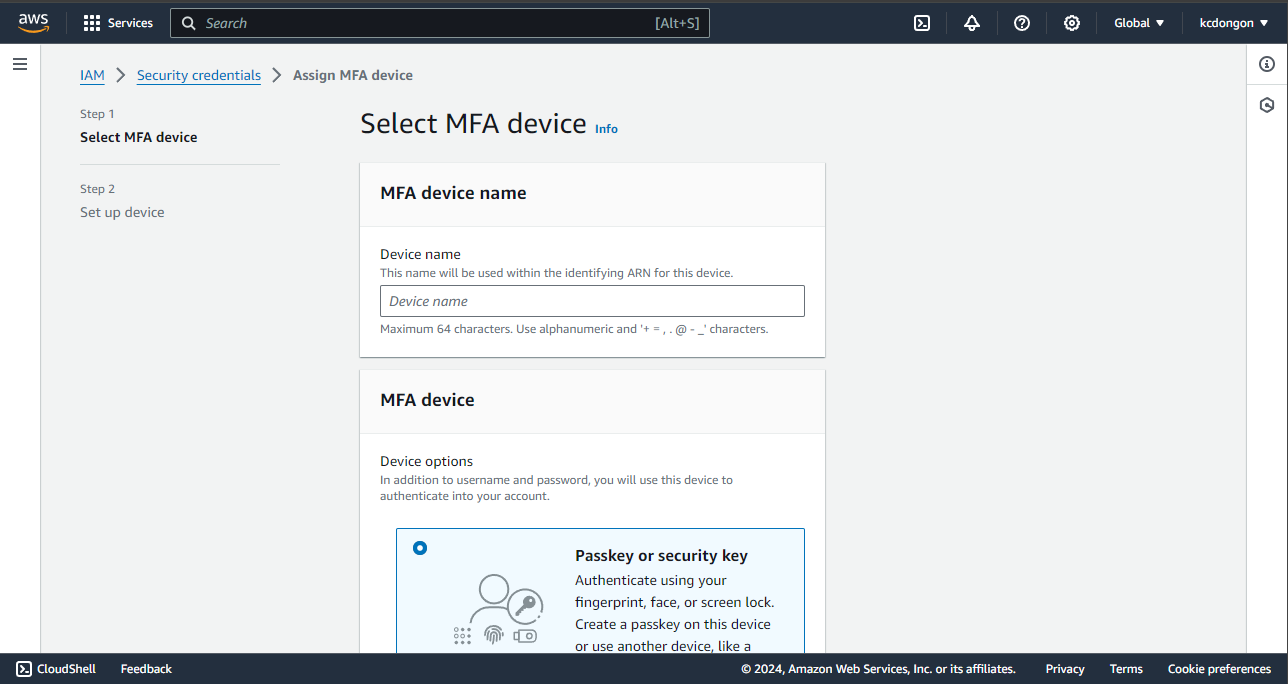
As you can see, there are only 2 steps to doing this. You can give a certain device name of your choice.
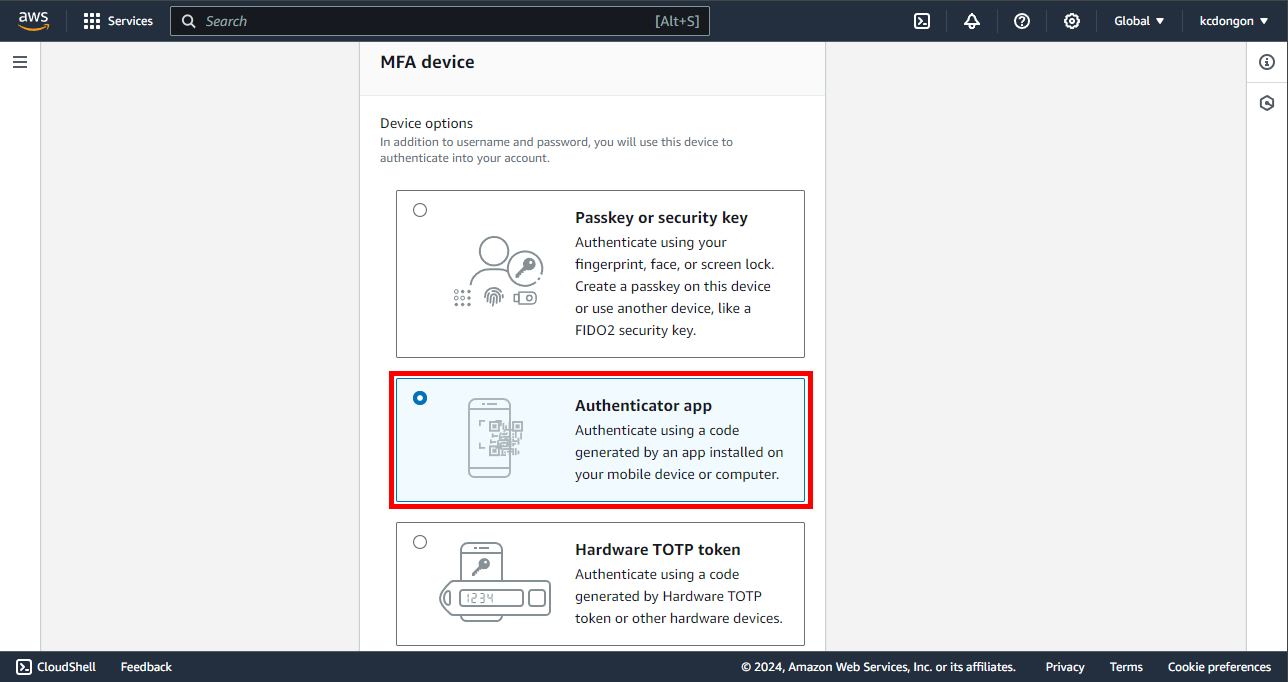
You have 3 options to choose from. Nowadays, the authenticator app is used more frequently since it is fast and portable. You can download Google Authenticator, Duo Mobile, or Authy app on your mobile device or computer.
Step 2: Set up Device
Once you are done downloading your authenticator app, you can now proceed to this section.
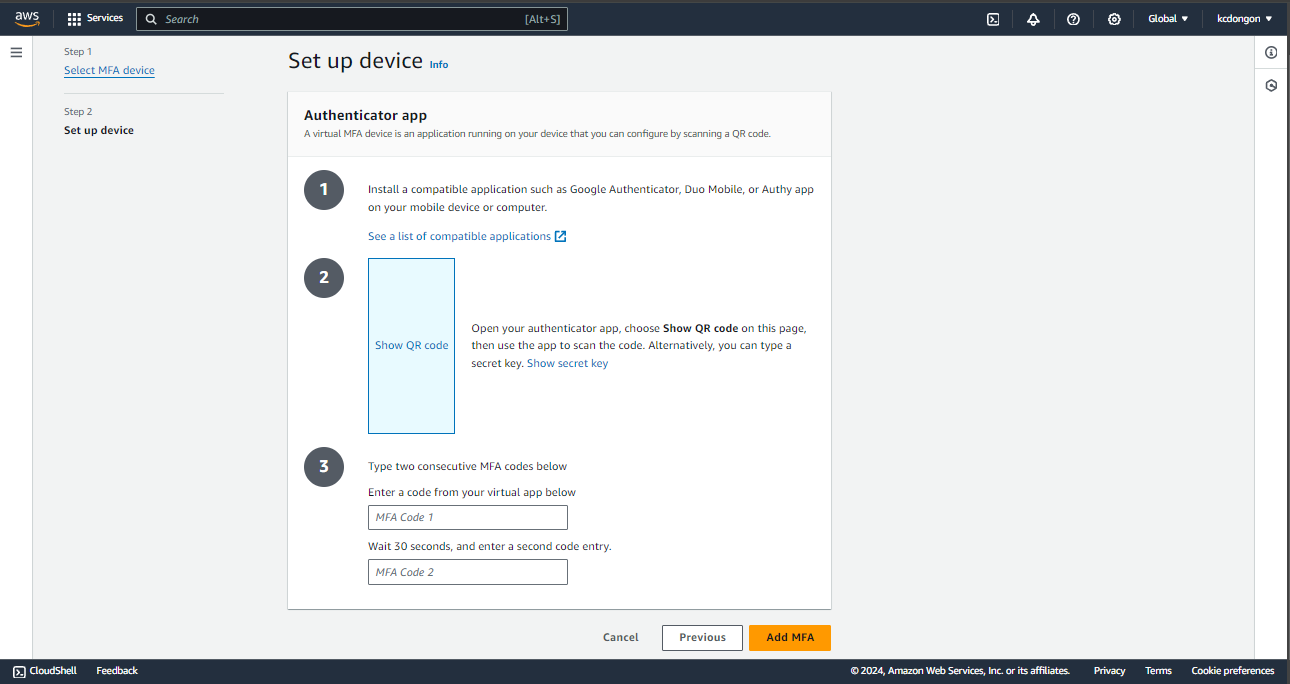 The instructions here are self-explanatory. You can now show the QR Code. For google authenticator, press the “+” symbol and the scan QR code will show, or you can use a secret key.
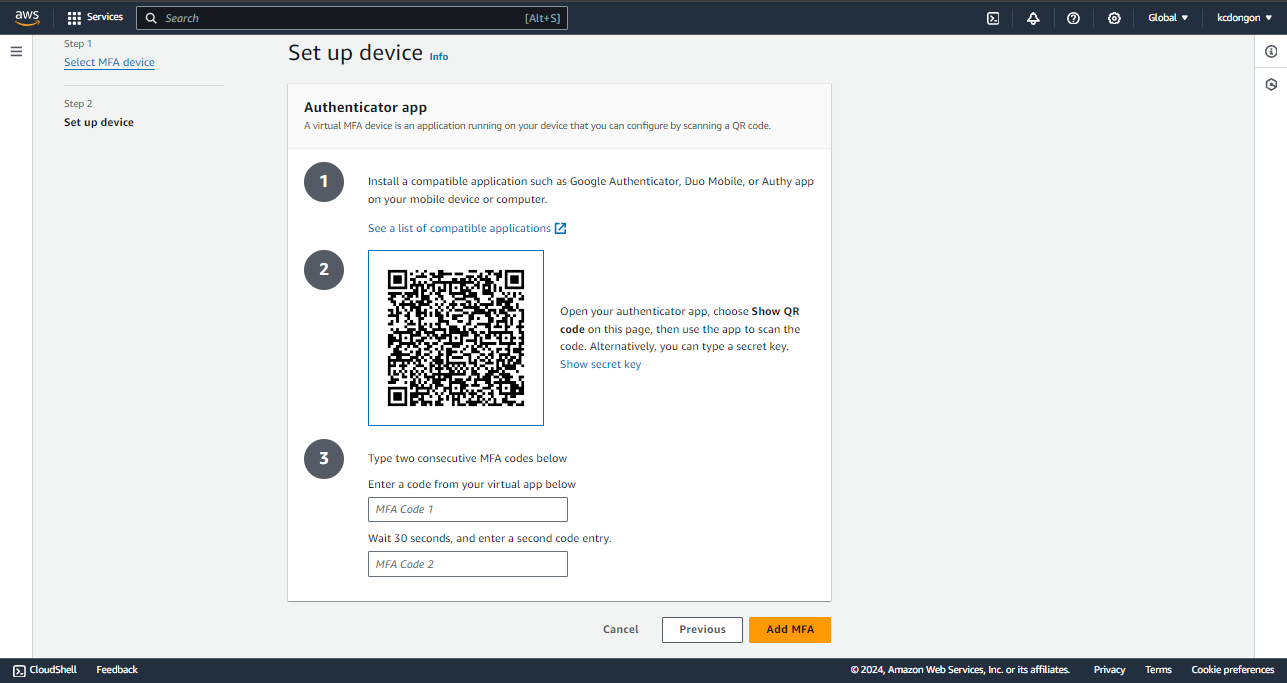
The moment you scan the QR code, the authenticator will give you codes. Type the first code in the “MFA Code 1 box” and the second code in the “MFA Code 2 box”. After that, press “Add MFA”.
With that, your MFA implementation is done. Now, it is time to test it.
Step 3: Testing the MFA
Prepare your authenticator app first. Once you are done preparing it, let us now test if the authenticator gives the second password to us.
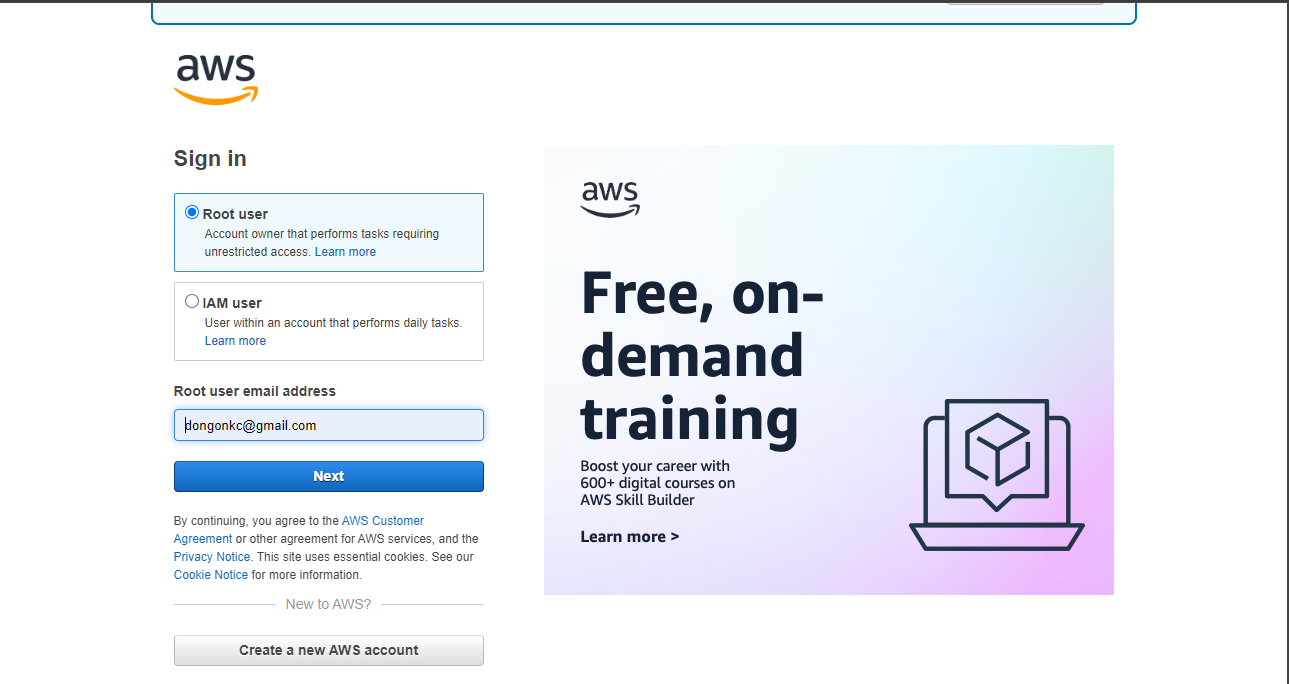
Here, you can enter your root user email address. After that, press “Next”.
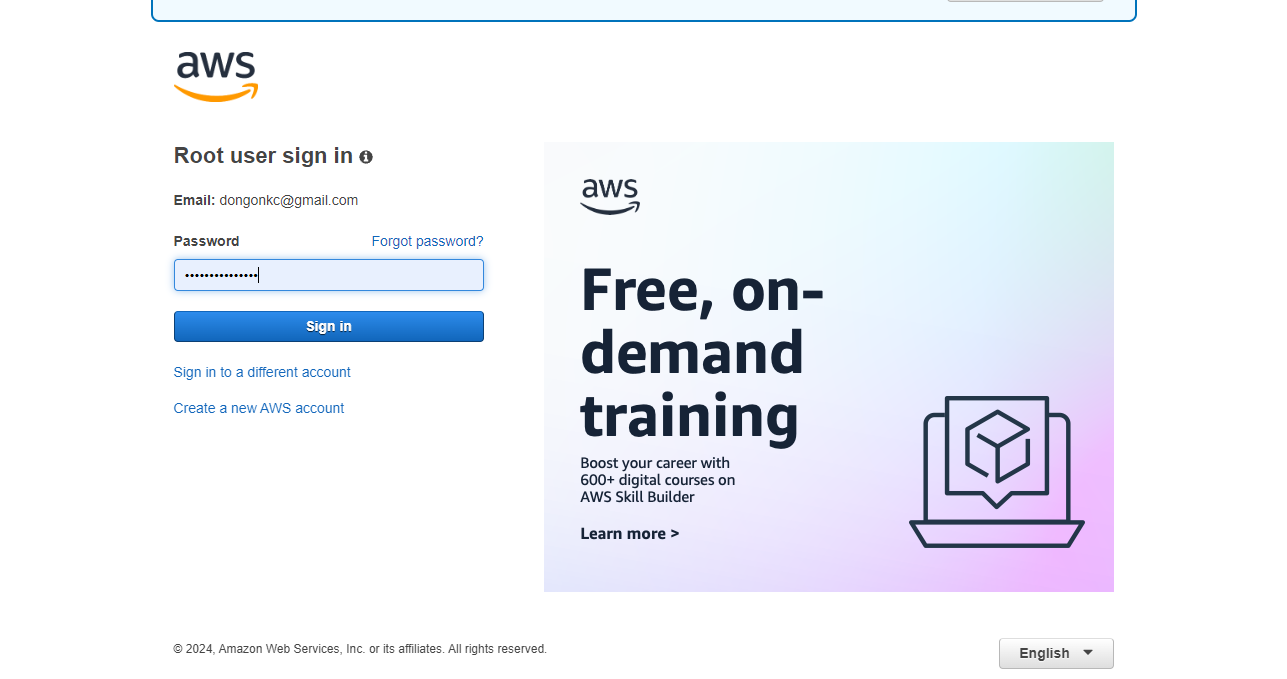
Now, enter your password. This is the first key to your safe.
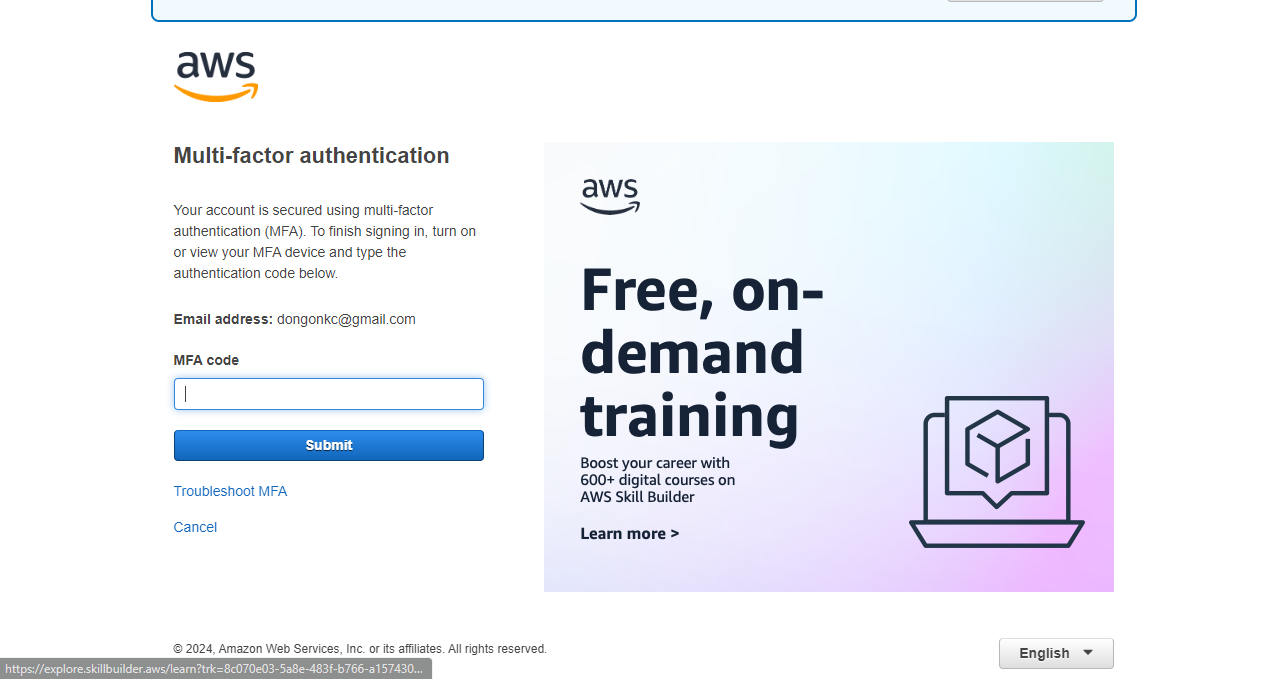
Now, it requires you to give the second password. Look at your authenticator and type the current code.
Congratulations! You can access your account now.
In conclusion, multi factor authentication (MFA) is a vital security tool that significantly enhances the protection of your online accounts by requiring multiple forms of verification. By implementing MFA, you add an extra layer of defense against unauthorized access, making it much more difficult for malicious actors to compromise your sensitive information. In today’s digital world, where cyber threats are constantly evolving, MFA is an essential component of any robust security strategy.
AWS Identity and Access Management
Introduction
AWS Identity and Access Management (IAM) is a fundamental service in AWS that allows you to control access to AWS resources securely. This workshop will guide you through the key features of IAM, how they work, and best practices for implementing IAM in your AWS environment.
IAM enables the creation and management of users, user groups, and permissions for AWS services. It also supports integration with third-party solutions, facilitating the management of federated users, which allows external users to access AWS resources securely.
IAM Identities
IAM Identities: IAM Users
An AWS Identity and Access Management (IAM) user is an entity that you create in AWS to represent a human user or a workload that interacts with AWS. Each IAM user has a name and credentials, and there are several ways to manage and use these credentials:
- Friendly Name: This is the name you specify when creating the IAM user, visible in the AWS Management Console.
- Amazon Resource Name (ARN): A unique identifier used to specify the IAM user across all of AWS, useful in IAM policies.
- Unique Identifier: Returned when creating the IAM user via API, CLI, or Tools for Windows PowerShell.
Default limit is 5,000 IAM Users per account. You can request an increase if needed.
Permissions:
- Default: No permissions initially; must be granted via IAM policies.
- Permissions Boundary: Limits maximum permissions.
- Account Association: No separate payment method needed; all activities billed to the account.
- Service Accounts: Use IAM users with credentials for AWS requests; avoid embedding keys in code; prefer temporary credentials (IAM roles).
IAM Identities: IAM Groups
An IAM Group is a collection of IAM users that simplifies the management of permissions. Instead of assigning policies individually to each user, you can attach policies to groups, and all users within that group will inherit those permissions.
Key Points
- No Nested Groups: AWS IAM does not support nested groups. Groups can only contain users, not other groups. However, users can belong to multiple groups. For example, a user who is both a developer and an artist could be part of separate groups like Developers and CreativeTeam.
- Centralized Management: Manage permissions for multiple users collectively from a single location.
- Inheritance: Users in a group automatically inherit the permissions assigned to the group.
- Scalability: Streamlines permissions management as teams expand or change.
IAM Roles
Roles offer a way to grant temporary access to AWS resources without relying on permanent credentials. This approach is especially useful for scenarios that require short-term access or adhere to best practices that discourage hardcoding credentials.
Key Uses of IAM Roles
- Secure Resource Access: Allow AWS services like EC2 to access other resources, such as S3 buckets, without storing credentials.
- Cross-Account Access: Enable sharing of resources and permissions between different AWS accounts.
- Role Chaining: Support sequential role assumption for varying levels of access and control.
Structure of IAM Roles
- Trust Policies: Specify which entities (users or services) are allowed to assume the role.
- Permissions Policies: Define the actions the role can perform on AWS resources.
- Permissions Boundaries: Set limits on the maximum permissions that the role can grant, ensuring adherence to the principle of least privilege.
Policies
IAM Identities enables you to grant different levels of access to different identities, but how exactly do you manage the credentials attached and the access-level allowed?
IAM policies are attached to identities. IAM Policies are JSON documents that define the permissions for API calls and entities, detailing effects, actions, resources, and conditions. They determine what controls are activated, as all controls are off by default. These policies are attached to identities, such as users, groups, and roles, to manage their permissions. IAM Policies are accessible through the AWS CLI, AWS SDKs, and the AWS Management Console.
Policy Categories:
-
Identity-Based:
- Inline: Directly attached to IAM identities.
- Managed: Reusable and attachable to multiple identities. Can be AWS-managed or customer-managed.
-
Resource-Based: Attached to resources (e.g., S3 buckets), specify access controls directly on the resource.
Key Features of AWS IAM
1. Fine-Grained Access Control
IAM provides the ability to define precise permissions, allowing you to specify who can access particular AWS services and resources and under what conditions. This control is implemented through policies that define the actions that can be performed on specific resources.
- Granular Permissions: Control access at a detailed level by defining policies that specify allowed actions and resources.
- Conditional Access: Set conditions for access, such as requiring requests to come from a specific IP range or requiring multi-factor authentication (MFA).
2. Delegating Access Using IAM Roles
IAM roles allow you to delegate access to users or AWS services without needing to share long-term credentials. Roles provide temporary security credentials for users, applications, or services that need to perform actions in your AWS environment.
- Temporary Credentials: Roles grant short-term access, ideal for use cases like automated workflows, third-party applications, and cross-account access.
- Role Assumption: Users or services assume a role to receive temporary credentials and access AWS resources as defined by the role’s policies.
3. IAM Roles Anywhere
IAM Roles Anywhere extends the ability to use IAM roles to workloads that run outside of AWS, such as on-premises or in hybrid and multicloud environments. This feature uses X.509 digital certificates for authentication.
- External Access: Workloads outside AWS can securely obtain temporary AWS credentials and access AWS resources.
- Consistency: Use the same IAM roles and policies for both AWS-hosted and external workloads.
4. IAM Access Analyzer
IAM Access Analyzer helps you manage and refine permissions by continuously analyzing access policies to ensure they adhere to the principle of least privilege.
- Permissions Analysis: Identify unused or excessive permissions and adjust them to align with best practices.
- Least Privilege: Continuously refine permissions to ensure that users and services have the minimum access necessary.
IAM Users and ARNs
What is an IAM User?
An IAM user is a regular account that you create for someone who needs access to your AWS resources. It is similar to giving someone a unique, personalized key that only opens specific doors you have assigned to them.
Why create IAM Users?
When you create an AWS account, you are provided with a root user, which acts as a master key. However, using this “master key” at all times is risky. Instead, you create IAM users and assign them the specific permissions they require. This is a good practice because if something goes wrong with one user, the other accounts remain secure.
What does an IAM User have?
An IAM user has a username and password, which serve as a key to access permissions. Depending on the permissions assigned, IAM users can access certain resources. Additionally, they have access keys, which are special credentials that allow them to interact with AWS services from the command line or through code.
Creating IAM User
When creating an AWS account, you create an identity called the root user which has complete access to all AWS services and resources. It is highly discouraged to use the root user for daily tasks, instead we use a certain ID and password which becomes your AWS User account. A user account is not a separate account, but instead is a user within your account.
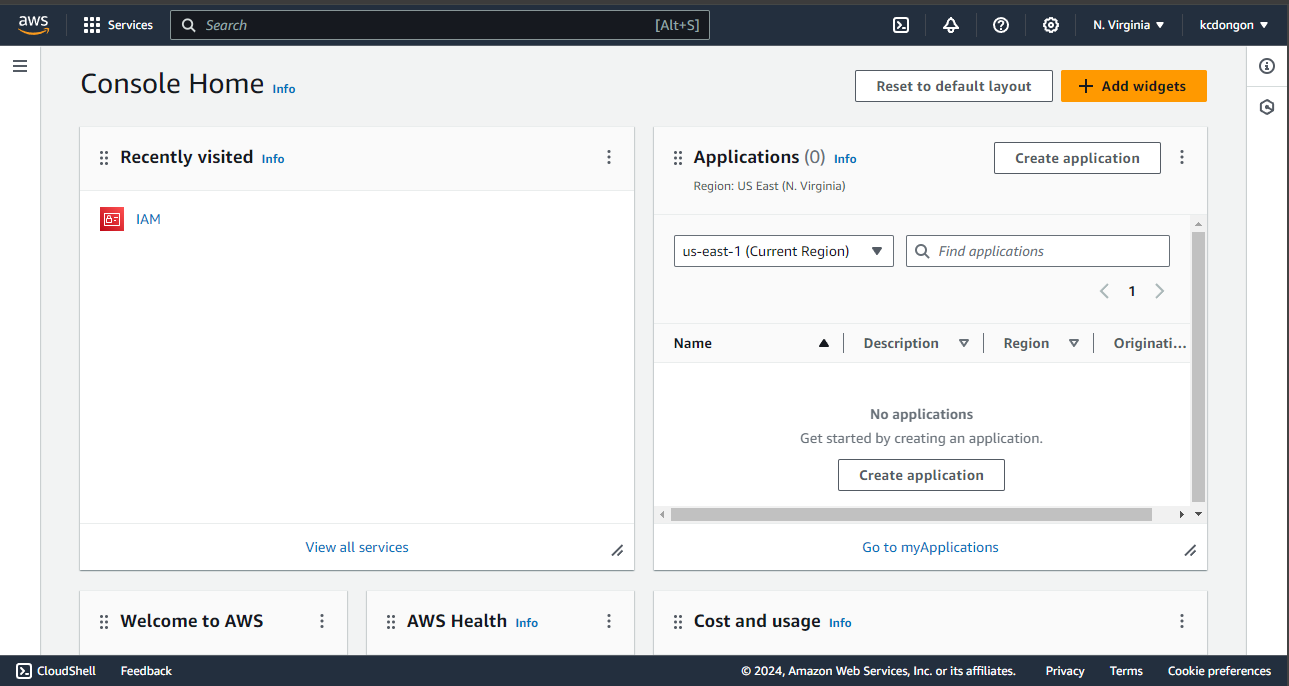
Step 1: Go to your AWS Console and open IAM Dashboard/Console
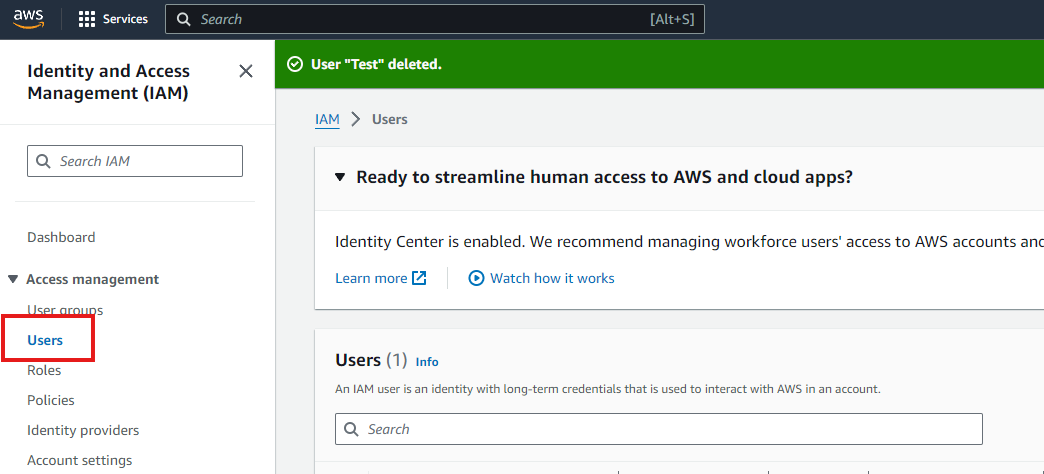
Step 2: In the side bar, click on “Users” to see users and create users
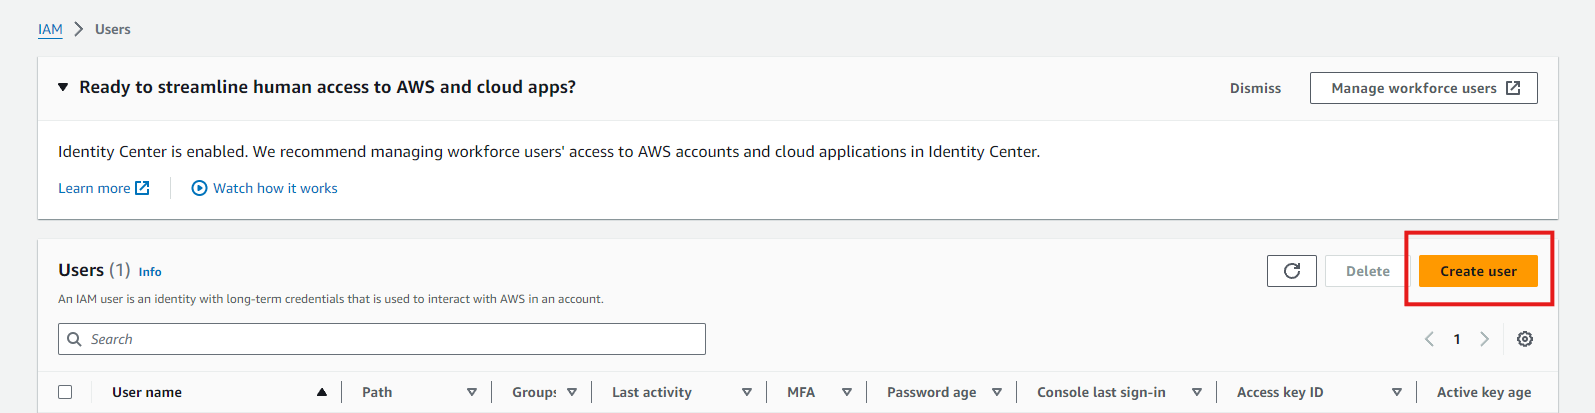
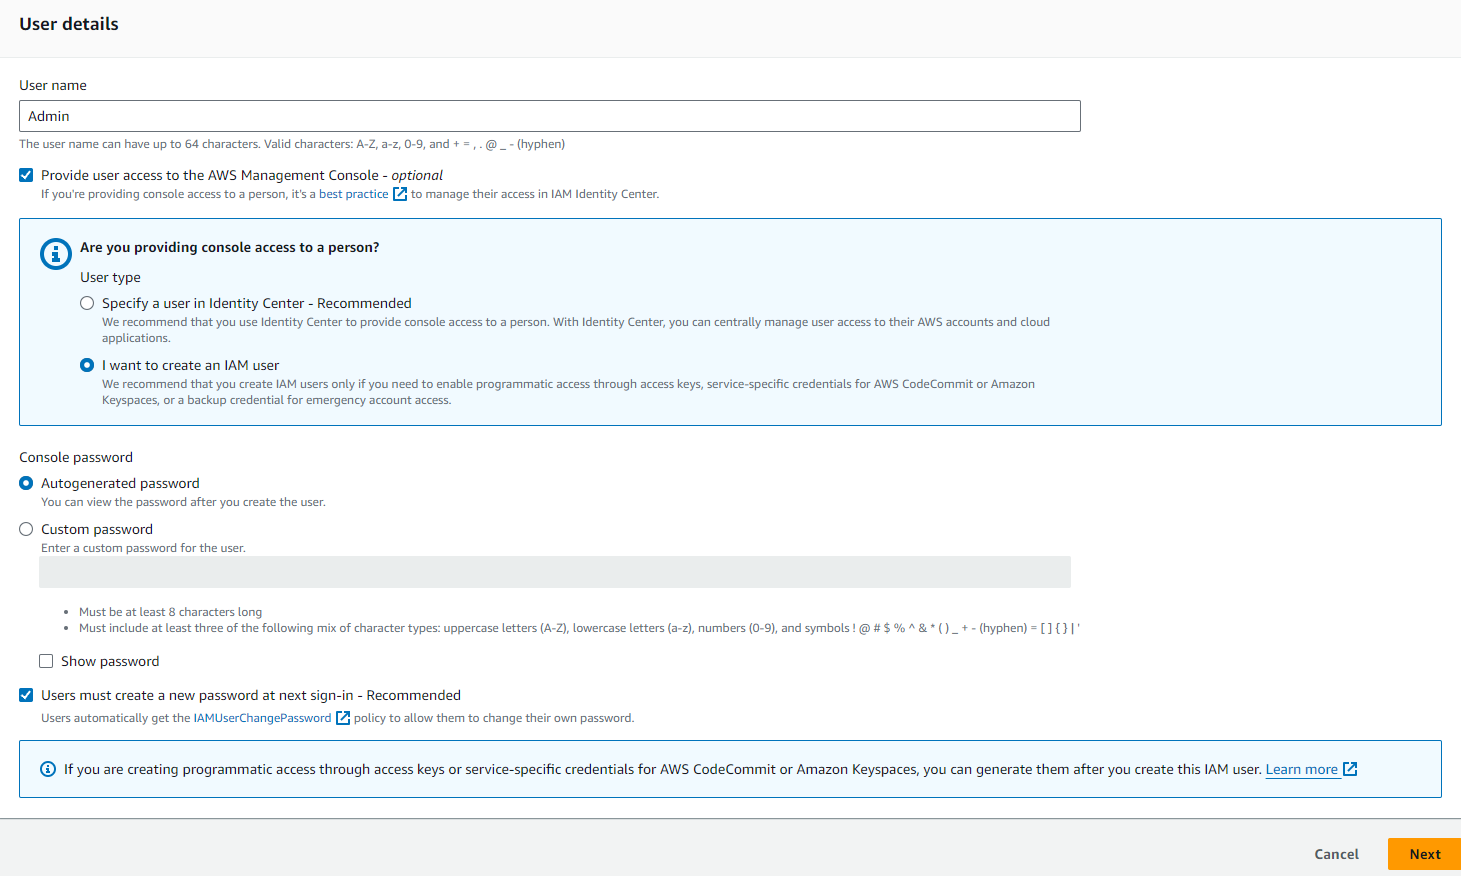
Step 3: Once you click “Create User”, it will lead to the specification of access and user details
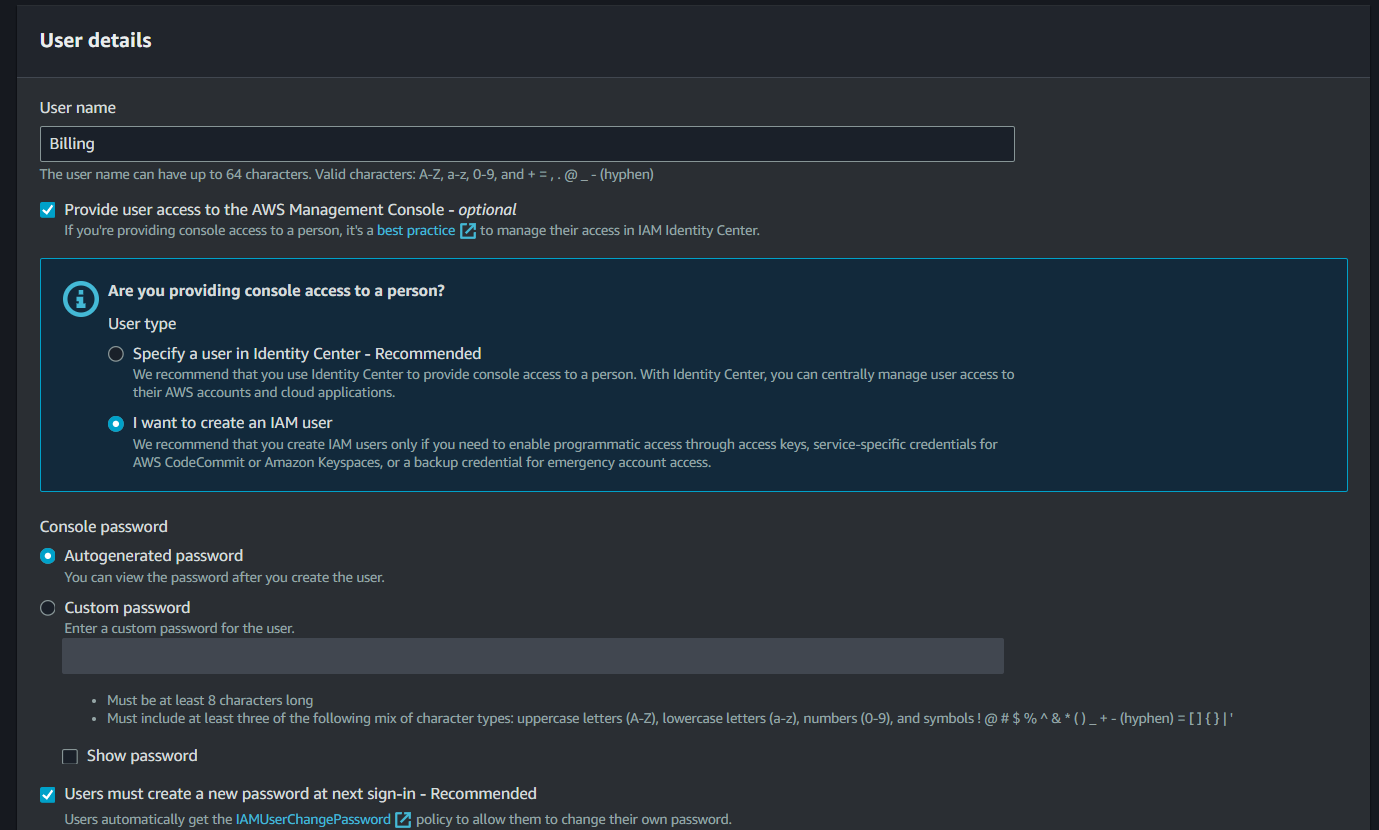
- You can enter a certain name for a user as well as provide the user to access the AWS management console (but it is optional). If you don’t provide the access to AWS Management Console, the user can only access your AWS account using SDK or CLI (programmatic access).
- Assuming that you checked it, AWS will ask if you wish to provide console access to a person. If you choose the first one, you will be redirected to the IAM Identity Center wherein you can centrally manage user access to services. In this case, we select “I want to create an IAM user”.
- You can select the specification of a password whether it is autogenerated, custom, or let the user create a new password at next sign-in.
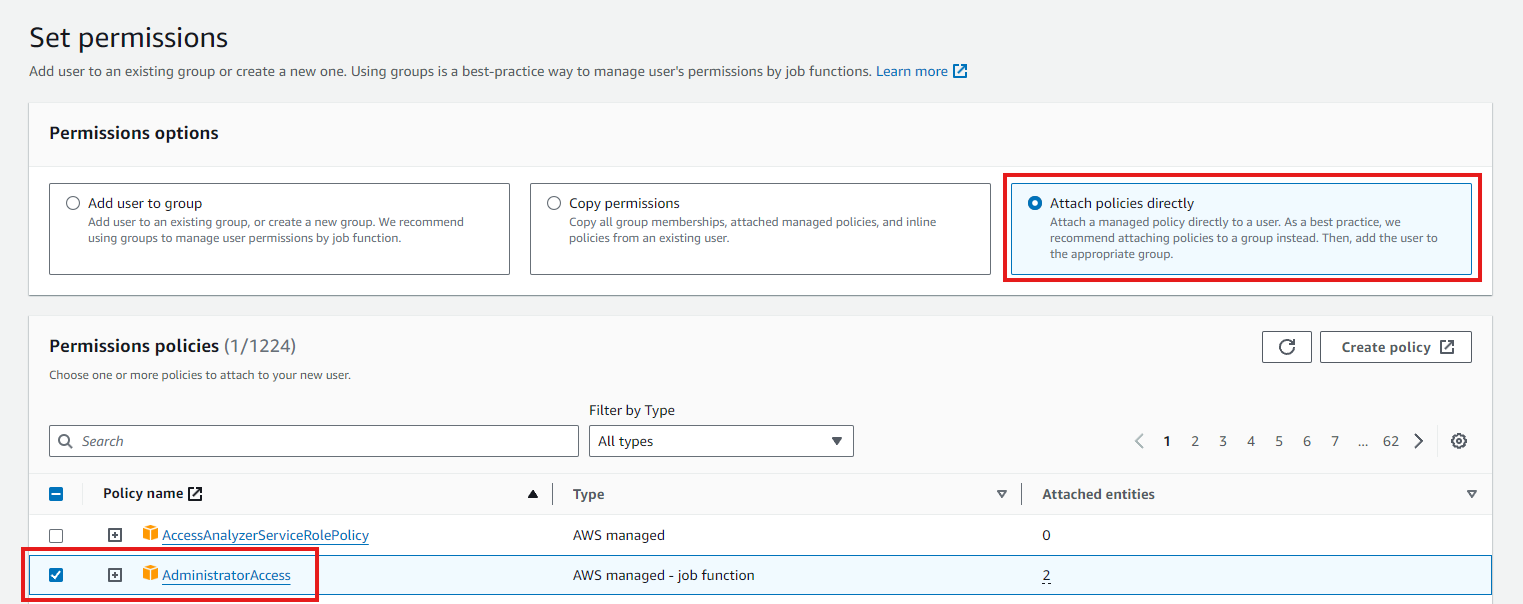
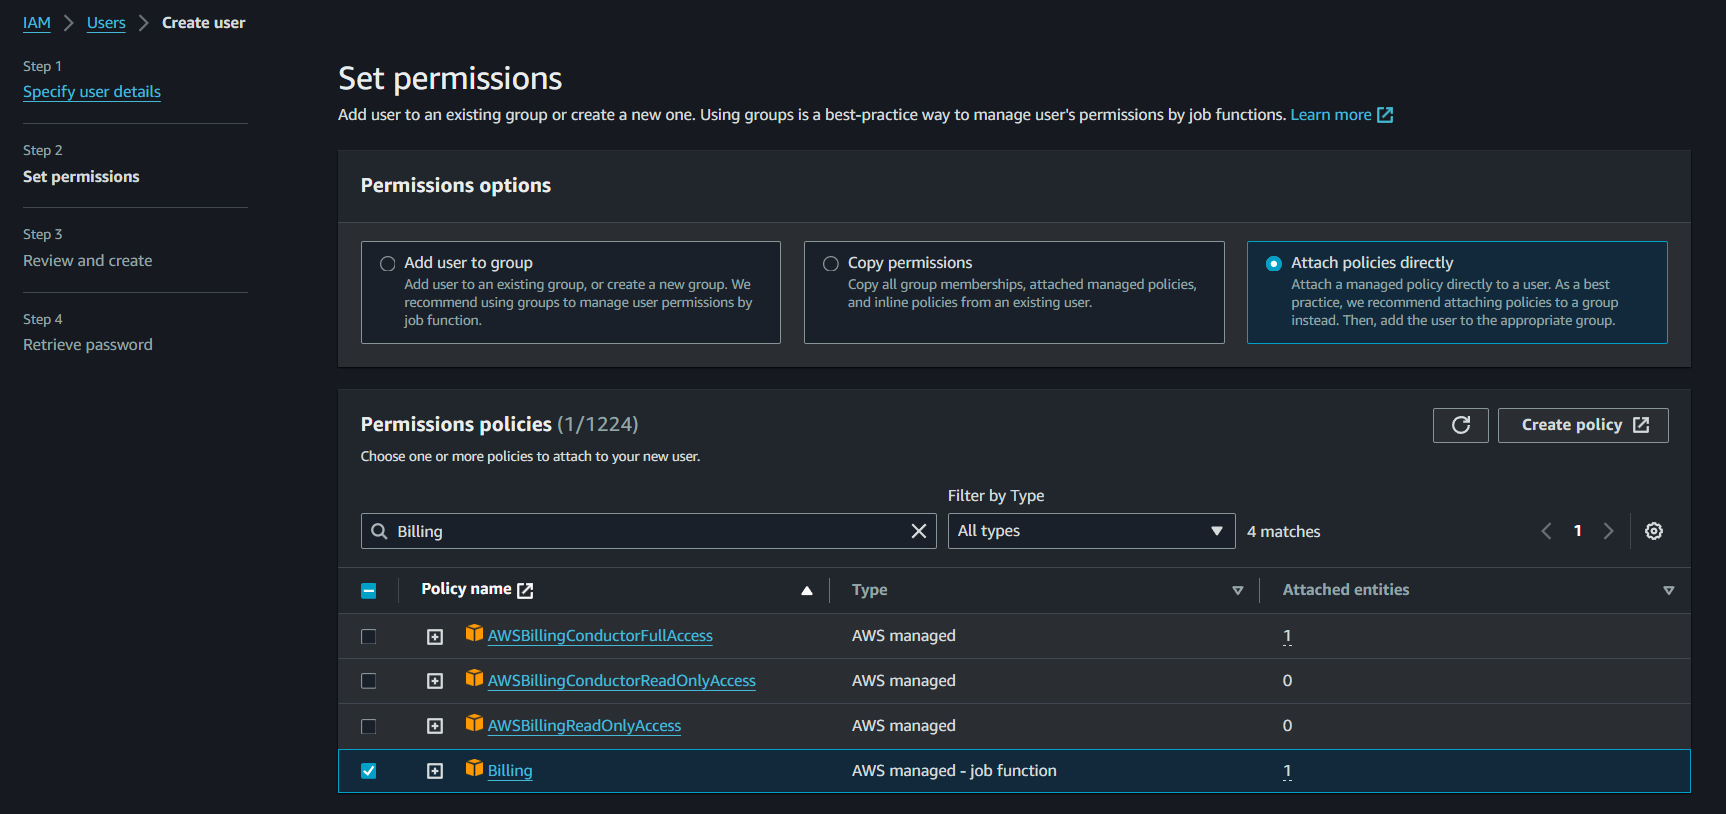
Step 4: Setting permissions for the account
To grant the admin IAM account full access, attach the “AdministratorAccess” policy to the IAM account, which provides it with comprehensive permissions across all AWS services and resources.
Policies are Javascript Object Notation (JSON) that can define the access of the IAM user. You can select certain policies for the IAM user as well the permissions boundary of it (optional). We will explore policies in more detail at a later stage.
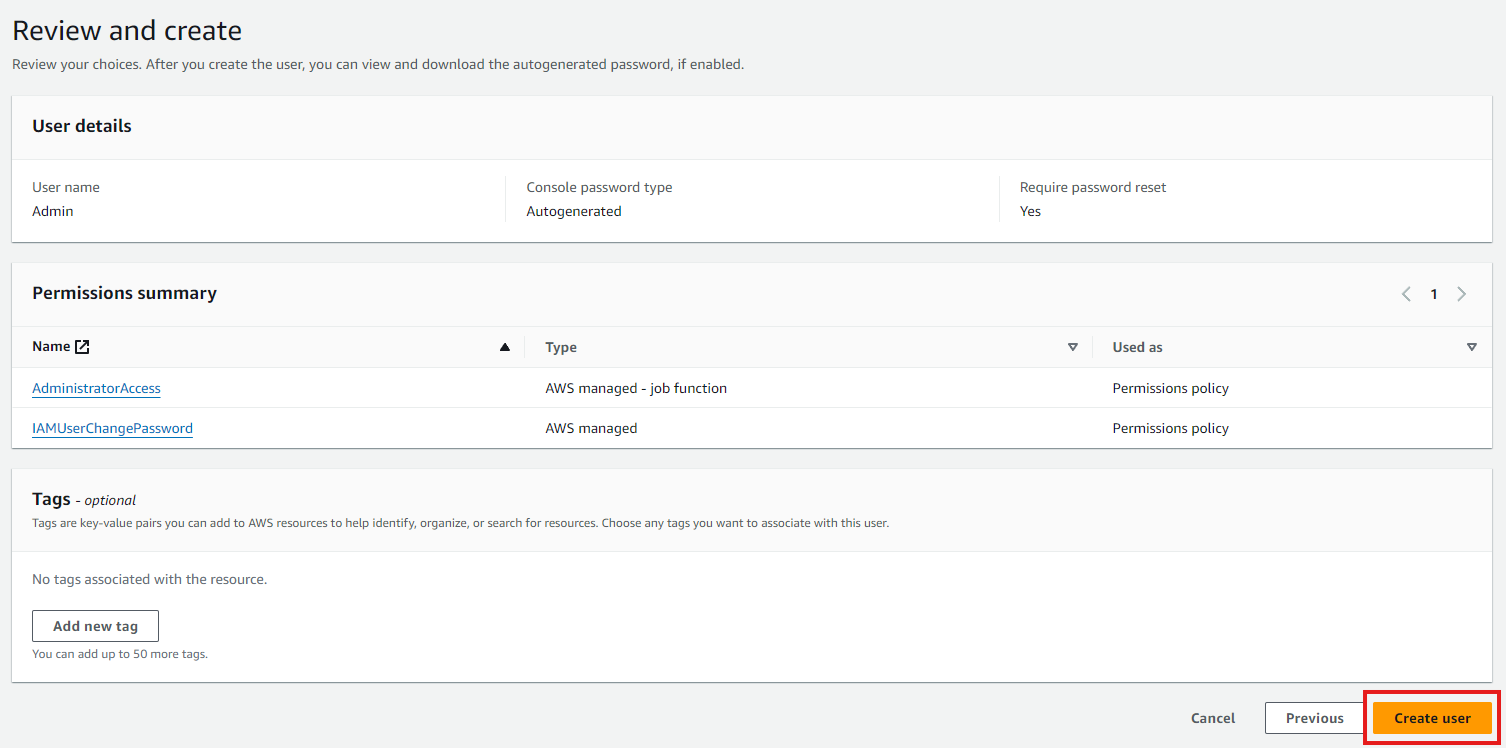
Step 5: Review and Create
In this part, AWS gives you a chance to review all of your choices to ensure everything is as you want it, also allowing you to change any details as you want it one last time. Once you are finished reviewing your choices, simply click “Create user”.
Step 6: Retrieval and Finishing
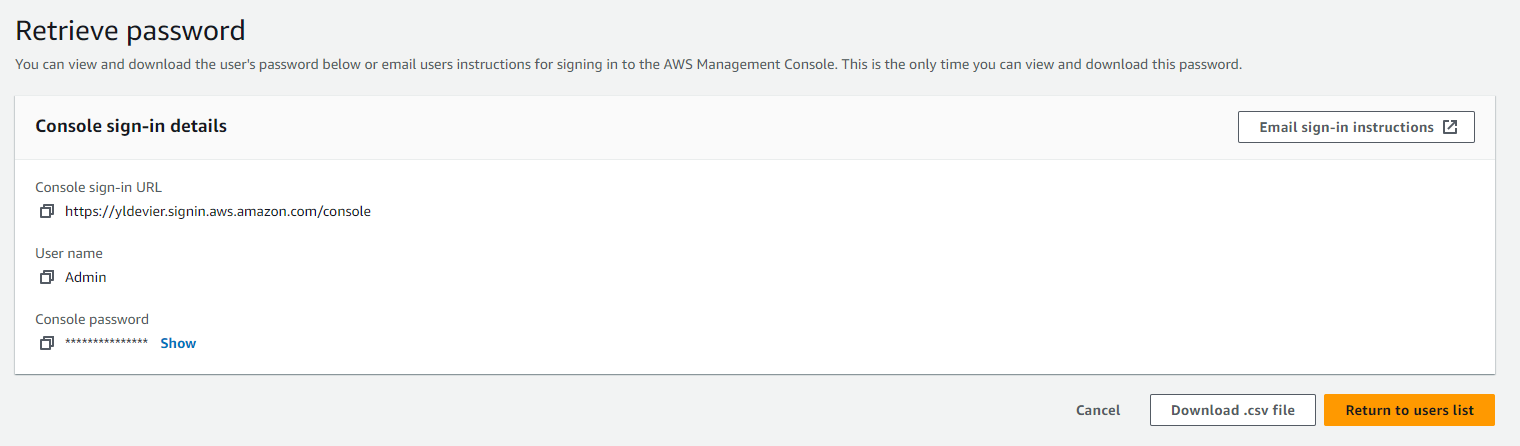
After creating the IAM user, you are almost set! The final step involves downloading the user’s console sign-in details, which include important information like the username, password, and the console sign-in link. You can easily download these details as a .csv file, which serves as a backup and a quick reference for future logins.
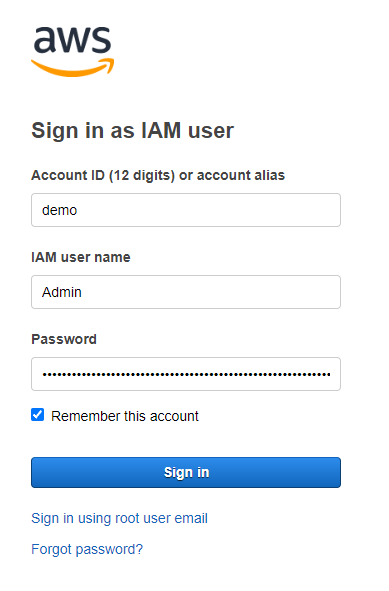
Step 7: Testing the IAM User to check if it works perfectly
Input the created credentials to check if you can access it.
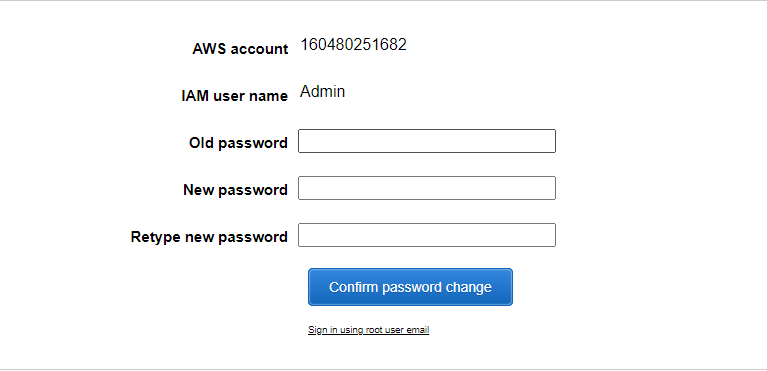
Step 8: Create New Password (Change the Autogenerated Password)
After logging in with the autogenerated password, the user should promptly log in and change it to a new, secure password. This is a crucial step in protecting the account and ensuring that the credentials remain confidential and safe.
Simply enter your old password, the one from the .csv file, and then generate and enter a new password using the Bitwarden Password Manager.
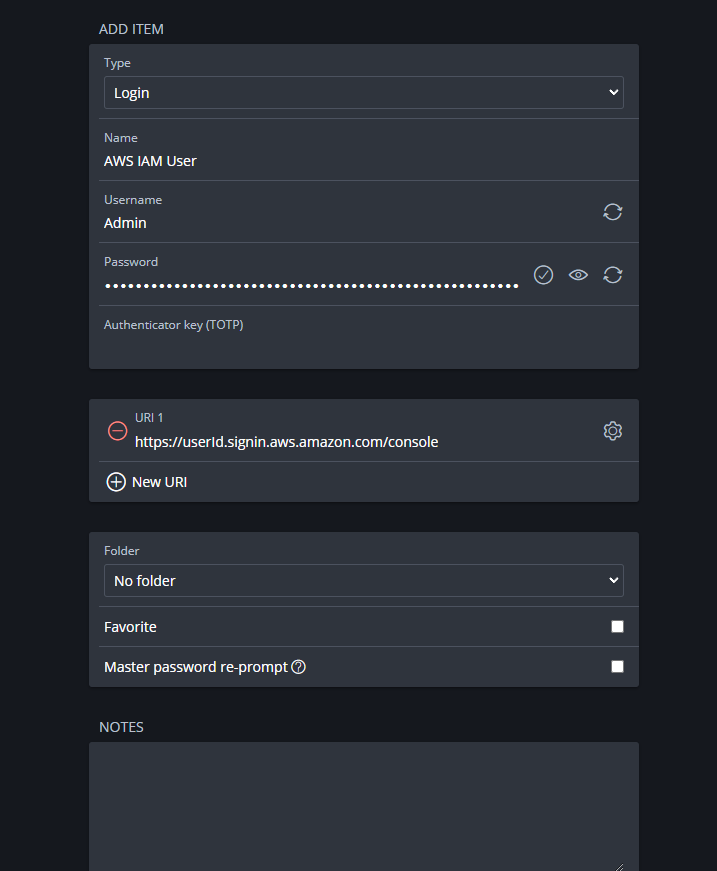
Step 9: Save New Password in a Password Manager (Bitwarden)
We will be using the Bitwarden password manager. It is essential for maintaining robust cybersecurity practices, as it securely stores and encrypts passwords, enabling the use of strong, unique credentials for each account. This approach mitigates the risk of security breaches caused by weak or reused passwords, enhancing overall organizational and personal data protection.
Enter the item name, username, and generate password. You can paste your console sign-in url from the credentials.csv you downloaded to the Bitwarden URI field.
What is an ARN?
In AWS, which functions as a massive digital library of resources (such as virtual computers, storage spaces, and databases), an ARN (Amazon Resource Name) is a special code or label that points to the exact “book” or resource you want to use.
Why do we need ARNs?
AWS has millions of different resources, so it is often necessary to specify which one you are referring to. For example, if you have two storage buckets (similar to two different folders), you need a way to distinguish between them. ARNs help by providing a unique name for each resource.
When do you use ARNs?
If you want to give someone permission to access a specific file in your digital library, you would use the ARN of that file to tell AWS exactly which one you are referring to. It is similar to giving directions that say, “Go to this exact address and pick up the specific book there.”
What does an ARN look like?
1
arn:partition:service:region:account-id:resouce-type/resource-id
1
arn:aws:ec2:us-west-2:123456789012:instance/i-0abcd1234ef567890
-
ARN: This indicates that what follows is an Amazon Resource Name.
-
Partition: Specifies the AWS partition in which the resource is located. Common partitions include
aws(for AWS regions) andaws-cn(for China regions). -
Service: Identifies the AWS service to which the resource belongs (e.g.,
s3for Amazon S3,ec2for Amazon EC2). -
Region: Specifies the region where the resource is located. Some services, like S3, are global, so this part might be omitted.
-
Account-id: The AWS account ID that owns the resource. This is a 12-digit number.
-
Resource-type/resource-id: Specifies the resource type and the unique identifier for the resource. The format and inclusion of resource-type may vary depending on the service.
IAM Access Keys
What are IAM Access Keys?
IAM Access Keys consist of two components: an Access Key ID and a Secret Access Key. These keys are analogous to a username and password and are used to sign programmatic requests to AWS services.
The Access Key ID is a unique identifier, while the Secret Access Key is a secret that should only be known by the user who owns the key.
IAM Access Keys are used when you want to interact with AWS services via APIs, the AWS Command Line Interface (CLI), or AWS SDKs. They are essential for automation tasks, such as running scripts that manage AWS resources or integrating with third-party applications that require access to your AWS account.
Why do we need Access Keys?
1. Security and Access Control
- Non-Root Access: It’s a best practice to avoid using root account credentials. Instead, you can create IAM users with Access Keys, each with specific roles and permissions, reducing the risk associated with using high-privileged accounts.
- Granular Permissions: You can create Access Keys for specific users with precise permissions, following the principle of least privilege. This allows you to control which actions or resources the keys can access.
2. Programmatic Access
- APIs and SDKs: Access Keys are used by AWS SDKs (e.g., for Python, Java, or Node.js) and APIs to authenticate and authorize programmatic requests. This is crucial for developers building applications that need to interact with AWS resources directly.
- Command Line Interface (CLI): The AWS CLI, a powerful tool for managing AWS resources from the command line, also relies on Access Keys for authentication.
3. Automating
- CI/CD Pipelines: Continuous Integration/Continuous Deployment (CI/CD) tools often use Access Keys to automate the deployment of applications, infrastructure changes, or updates to AWS services.
How to Create Access Keys in the Management Console
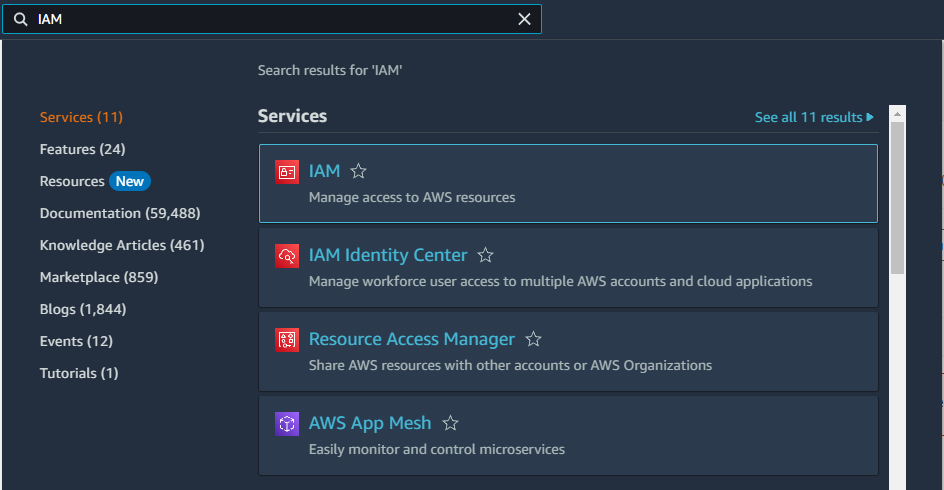
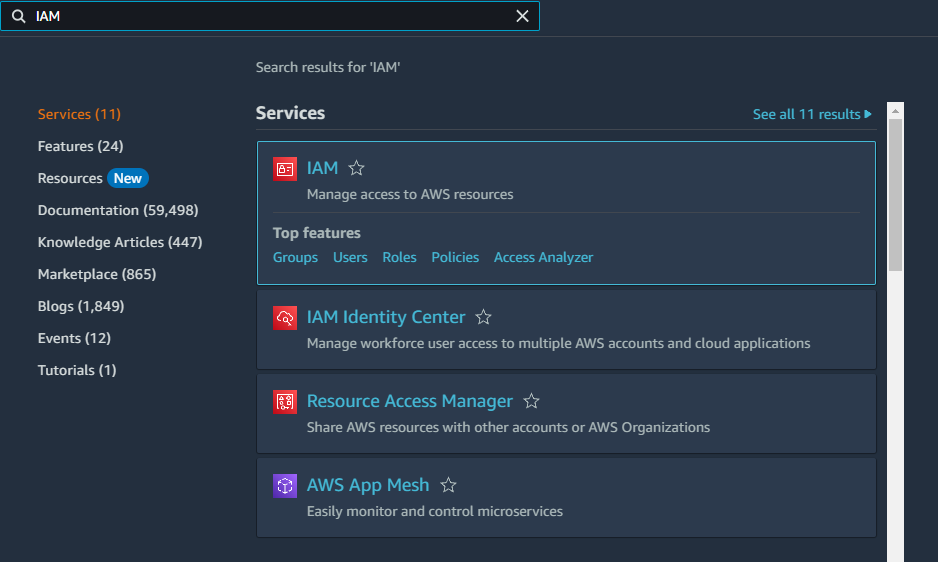
1. Navigate to the IAM Service
In the AWS Management Console, search for “IAM” in the search bar at the top and click on the IAM service from the results.
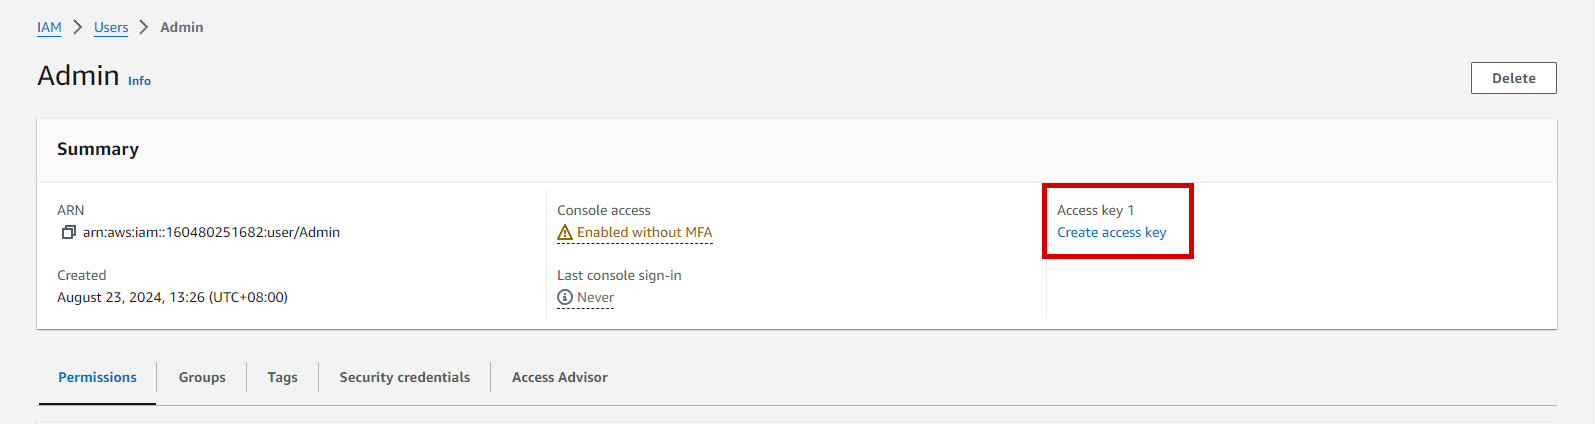
2. Select a User
In the “Users” section, click on the username which we created earlier.
3. Create Access Keys
Once a user is selected, create access key 1 by clicking the Create Access Key
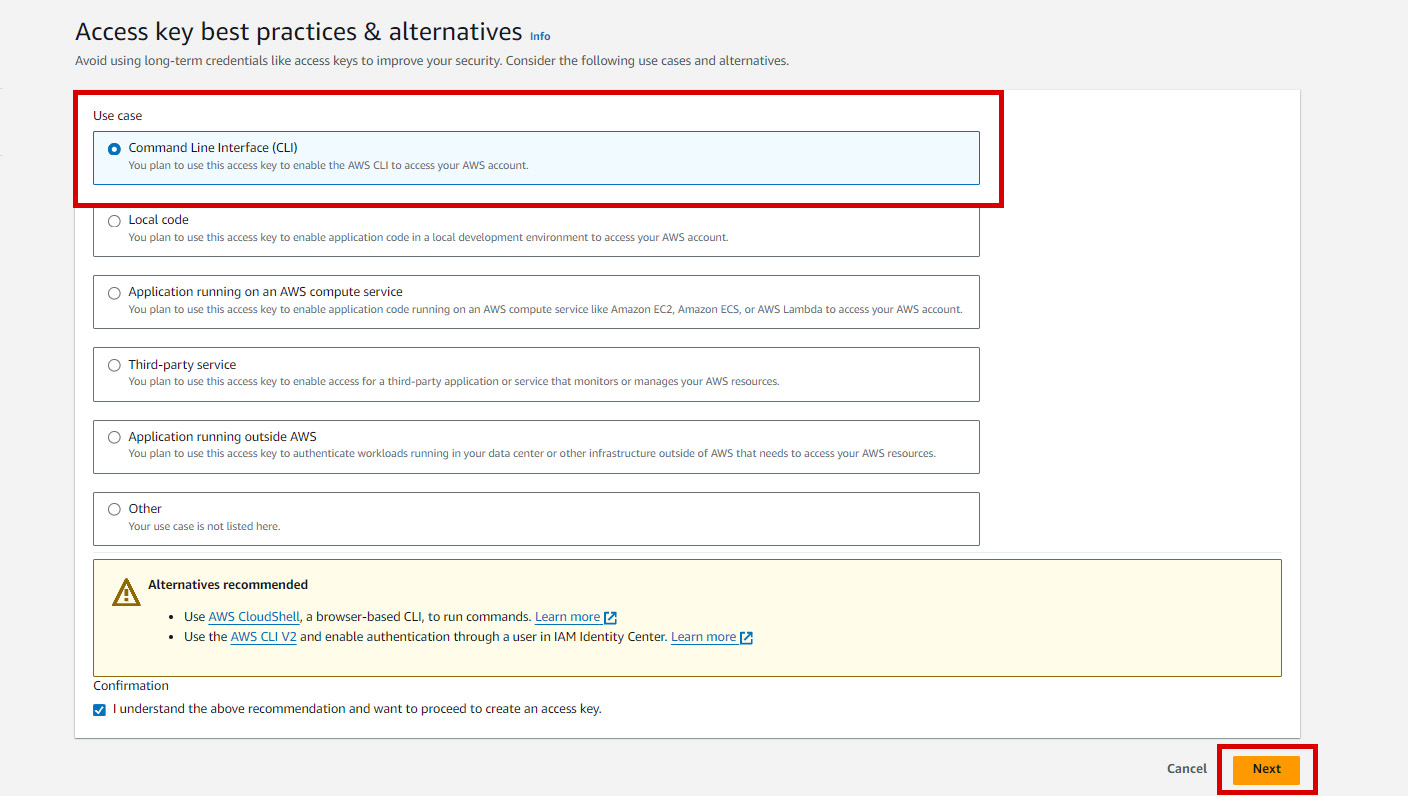
4. Use Case
Select the Command Line Interface to enable the AWS CLI to access this AWS IAM User account.
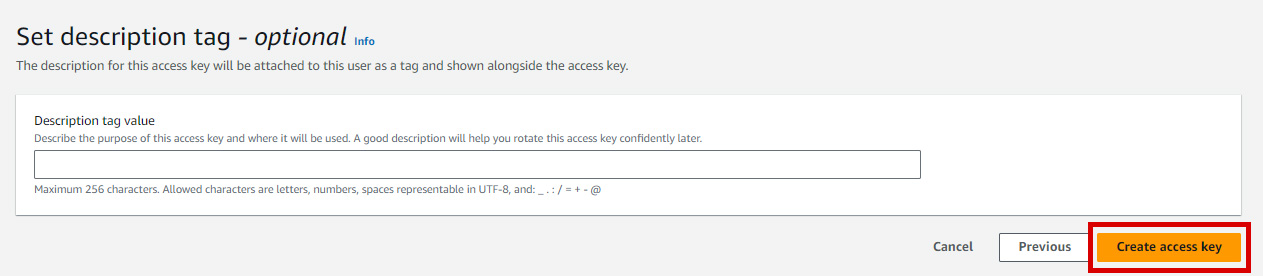
5. Set Description Tag (optional)
After setting a description tag, you can now create access key by clicking the button.
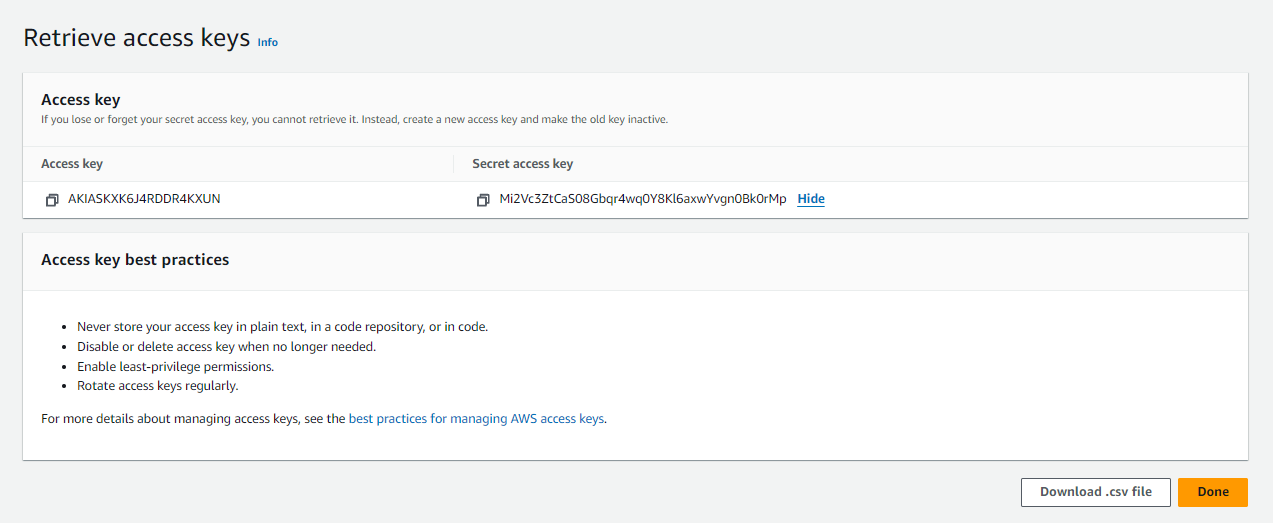
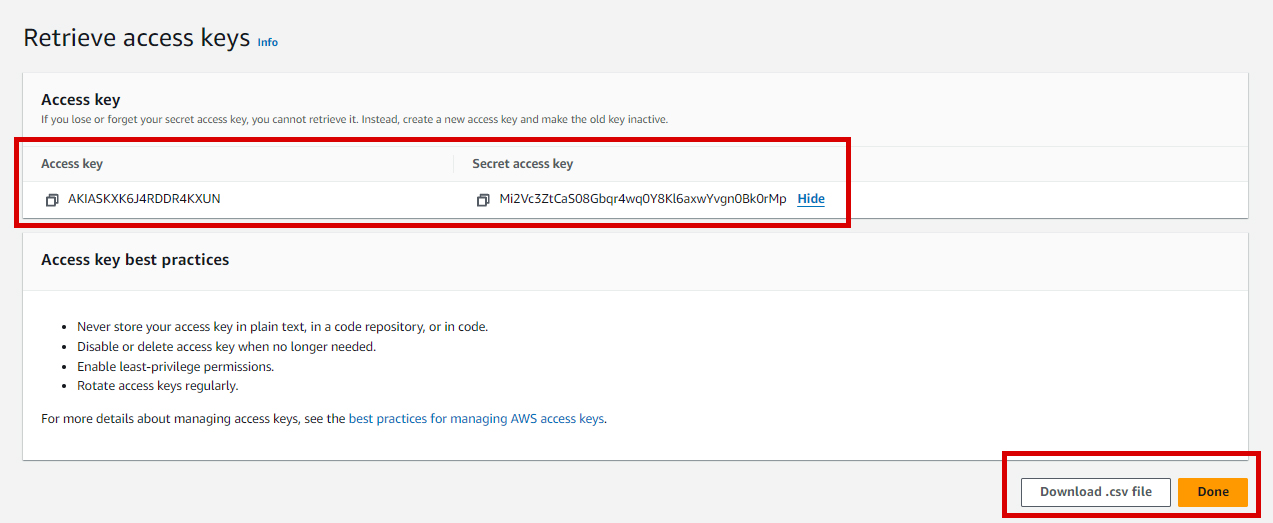
6. Download the Access Key
- After the access key is generated, you’ll see the Access Key ID and Secret Access Key.
- Make sure to download the
.csvfile or copy the Access Key ID and Secret Access Key immediately. AWS does not store the Secret Access Key, so if you lose it, you’ll have to create a new access key.
How to Set Up AWS v2 Tools
Install unzip in Linux or WSL
1
sudo apt install unzip
Download and Install AWS CLI
1
2
3
4
5
curl "https://awscli.amazonaws.com/awscli-exe-linux-x86_64.zip" -o "awscliv2.zip"

unzip awscliv2.zip

sudo ./aws/install
Verify AWS CLI Installation
1
aws --version
Configure AWS CLI (Default Profile)
1
aws configure
Upon executing the command, the following output will be displayed in the terminal.
1
2
3
4
5
6
7
8
AWS Access Key ID [None]: YOUR_ACCESS_KEY_ID

AWS Secret Access Key [None]: YOUR_SECRET_ACCESS_KEY

Default region name [None]: ap-southeast-1

Default output format [None]:
How to Create Access Keys Using AWS CLI
List users:
1
aws iam list-users
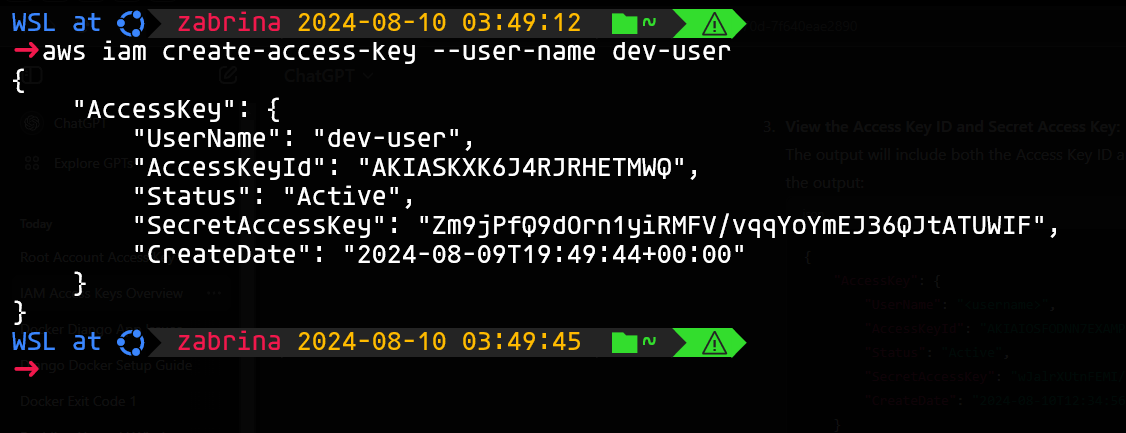
Create access key for a specific user
1
aws iam create-access-key --user-name <IAM_username>
Test your Configuration
Before testing our configuration, we need to create an Amazon S3 bucket using the AWS Management Console. This process will help you verify that your AWS CLI credentials and access keys are correctly configured.
Creating S3 Bucket
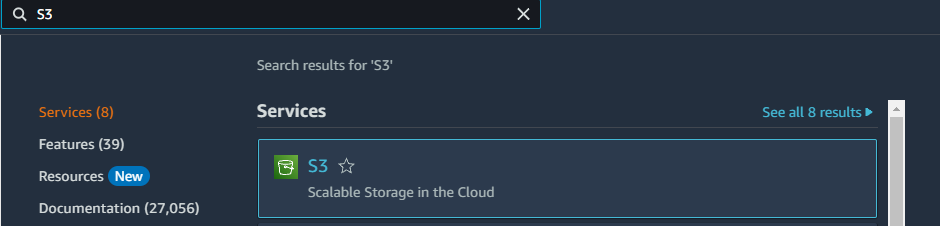
1. Navigate to the IAM Service
In the AWS Management Console, search for “S3” in the search bar at the top and click on the IAM service from the results.
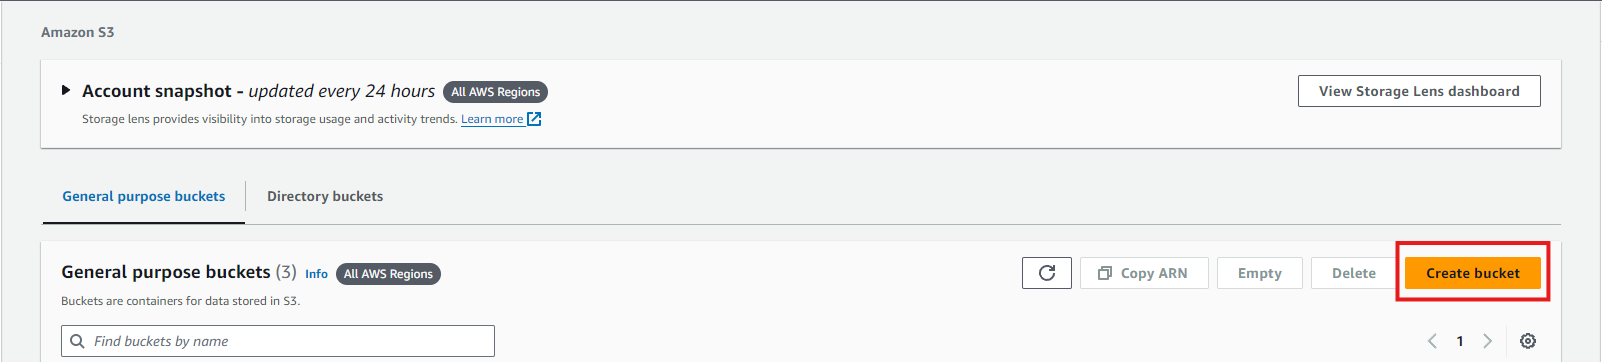
2. Create a Bucket
- On the S3 Dashboard, click the Create bucket button.
- You’ll be taken to the Create bucket wizard.
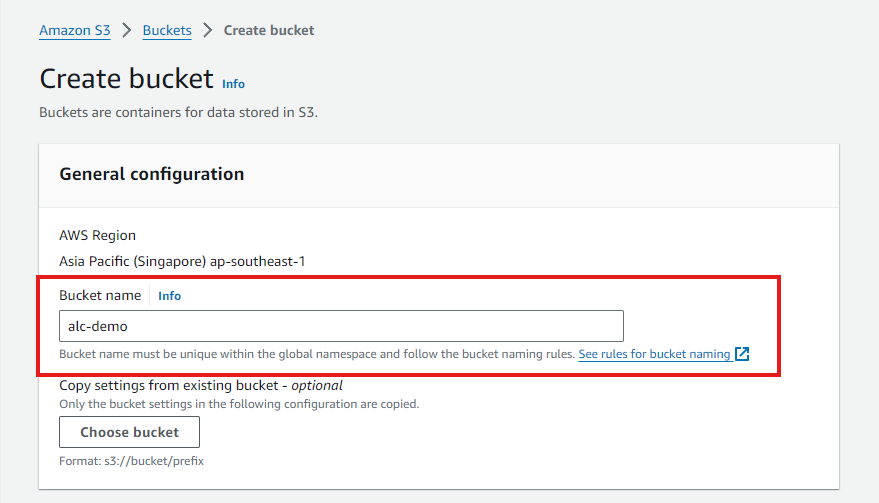
- Configure Bucket Settings
- Enter a unique name for your bucket. Bucket names must be globally unique across all AWS accounts.
- Scroll down, leave all as it is by default and click
Create Bucket
3. Upload a File to Your Bucket
Click on your newly created bucket to open it.
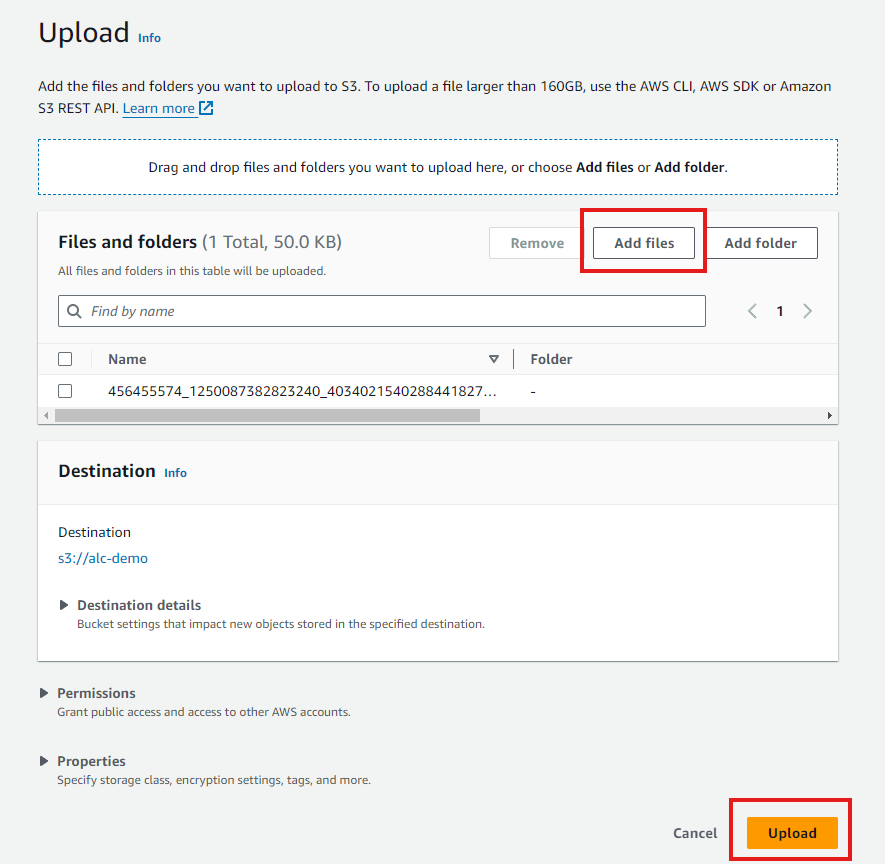
Click the Upload button.
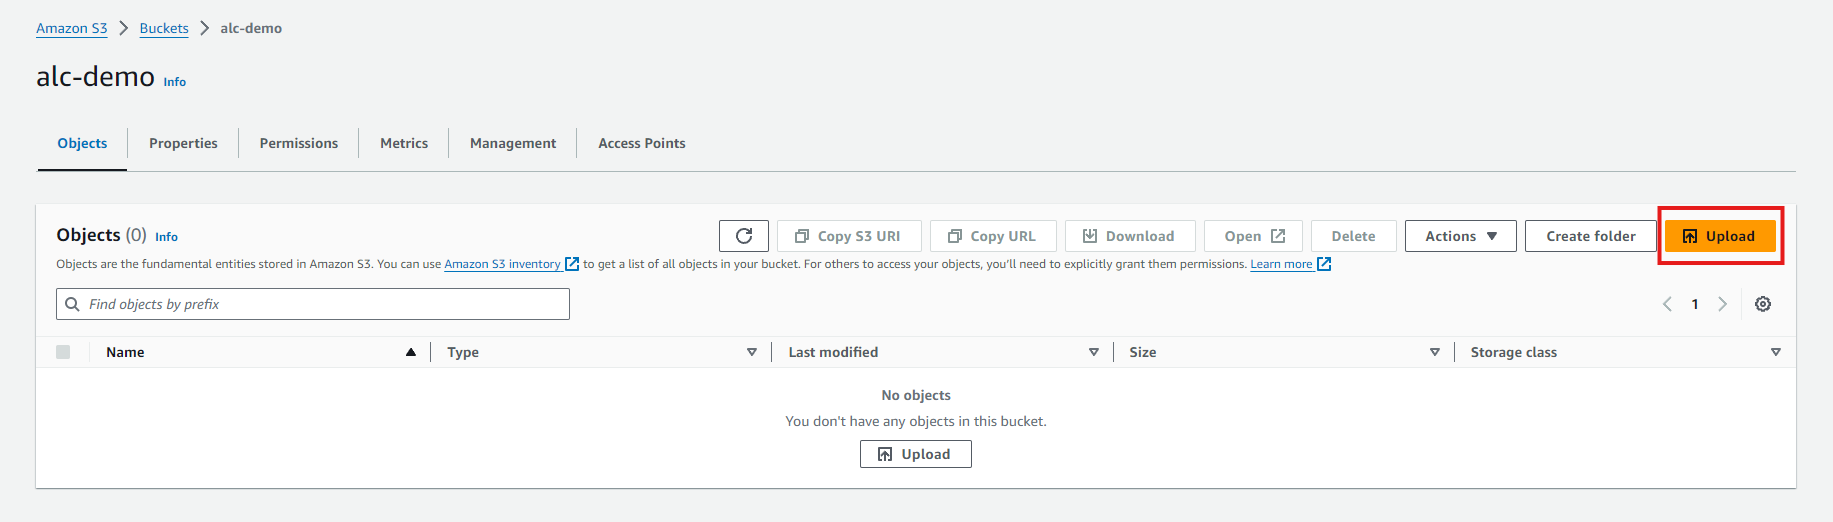
In the upload dialog, drag and drop files or use the Add files button to select files from your computer.
Click the Upload button to start the upload process.
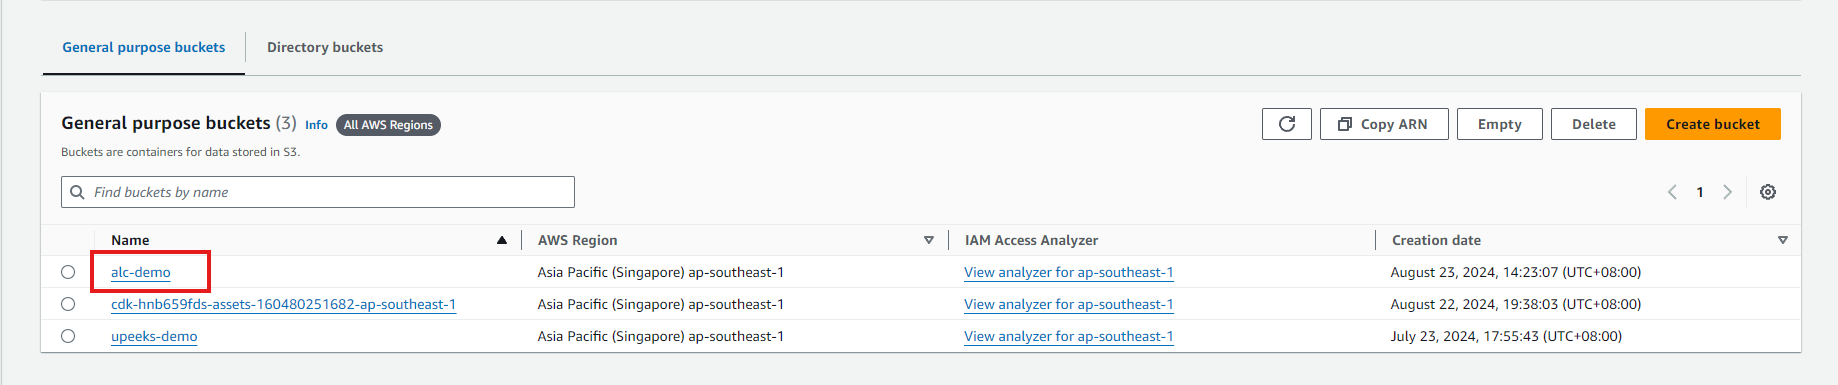
Testing AWS CLI Access Keys Using Listing Buckets
1
aws s3 ls
Testing: List S3 Buckets Using Specific Profile (Optional)
If you have multiple profiles configured in your AWS CLI, follow the steps below to list S3 buckets using a specific profile.
View the profile list created:
1
cat ~/.aws/credentials
1
aws s3 ls --profile myprofile
IAM Groups
An IAM group is a collection of users with specific permissions assigned to all group members. This approach simplifies the management of user privileges by allowing administrators to assign permissions to groups rather than to each user individually.
IAM Groups allow you to:
-
Manage Users: Assign access keys.
-
Define Roles: Provide access to resources without sharing passwords or keys.
-
Utilize Groups: Organize users into groups with specific permissions.
-
Apply Policies: Attach policies to users, groups, or roles to define permitted actions.
This ensures that users can only perform actions within the scope of their group’s permissions, maintaining security and control within the AWS environment.
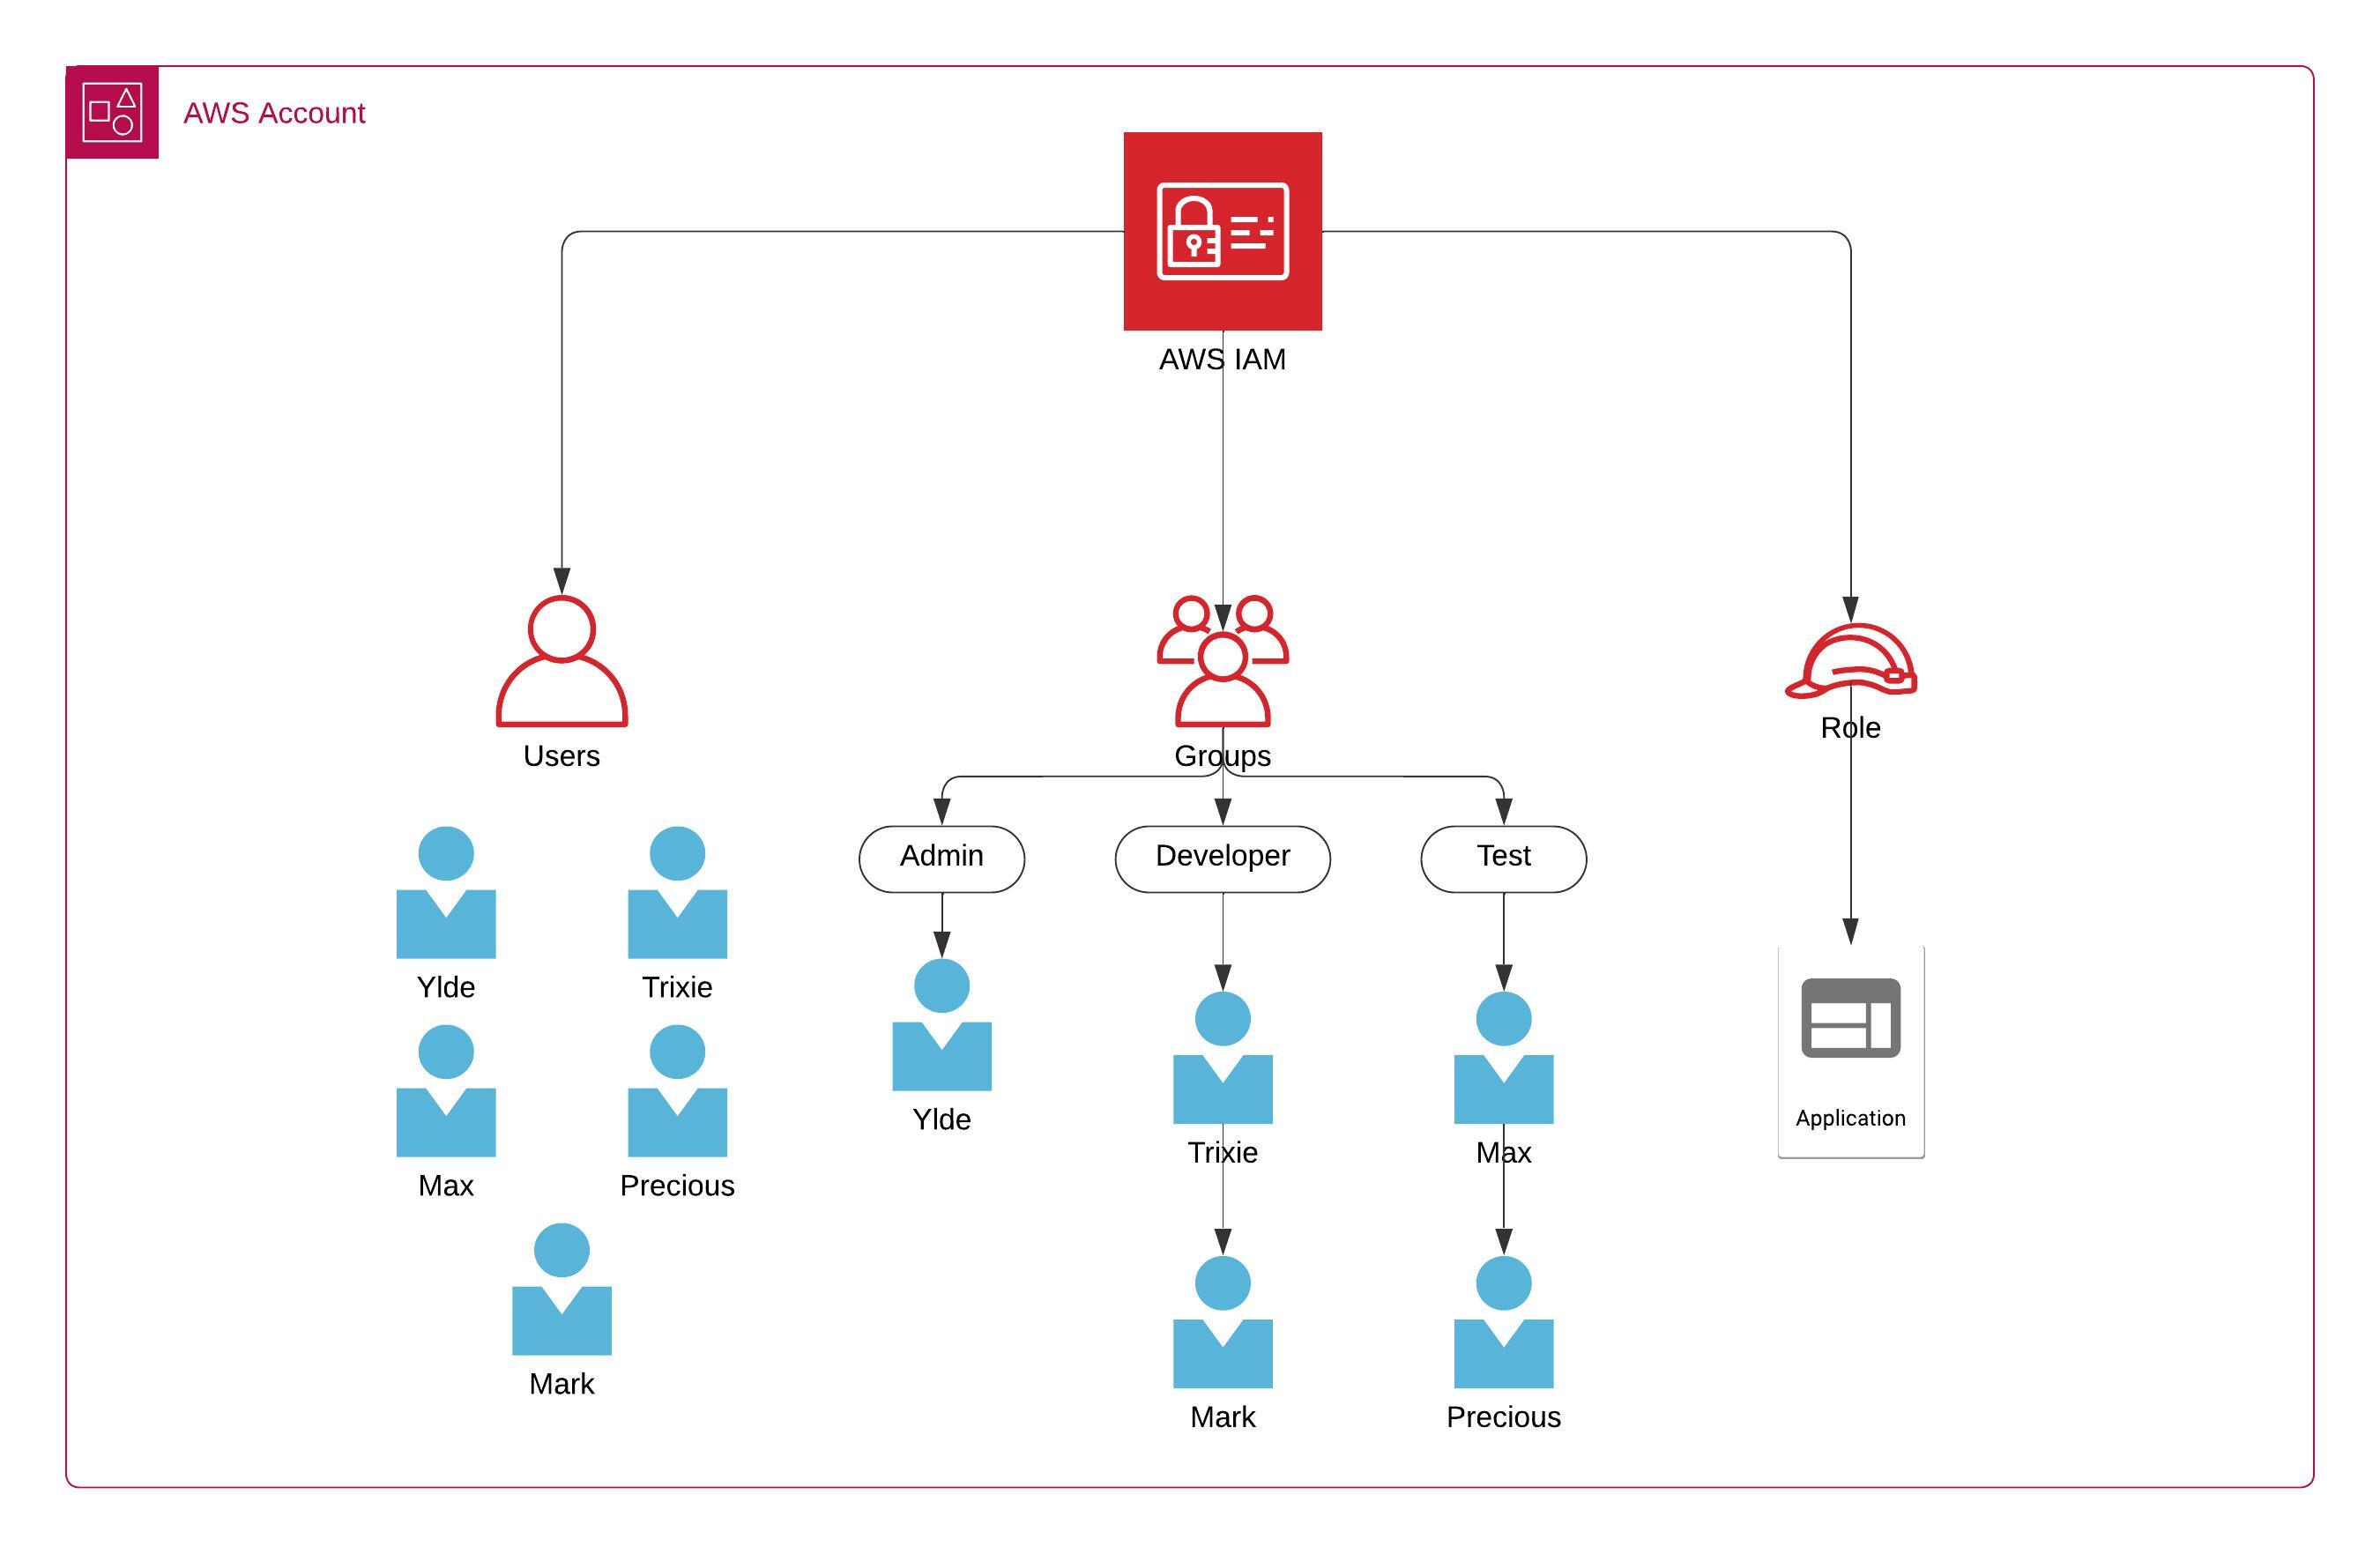
For example, an account has three groups: developers, data analysts, and admins group. Each group has specific permissions tailored to their roles:
- Admins: They have full administrative access, including the ability to manage all resources, create new IAM users, and assign permissions.
- Developers: They have permission to deploy and manage code in AWS services like EC2 and Lambda.
- Test: Have access to testing environments and related services, enabling them to verify and test the deployed code.
Each user in the organization can be assigned to one or more of these groups based on their responsibilities, simplifying the management of permissions and ensuring that each user has the appropriate level of access.
Permission Control Using IAM Groups
Creating IAM user groups
Creating and managing IAM (Identity and Access Management) user groups in AWS is essential for maintaining a secure and organized environment. User groups allow you to efficiently manage permissions for multiple users by assigning policies to a group rather than individually configuring each user’s access.
In this guide, you’ll learn how to create an IAM user group, attach policies to the group, and add users to it. This process ensures that users within a group inherit the same set of permissions, making it easier to manage access control across your AWS environment.
Steps Overview
- Log in to the AWS Management Console
-
Go to the IAM dashboard.
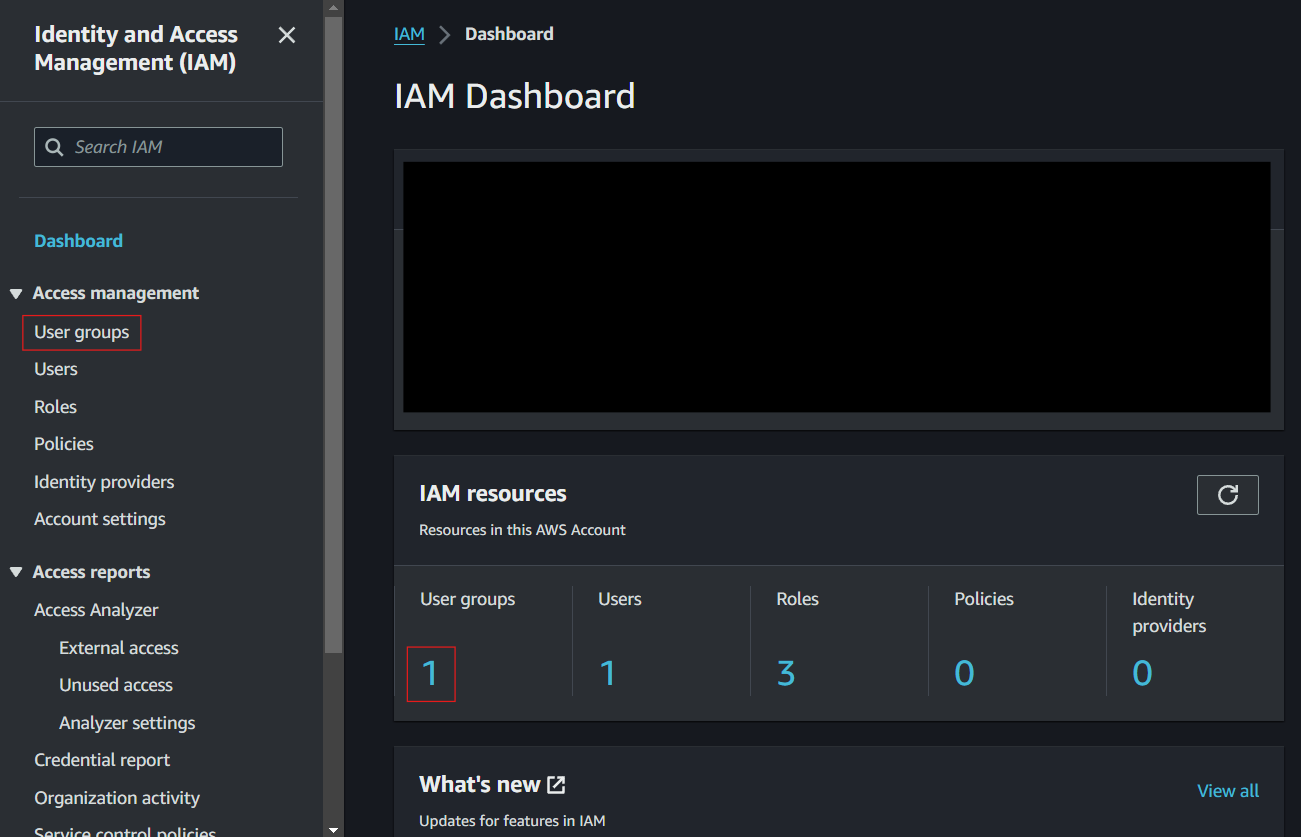
- Navigate to “Groups” and click “Create New Group.”
-
Enter the Group Name (e.g., Developers).
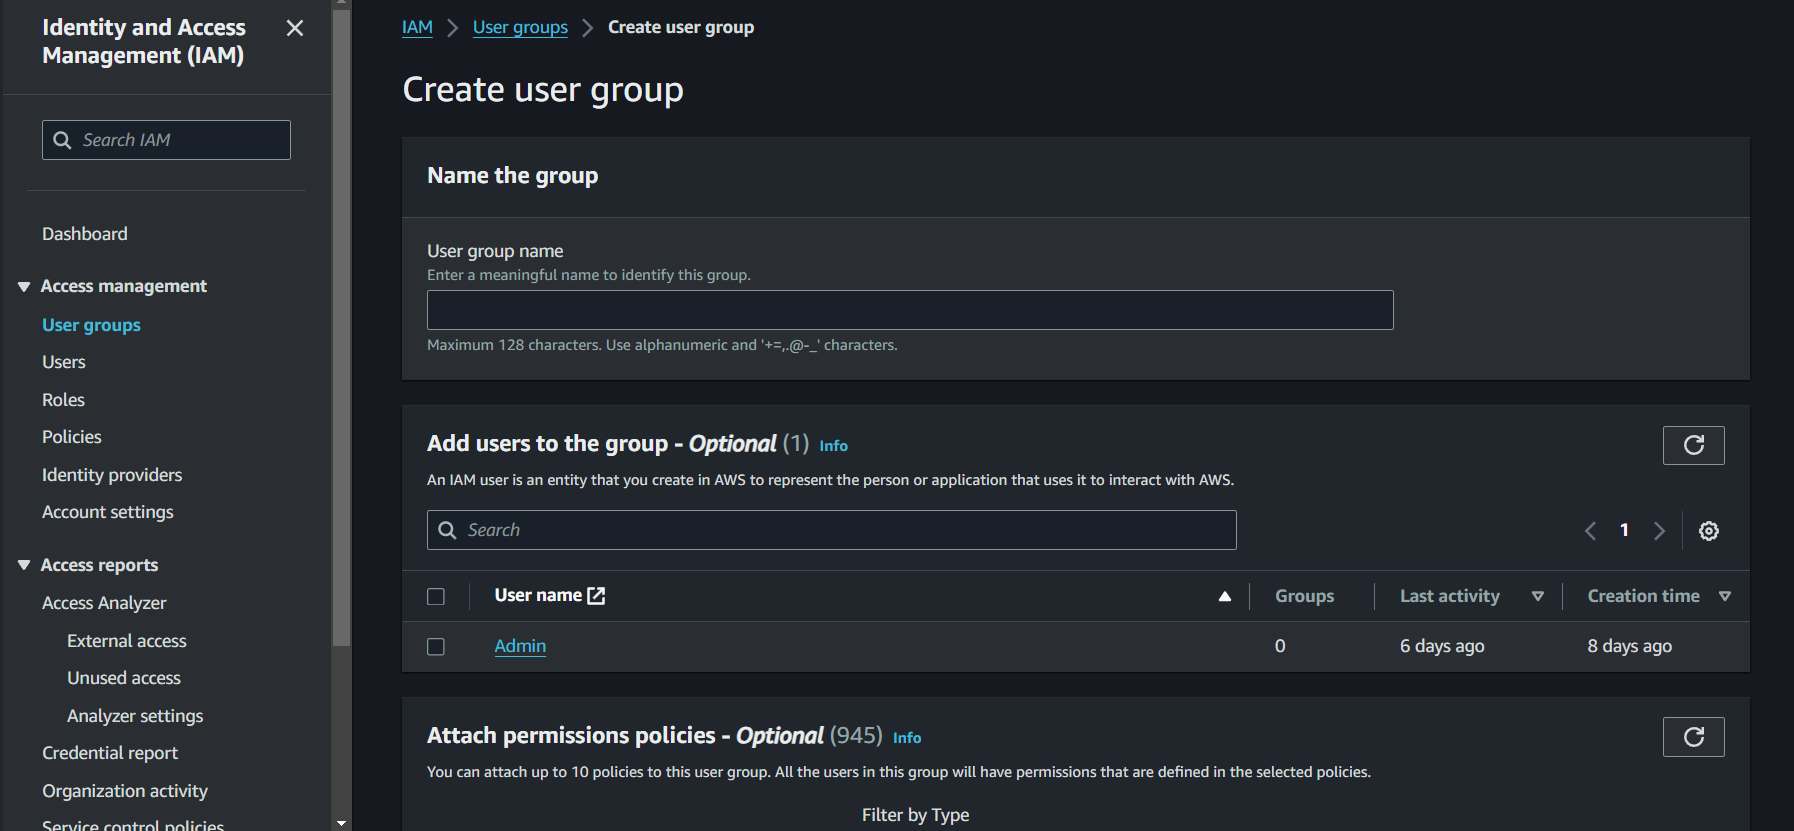
- Attach Policies to the Group:
- Choose policies from the policy list. For this demo, attach the ‘AmazonEC2ReadOnlyAccess’ policy.
-
Click “Create Group.”
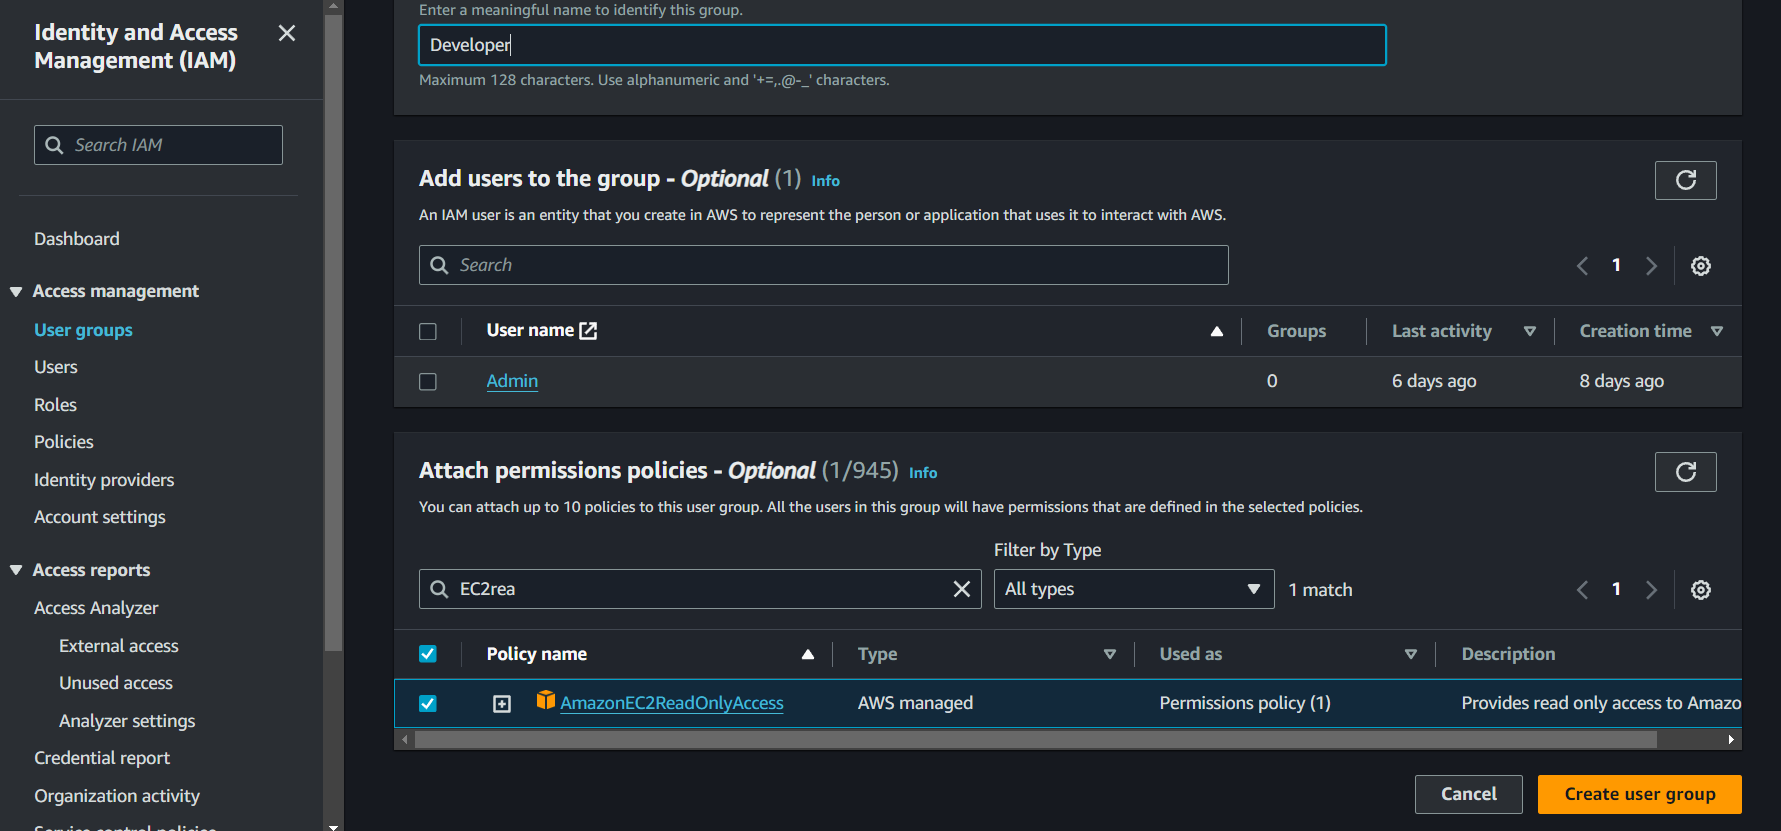
Adding Users to the Group
- Navigate to the IAM Dashboard.
- Navigate to User Group
- Select the user group that you want to add a user to, for this demo choose the one we created earlier.
-
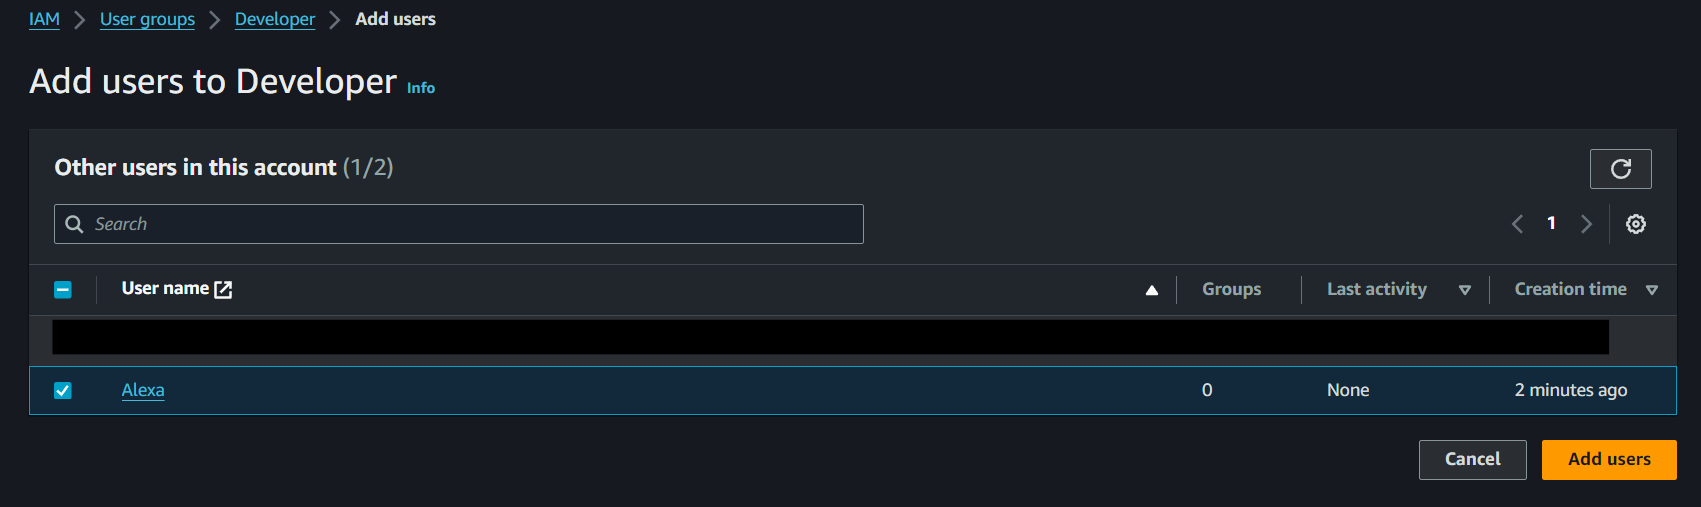
Click on ‘Add Users’
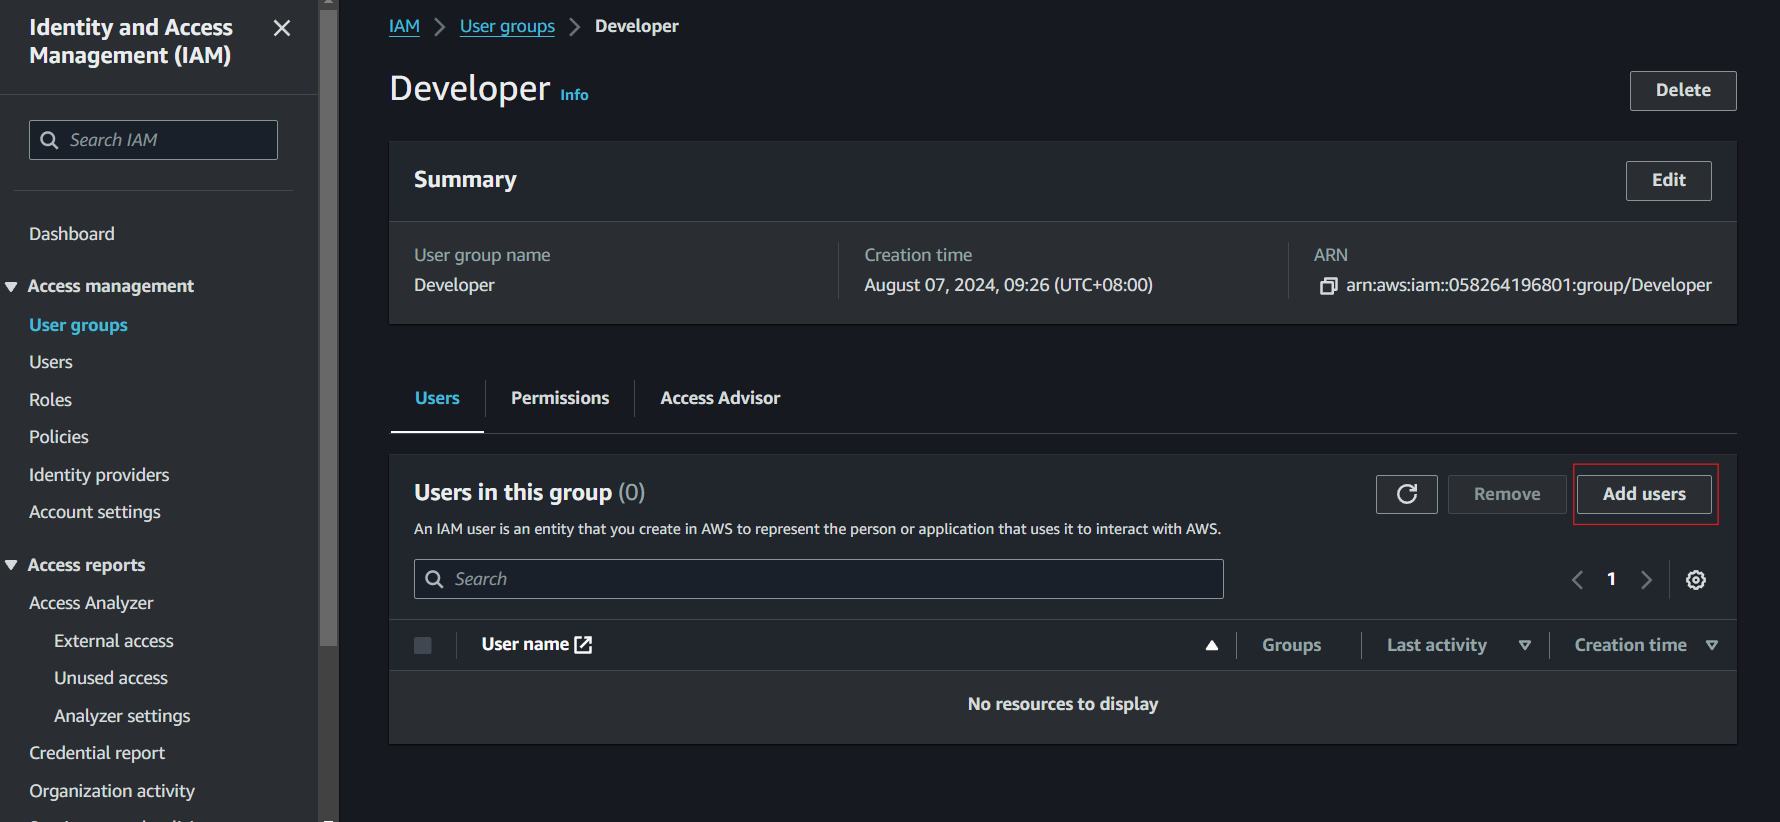
-
Select the User to Add to the Group
-
Click on ‘Add User’
You can also edit the certain user’s permissions to add them to the group.
- Navigate to the IAM Dashboard.
-
Navigate to Users
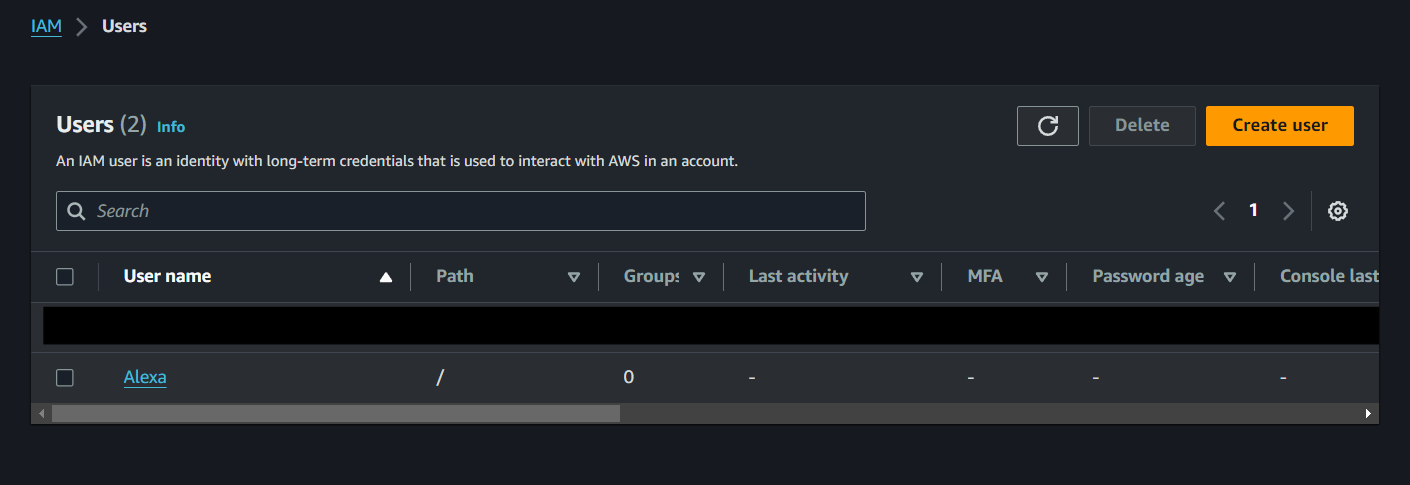
- Click on the user you want to edit permissions and add to the group.
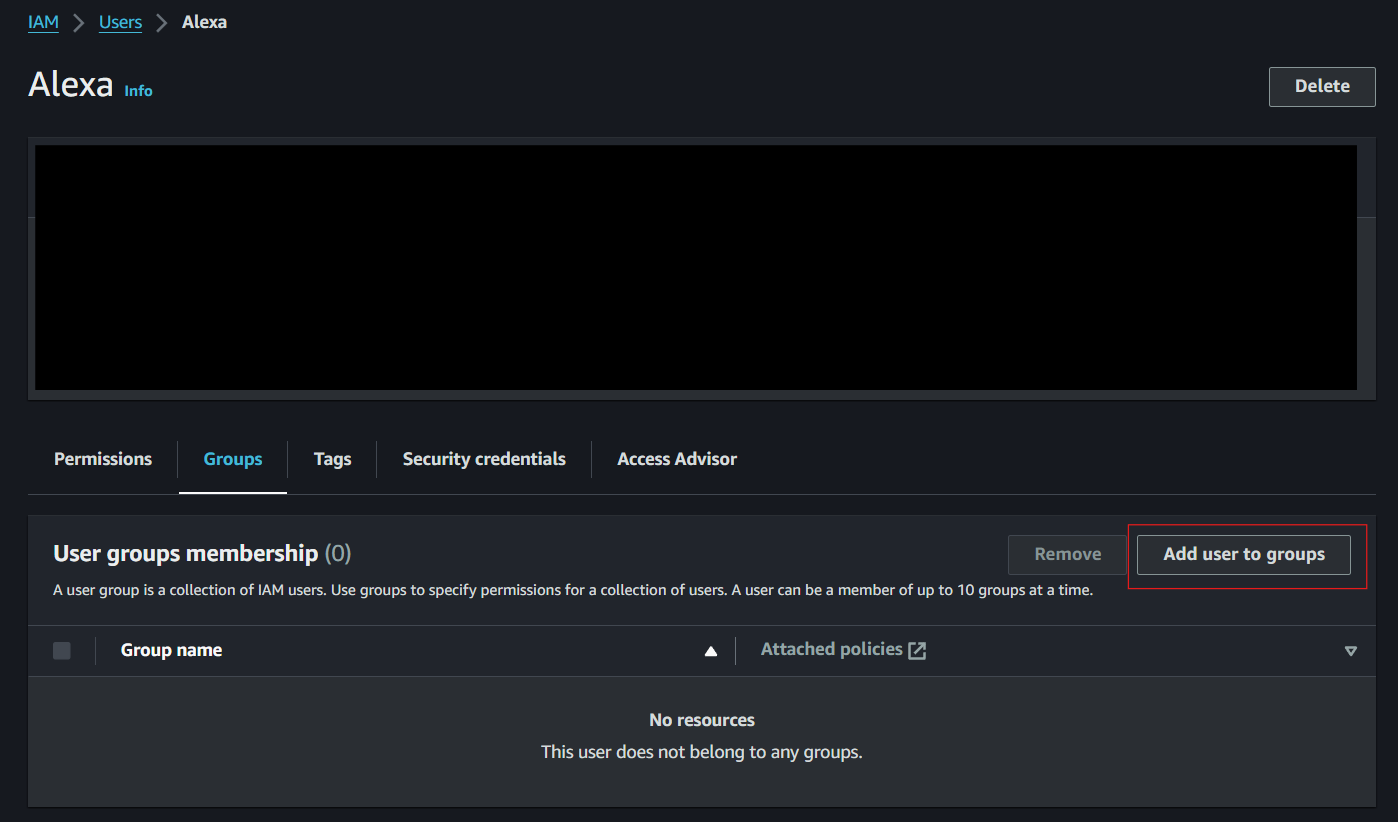
- Click add permissions
-
Click Add user to a group
- Choose the group you want to add the user to.
-
Click Next, which will direct you to the review page. Review your choices, and when you are done click ‘add permissions’
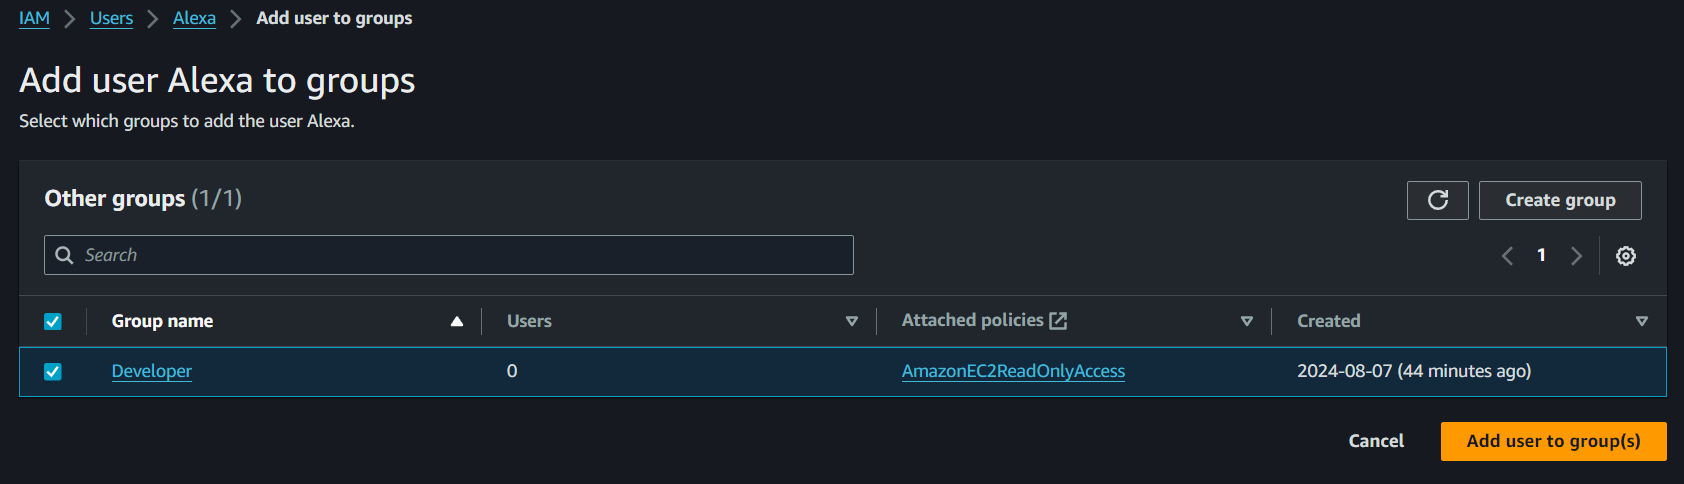
The user is now added to the selected group, and will inherit the permissions assigned to that group.
IAM Roles
What are IAM Roles?
IAM (Identity and Access Management) roles provide temporary access to AWS resources without using permanent credentials.
Roles offer a way to grant temporary access to AWS resources without relying on permanent credentials. This approach is especially useful for scenarios that require short-term access or adhere to best practices that discourage hardcoding credentials. Unlike IAM users, IAM roles provide temporary security credentials, which can be assumed by various entities such as users or applications.
- IAM roles are versatile and can be used in several important ways. They allow AWS services, such as EC2 instances, to securely access other AWS resources like S3 buckets. Additionally, they facilitate cross-account access, enabling resources and permissions to be shared between different AWS accounts. IAM roles also support role chaining, where multiple roles can be assumed in sequence to achieve varying levels of access.
-
The structure of IAM roles includes key components: Trust Policies, which define who is allowed to assume the role; Permissions Policies, which specify what actions the role can perform; and Permissions Boundaries, which set the maximum permissions that the role can grant.
- Use Cases:
- Access Within AWS: Allow applications (e.g., EC2 instances) to securely access other AWS resources (e.g., S3 buckets).
- Access Outside AWS: Enable external applications to access AWS resources using IAM Roles Anywhere.
- Cross-Account Access: Share resources and permissions between different AWS accounts.
- Grant Service Access: Let AWS services (e.g., Lambda) perform actions on your behalf.
Key Components of IAM Roles:
- Trust Policies: Define who is allowed to assume the role.
- Permissions Policies: Specify what actions the role can perform.
- Permissions Boundaries: Set the maximum permissions the role can grant.
Common Scenarios
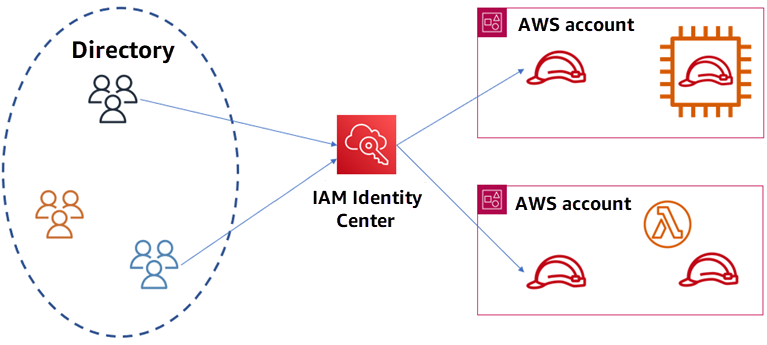
The image above represents a simplified structure of AWS IAM Identity Center and its role.
Other Scenarios
Access Workloads Within AWS
- Scenario: An application running on an EC2 instance needs to interact with other AWS services.
- How It Works: Create an IAM role with the necessary permissions and assign it to the application. The application uses temporary security credentials provided by the role.
Access Workloads Outside of AWS
- Scenario: Applications running on-premises or in other clouds need to access AWS resources.
- How It Works: Use IAM Roles Anywhere to allow these external applications to obtain temporary access to AWS services, similar to applications within AWS.
Enable Cross-Account Access
- Scenario: You have multiple AWS accounts (e.g., development and production) and need to share resources between them.
- How It Works: Set up IAM roles to grant permissions across AWS accounts, allowing resources in one account to access resources in another.
Grant Access to AWS Services
- Scenario: AWS services (e.g., Lambda) need to perform actions on your behalf (e.g., read from S3, write to DynamoDB).
- How It Works: Define a role with specific permissions for the service. The service assumes this role to carry out its tasks.
Federated Identities in AWS
What It Is:
- Allows users from external systems (e.g., corporate directories, social logins) to access AWS resources without separate AWS accounts.
How It Works:
- User Logs In: Signs in through an existing identity provider (e.g., Microsoft Active Directory, Google).
- Token Exchange: The identity provider sends a token to AWS to verify the user’s identity.
- Role Assumption: AWS uses the token to grant access by allowing the user to assume an IAM role with specific permissions.
- Temporary Access: AWS provides temporary credentials based on the role, allowing access to resources.
IAM Roles Demonstration
Introduction
IAM Roles are a powerful feature in AWS that allows you to grant temporary access to your AWS resources without needing to share long-term credentials. In this demonstration, we will walk through the process of creating an IAM role, configuring the AWS CLI to use that role, and performing actions using the role’s permissions.
Step 1: Create an IAM Role
-
Navigate to IAM Dashboard:
- Log in to the AWS Management Console.
- Go to the IAM service.
-
Create a New Role:
- In the IAM Dashboard, click on Roles in the left-hand menu.
- Click Create role.

-
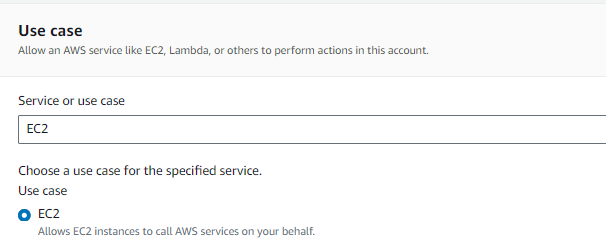
Select Trusted Entity:
- Choose AWS service as the trusted entity.
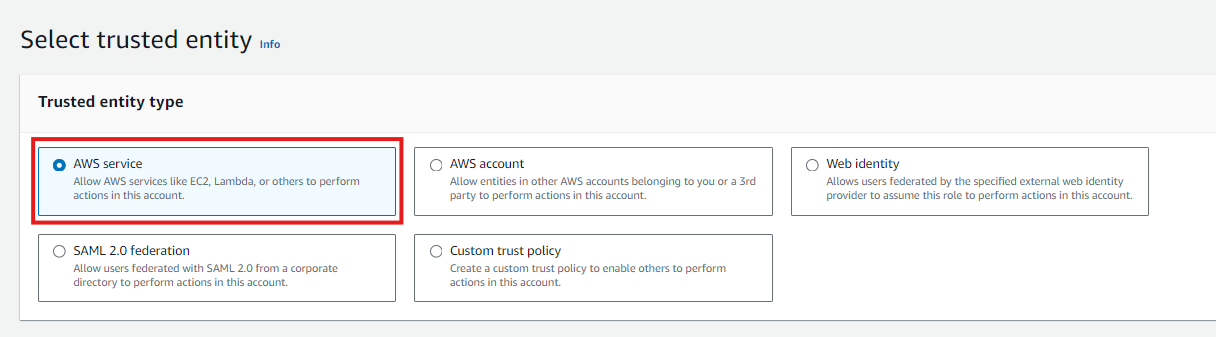
- Select the service that will use the role, such as EC2.
-
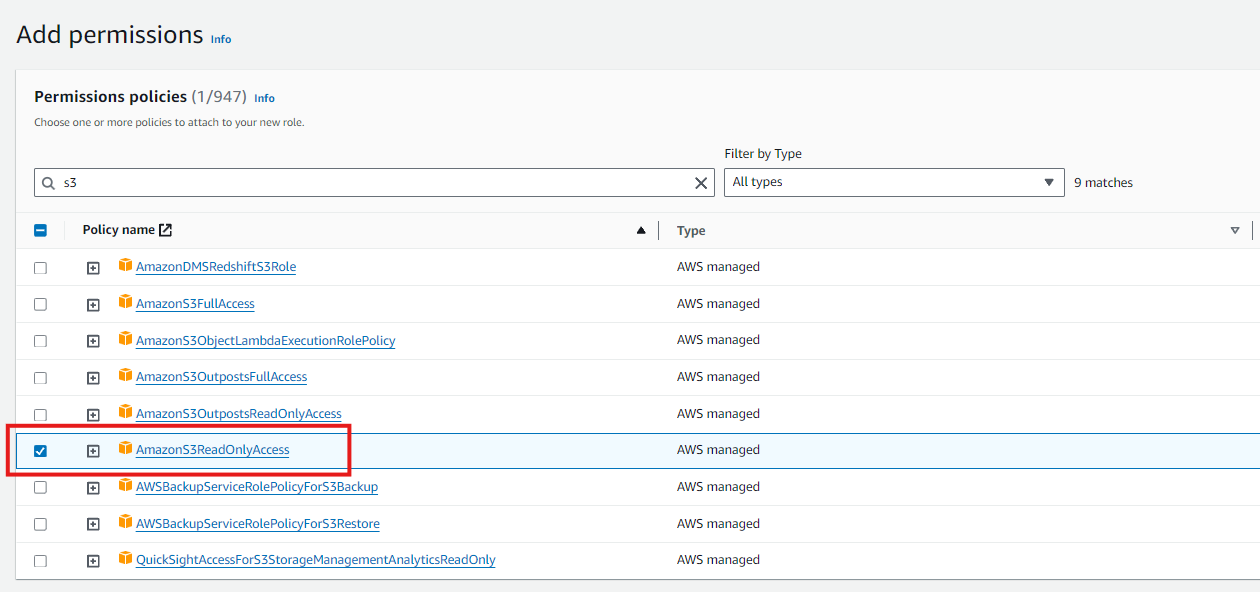
Attach Permissions:
- Attach the
AmazonS3ReadOnlyAccesspolicy to the role to grant read-only access to S3.
- Attach the
-
Name and Create the Role:
- Give the role a descriptive name, such as
EC2_S3ReadOnlyAccess.
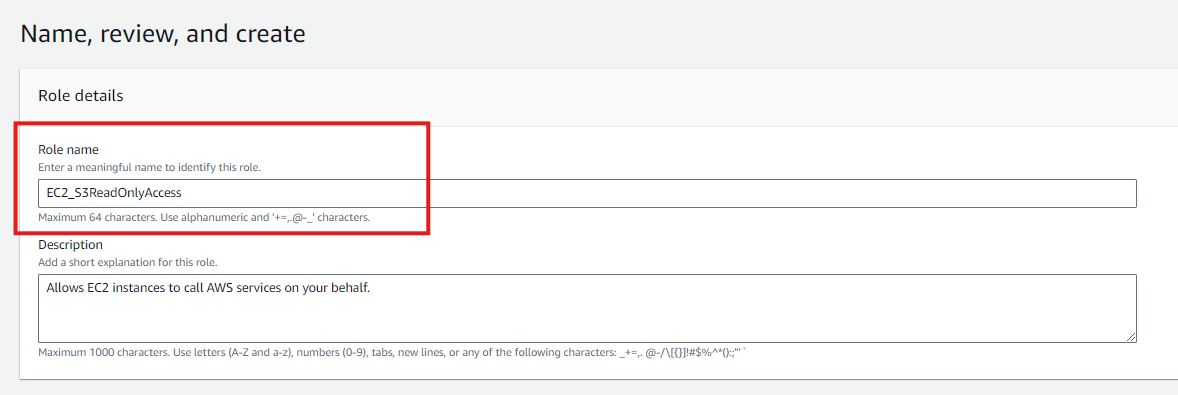
- Review the settings and click Create role.
- Give the role a descriptive name, such as
Step 2: Create an EC2 Instance
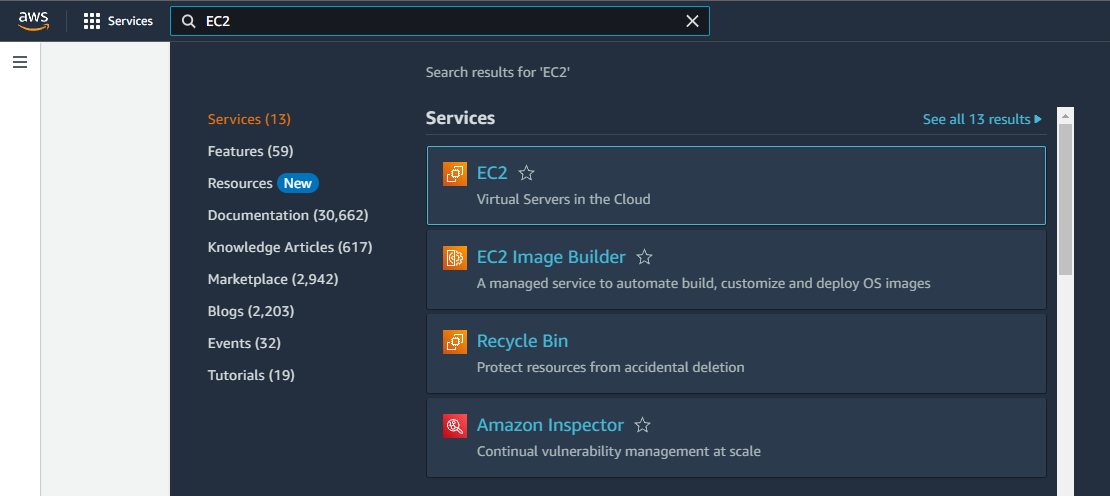
Navigate to EC2
- In the AWS Management Console, search for “EC2” in the search bar at the top.
-
Click on “EC2” from the search results to open the EC2 Dashboard.
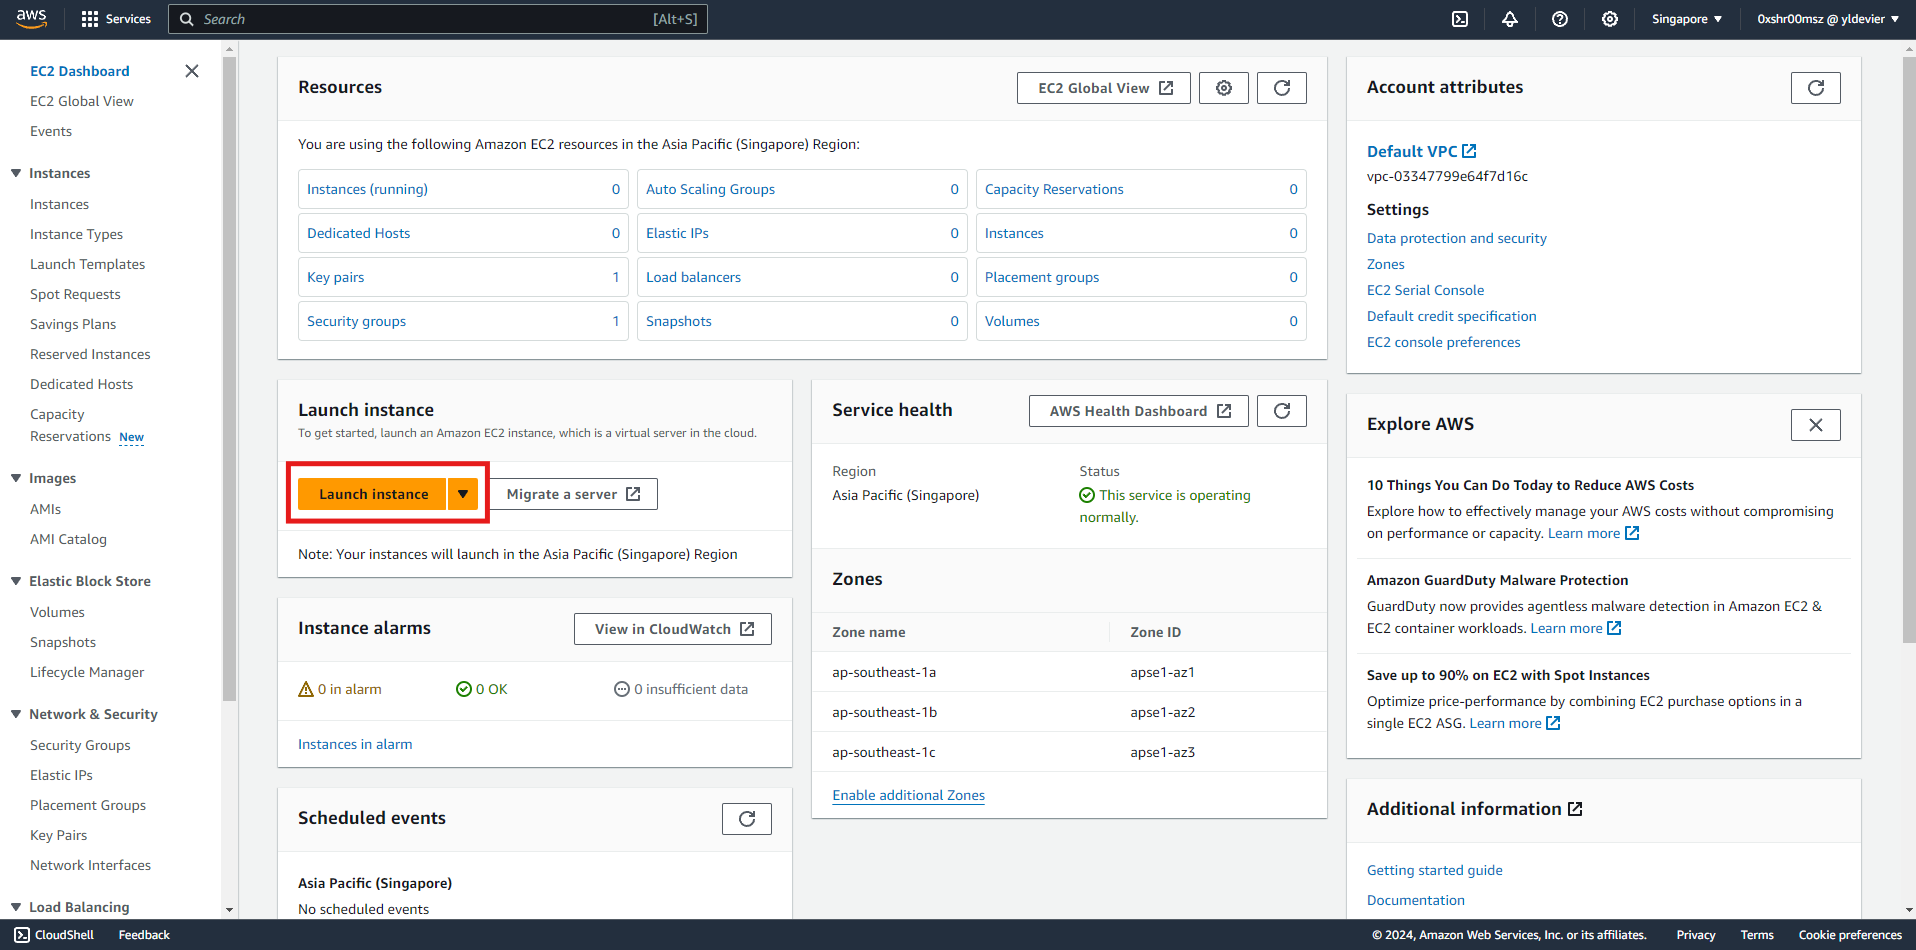
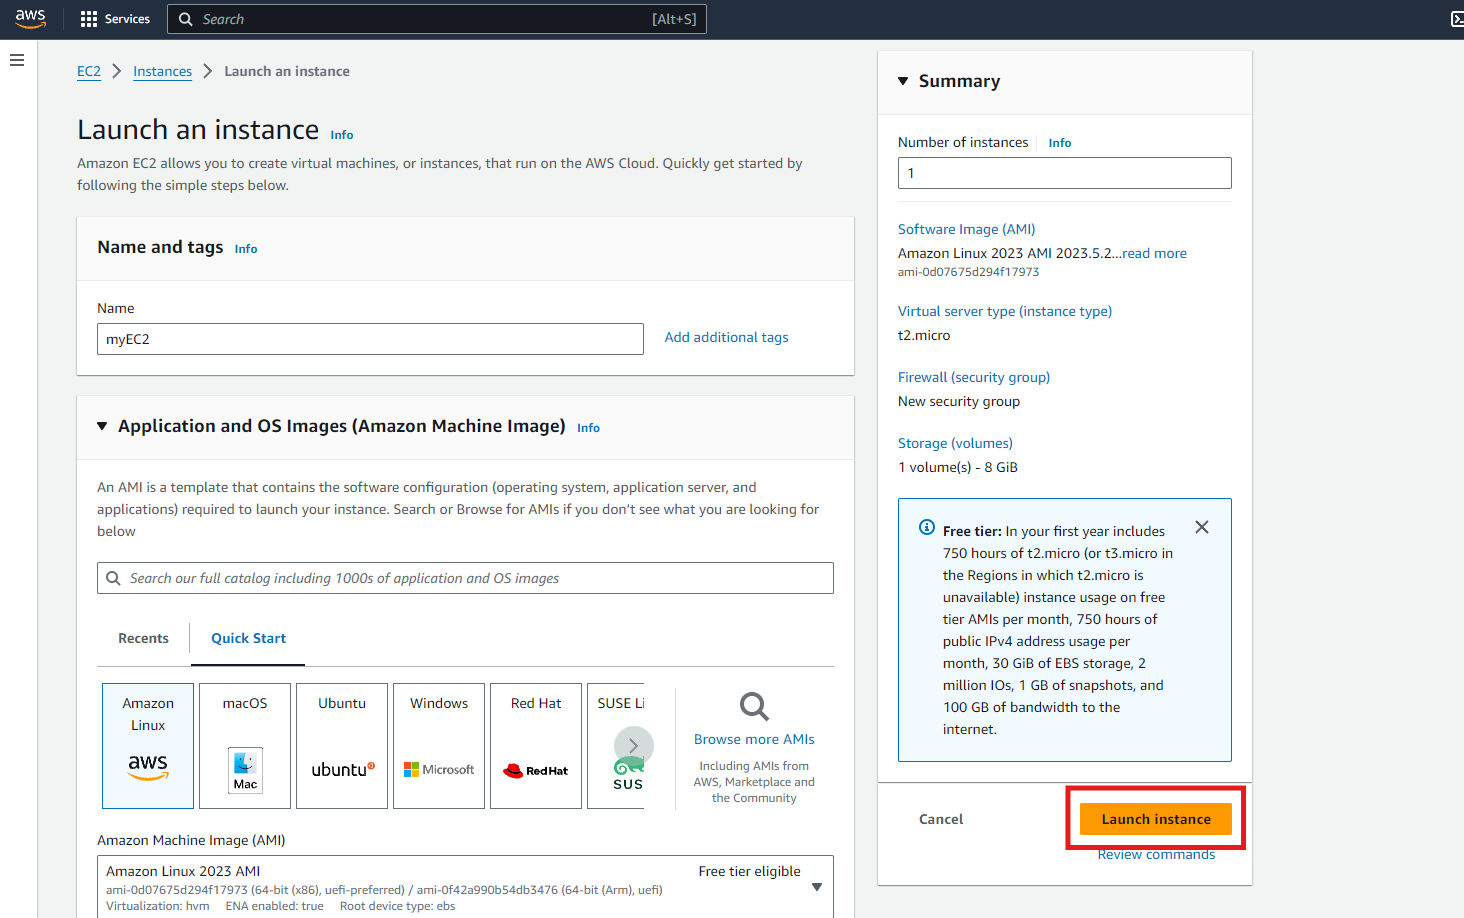
Launch Instance
-
In the EC2 Dashboard, click on the “Launch Instance” button to start the instance creation process.
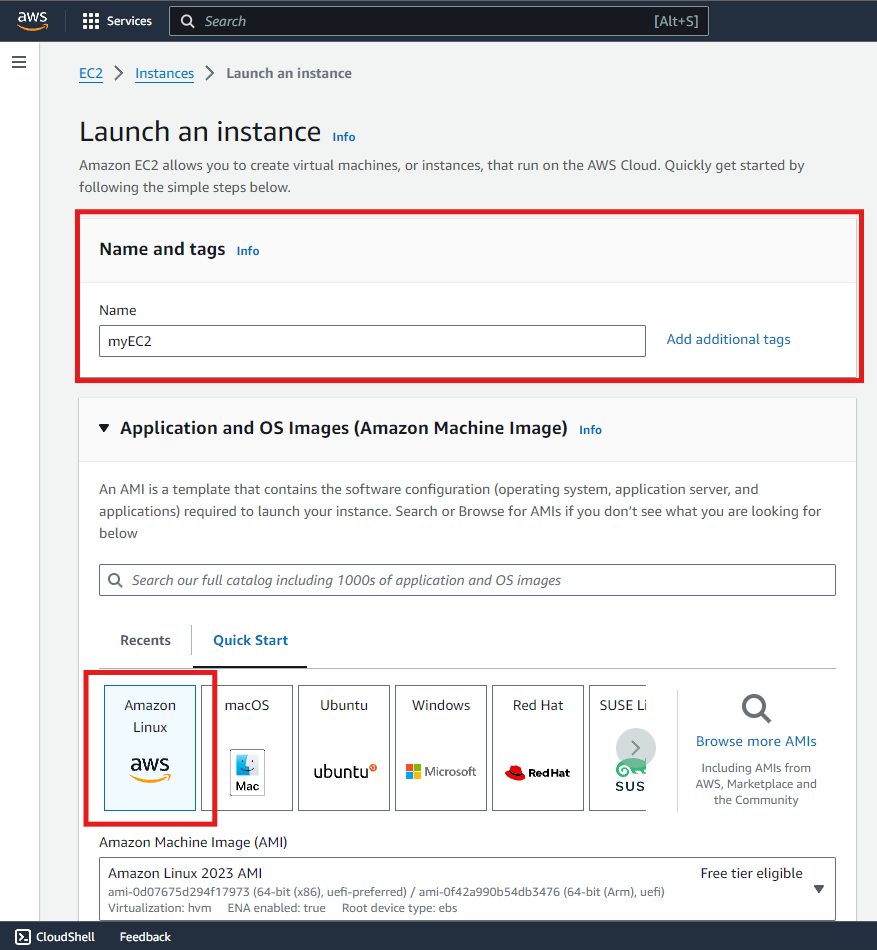
Choose an Amazon Machine Image (AMI)
- Provide a name for your EC2 Instance
-
You’ll be presented with a list of AMIs. Select an AMI that suits your needs. For this workshop, you can choose an Amazon Linux AMI.
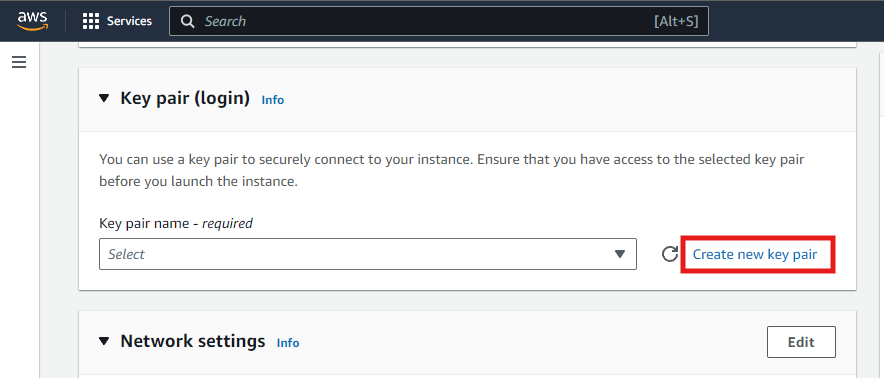
Create a Key Pair
-
When prompted, create a new one. This key pair will be used to securely connect to your instance.
-
Provide a key pair name, select RSA Key Pair Type and click Create Key Pair.
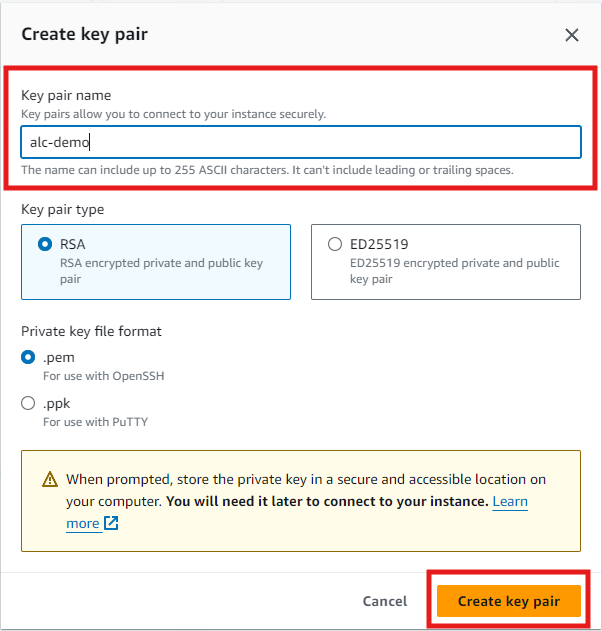
-
Download the key pair file if you create a new one and store it in a safe location.
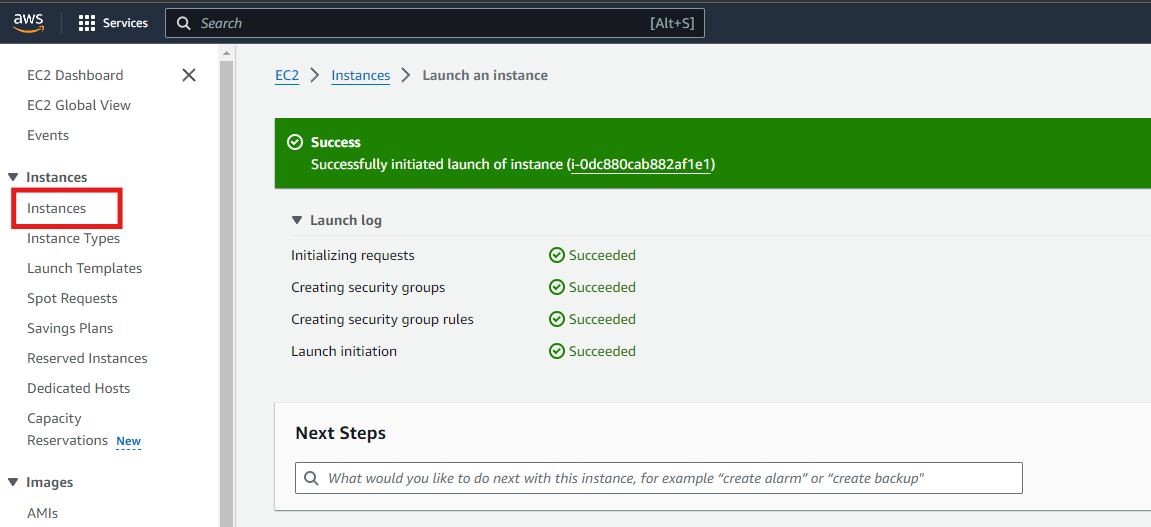
Launch Instance
Leave everything else as it is and click the Launch Instance.
Attach the role to your EC2 Instance
- Go back to the EC2 Dashboard.
-
In the left sidebar, click on “Instances”.
-
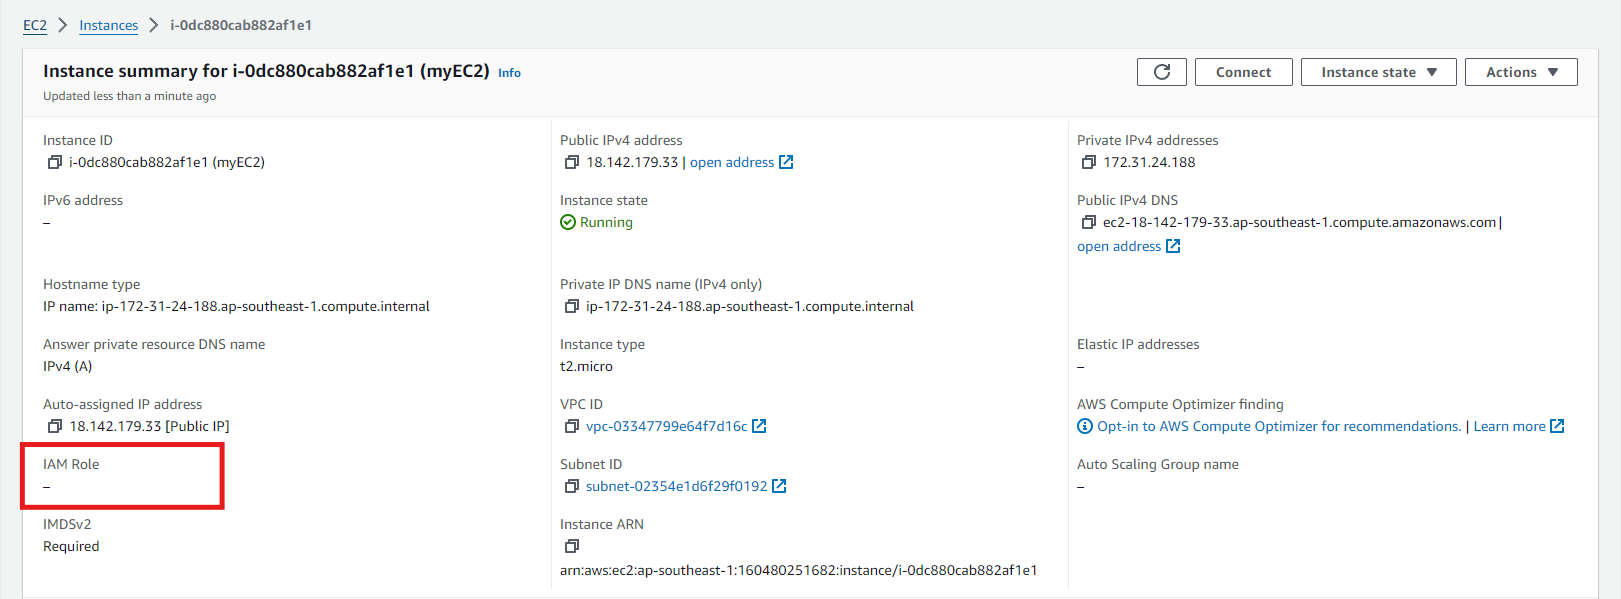
Select the instance to which you want to attach the role.

-
In default, our newly created EC2 Instance has no IAM Role yet.
-
Click on the “Actions” dropdown menu, then select “Security” > “Modify IAM Role”.
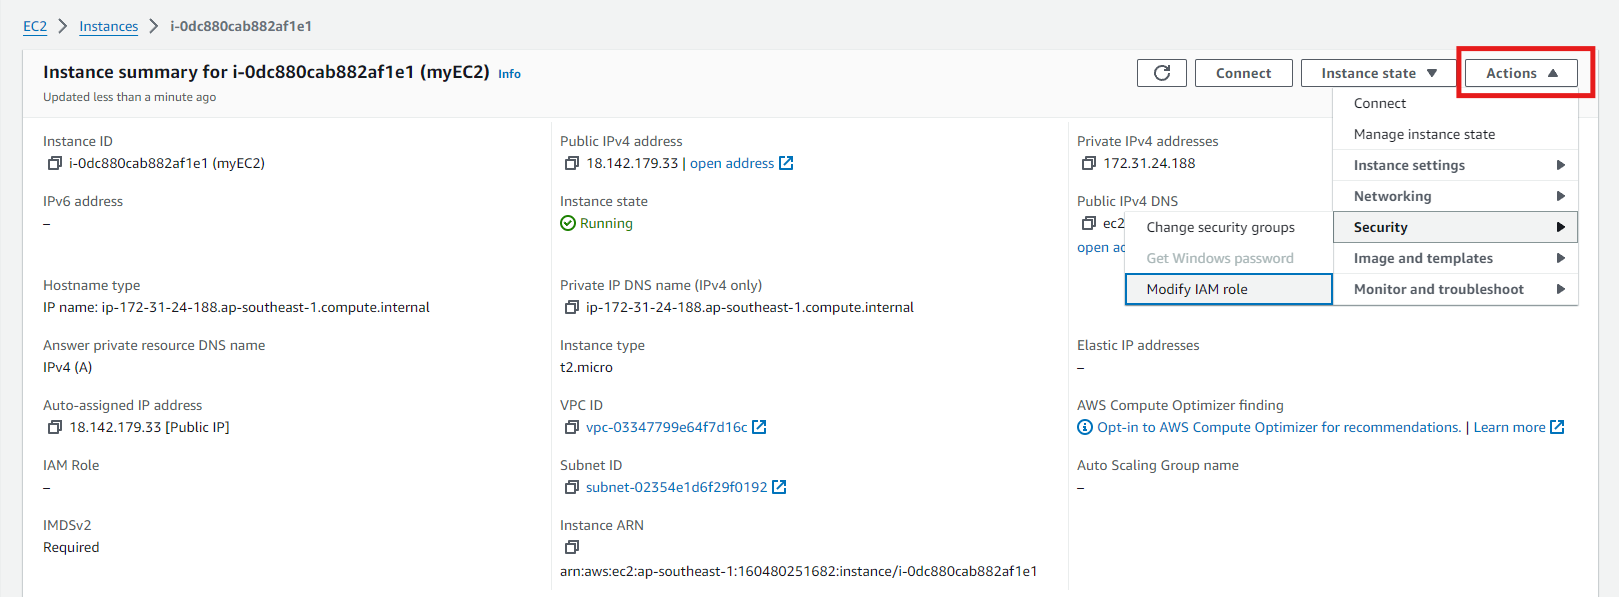
- In the “Modify IAM Role” dialog:
-
Select the IAM role you want to attach from the dropdown list. In this case, select the IAM role we created earlier and click
Update IAM Role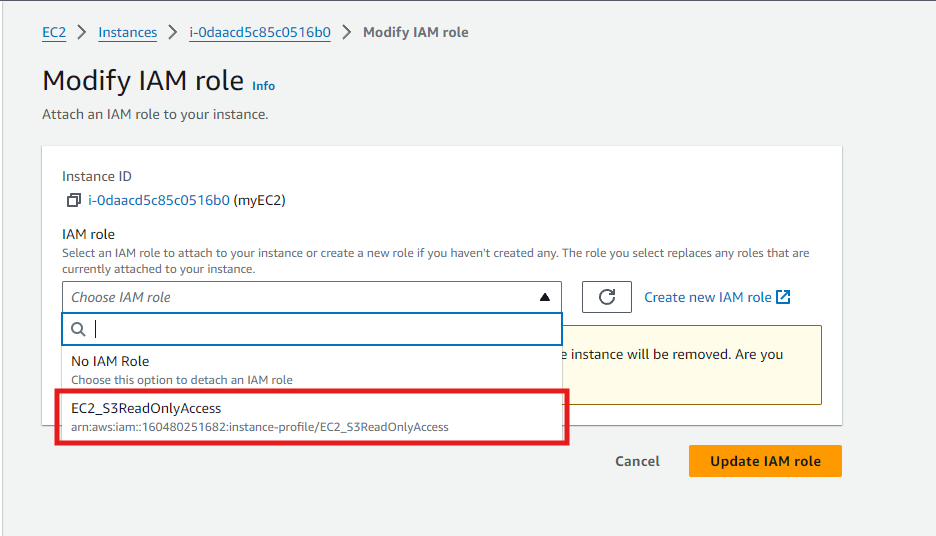
Connecting to EC2 Instance
-
With your instance selected, click on the
Connectbutton at the top of the page.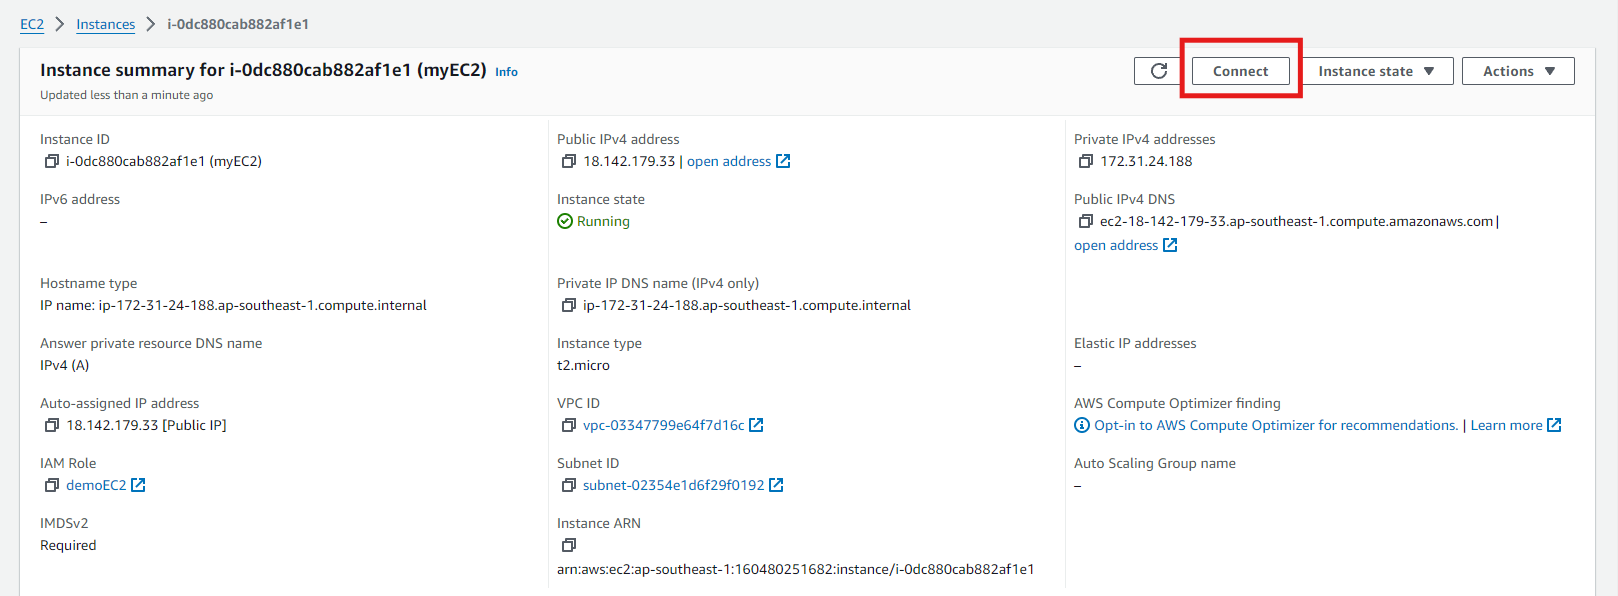
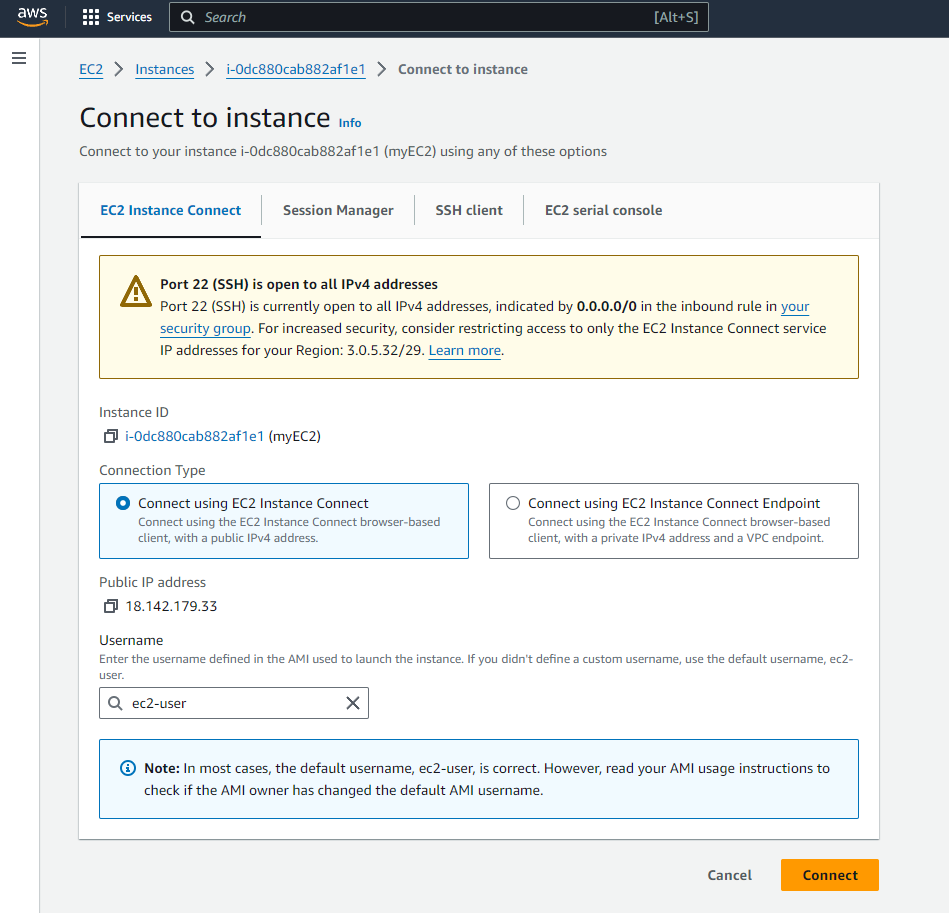
- In the “Connect to Instance” Dialog, select the “EC2 Instance Connect” tab.
- Ensure the Connection Type selected is the “Connect using EC2 Instance Connect”.
-
Click the “Connect” button.
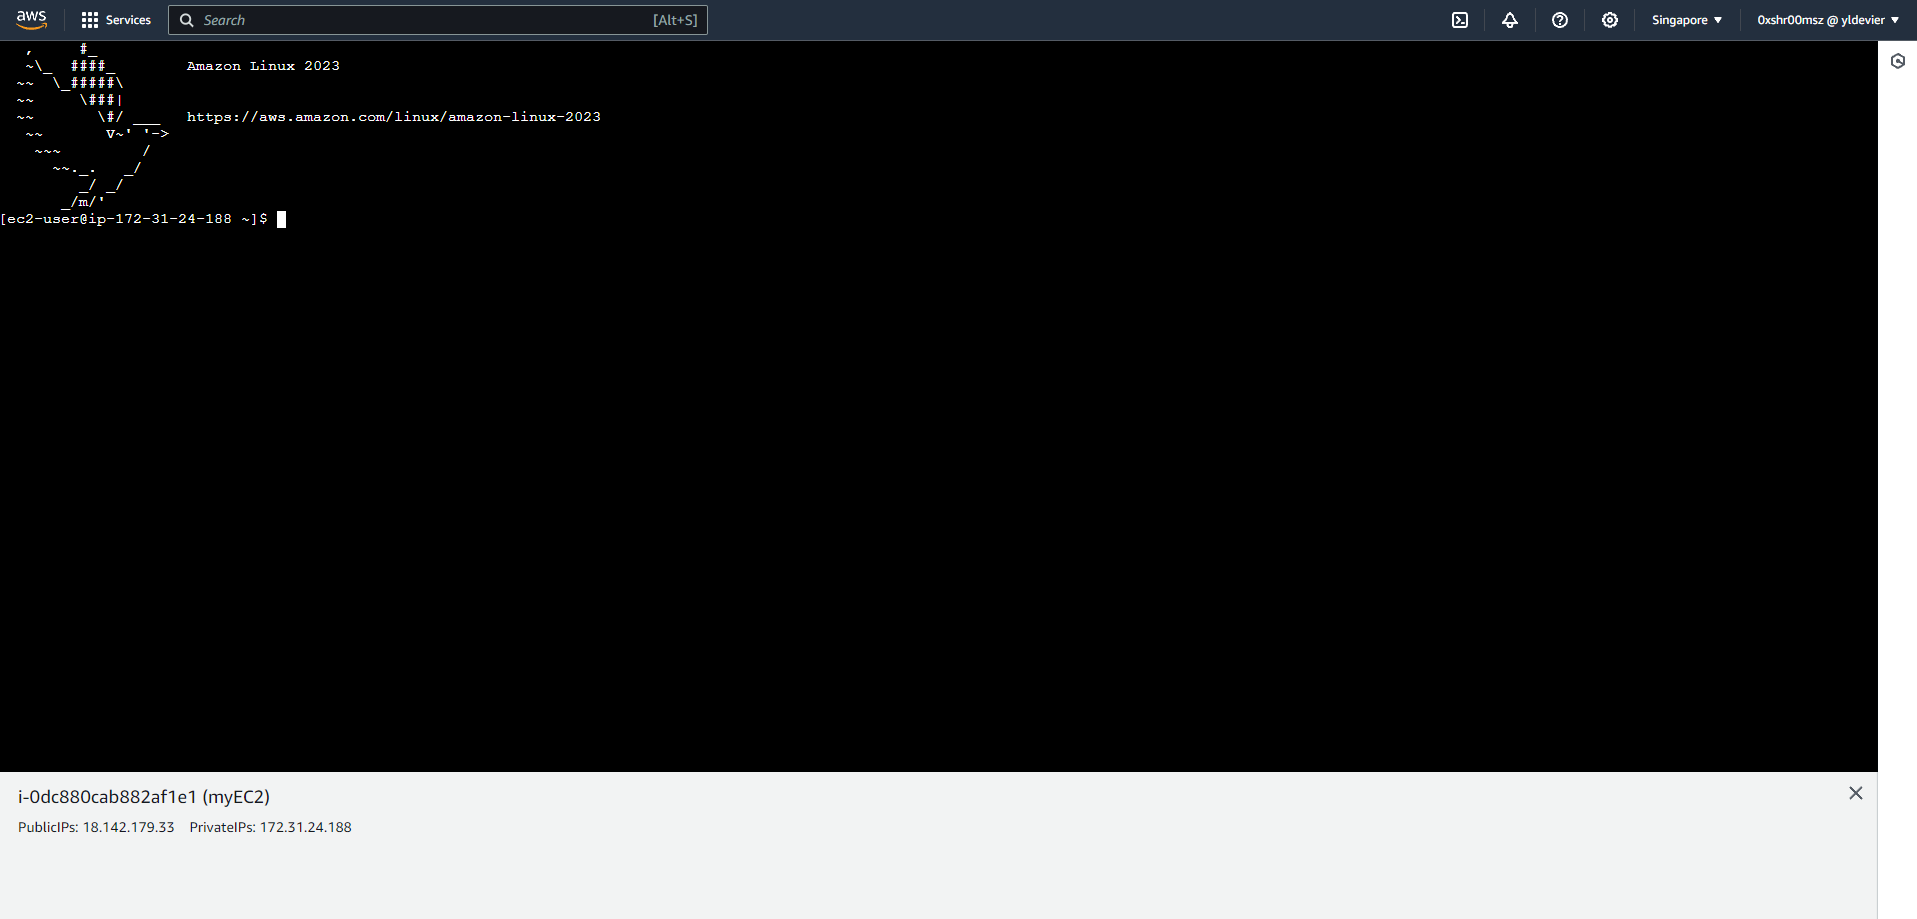
Access Your Instance
- A new terminal window will open with an SSH session to your instance.
-
You are now connected to your instance and can start working on it.
STEP 3: Demonstrate Role Usage
List S3 Buckets
-
Use the command below to list all S3 buckets accessible with the role:
1
aws s3 ls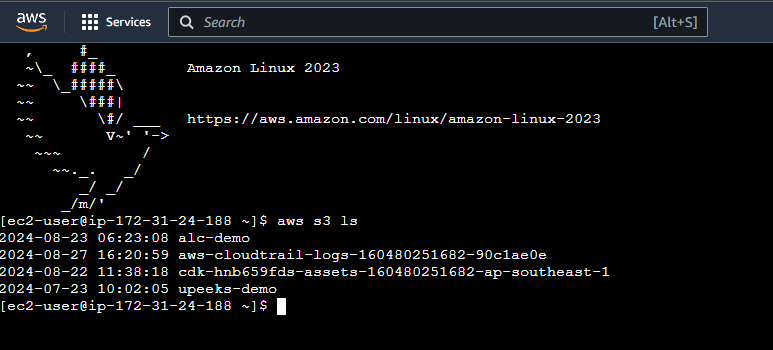
Accessing S3 with the Role
-
Go to S3 Dashboard and click the bucket we created to view the files. Let’s try to download
alcnumber1.txtor depends on the filename you uploaded.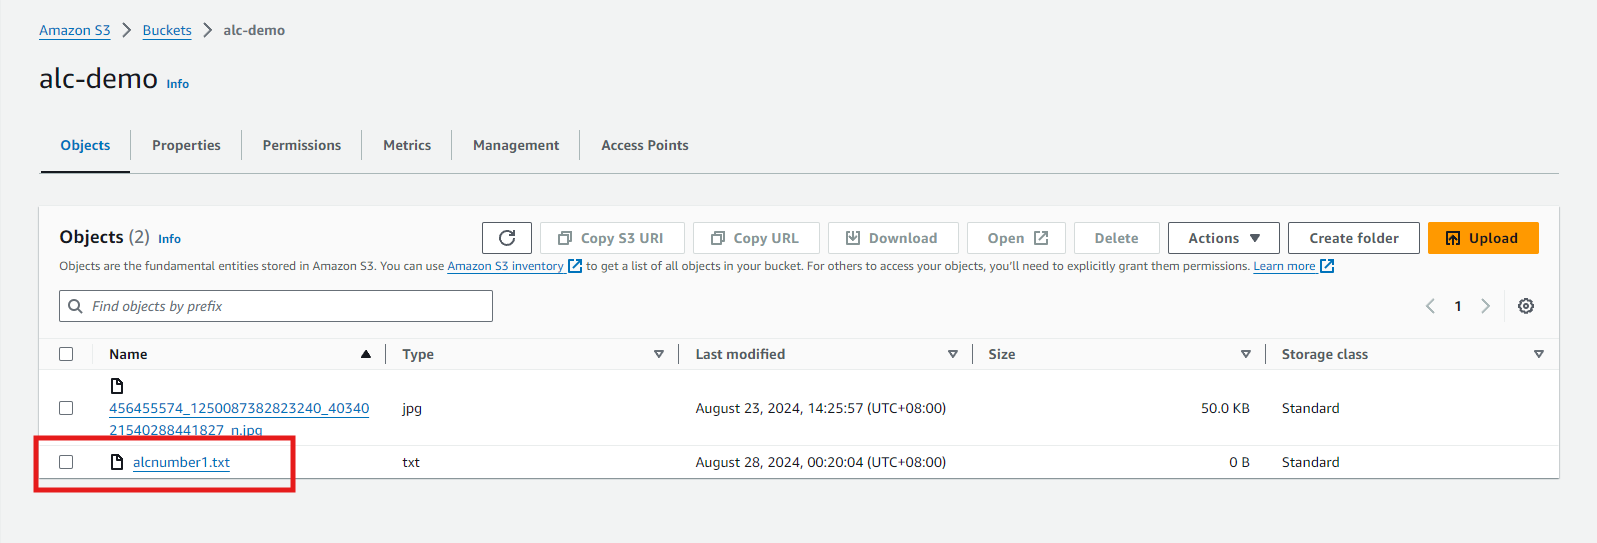
Upload Files to the S3 Bucket
-
Lets create a file first
1
touch test.txt -
In the EC2 instance, let’s try to upload a file to the S3 Bucket we created earlier.
1
aws s3 cp test.txt s3://alc-demo/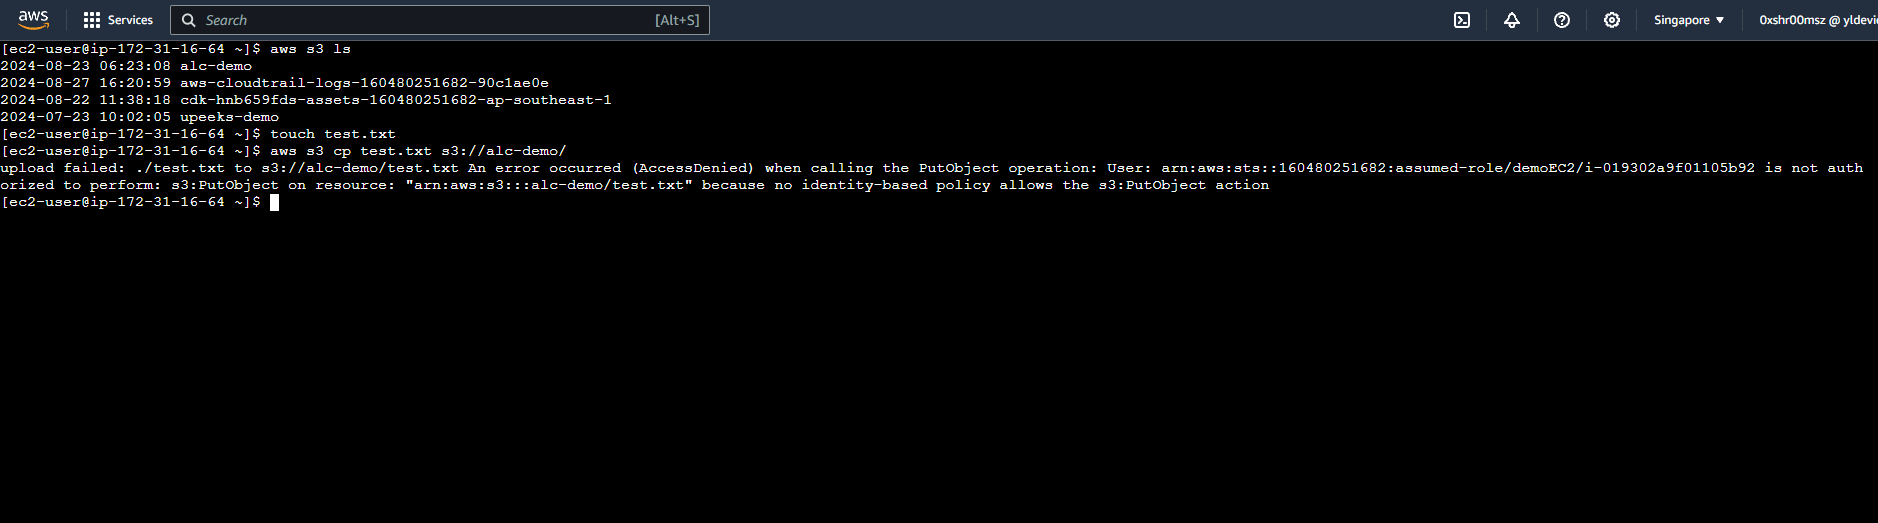
The permissions of the role we created is
ReadOnly. ReadOnly permissions are designed to restrict actions to viewing and reading data only, which is why uploading files is not allowed under this permission set.
Download Files from S3 Bucket
-
Let’s download the file
alcnumber1.txt1
aws s3 cp s3://alc-demo/alcnumber1.txt ./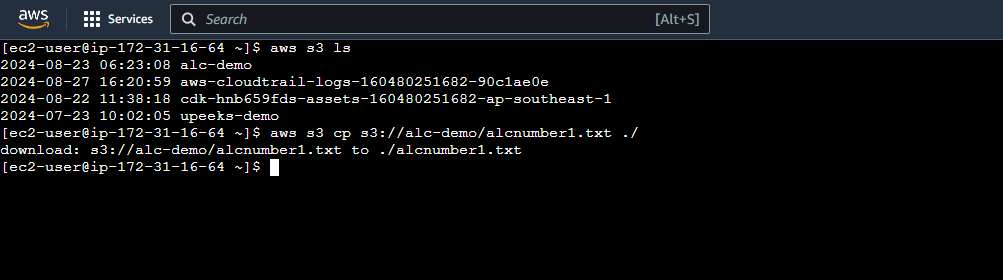
-
We now have the
alcnumber1.txtfile inside our EC2 Instance.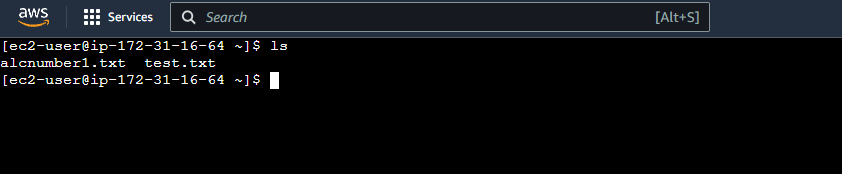
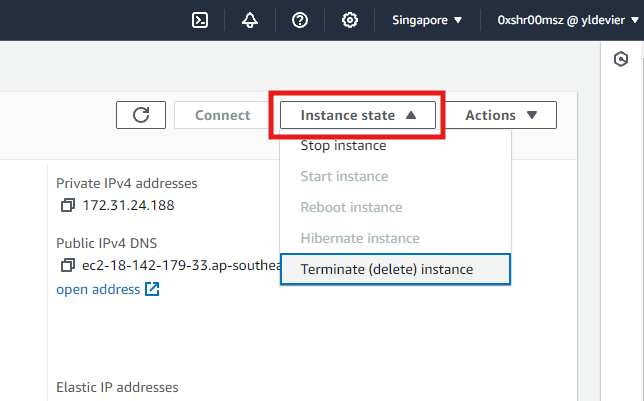
STEP 4: Terminating EC2 Instance
-
Select the EC2 instance
- Click on the Instance State dropdown button at the top of the page.
-
Select “Terminate Instance” from the dropdown menu.
Identity Policies in AWS
What are AWS IAM Permissions and Policies?
Permissions in AWS IAM define what actions an identity (user, group, or role) can perform on AWS resources. These permissions are granted through policies, which are attached to identities. Policies are objects that define permissions and can be attached to identities.
Why Are Permissions Important?
- Ensure Specific Access Levels: Users, groups, and roles can have complex and specific levels of access to AWS resources.
- Maintain Security and Compliance: Prevent unauthorized actions and manage security and compliance effectively.
Types of IAM Policies
-
Managed Policies: Pre-built policies created and maintained by AWS or your organization. These can be attached to users, groups, or roles.
-
Inline Policies: Custom policies directly attached to a specific identity (user, group, or role).
Adding Simple Identity Permissions in AWS IAM
Permissions for IAM Users
-
Navigate to IAM Users
- Open the AWS Management Console.
- Go to IAM or search for IAM in the search bar.
-
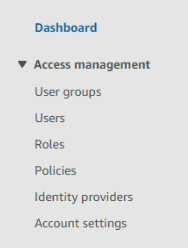
Select Users, User Groups, or Roles from the sidebar.
-
Select the Identity
-
Click on the user/user group/role to which you want to add permissions.
-
-
Attach Policies
-
Go to the Permissions tab and click Add permissions.
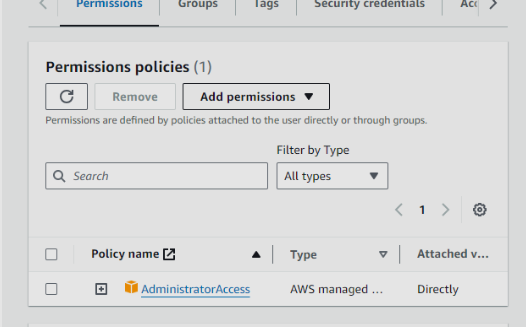
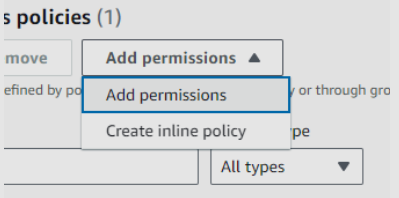
-
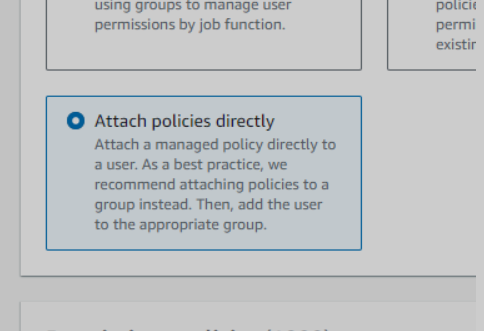
Choose Attach policies directly to assign managed or inline policies.
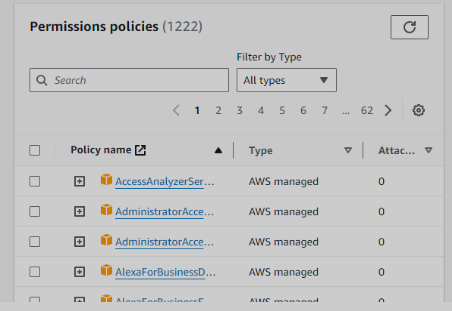
-
Find the appropriate policy using the search bar and select it.
-
Common AWS Managed Policies
-
AdministratorAccess
- Full Access to All Services: Perform any action on any AWS service.
- Full Control Over All Resources: Create, modify, delete, and configure any AWS resource.
-
No Restrictions: No limitations or conditions imposed.

-
ReadOnlyAccess
- Read-Only Access: Provides read-only access to all AWS services.
-
Use Case: Ideal for users who need to view resources across all AWS services.

(The policy search bar works by finding all results with that text, so other more specific policies may pop up first).
-
IAMFullAccess

- Purpose: Grants full access to IAM.
- Permissions: Manage IAM users, groups, roles, and policies.
- Use Case: Best for administrators managing IAM aspects.
-
IAMUserChangePassword

- Purpose: Allows users to change their own IAM password.
- Permissions: Allows actions like
iam:ChangePassword. - Use Case: Attach to users who need to manage their own password.
Custom Inline Policies
If you need fine-grained control and a high degree of specificity, create inline policies. Useful for roles with unique requirements not covered by managed policies.
Steps to Create a Custom Inline Policy
-
Navigate to the Permissions Tab
- For the user, group, or role, go to the Permissions tab.
- Click Add inline policy.
-
Use the Policy Editor
-
Visual Editor: Define permissions by selecting actions, resources, and conditions through a guided interface.
-
JSON Editor: Write the policy directly for more flexibility.
Full Administrator Permissions JSON:
1
2
3
4
5
6
7
8
9
10
{
  "Version": "2012-10-17",
  "Statement": [
    {
      "Effect": "Allow",
      "Action": "*",
      "Resource": "*"
    }
  ]
}
IAMFullAccess JSON:
1
2
3
4
5
6
7
8
9
10
11
12
13
14
15
16
17
18
19
20
21
22
{
  "Version": "2012-10-17",
  "Statement": [
    {
      "Effect": "Allow",
      "Action": [
        "iam:*",
        "organizations:DescribeAccount",
        "organizations:DescribeOrganization",
        "organizations:DescribeOrganizationalUnit",
        "organizations:DescribePolicy",
        "organizations:ListChildren",
        "organizations:ListParents",
        "organizations:ListPoliciesForTarget",
        "organizations:ListRoots",
        "organizations:ListPolicies",
        "organizations:ListTargetsForPolicy"
      ],
      "Resource": "*"
    }
  ]
}
-
-
Review and Name Your Policy
- Click Review policy.
- Give your policy a meaningful name.
- Click Create policy to apply it.
Using the AWS IAM Policy Simulator: Test Your IAM Policies Before Applying
What is the AWS IAM Policy Simulator?
The AWS IAM Policy Simulator is a powerful tool that lets you test the effects of policies on your IAM entities (like users, groups, and roles) before you actually apply them. By using this simulator, you can evaluate how your policies will behave and ensure they are granting or denying permissions as expected.
How to Access the IAM Policy Simulator
To get started, follow these steps:
-
Login to AWS Management Console: Navigate to the AWS Management Console and sign in to your account.
-
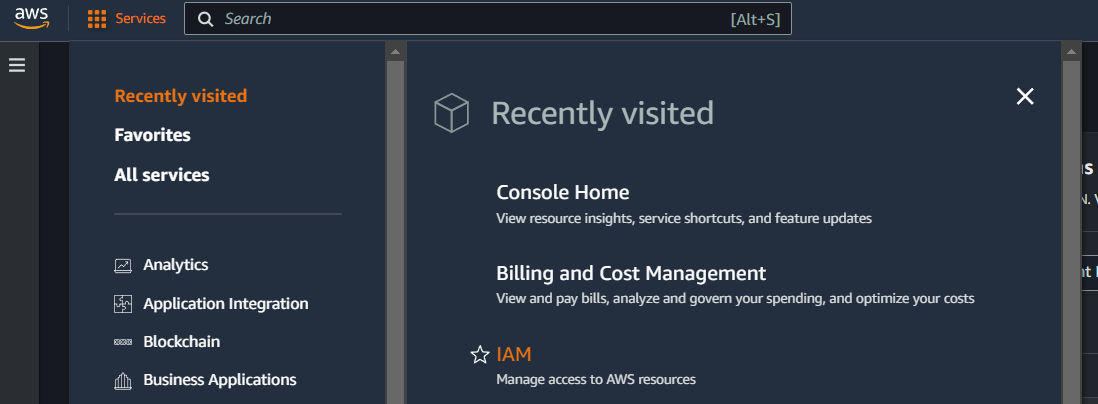
Search for IAM: In the search bar, type “IAM” and select it from the dropdown list.
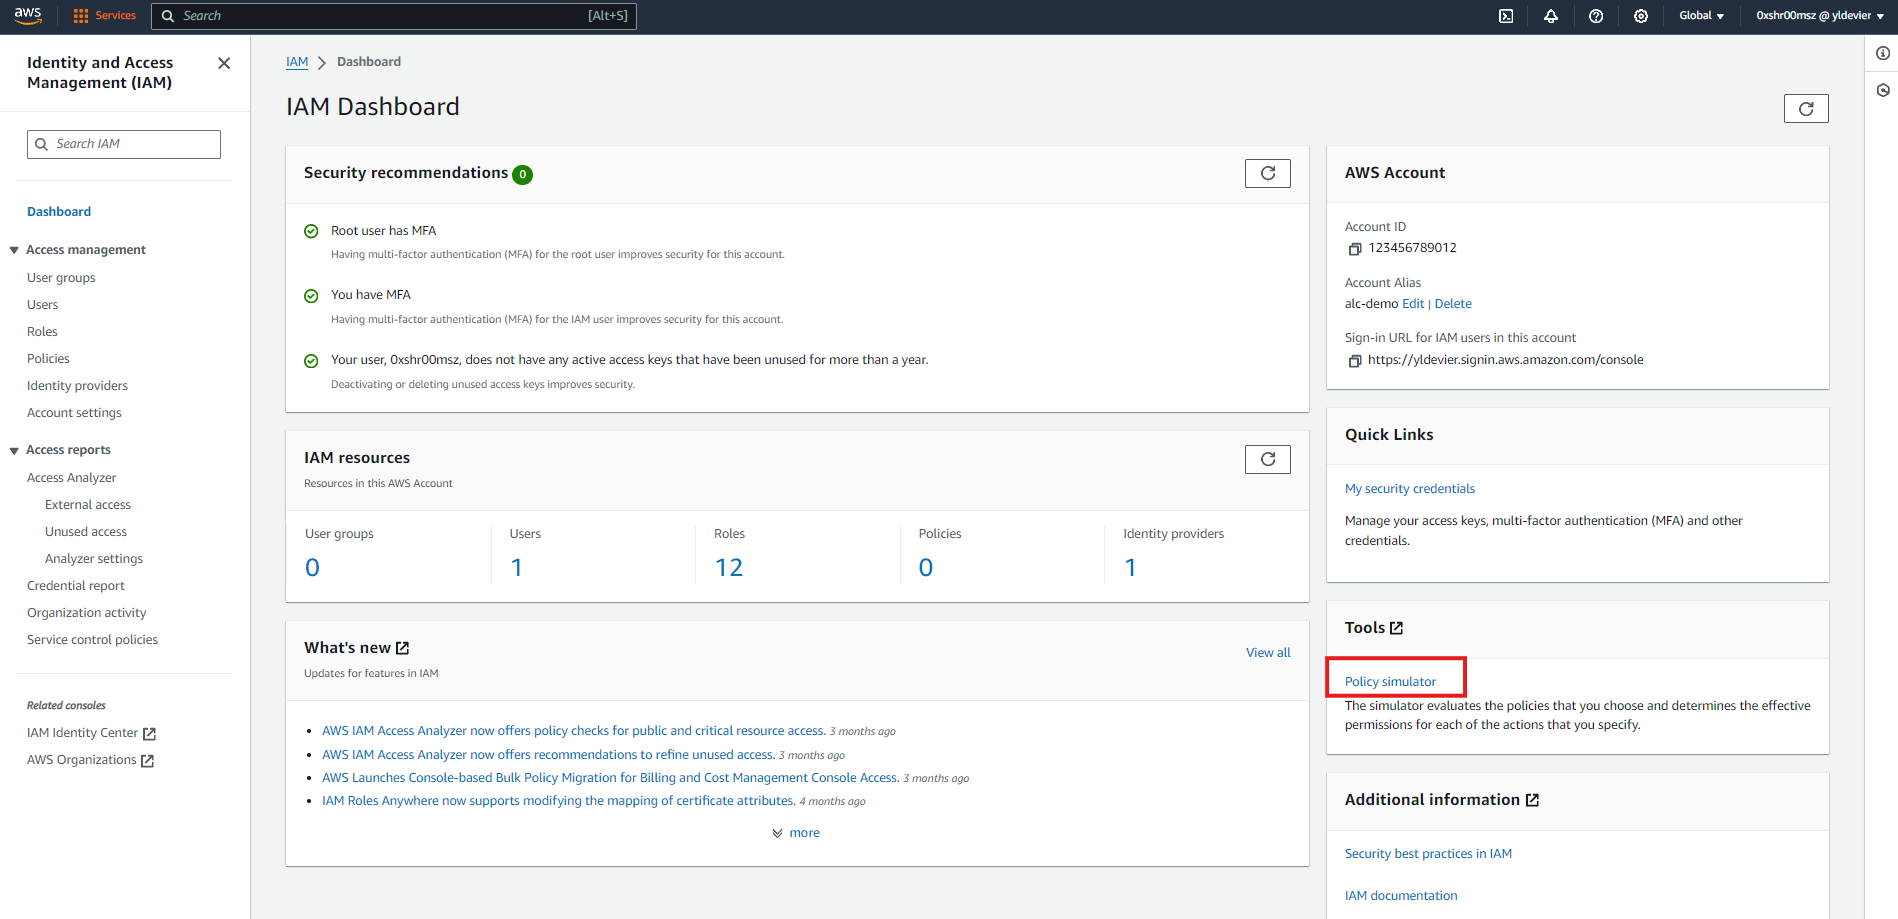
-
Navigate to Policy Simulator: Once in the IAM dashboard, look for “Policy Simulator” under the “Tools” section on the right-hand menu.
Step-by-Step Guide to Using the IAM Policy Simulator
Step 1: Select a Policy to Simulate
In the IAM Policy Simulator, you have the option to select policies attached to users, groups, or roles, or you can paste a policy directly into the simulator. Here’s how you can do it:
-
Choose the Entity: Select whether you want to simulate a policy for a user, group, role, or directly enter a policy.
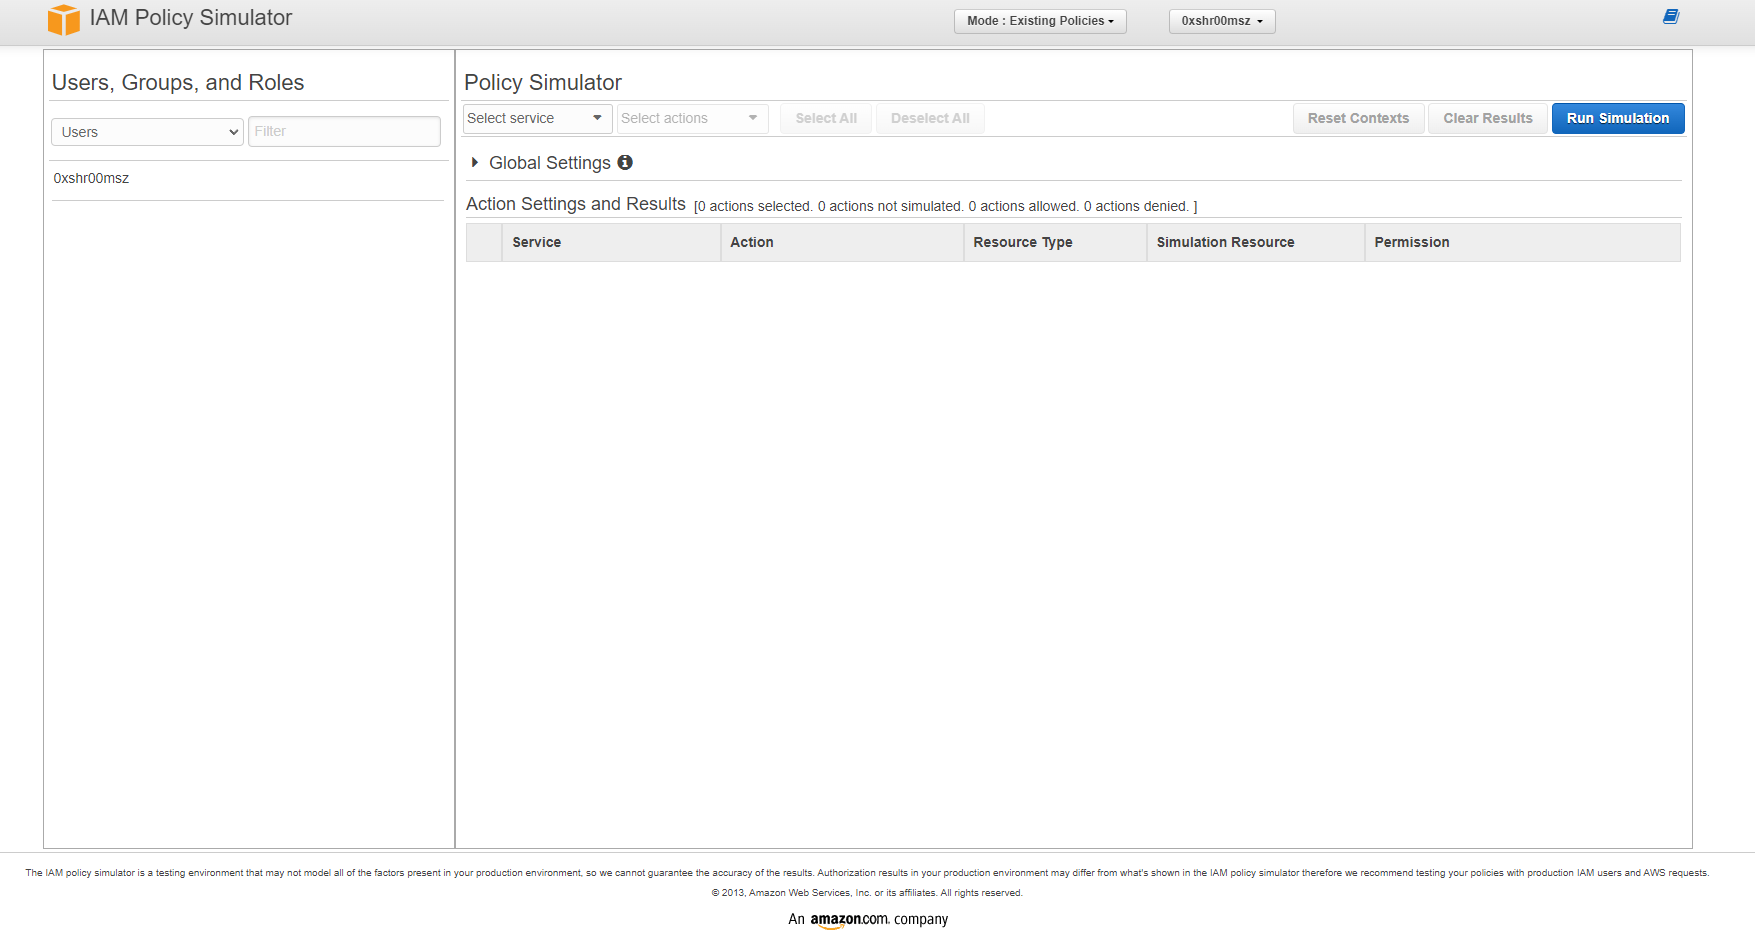
-
Select the Policy: If you chose a user, group, or role, you’ll see a list of associated policies. Check the box next to the policy you want to simulate. In this case, we want to test the permissions set to user
0xshr00mszusing Amazon S3, selecting all of its actions and simulate.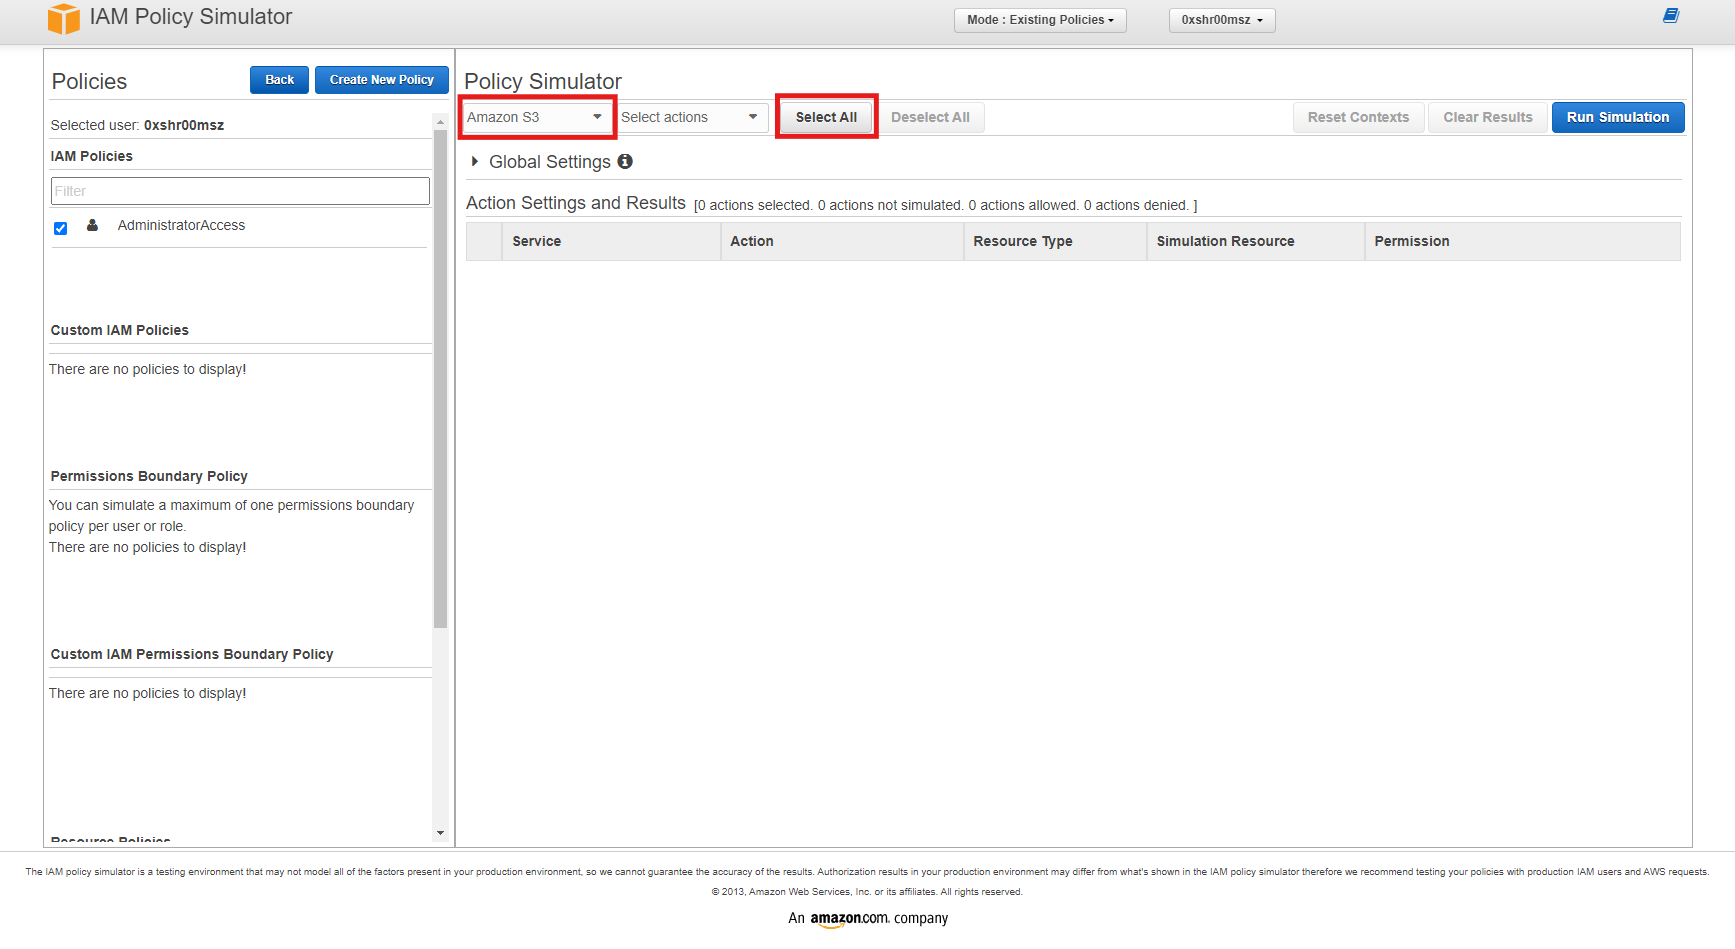
Step 2: Choose Actions to Simulate
Next, you’ll need to simulate actions to test various permissions.
-
Simulate Actions: After clicking the
Run Simulation, you can see the allowed and denied permissions based on the actions you selected.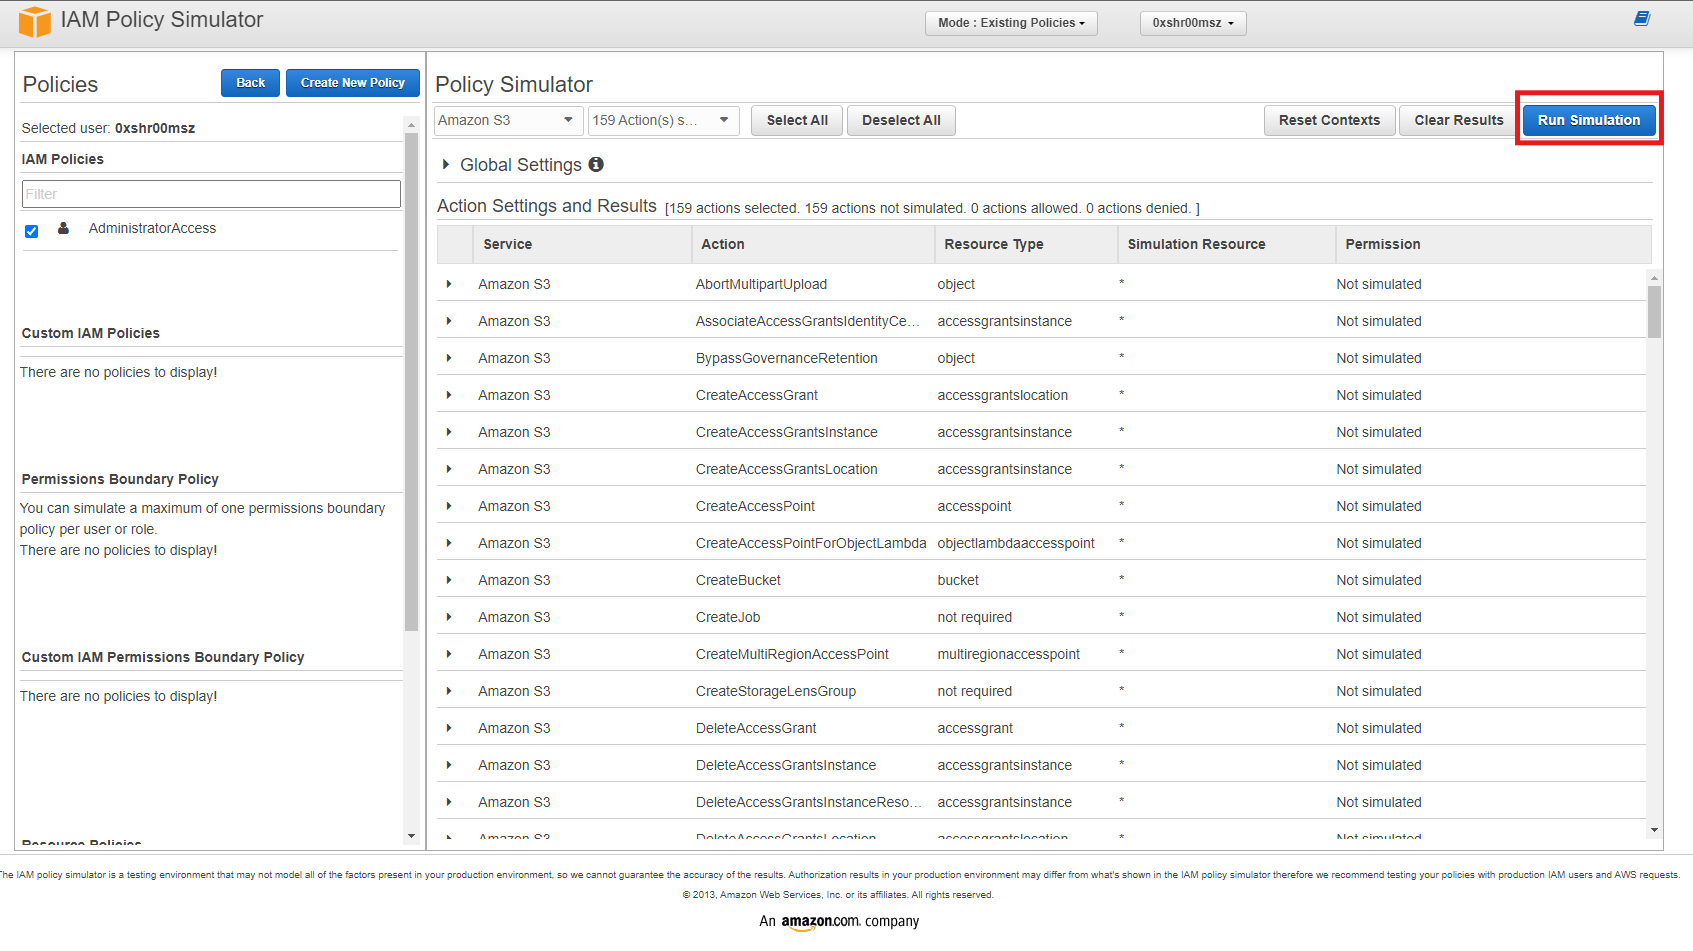
-
Review Results: Since user
0xshr00mszhas AdministratorAccess, all permissions are expected to be allowed as seen from the image below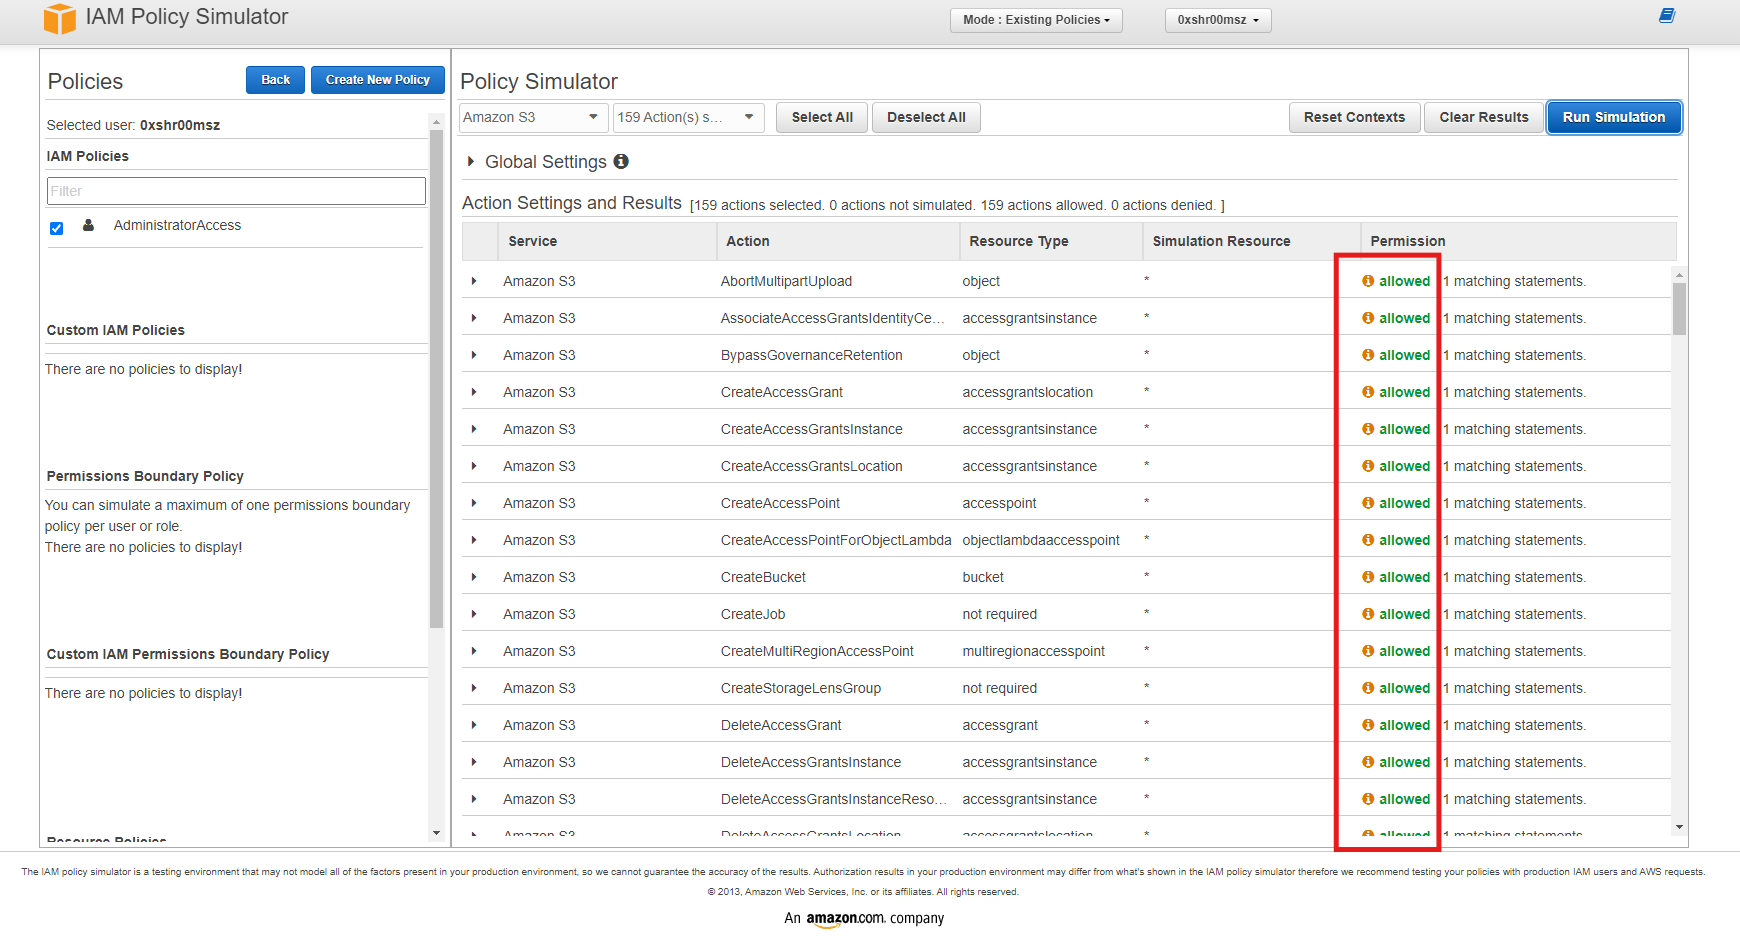
Allow Access to Billing Console for an IAM user
By default, IAM users do not have access to the AWS Billing Console. To enable such access, the root user must first make a specific configuration change. This restriction is in place to enhance security and ensure that only trusted accounts can manage billing and account-related settings. Therefore, the root user must manually grant access by modifying the relevant IAM policies or settings.
Allow Access to the Billing Console
- Sign in to the AWS Management Console using your root account.
-
In the navigation bar, click on your account name, and then choose Account.
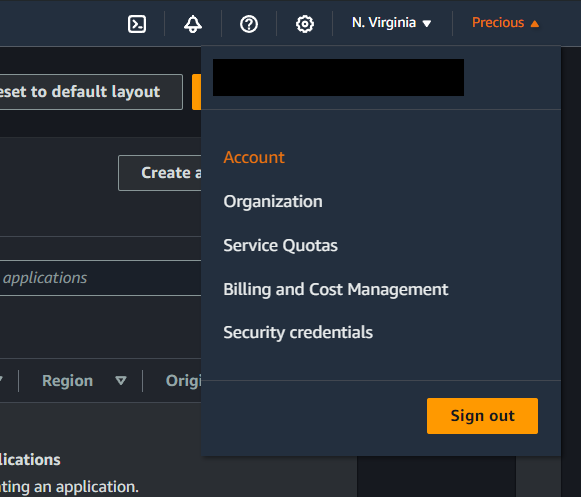
-
Scroll down and look for IAM user and Role Access to Billing Information and then click on Edit.

-
Click on the Activate IAM Access checkbox to allow access. Afterwards, click on Update.

Create an IAM Entity with Billing Permissions
-
Go to the AWS Management Console and look for IAM on the Services Tab.
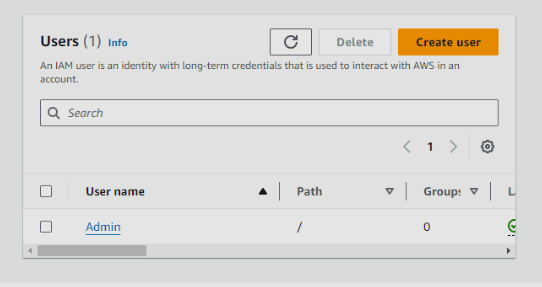
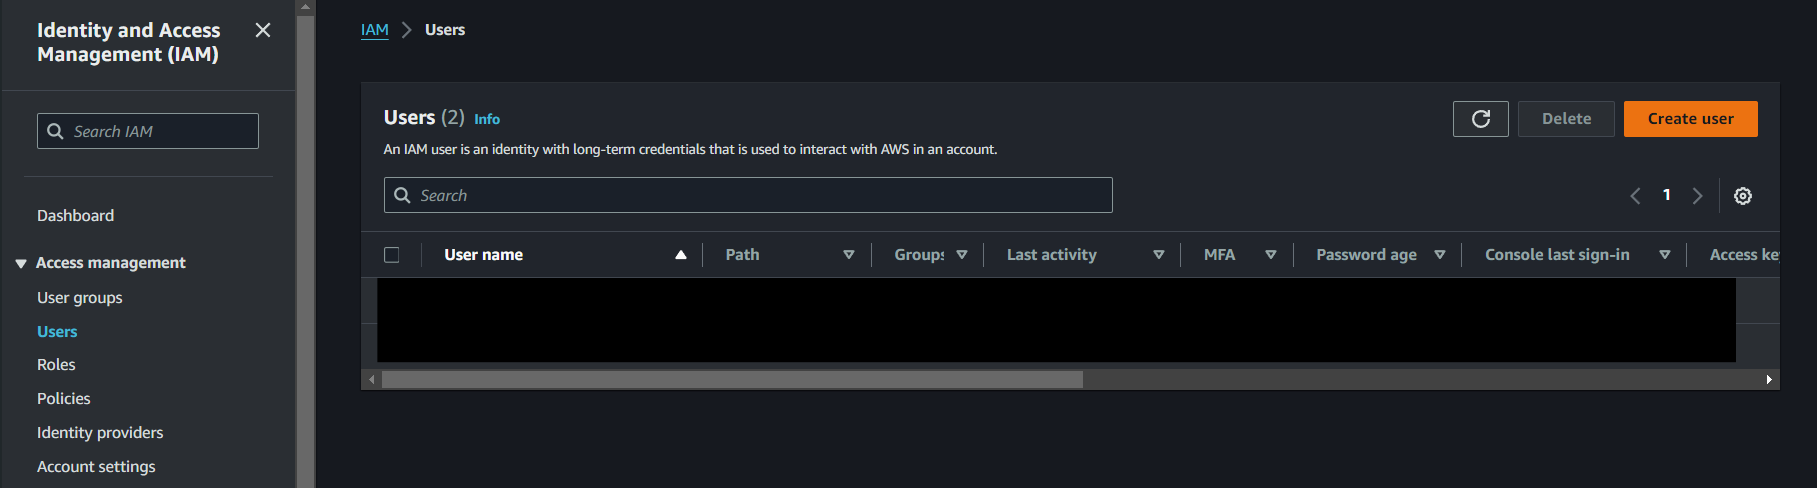
-
Navigate to Users on the sidebar and click on Create User.
-
Specify user details, such as the name and password.
-
Set permissions for the user. Choose Attach policies directly and then look for Billing in the permission policies.
-
Review your choices, and once you’re done click on Create User.
Creating a Budget and Setting Up Budget Alarms
Introduction to AWS Budgets
AWS Budgets allows you to set custom spending limits on your AWS costs and usage. You can receive alerts when you exceed your budget or approach the limit, helping you keep track of your expenditures. By setting up AWS Budgets, you can gain better control over your AWS spending and avoid unexpected charges.
You can set up a budget in two ways: using a budget template, or customizing your own. To better understand budgets, let’s set up your own customized budget.
Creating a Budget
Step 1: In your AWS Console, click services and look for Billing and Cost Management, alternatively you can also use the search bar to access it.
Step 2: Navigate to Budgets in the sidebar.
Step 3: Click on “Create budget”.
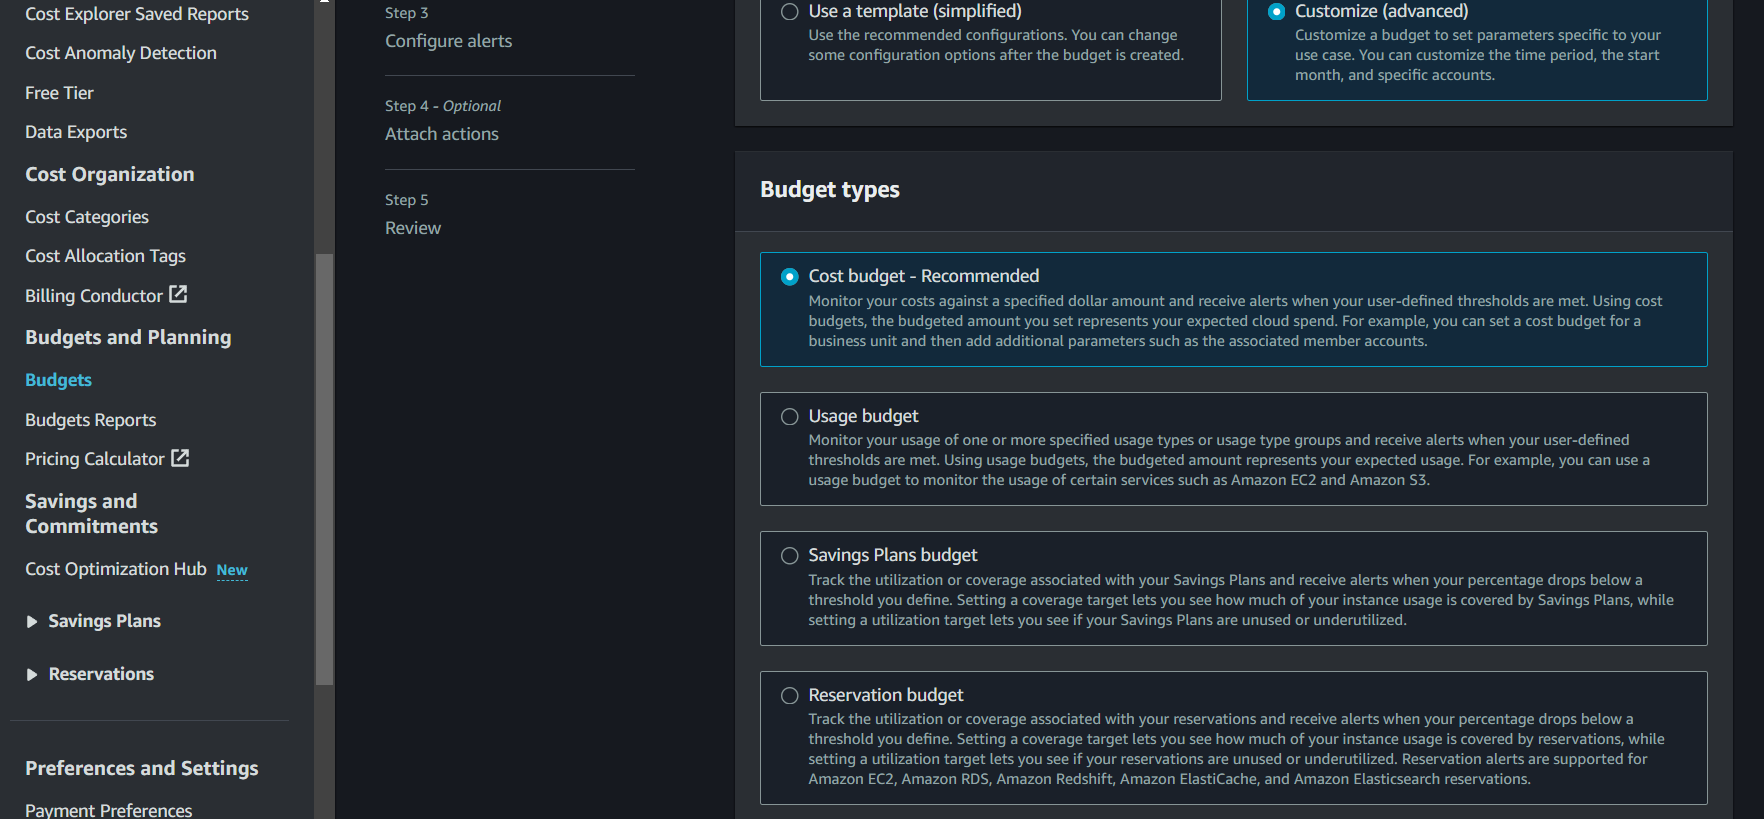
Step 4: Choose if you want to use a template or customize. In this case, let’s create a customized cost budget for Amazon S3.
Customized:
-
Choose Budget Type: You’ll be prompted to choose the type of budget you want to create. The main options are:
- Cost Budget: For tracking spending by cost.
- Usage Budget: For tracking usage of specific AWS services.
- Reservation Budget: For tracking costs related to reserved instances.
- Savings Plan Budget: For tracking savings plan utilization and ensuring you’re meeting your committed usage levels.
-
Configure Your Budget:
- Name: Enter a name that will help you identify the budget later.
- Set the budget amount: Enter the maximum amount you are willing to spend. You can choose to set this amount for a specific time period (e.g., monthly, quarterly, yearly).
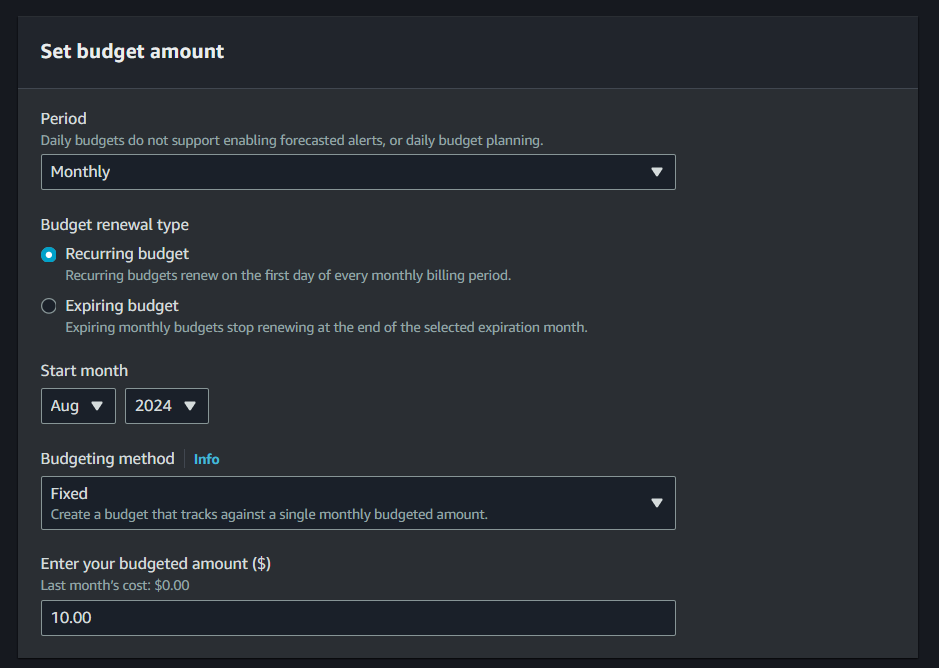
- Specify the budget scope: Choose whether the budget should apply to your entire account or specific services, cost categories, or tags.
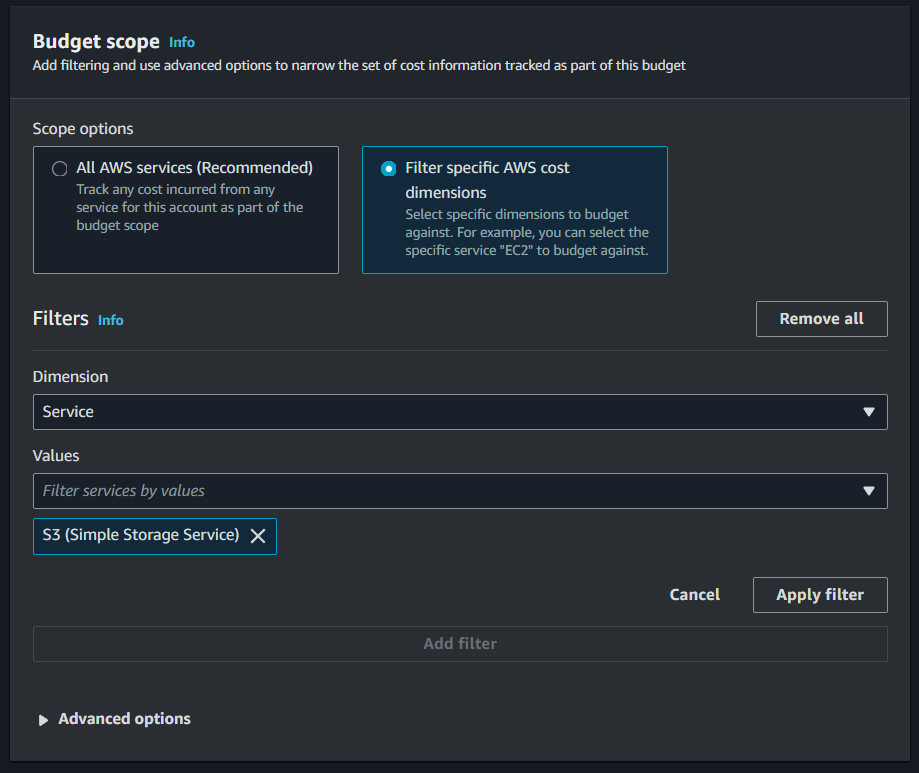
For this demo, configure your budget to be recurring, fixed, and monthly, with a budget amount of $10.00. Specify your budget scope to Filter Specific AWS Cost Dimensions, choose Service for the Dimension and look for S3 (Simple Storage Service) for the Values.
-
Set Alerts and Notifications:
You can set up notifications to alert you via email when your spending reaches certain thresholds (e.g., 50%, 80%, 100% of the budget).
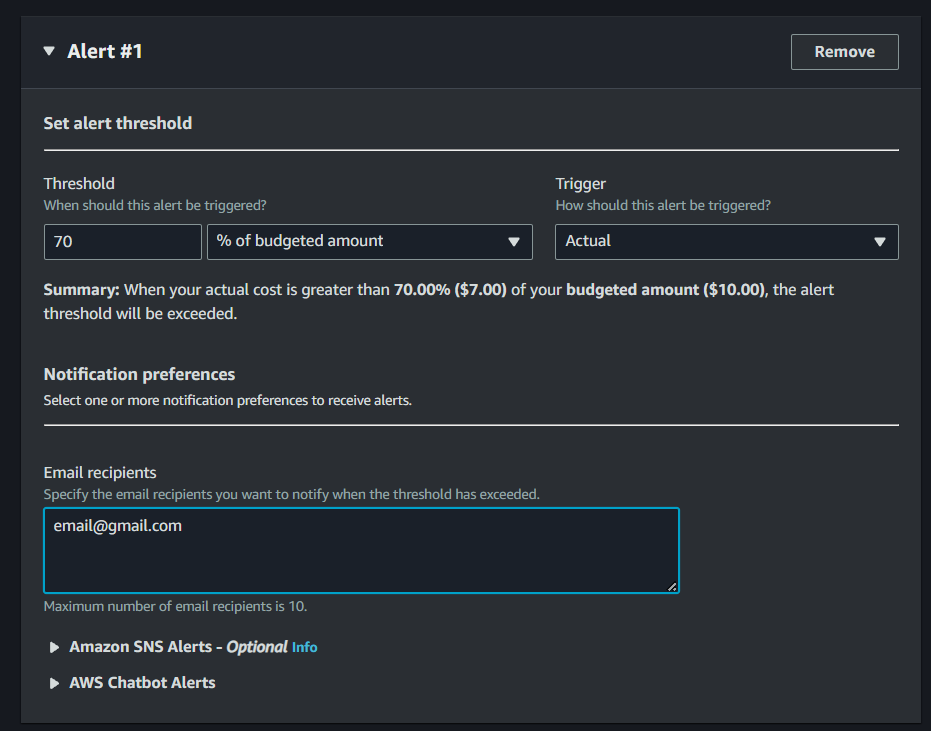
- On the 3rd step of setting up your customize budget, click “Add an alert threshold”
- Here, you can set when the alarm is triggered, such as a numerical absolute or percentage value, and whether it should trigger when it reaches the forecasted cost or actual cost.
-
Then, you can move on to the notification preferences. The budget alerts can notify you via email, SNS, or chatbot alerts.
Email: For Email alerts, you can input the emails you would like to receive alerts to, separated by commas: person@gmail.com, aws@aws.com, etc.
Amazon Simple Notification Service Alerts (SNS): You also have an option to send notifications with SNS. This is where your Amazon SNS sends an alert to a Topic, which in turn sends it to its subscribers, Applications or Persons.
Chatbot: For Chatbot Alerts, it can send a notification to the specified chat rooms.
In this case, we set the threshold to 70% of the budgeted amount, to trigger when it reaches greater than the threshold.
-
Review and Confirm:
- Review your budget settings to ensure they meet your needs.
- Click “Create budget” to finalize and save your new budget.
Since we’ve set up a customized budget already, you’ve already likely understood the essentials for creating a budget. However, there might be cases wherein you don’t actually need a fully customized budget for your services or account. In this case, you would greatly benefit from using AWS Budgets Templates. Let’s now set up a budget using a template.
Template:
-
You have four (4) options if you want to use a template:
- Zero spend budget: A budget that notifies you after your spending exceeds AWS Free Tier limits ($0.01)
- Monthly cost budget: A monthly budget that notifies you if you exceed, or are forecasted to exceed, the budget amount.
- Daily Savings Plans coverage budget: A coverage budget for your Savings Plans that notifies you when you fall below the defined target. (For savings plan)
- Daily reservation utilization budget: A utilization budget for your Reserved Instances that notifies you when you fall below the defined target. (For reserved instances plan)
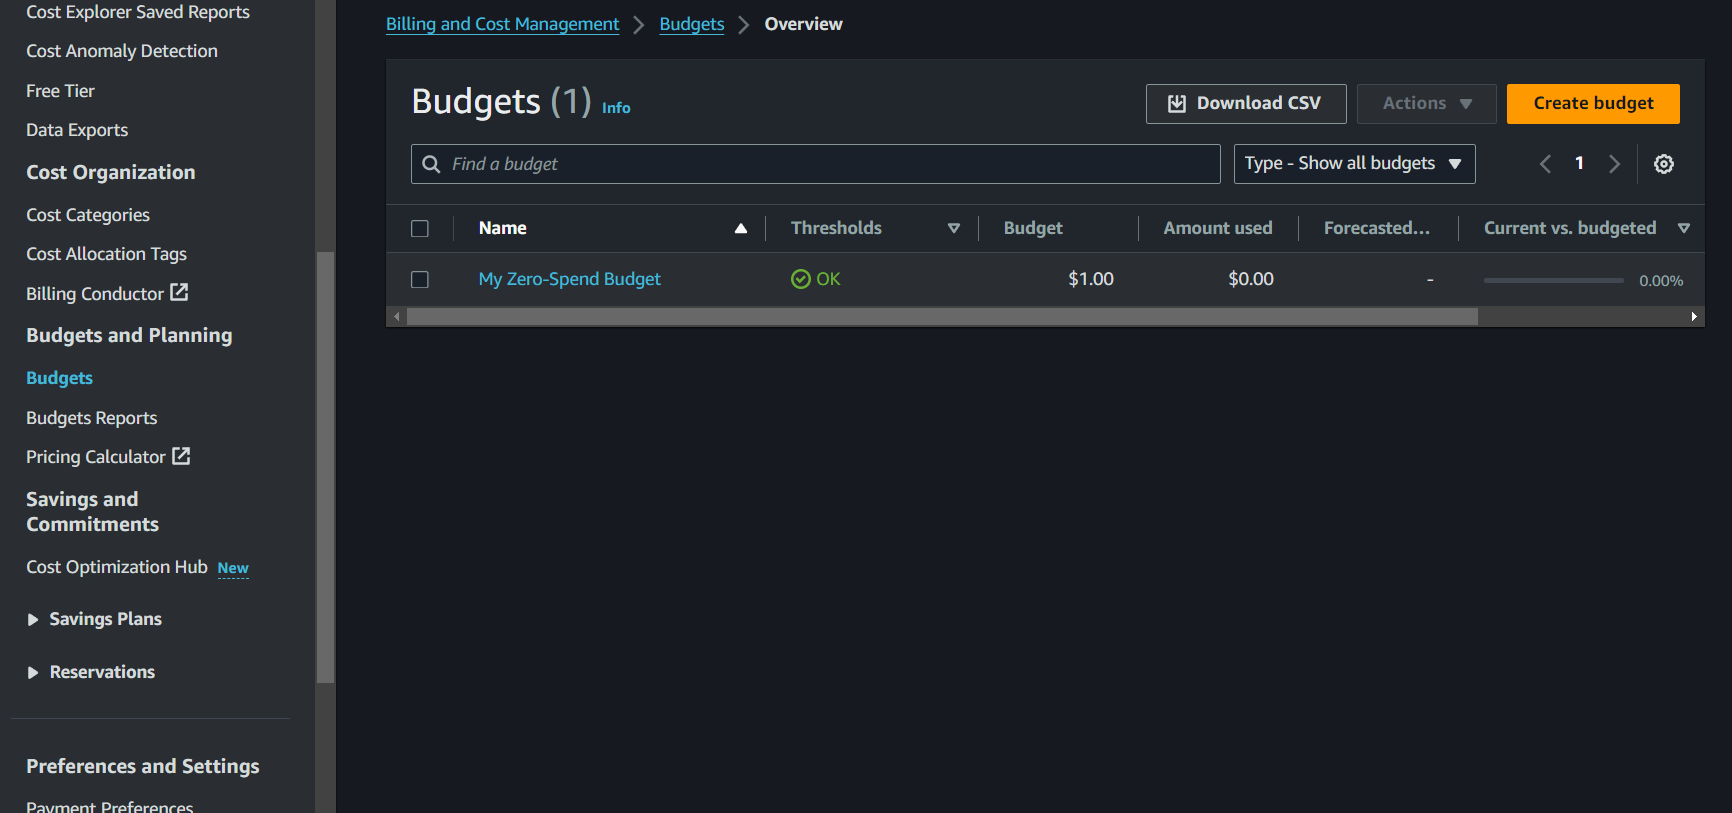
In this case, let’s choose the zero-spend budget.
-
After choosing, you have to specify the email recipients you want to notify when the threshold has exceeded (The maximum number is 10). You can also choose to have a customized name for your budget, albeit optional.

-
Review and Confirm:
- Review your budget settings to ensure they meet your needs.
- Click “Create budget” to finalize and save your new budget.
- Do note that you can configure this budget after creating it, so in the case wherein you only need to change one setting, you can create a budget with a template without tediously configuring everything.
After creating your budget, you can monitor it from the AWS Budgets dashboard. This section will show you how much you’ve spent and how it compares to your budgeted amount. You can also create budget reports to monitor the performance of your existing budgets on a daily, weekly, or monthly frequency and deliver that report to up to 50 email addresses.